sensor PORSCHE CAYNNE TURBO 2005 1.G Owners Manual
[x] Cancel search | Manufacturer: PORSCHE, Model Year: 2005, Model line: CAYENNE TURBO, Model: PORSCHE CAYENNE TURBO 2005 1.GPages: 369, PDF Size: 3.17 MB
Page 11 of 369

Controls, Safety, Instruments
11 Controls, Safety, Instruments
Porsche and the Environment .......................... 4
Never invite car theft! .................................... 16
Keys ............................................................ 17
Central Locking System ................................ 21
Porsche Entry & Drive ................................... 24
Doors .......................................................... 26
Alarm System, Ultrasound Passenger Compart-
ment Monitoring System, Inclination Sensor .... 27
Power Windows ............................................ 29
Front seats................................................... 32
Front seat with memory................................. 33
Easy Entry Function ...................................... 35
Headrests .................................................... 36
Rear Seats ................................................... 37
Heated Seats – Front and Rear ...................... 40
Safety Belts.................................................. 42
Child Restraint Anchorages ............................ 46
Child Restraint Systems ................................ 47
Airbag Systems ............................................ 49
Steering Wheel ............................................. 51
Multi-Functional Steering Wheel ...................... 53
Interior Mirror ............................................... 55
Door Mirrors................................................. 55
Automatic Anti-Dazzle Mirror .......................... 57
Ignition Lock/Steering Lock ........................... 58
Starting and Stopping the Engine ................... 60
Parking Brake ............................................... 62
Brakes ......................................................... 63
Instrument Panel USA Models ........................ 68
Instrument Panel Canada Models.................... 70
Oil Temperature Gauge ................................. 72
Speedometer ............................................... 72Cooling System ............................................ 73
Fuel ............................................................. 74
Odometer..................................................... 75
Emission Control........................................... 76
Multi-Purpose Display .................................... 78
Warning Lights and Warning Messages ......... 106
Light Switch ............................................... 114
Instrument Illumination ................................. 116
Automatic Headlight Beam Adjustment ......... 116
Turn signal/High Beam/
Headlight Flasher Stalk ................................ 117
Emergency warning lights............................ 118
Windshield Wiper/Washer Stalk .................... 119
Cruise Control ............................................ 122
Vents ......................................................... 125
Fresh-air intake ........................................... 125
Heated Rear Window ................................... 126
Automatically Controlled
Two-Zone Air Conditioning ........................... 127
Automatically Controlled
Four-Zone Air Conditioning ........................... 131
Parking Heater............................................ 137
Sun Visors .................................................. 142
Sun Blinds, Rear Side Windows .................... 143
Interior Lighting .......................................... 144
Door-Surrounding Lighting ........................... 146
Coming Home Function (Off Delay) ............... 146
Sliding/Lifting Roof ..................................... 147
Parking Aids ............................................... 157
Garage Door Opener ................................... 162
Ashtray ...................................................... 165
Cigarette Lighter......................................... 166Car Audio Operation/Tips ............................ 167
Porsche Communication
Management (PCM) ..................................... 170
Fire Extinguisher ......................................... 171
Storage...................................................... 172
Cupholder .................................................. 176
Rear Lid ..................................................... 178
Rear Window .............................................. 180
Engine Compartment Lid ............................. 180
Loadspace ................................................. 182
Luggage Compartment Cover ...................... 183
Luggage Safety Net ....................................185
Ski Bag ...................................................... 187
Roof Transport System................................ 189
Trailer Coupling .......................................... 190
Loading Information ....................................191
Page 21 of 369

Controls, Safety, Instruments
21
Central Locking SystemThis device complies with:
Part 15 of the FCC Rules
RSS-210 of Industry Canada.
Operation of this device is subject to the following
two conditions:
– It may not cause harmful interference, and
– it must accept any interference received in-
cluding interference that may cause undesired
operation.
Note
The manufacturer is not responsible for any radio
or TV interference caused by unauthorized modifi-
cations to this equipment.
Such modification could void the user's authority
to operate the equipment.
fPlease observe the chapter “POWER WIN-
DOWS” on Page 29.
fPlease observe the chapter “SLIDING/LIFTING
ROOF” on Page 147.The vehicle doors can be centrally unlocked or
locked with the remote control.
All doors are locked or unlocked if central locking
button A is activated in the relevant armrest.
Please observe the chapter “CENTRAL LOCKING
BUTTON” on Page 22.
The vehicle cannot be locked if the driver’s door is
not completely closed.
If you unlock the vehicle with the key at the door
lock, only the driver’s door is opened. In order to
prevent the alarm system from being triggered,
you must switch the ignition on within 15 seconds
of opening the door.
Switching off the alarm system if it is
triggered
fUnlock vehicle doors or
fSwitch ignition on.
Automatic relockingIf the vehicle is unlocked and none of the vehicle
doors is opened within approximately
30 seconds, automatic relocking takes place.
Note on operation
If the passenger compartment monitoring system
and the inclination sensor have been deactivated
(theft protection is limited), the doors can be
opened after automatic relocking by pulling the in-
ner door handle twice.
When locked again, the passenger compartment
monitoring system and inclination sensor are acti-
vated once more.
fPlease observe the chapter “ALARM SYSTEM,
ULTRASOUND PASSENGER COMPARTMENT
MONITORING SYSTEM, INCLINATION SEN-
SOR” on Page 27.
fPlease observe the chapter “ALARM” on
Page 101.Indication by the emergency flashersIf the vehicle doors are unlocked or locked, a re-
sponse is provided by the emergency flashers:
– Unlocking – single flash
– Locking – double flash
fPlease observe the chapter “SIGNAL” on
Page 103.
f f f USA: KR5KESSY
Canada: CAN 267 104 139
Page 22 of 369

22
Controls, Safety, Instruments
Locking conditionsfLock vehicle once.
The doors cannot be opened from the outside.
The alarm system, passenger compartment
monitoring system and inclination sensor are
switched on.
If a person or animal remains in the vehicle:
fQuickly lock vehicle twice.
The doors cannot be opened from the outside.
The passenger compartment monitoring
system and inclination sensor are switched off.
The doors are locked but can be opened from
the inside.
Unlocking the door with the inner door
handle
fPull inner door handle once.
Door lock is unlocked.
fPull inner door handle again.
Door can be opened.
fInform any persons remaining in the vehicle
that the alarm system will be triggered if the
door is opened.
Central locking buttonCentral locking buttons in the armrests let you
lock and unlock the vehicle electrically.
fPress the button A symbol.
All vehicle doors will be locked.
The doors can be opened by pulling the inner
door handle twice.
fPress the button A symbol.
If activated on the rear doors, only the relevant
door will be unlocked.
Note on operation
If the vehicle was locked with the key or by remote
control, it cannot be unlocked with the central
locking button.
The central locking buttons and the power
windows for the rear doors can be disabled using
safety button B in the armrest of the driver’s door.
Switching off
fPress safety button B.
The central locking buttons and power
windows on the rear doors are disabled.
Switching on
fPress safety button B again.
The central locking buttons and power
windows are operational. Locking
Unlocking
Safety button
Page 23 of 369

Controls, Safety, Instruments
23
Emergency operationfLock the vehicle with the key at the door lock.
If there is a defect in the central locking system,
operating the lock barrel in the driver's door will
lock all functioning elements of the central locking
system.
fThe fault should be remedied immediately at
an authorized Porsche dealer.
Note on operation
The alarm system, passenger compartment
monitoring system and inclination sensor are
switched on.
In order to prevent the alarm system from being
triggered, you must switch the ignition on within
15 seconds of opening the door.
Switching off the alarm system if it is
triggered
fUnlock vehicle doors or
fSwitch ignition on.
Automatic door locking
Warning!
In an emergency situation where you need to
exit the car through an automatically locked
door, remember the following procedure to
open the door.
fUnlock the doors by pressing the central lock-
ing button or
fpull the inside door handle twice to open the door.
You can select various options for automatically
locking the doors on the multi-purpose display in
the instrument panel.
fPlease observe the chapter “DOOR OPENING”
on Page 102.
Option 1 (AUTO-LOCK)
Doors lock automatically when a speed of approx.
3 mph (6 km/h) is exceeded.
Option 2
The doors do not lock automatically.
Note on operation
Automatically locked doors can be unlocked with
the central locking button and opened by pulling
on the inside door handle twice.
Page 27 of 369

Controls, Safety, Instruments
27
A- Light-emitting diode for alarm systemAlarm System, Ultrasound
Passenger Compartment
Monitoring System, Inclination
SensorfPlease observe the chapter “ALARM” on
Page 101.
Avoiding false alarmsfAlways close the sliding/lifting roof and all door
windows.
fDo not leave a mobile phone switched on in the
glasses case of the roof console.
fAlways turn off the alarm system before you at-
tach a trailer. The inclination sensor could trig-
ger the alarm unintentionally.Switching onfLock the vehicle.
The alarm system, passenger compartment
monitoring system and inclination sensor are
switched on.
fPlease observe the chapter “CENTRAL LO-
CKING SYSTEM” on Page 21.Switching offfUnlock the vehicle.
The alarm system, passenger compartment
monitoring system and inclination sensor are
switched off automatically.
Note on operation
If you unlock the vehicle with the key at the door
lock, you must switch the ignition on (ignition lock
position1) within 15 seconds of opening the door
in order to prevent the alarm system from being
triggered.
Switching off the alarm system if it is
triggeredfUnlock vehicle doors or
fSwitch ignition on.Function indicationThe locking condition of the vehicle is indicated by
a rapid flashing of the light-emitting diode A on the
driver’s door.
The light-emitting diode goes out when the vehicle
is unlocked.
Passenger compartment monitoring system
and inclination sensor are switched on
fThe light-emitting diode flashes for 2 seconds,
rapidly, then slowly.
Passenger compartment monitoring system
and inclination sensor are switched off
fThe light-emitting diode flashes rapidly for
2 seconds, goes out for 28 seconds and then
flashes slowly.
Fault indication
fThe light-emitting diode flashes rapidly for
2 seconds, shines for 28 seconds and then
flashes slowly.
Page 28 of 369

28
Controls, Safety, Instruments
The following alarm contacts are
monitored– Doors
– Engine compartment lid
– Rear lid
–Rear window
– Passenger compartment
– Vehicle inclination
If one of these alarm contacts is interrupted, the
alarm horn sounds for approx. 30 seconds and
the emergency flashers flash.
After 10 seconds of interruption the alarm is
triggered again. This cycle is repeated ten times.Temporarily switching off ultrasound
passenger compartment monitoring
system and inclination sensorIf people or animals are remaining in the locked ve-
hicle or the vehicle is being transported on a pas-
senger train or ship, for example, the passenger
compartment monitoring system and inclination
sensor must be switched off.
When locked again, the passenger compartment
monitoring system and inclination sensor are acti-
vated once more.Switching off
fLock the vehicle quickly twice with the remote
control or
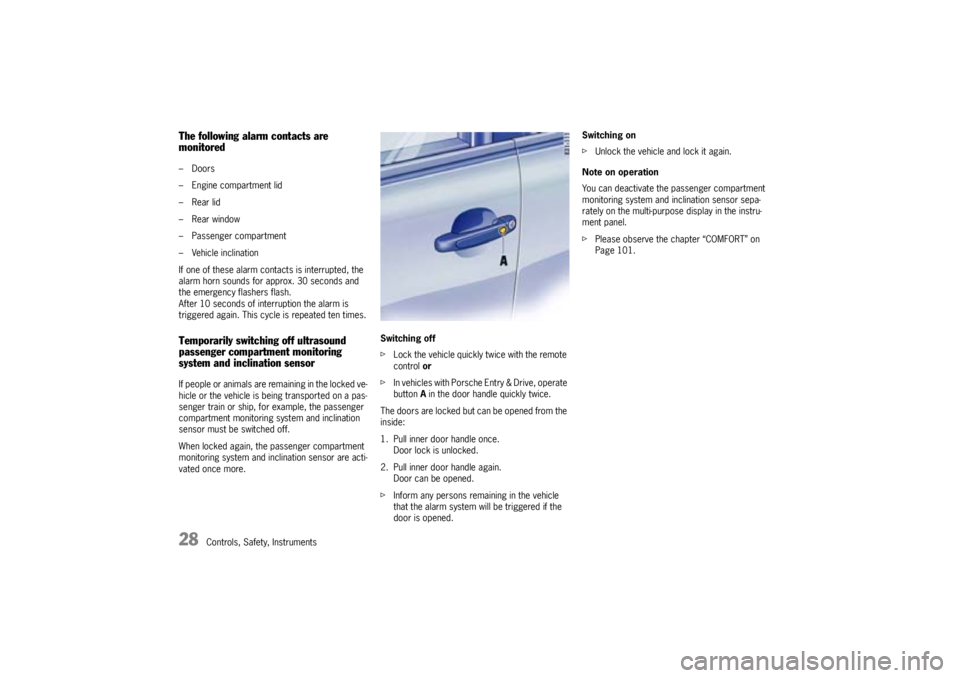
fIn vehicles with Porsche Entry & Drive, operate
buttonA in the door handle quickly twice.
The doors are locked but can be opened from the
inside:
1. Pull inner door handle once.
Door lock is unlocked.
2. Pull inner door handle again.
Door can be opened.
fInform any persons remaining in the vehicle
that the alarm system will be triggered if the
door is opened.Switching on
fUnlock the vehicle and lock it again.
Note on operation
You can deactivate the passenger compartment
monitoring system and inclination sensor sepa-
rately on the multi-purpose display in the instru-
ment panel.
fPlease observe the chapter “COMFORT” on
Page 101.
Page 57 of 369

Controls, Safety, Instruments
57
E- Light-emitting diodes (LED)
F- Button for automatic anti-dazzle operation
G- Light sensorsAutomatic Anti-Dazzle MirrorSensors on the front and rear sides of the interior
mirror measure the incident light. The mirrors au-
tomatically change to anti-dazzle position or revert
to their normal state, depending on the light inten-
sity.
Warning!
Danger of injury. Electrolyte fluid can
emerge from broken mirror glass. This fluid
irritates the skin and eyes.
fIf the electrolyte fluid should come into contact
with the skin or eyes, immediately rinse it off
with clean water.
See a doctor if necessary.
Risk of damage to paintwork, leather, plastic
parts, and clothing. Electrolyte fluid can be
removed only while it is still wet.
fClean the affected parts with water.Note on operation
The incident light in the area of light sensors G
must not be restricted (e.g. by stickers on the
windshield).
Switching off automatic anti-dazzle
operation
fPress button F.
Light-emitting diode E goes out.
Note on operation
Anti-dazzle operation switches off automatically,
if:
– Reverse gear is engaged or
– Interior lighting and/or
Reading lights at the front are switched on.
Switching on automatic anti-dazzle
operation
fPress button F.
Light-emitting diode E lights up.
Page 101 of 369

Controls, Safety, Instruments
101
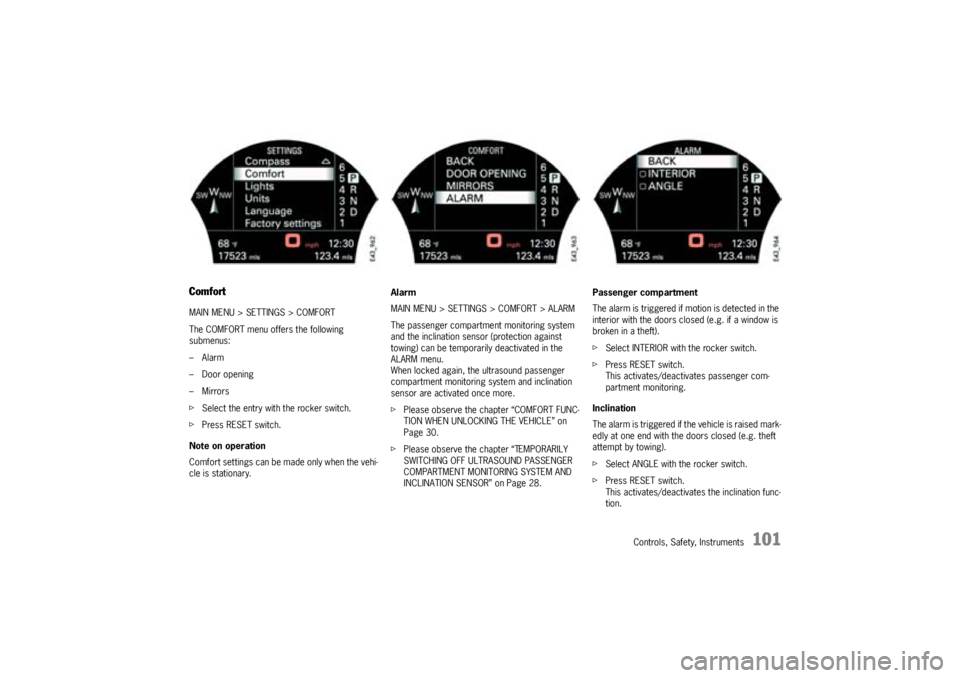
ComfortMAIN MENU > SETTINGS > COMFORT
The COMFORT menu offers the following
submenus:
–Alarm
–Door opening
–Mirrors
fSelect the entry with the rocker switch.
fPress RESET switch.
Note on operation
Comfort settings can be made only when the vehi-
cle is stationary.Alarm
MAIN MENU > SETTINGS > COMFORT > ALARM
The passenger compartment monitoring system
and the inclination sensor (protection against
towing) can be temporarily deactivated in the
ALARM menu.
When locked again, the ultrasound passenger
compartment monitoring system and inclination
sensor are activated once more.
fPlease observe the chapter “COMFORT FUNC-
TION WHEN UNLOCKING THE VEHICLE” on
Page 30.
fPlease observe the chapter “TEMPORARILY
SWITCHING OFF ULTRASOUND PASSENGER
COMPARTMENT MONITORING SYSTEM AND
INCLINATION SENSOR” on Page 28.Passenger compartment
The alarm is triggered if motion is detected in the
interior with the doors closed (e.g. if a window is
broken in a theft).
fSelect INTERIOR with the rocker switch.
fPress RESET switch.
This activates/deactivates passenger com-
partment monitoring.
Inclination
The alarm is triggered if the vehicle is raised mark-
edly at one end with the doors closed (e.g. theft
attempt by towing).
fSelect ANGLE with the rocker switch.
fPress RESET switch.
This activates/deactivates the inclination func-
tion.
Page 119 of 369

Controls, Safety, Instruments
119
Windshield Wiper/Washer Stalk
Warning!
Danger of injury when the windshield wipers
operate unintentionally.
Risk of damage to the engine compartment
lid, windshield and wiper system.
fOnly wipe the windshield when sufficiently wet,
otherwise it could be scratched.
fLoosen frozen wiper blades before driving off.
fDo not operate headlight washer when it is
frozen.
fAlways switch off windshield wipers in car
wash to prevent them wiping unintentionally
(rain sensor operation).
fDo not operate headlight washer in car wash-
es.
fAlways switch off windshield wipers before
cleaning the windshield to avoid unintentional
operation (rain sensor operation).
fAlways hold the wiper arm securely when re-
placing the wiper blade.fAlways switch the windscreen wipers off (posi-
tion 0) before opening the engine compart-
ment lid. If the wiper arms are not in position
0, they will automatically move to this position
when the engine compartment lid is opened.
This will happen even if the ignition is off.
The wiper arms remain in this position until the
lid is closed and the wiper system is switched.
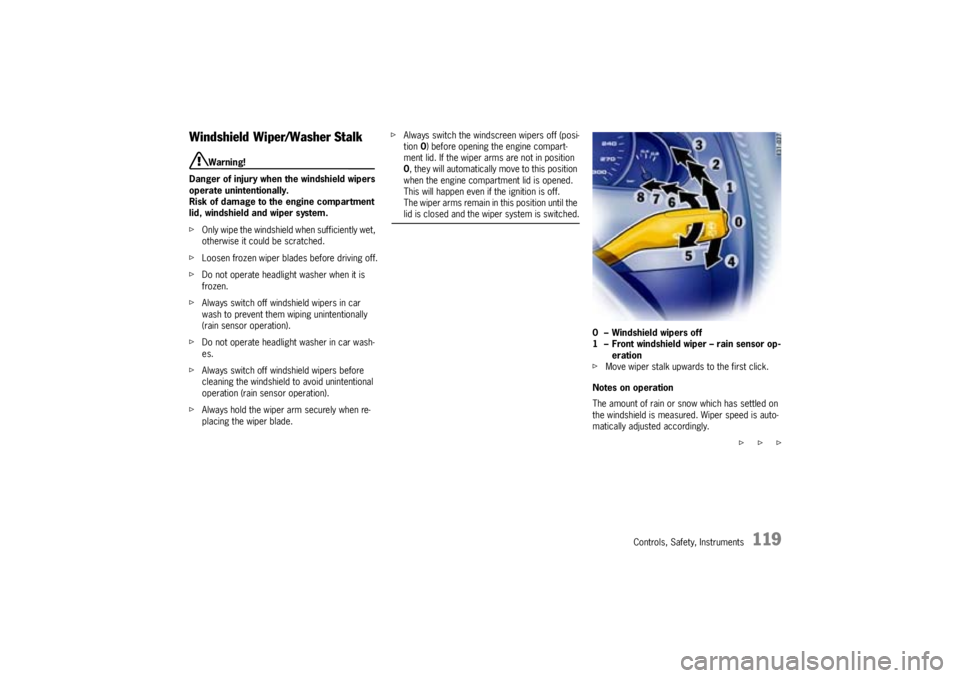
0 – Windshield wipers off
1 – Front windshield wiper – rain sensor op-
eration
fMove wiper stalk upwards to the first click.
Notes on operation
The amount of rain or snow which has settled on
the windshield is measured. Wiper speed is auto-
matically adjusted accordingly.
f f f
Page 120 of 369

120
Controls, Safety, Instruments The rain sensor remains switched off if the wiper
lever is already in position 1 when the ignition is
switched on.
To switch the rain sensor on again:
fMove wiper stalk to position 0 and then to
position1 – switching on is confirmed by one
wipe of the windscreen – or
fOperate windscreen washer system 5–
switching on is confirmed by three wipes of the
windscreen – or
fChange the sensitivity of the rain sensor with
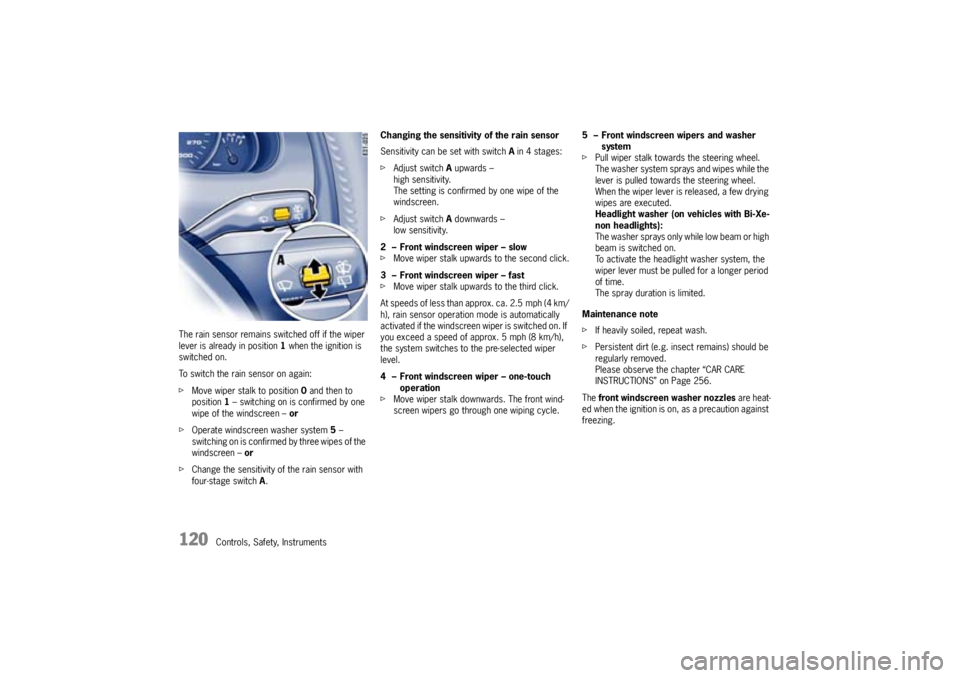
four-stage switch A.Changing the sensitivity of the rain sensor
Sensitivity can be set with switch A in 4 stages:
fAdjust switch A upwards –
high sensitivity.
The setting is confirmed by one wipe of the
windscreen.
fAdjust switch A downwards –
low sensitivity.
2 – Front windscreen wiper – slow
fMove wiper stalk upwards to the second click.
3 – Front windscreen wiper – fast
fMove wiper stalk upwards to the third click.
At speeds of less than approx. ca. 2.5 mph (4 km/
h), rain sensor operation mode is automatically
activated if the windscreen wiper is switched on. If
you exceed a speed of approx. 5 mph (8 km/h),
the system switches to the pre-selected wiper
level.
4 – Front windscreen wiper – one-touch
operation
fMove wiper stalk downwards. The front wind-
screen wipers go through one wiping cycle.5 – Front windscreen wipers and washer
system
fPull wiper stalk towards the steering wheel.
The washer system sprays and wipes while the
lever is pulled towards the steering wheel.
When the wiper lever is released, a few drying
wipes are executed.
Headlight washer (on vehicles with Bi-Xe-
non headlights):
The washer sprays only while low beam or high
beam is switched on.
To activate the headlight washer system, the
wiper lever must be pulled for a longer period
of time.
The spray duration is limited.
Maintenance note
fIf heavily soiled, repeat wash.
fPersistent dirt (e.g. insect remains) should be
regularly removed.
Please observe the chapter “CAR CARE
INSTRUCTIONS” on Page 256.
Thefront windscreen washer nozzles are heat-
ed when the ignition is on, as a precaution against
freezing.