wheel bolts PORSCHE CAYNNE TURBO 2005 1.G Owners Manual
[x] Cancel search | Manufacturer: PORSCHE, Model Year: 2005, Model line: CAYENNE TURBO, Model: PORSCHE CAYENNE TURBO 2005 1.GPages: 369, PDF Size: 3.17 MB
Page 12 of 369

12
Controls, Safety, Instruments
Dear Porsche OwnerA lot has gone into the manufacture of your
Porsche, including advanced engineering, rigid
quality control and demanding inspections. These
engineering and safety features will be enhanced
by you...the safe driver...– who knows his car and all controls,
– who maintains the vehicle properly,
– who uses driving skills wisely and always
drives within her/his own capabilities and the
level of familiarity with the vehicle.
You will find helpful hints in this manual on how to
perform most of the checks listed on the following
pages. If in doubt, have these checks performed
by your authorized Porsche dealer.
Before driving off...Check the following items firstfTurn the engine off before you attempt any
checks or repairs on the vehicle.
fBe sure the tires are inflated correctly.
Check tires for damage and tire wear.
fSee that wheel bolts are properly tightened
and not loose or missing.
fCheck engine oil level, add if necessary. Make
it a habit to have engine oil checked with every
fuel filling.
fCheck all fluid levels such as windshield wash-
er and brake fluid levels.
fBe sure the vehicle battery is well charged and
cranks the engine properly.
fCheck all doors and lids for proper operation
and latch them properly.
fCheck and if necessary replace worn or
cracked wiper blades.
fSee that all windows are clear and unobstruct-
ed.
fCheck air intake slots and area between en-
gine compartment lid and windshield are free
of snow and ice, so the heater and the wind-
shield wipers work properly.fIf a child will be riding in the vehicle, check
child seat/child seat restraint system to ensure
that restraints are properly adjusted.
fCheck all exterior and interior lights for opera-
tion and that the lenses are clean.
fCheck the headlights for proper aim, and if
necessary, have them adjusted.
fCheck under the vehicle for leaks.
fBe sure all luggage is stowed securely.
Emergency equipmentIt is good practice to carry emergency equipment
in your vehicle.
Some of the items you should have are: window
scraper, snow brush, container or bag of sand or
salt, emergency light, small shovel, first-aid kit,
etc.
Page 267 of 369

Practical Tips, Minor Repairs
267 Practical Tips, Minor Repairs
Exercise Extreme Caution when
Working on your Vehicle.............................. 268
Notes on Minor Repairs .............................. 269
Tires/Wheels ............................................. 269
Jack .......................................................... 283
Tool Kit ..................................................... 283
Lifting the Vehicle with a Lifting Platform
or Garage lift ............................................. 284
Compressor .............................................. 285
Wheel Bolts ............................................... 285
Changing Wheels........................................ 286
Flat Tire ..................................................... 287
Electrical System ....................................... 302
Battery ...................................................... 312
Emergency Starting with Jumper Cables ...... 323
Replacing the remote control battery ........... 326
Bulb Chart ................................................. 327
Replacing Bulbs ......................................... 328
Headlights ................................................. 329
Tail Light ................................................... 335
License Plate Lights ................................... 337
Headlight Adjustment.................................. 338
Changing Headlights from Left to
Right-Hand Traffic ....................................... 339
Towing ...................................................... 340
Page 269 of 369

Practical Tips, Minor Repairs
269
Notes on Minor RepairsTool kitThe tool kit is accommodated in the spare-wheel
well under the cover of the loadspace floor.
Tires/WheelsThe original equipment tires and wheel rims on
your Porsche comply with all applicable Federal
Motor Vehicle Safety Standards.
For your safety remember the following:
– Wheel rims and wheel bolts are matched to fit
your Porsche.
– If you intend to use other than original equip-
ment wheels, be sure that they conform to
Porsche specifications for your model.Only
tires with the same make and with the same
specification code (e.g. “N0“, “N1“...) can be
mounted.
– The use of wheel rims and wheel bolts that do
not meet specifications of the original factory
installed equipment will affect the safe opera-
tion of your vehicle.
– Before you plan on exchanging wheels, or
snow tires already mounted on the wheel rims,
consult your authorized Porsche dealer.
Your dealer has the technical information nec-
essary to advise you which wheel rims and
wheel bolts are compatible with the original
factory installations.
Danger!
Risk of loss of control and serious personal
injury or death.
fIf while driving, your vehicle experiences a sud-
den vibration or ride disturbance, and/or you
suspect that possible damage to your tires or
vehicle has occurred, you should immediately
reduce your speed without excessive use of
the brakes.
fStop the vehicle as soon as possible, and in-
spect the tires.
If you cannot determine the cause for the dis-
turbance, have your vehicle towed to the near-
est Porsche or tire dealer to have your vehicle
or tire(s) inspected.
fContinuing to operate the vehicle without cor-
rection could result in a loss of control and se-rious personal injury.
Page 278 of 369

278
Practical Tips, Minor Repairs
Removing and storing tiresfAfter changing, adjust tire pressure and torque
wheel bolts diagonally.
Please observe the chapter “CHANGING
WHEELS” on Page 286.
Tires must always remain on the same side of
the vehicle.
When wheels are removed, the direction of rota-
tion and position of each wheel should be marked.
Example
FR (front right), FL, RR and RL.
Wheels must always be fitted in accordance with
their marking.
The perception that tire durability and perfor-
mance are not affected by storage and age is un-
founded.
Chemical additives, which make the rubber elas-
tic, lose their effectiveness over the course of
time and the rubber becomes brittle and cracks.
Therefore, the tires, especially the spare tire,
should be inspected from time to time.Note
Under no circumstances should tires older than
6 years be used on your Porsche.
The age of the tire can be obtained from the “DOT“
code number. If, for example, the last three num-
bers read 1202, then the tire was produced in the
12th week of 2002.
fStore tires in a cool and dry place.
fRotate periodically to avoid flat spots.
Page 285 of 369
Practical Tips, Minor Repairs
285
CompressorOn vehicles without level-control systems, there is
an additional compressor with pressure tester un-
der the loadspace floor.
On vehicles with level control, you can use the
compressor of the level-control system to fill the
tires.
The filler hose required for this purpose can be
found under the left rear seat.
fPlease observe the chapter “FOLDING REAR
SEATS FORWARD” on Page 37.
fPlease observe the chapter “INFLATING TIRES
ON VEHICLES WITHOUT AIR SUSPENSION” on
Page 295.
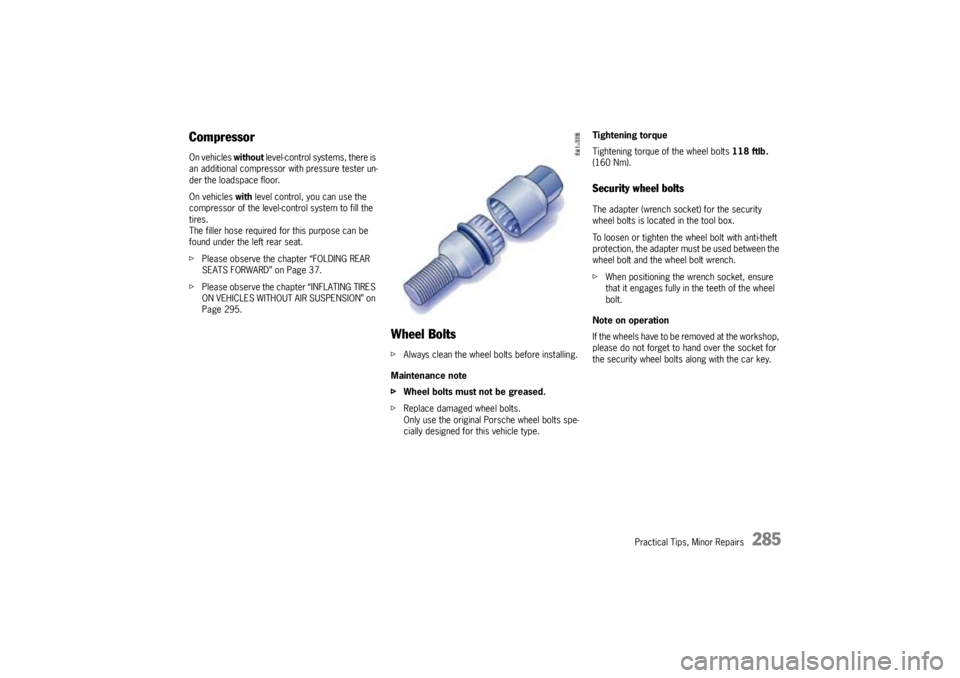
Wheel BoltsfAlways clean the wheel bolts before installing.
Maintenance note
fWheel bolts must not be greased.
fReplace damaged wheel bolts.
Only use the original Porsche wheel bolts spe-
cially designed for this vehicle type.Tightening torque
Tightening torque of the wheel bolts 118 ftlb.
(160 Nm).
Security wheel boltsThe adapter (wrench socket) for the security
wheel bolts is located in the tool box.
To loosen or tighten the wheel bolt with anti-theft
protection, the adapter must be used between the
wheel bolt and the wheel bolt wrench.
fWhen positioning the wrench socket, ensure
that it engages fully in the teeth of the wheel
bolt.
Note on operation
If the wheels have to be removed at the workshop,
please do not forget to hand over the socket for
the security wheel bolts along with the car key.
Page 290 of 369

290
Practical Tips, Minor Repairs
Lifting the vehicle with a jack
Warning!
Danger of injury. The car may slip off the
jack.
fMake sure that no one is in the vehicle when
jacking up and changing a wheel.
fNever jack up the vehicle when it is parked on
a surface that slopes up, down or to the side.
fUse the jack only to raise the car for wheel
changing.
fAlways place the car on stable supports if work
has to be carried out under the car.
The car jack is not suitable for this.
Danger of injury if the level-control system
operates during the wheel change.
fSet the car to jacking mode before raising the
car.
Please observe the chapter “RAISING VEHICLE
WITH THE JACK” on Page 230.
Risk of injury and damage if the vehicle is not
secured.
fSecure the vehicle against rolling.
fPlease observe the chapter “SECURING THE VEHICLE AGAINST ROLLING” on Page 287.Maintenance note
The jacking point on the vehicle must be free of
dirt.
1. Slightly slacken the wheel bolts of the wheel to
be changed.
2. Only set up the jack at the rear jacking point
designed for the purpose. The jack foot must
be in contact over its whole area and must be
positioned directly below the head piece.
Use a suitable support if necessary.
3. Hold jack still and wind it up until its head en-
ters the jacking point on the vehicle.
Only jack vehicle up until the wheel to be chan-
ged is completely off the ground.
4. After lowering the vehicle, remove the jack.
Front jacking pointJacking point base
fSet up jack only at the points provided A or B.
Page 293 of 369
Practical Tips, Minor Repairs
293
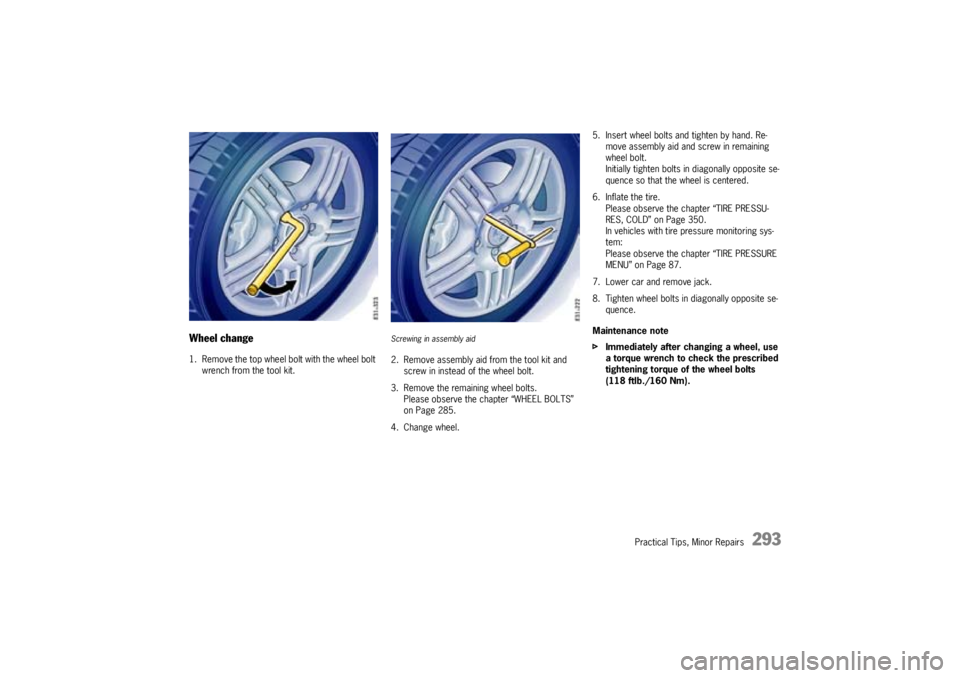
Wheel change1. Remove the top wheel bolt with the wheel bolt
wrench from the tool kit.
Screwing in assembly aid 2. Remove assembly aid from the tool kit and
screw in instead of the wheel bolt.
3. Remove the remaining wheel bolts.
Please observe the chapter “WHEEL BOLTS”
on Page 285.
4. Change wheel.5. Insert wheel bolts and tighten by hand. Re-
move assembly aid and screw in remaining
wheel bolt.
Initially tighten bolts in diagonally opposite se-
quence so that the wheel is centered.
6. Inflate the tire.
Please observe the chapter “TIRE PRESSU-
RES, COLD” on Page 350.
In vehicles with tire pressure monitoring sys-
tem:
Please observe the chapter “TIRE PRESSURE
MENU” on Page 87.
7. Lower car and remove jack.
8. Tighten wheel bolts in diagonally opposite se-
quence.
Maintenance note
fImmediately after changing a wheel, use
a torque wrench to check the prescribed
tightening torque of the wheel bolts
(118 ftlb./160 Nm).
Page 299 of 369
Practical Tips, Minor Repairs
299
Spare wheel
Warning!
Risk of accident. The wheel and tire size and
the tire quality of the spare wheel and normal
wheel may differ.
If a spare wheel that differs from the normal
tires is used, this may impair the driving be-
havior.
fThe spare wheel must be used only over short
distances in cases of emergency.
For safety reasons, replace the tires before
the wear indicators appear (webs in the tire
grooves, 1.6 mm high).
fNever deactivate the Porsche Stability
Management (PSM) system.
fIf the tire on the spare wheel is older than
4 years, the spare wheel should be used only
in the event of a flat.
fAvoid hard acceleration and high cornering
speeds.
The maximum permitted speed is 50 mph
(80 km/h) if the mounted spare wheel differs
from the other three wheels on the car. This
maximum speed must not be exceeded be-
cause of altered driving characteristics and for
reasons of wear.
fDo not use a spare wheel from a different vehi-
cle type.
fDo not mount the spare wheel from your car on a different vehicle.Removing spare wheel
Warning!
Danger of injury if the spare wheel is re-
moved improperly.
fRemove the spare wheel only when the spare
wheel bracket is locked.
fRemove the spare wheel from the spare wheel
bracket with care. The wheel is very heavy (ap-prox. 77 lbs. or 35 kg).
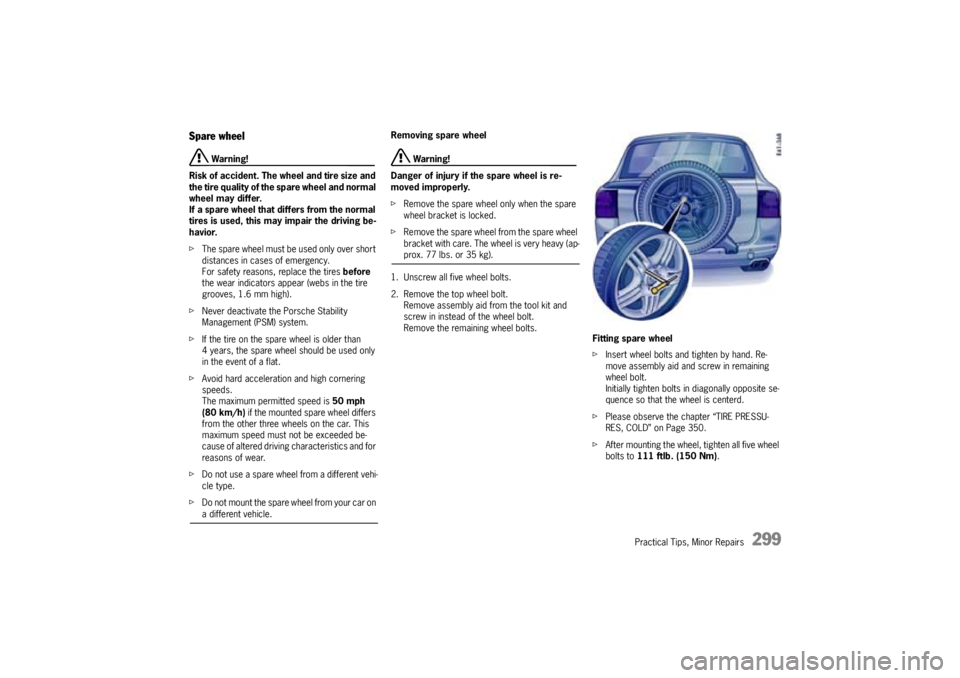
1. Unscrew all five wheel bolts.
2. Remove the top wheel bolt.
Remove assembly aid from the tool kit and
screw in instead of the wheel bolt.
Remove the remaining wheel bolts.
Fitting spare wheel
fInsert wheel bolts and tighten by hand. Re-
move assembly aid and screw in remaining
wheel bolt.
Initially tighten bolts in diagonally opposite se-
quence so that the wheel is centerd.
fPlease observe the chapter “TIRE PRESSU-
RES, COLD” on Page 350.
fAfter mounting the wheel, tighten all five wheel
bolts to 111 ftlb. (150 Nm).
Page 365 of 369

Index
365
Seat memory ...................................... 33
,161
Recall using car key .............................. 33
Recall using person buttons ................... 33
Storage, automatic ............................... 34
Storing driver’s seat settings ................. 34
Storing parking aid ................................ 34
Storing passenger seat settings............. 34
Seat memory (comfort) ................................. 33
Seat with memory ....................................... 161
Seats
Front .................................................... 32
Position ................................................ 32
Rear..................................................... 37
Setting ................................................. 32
Security wheel bolts .................................... 285
Selection mode
Automatic.................................. 200,201
Manual ...................................... 202,203
Selector lever ............................................. 198
Selector lever lock ...................................... 205
Selector lever position ................................ 199
Display ...................................... 198,199
Service indicator......................................... 109
Shifting
Down ................................................. 202
On the steering wheel.......................... 200
Up ..................................................... 202
Shifting up.................................................. 203
Shock absorber adjustment ......................... 211
Shock absorbers ........................................ 211
Side lights .................................................. 114
Side marker light ........................................ 146
Side member panel ..................................... 292
Side vents ......................................... 129,135Ski bag ......................................................187
Sliding roof .................................................147
Closing ...............................................148
Lifting.................................................148
Opening completely .............................148
Opening to comfort setting ..................148
Readiness for operation .......................147
Sliding/lifting roof .......................................147
Closing ...............................................148
Lifting.................................................148
Opening completely .............................148
Opening to comfort setting ..................148
Readiness for operation .......................147
Snow chains ......................................280
,349
Snow tires ..................................................279
Socket .......................................................302
Spare parts ................................................344
Spare wheel .............90
,294
,299
,319
,349
Warning light.......................................108
Spare wheel bracket .................178
,300
,301
Locking ................................................24
Opening ...............................................24
Unlocking .............................................20
Special low level .........................................228
Special terrain level .....................................228
Speed code letter .......................................281
Speed limit ..........................................89,281
Speedometer................................................72
Cayenne Turbo...............................68,70
SportDesign package ......................................7
Stability Management System .............214
,216
Indicator light ......................................110
Off road..............................................215
Warning light.........................68
,70,110Stability management system ...................... 211
Starting ..................................................... 198
Starting and stopping ................................... 60
Steam-jet units ........................................... 158
Steering lock ............................................... 58
Steering wheel ............................................. 51
Adjusting ............................................. 52
Heating................................................ 51
Multi-functional steering wheel ............... 53
Shifting .............................................. 201
Steering wheel buttons ................................. 53
Lighting ............................................... 54
Stopping ................................................... 203
Storage .............................................. 16
,172
Storage compartment ................................ 172
At the sides in the
luggage compartment ........................ 175
Storage tray
Armrest, front .................................... 174
Armrest, rear ..................................... 174
Stowing luggage ........................................ 193
Subwoofer
Installing ............................................ 320
Removing .......................................... 320
Summer tires ............................................. 348
Sun blind ................................................... 143
Sun visors ................................................. 142
TTachometer ................................... 68
,70,72
Tail light ............................................ 335
,336
Tank opening ............................................. 250
Telephone .................................................. 169
Page 367 of 369

Index
367
Securing against rolling ....................... 287
Storage.............................................. 313
Transport .................................... 28
,230
Washing ............................................. 257
Vehicle door
Locking ......................................... 20,24
Unlocking ............................................. 20
Vehicle key
Battery ............................................... 326
Vehicle-trailer combination stabilisation ......... 217
Ventilation ................................ 126
,127
,131
Vents ......................................................... 125
Central ...................................... 129,135
Footwell .................................... 129,135
Side .......................................... 129,135
Vertical coupling load .................................. 191
Voltmeter
Battery/generator warning ..................... 77
WWarning triangle.......................................... 175
Warnings ...................................................... 83
Washer fluid
Level.................................................. 243
Topping up ......................................... 243
Washer system, windscreen wipers ..... 120
,121
Washing ..................................................... 257
Water crossing ........................................... 224
Weights...................................................... 352
Wheel alignment ......................................... 277
Wheel bolts ................................................ 285
Removing .................................. 293,299
Wheel change ............................................. 279Wheels ..............................................262
,269
Adjusting ............................................277
Change .....................................286,293
Storing ...............................................278
Tracks................................................348
Wheel balancing .........................219,277
Windows ....................................................260
Windscreen wipers
Front ..................................................120
Rear ...................................................121
Windshield ................................129
,135
,243
Windshield wiper/washer stalk .....................119
Windshield wipers ..............................180,246
Blades................................................260
Switch ................................................119
Winter
Driving ...............................................313
Tires ..................................................348
Wiper blades .....................................246,260
Changing ...................................246,248
Working on your vehicle ...............................234