remote control PORSCHE CAYNNE TURBO 2006 1.G User Guide
[x] Cancel search | Manufacturer: PORSCHE, Model Year: 2006, Model line: CAYENNE TURBO, Model: PORSCHE CAYENNE TURBO 2006 1.GPages: 387, PDF Size: 8.44 MB
Page 122 of 387
122
Controls, Safety, Instruments
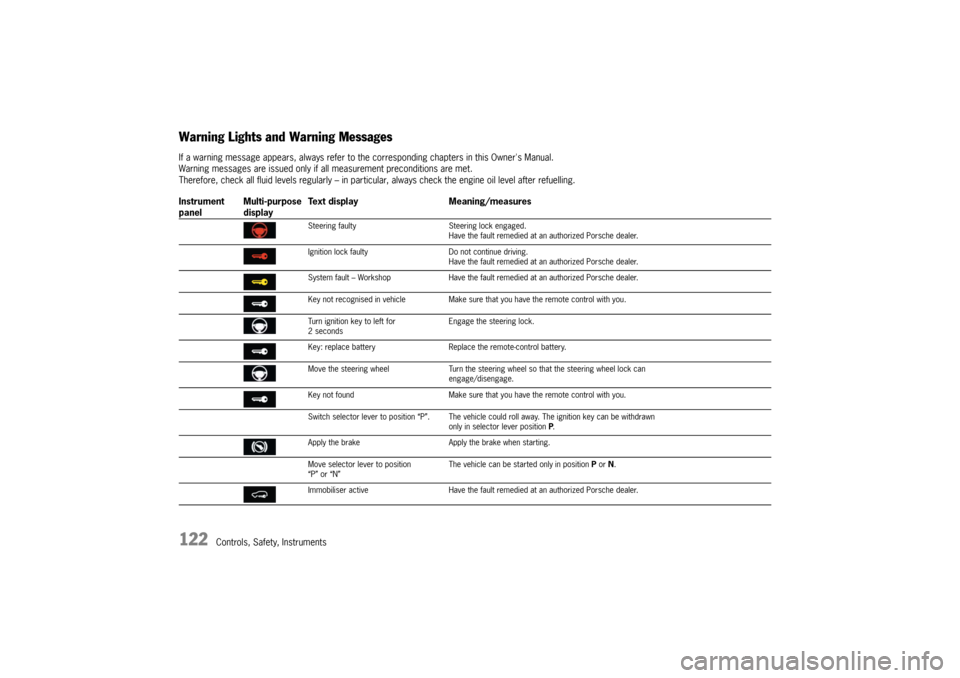
Warning Lights and Warning MessagesIf a warning message appears, always refer to the corresponding chapters in this Owner's Manual.
Warning messages are issued only if all measurement preconditions are met.
Therefore, check all fluid levels regularly – in particular, always check the engine oil level after refuelling.
Instrument
panelMulti-purpose
displayText display Meaning/measures
Steering faulty Steering lock engaged.
Have the fault remedied at an authorized Porsche dealer.
Ignition lock faulty Do not continue driving.
Have the fault remedied at an authorized Porsche dealer.
System fault – Workshop Have the fault remedied at an authorized Porsche dealer.
Key not recognised in vehicle Make sure that you have the remote control with you.
Turn ignition key to left for
2 secondsEngage the steering lock.
Key: replace battery Replace the remote-control battery.
Move the steering wheel Turn the steering wheel so that the steering wheel lock can
engage/disengage.
Key not found Make sure that you have the remote control with you.
Switch selector lever to position “P”.The vehicle could roll away. The ignition key can be withdrawn
only in selector lever position P.
Apply the brake Apply the brake when starting.
Move selector lever to position
“P” or “N”The vehicle can be started only in position P or N.
Immobiliser active Have the fault remedied at an authorized Porsche dealer.
Page 143 of 387
Controls, Safety, Instruments
143
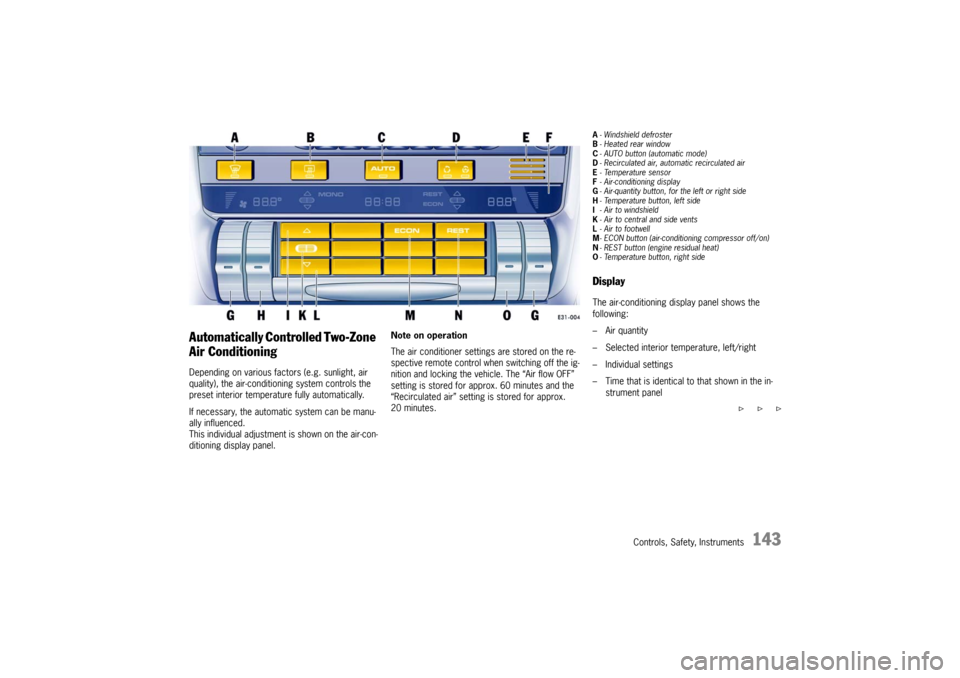
Automatically Controlled Two-Zone
Air ConditioningDepending on various factors (e.g. sunlight, air
quality), the air-conditioning system controls the
preset interior temperature fully automatically.
If necessary, the automatic system can be manu-
ally influenced.
This individual adjustment is shown on the air-con-
ditioning display panel.Note on operation
The air conditioner settings are stored on the re-
spective remote control when switching off the ig-
nition and locking the vehicle. The “Air flow OFF”
setting is stored for approx. 60 minutes and the
“Recirculated air” setting is stored for approx.
20 minutes.
A- Windshield defroster
B-Heated rear window
C- AUTO button (automatic mode)
D- Recirculated air, automatic recirculated air
E-Temperature sensor
F- Air-conditioning display
G- Air-quantity button, for the left or right side
H- Temperature button, left side
I- Air to windshield
K- Air to central and side vents
L- Air to footwell
M- ECON button (air-conditioning compressor off/on)
N- REST button (engine residual heat)
O- Temperature button, right sideDisplayThe air-conditioning display panel shows the
following:
– Air quantity
– Selected interior temperature, left/right
– Individual settings
– Time that is identical to that shown in the in-
strument panel
f f f
Page 147 of 387
Controls, Safety, Instruments
147
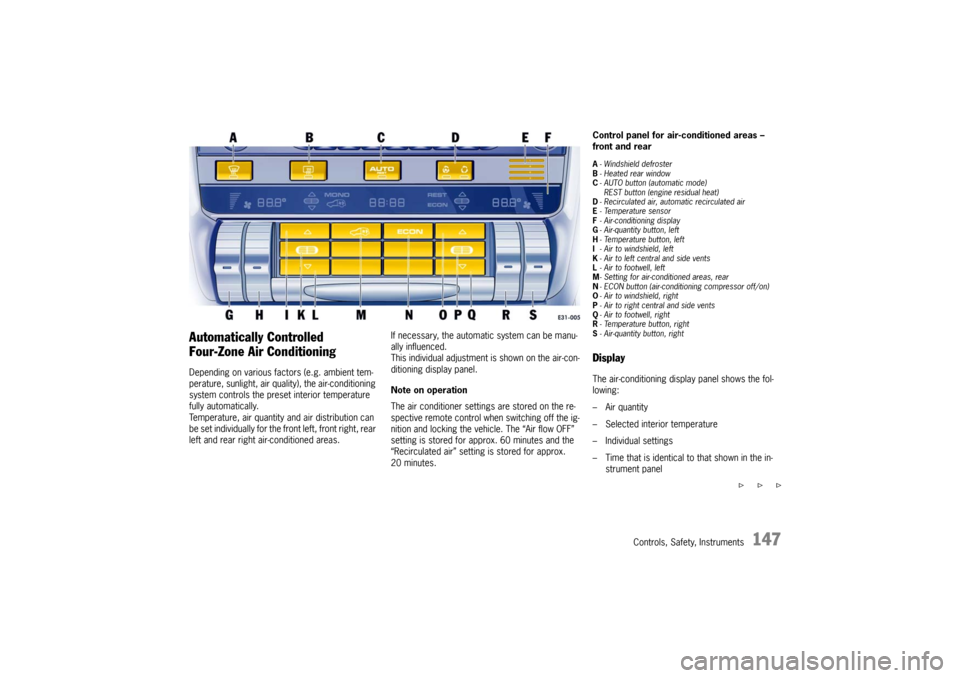
Automatically Controlled
Four-Zone Air ConditioningDepending on various factors (e.g. ambient tem-
perature, sunlight, air quality), the air-conditioning
system controls the preset interior temperature
fully automatically.
Temperature, air quantity and air distribution can
be set individually for the front left, front right, rear
left and rear right air-conditioned areas.If necessary, the automatic system can be manu-
ally influenced.
This individual adjustment is shown on the air-con-
ditioning display panel.
Note on operation
The air conditioner settings are stored on the re-
spective remote control when switching off the ig-
nition and locking the vehicle. The “Air flow OFF”
setting is stored for approx. 60 minutes and the
“Recirculated air” setting is stored for approx.
20 minutes.
Control panel for air-conditioned areas –
front and rearA- Windshield defroster
B-Heated rear window
C- AUTO button (automatic mode)
REST button (engine residual heat)
D- Recirculated air, automatic recirculated air
E-Temperature sensor
F- Air-conditioning display
G- Air-quantity button, left
H-Temperature button, left
I- Air to windshield, left
K- Air to left central and side vents
L- Air to footwell, left
M- Setting for air-conditioned areas, rear
N- ECON button (air-conditioning compressor off/on)
O- Air to windshield, right
P- Air to right central and side vents
Q- Air to footwell, right
R- Temperature button, right
S- Air-quantity button, rightDisplayThe air-conditioning display panel shows the fol-
lowing:
– Air quantity
– Selected interior temperature
– Individual settings
– Time that is identical to that shown in the in-
strument panel
f f f
Page 162 of 387
162
Controls, Safety, Instruments
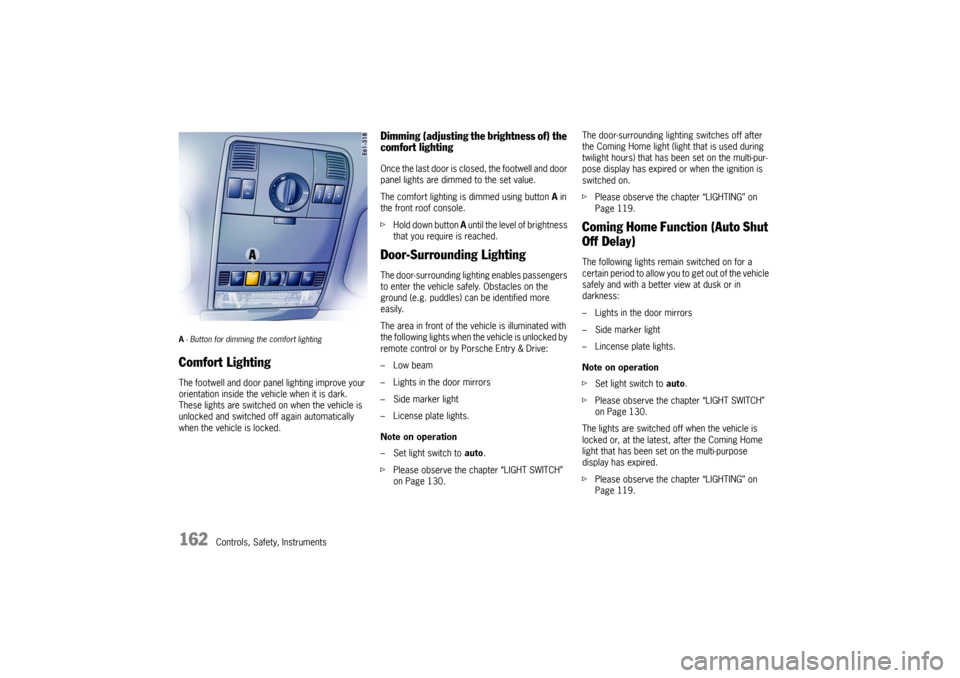
A- Button for dimming the comfort lighting Comfort LightingThe footwell and door panel lighting improve your
orientation inside the vehicle when it is dark.
These lights are switched on when the vehicle is
unlocked and switched off again automatically
when the vehicle is locked.
Dimming (adjusting the brightness of) the
comfort lightingOnce the last door is closed, the footwell and door
panel lights are dimmed to the set value.
The comfort lighting is dimmed using button A in
the front roof console.
fHold down button A until the level of brightness
that you require is reached.Door-Surrounding LightingThe door-surrounding lighting enables passengers
to enter the vehicle safely. Obstacles on the
ground (e.g. puddles) can be identified more
easily.
The area in front of the vehicle is illuminated with
the following lights when the vehicle is unlocked by
remote control or by Porsche Entry & Drive:
–Low beam
– Lights in the door mirrors
– Side marker light
– License plate lights.
Note on operation
– Set light switch to auto.
fPlease observe the chapter “LIGHT SWITCH”
on Page 130.The door-surrounding lighting switches off after
the Coming Home light (light that is used during
twilight hours) that has been set on the multi-pur-
pose display has expired or when the ignition is
switched on.
fPlease observe the chapter “LIGHTING” on
Page 119.
Coming Home Function (Auto Shut
Off Delay)The following lights remain switched on for a
certain period to allow you to get out of the vehicle
safely and with a better view at dusk or in
darkness:
– Lights in the door mirrors
– Side marker light
– Lincense plate lights.
Note on operation
fSet light switch to auto.
fPlease observe the chapter “LIGHT SWITCH”
on Page 130.
The lights are switched off when the vehicle is
locked or, at the latest, after the Coming Home
light that has been set on the multi-purpose
display has expired.
fPlease observe the chapter “LIGHTING” on
Page 119.
Page 194 of 387
194
Controls, Safety, Instruments
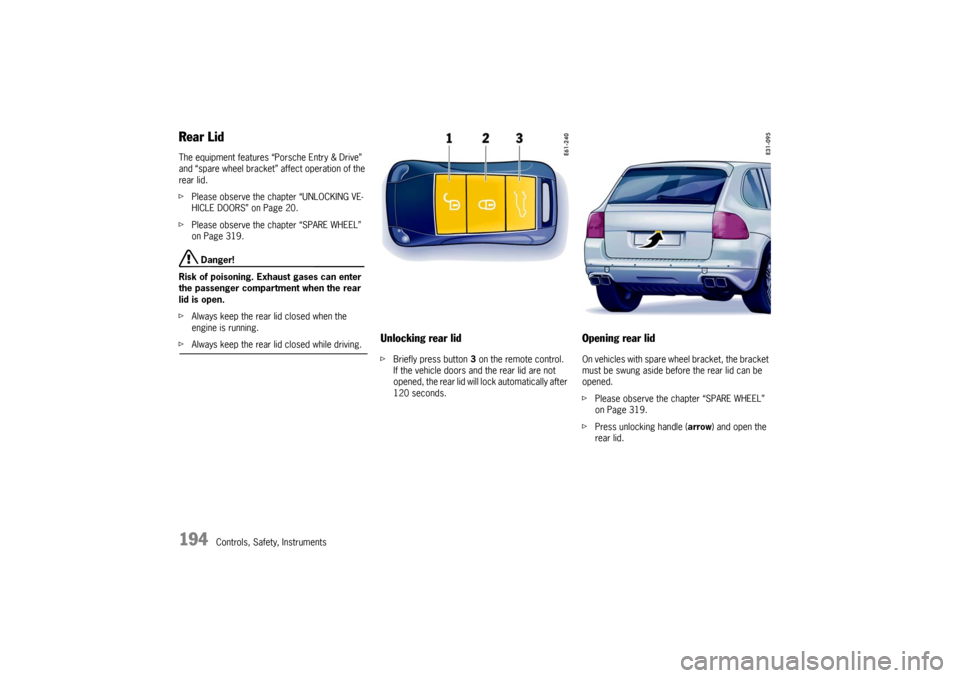
Rear LidThe equipment features “Porsche Entry & Drive”
and “spare wheel bracket” affect operation of the
rear lid.
fPlease observe the chapter “UNLOCKING VE-
HICLE DOORS” on Page 20.
fPlease observe the chapter “SPARE WHEEL”
on Page 319.
Danger!
Risk of poisoning. Exhaust gases can enter
the passenger compartment when the rear
lid is open.
fAlways keep the rear lid closed when the
engine is running.
fAlways keep the rear lid closed while driving.
Unlocking rear lidfBriefly press button 3 on the remote control.
If the vehicle doors and the rear lid are not
opened, the rear lid will lock automatically after
120 seconds.
Opening rear lidOn vehicles with spare wheel bracket, the bracket
must be swung aside before the rear lid can be
opened.
fPlease observe the chapter “SPARE WHEEL”
on Page 319.
fPress unlocking handle (arrow) and open the
rear lid.
Page 195 of 387
Controls, Safety, Instruments
195
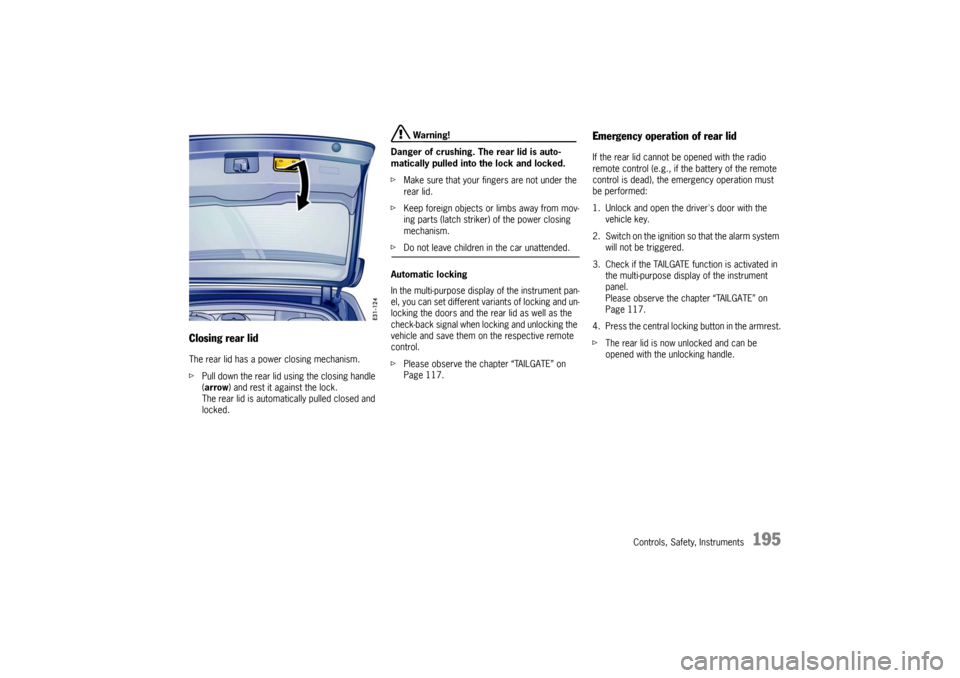
Closing rear lidThe rear lid has a power closing mechanism.
fPull down the rear lid using the closing handle
(arrow) and rest it against the lock.
The rear lid is automatically pulled closed and
locked.
Warning!
Danger of crushing. The rear lid is auto-
matically pulled into the lock and locked.
fMake sure that your fingers are not under the
rear lid.
fKeep foreign objects or limbs away from mov-
ing parts (latch striker) of the power closing
mechanism.
fDo not leave children in the car unattended.
Automatic locking
In the multi-purpose display of the instrument pan-
el, you can set different variants of locking and un-
locking the doors and the rear lid as well as the
check-back signal when locking and unlocking the
vehicle and save them on the respective remote
control.
fPlease observe the chapter “TAILGATE” on
Page 117.
Emergency operation of rear lidIf the rear lid cannot be opened with the radio
remote control (e.g., if the battery of the remote
control is dead), the emergency operation must
be performed:
1. Unlock and open the driver's door with the
vehicle key.
2. Switch on the ignition so that the alarm system
will not be triggered.
3. Check if the TAILGATE function is activated in
the multi-purpose display of the instrument
panel.
Please observe the chapter “TAILGATE” on
Page 117.
4. Press the central locking button in the armrest.
fThe rear lid is now unlocked and can be
opened with the unlocking handle.
Page 196 of 387
196
Controls, Safety, Instruments
Rear Window
Danger!
Risk of poisoning. Exhaust gases can enter
the passenger compartment when the rear
window is open.
fAlways keep the rear window closed when the
engine is running.
fAlways keep the rear window closed while driving.
fPlease observe the chapter “PORSCHE ENTRY
& DRIVE” on Page 22.
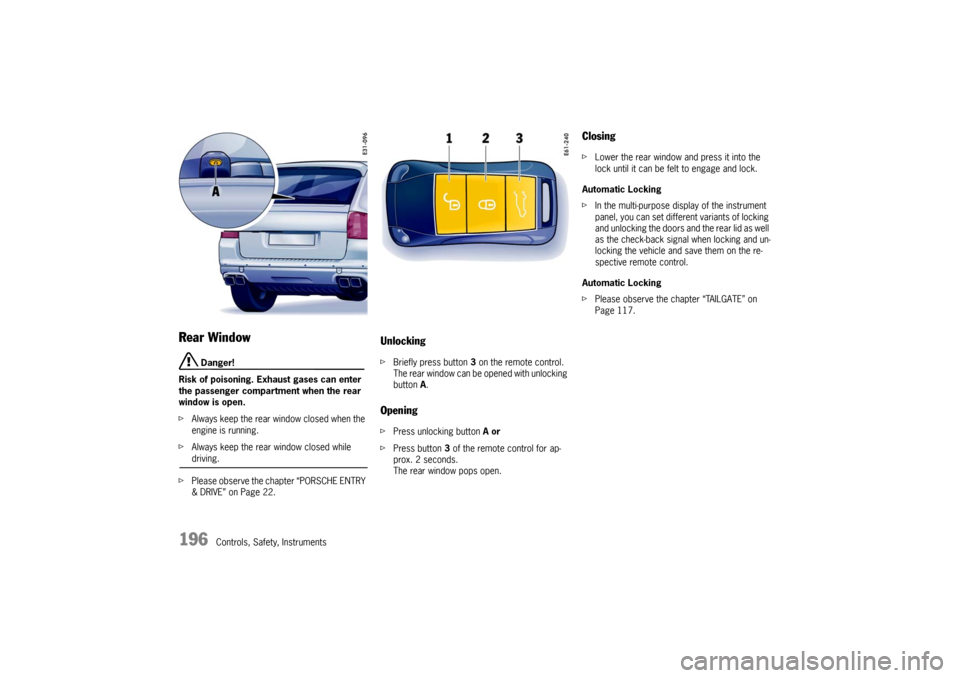
UnlockingfBriefly press button 3 on the remote control.
The rear window can be opened with unlocking
button A.OpeningfPress unlocking button A or
fPress button 3 of the remote control for ap-
prox. 2 seconds.
The rear window pops open.
ClosingfLower the rear window and press it into the
lock until it can be felt to engage and lock.
Automatic Locking
fIn the multi-purpose display of the instrument
panel, you can set different variants of locking
and unlocking the doors and the rear lid as well
as the check-back signal when locking and un-
locking the vehicle and save them on the re-
spective remote control.
Automatic Locking
fPlease observe the chapter “TAILGATE” on
Page 117.
Page 267 of 387
Maintenance, Car Care
267
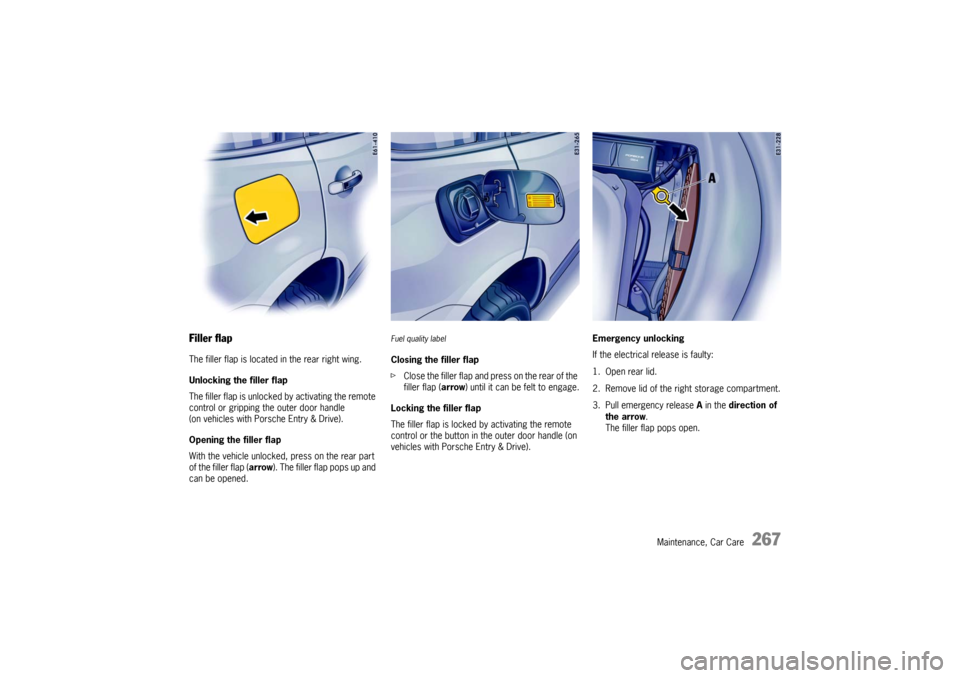
Filler flapThe filler flap is located in the rear right wing.
Unlocking the filler flap
The filler flap is unlocked by activating the remote
control or gripping the outer door handle
(on vehicles with Porsche Entry & Drive).
Opening the filler flap
With the vehicle unlocked, press on the rear part
of the filler flap (arrow). The filler flap pops up and
can be opened.
Fuel quality labelClosing the filler flap
fClose the filler flap and press on the rear of the
filler flap (arrow) until it can be felt to engage.
Locking the filler flap
The filler flap is locked by activating the remote
control or the button in the outer door handle (on
vehicles with Porsche Entry & Drive).Emergency unlocking
If the electrical release is faulty:
1. Open rear lid.
2. Remove lid of the right storage compartment.
3. Pull emergency release A in the direction of
the arrow.
The filler flap pops open.
Page 283 of 387

Practical Tips, Minor Repairs
283 Practical Tips, Minor Repairs
Exercise Extreme Caution when Working on your
Vehicle ...................................................... 284
Notes on Minor Repairs .............................. 285
Tires/Wheels ............................................. 285
Jack .......................................................... 299
Tool Kit ..................................................... 299
Lifting the Vehicle with a Lifting Platform or
Garage lift ................................................. 300
Compressor .............................................. 301
Wheel Bolts ............................................... 301
Spacers .................................................... 302
Changing Wheels........................................ 303
Flat Tire ..................................................... 304
Electrical System ....................................... 322
Battery ...................................................... 332
Emergency Starting with Jumper Cables ...... 343
Replacing the remote control battery ........... 346
Bulb Chart ................................................. 347
Replacing Bulbs ......................................... 348
Headlights ................................................. 349
Tail Light ................................................... 355
License Plate Lights................................... 357
Headlight Adjustment.................................. 358
Changing Headlights from Left to Right-Hand
Traffic ....................................................... 359
Towing ...................................................... 360
Page 321 of 387
Practical Tips, Minor Repairs
321
Closing spare wheel bracket
Warning!
Danger of injury and risk of accident if the
spare wheel bracket is operated improperly.
fOperate the spare wheel bracket only using
button B.
fIf the vehicle is tilted to the side, more effort
will be required to swing the spare wheel
bracket.
fMake sure that no persons or animals are with-
in the range of movement of the spare wheel bracket.
1. Check whether additional lock C is engaged. If
necessary, slide additional lock C to the right.
2. Swing spare wheel bracket closed with force.
3. Check lock and observe indication on the multi-
purpose display of the instrument panel.
The indicator light must go out when the spare
wheel bracket is locked.
Automatic locking
In the multi-purpose display of the instrument pan-
el, you can set different variants of locking and un-
locking the doors and the rear lid as well as the
check-back signal when locking and unlocking the
vehicle and save them on the respective remote
control.
fPlease observe the chapter “TAILGATE” on
Page 117.
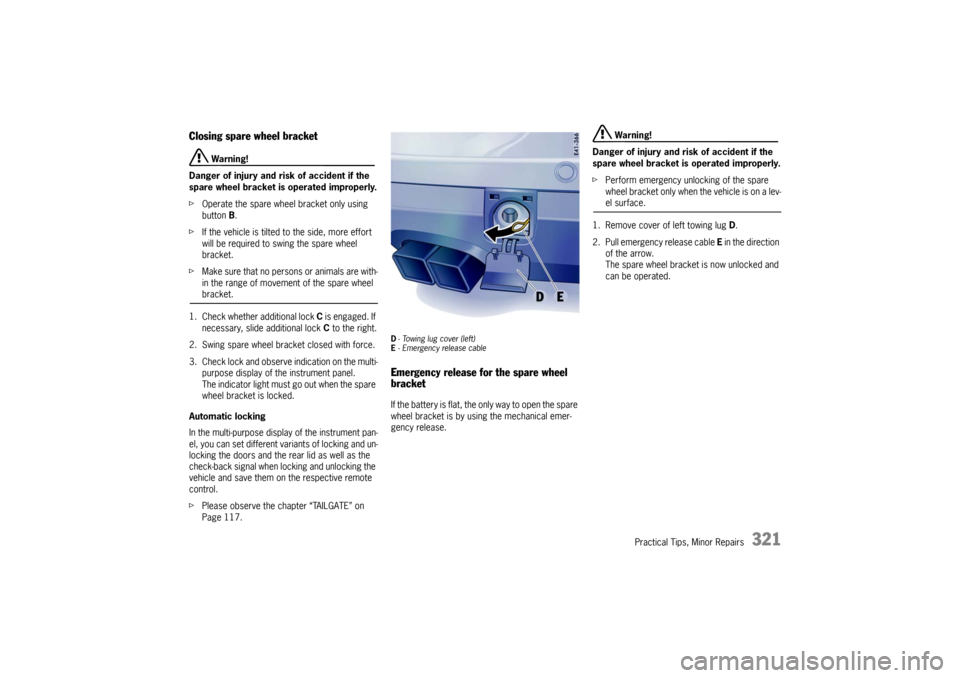
D- Towing lug cover (left)
E- Emergency release cableEmergency release for the spare wheel
bracketIf the battery is flat, the only way to open the spare
wheel bracket is by using the mechanical emer-
gency release.
Warning!
Danger of injury and risk of accident if the
spare wheel bracket is operated improperly.
fPerform emergency unlocking of the spare
wheel bracket only when the vehicle is on a lev-el surface.
1. Remove cover of left towing lug D.
2. Pull emergency release cable E in the direction
of the arrow.
The spare wheel bracket is now unlocked and
can be operated.