spare wheel PORSCHE CAYNNE TURBO 2006 1.G Owner's Manual
[x] Cancel search | Manufacturer: PORSCHE, Model Year: 2006, Model line: CAYENNE TURBO, Model: PORSCHE CAYENNE TURBO 2006 1.GPages: 387, PDF Size: 8.44 MB
Page 289 of 387
Practical Tips, Minor Repairs
289
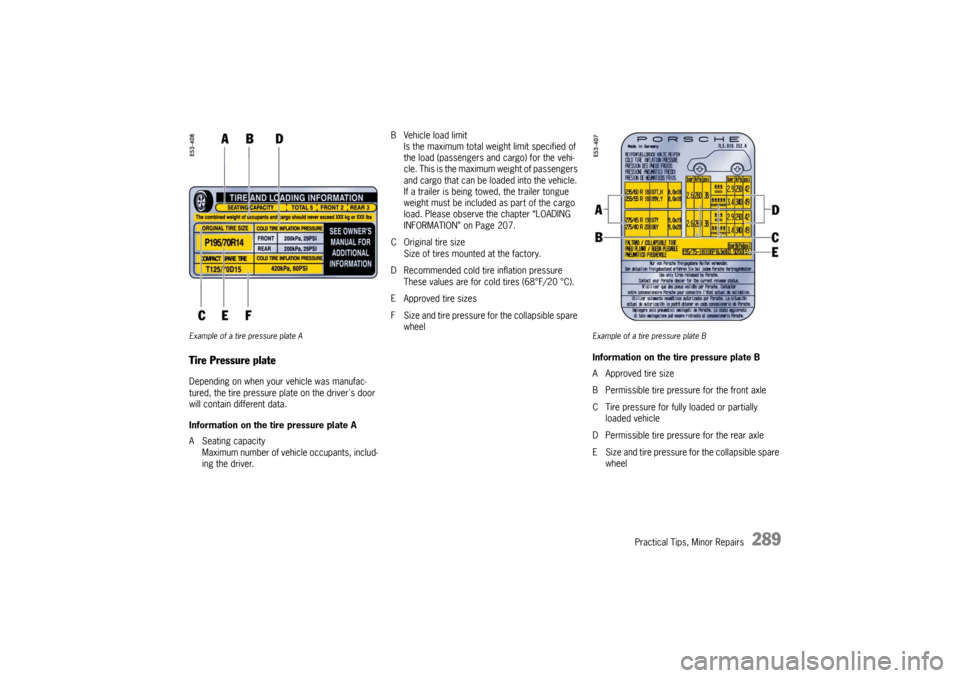
Example of a tire pressure plate ATire Pressure plateDepending on when your vehicle was manufac-
tured, the tire pressure plate on the driver's door
will contain different data.
Information on the tire pressure plate A
A Seating capacity
Maximum number of vehicle occupants, includ-
ing the driver.B Vehicle load limit
Is the maximum total weight limit specified of
the load (passengers and cargo) for the vehi-
cle. This is the maximum weight of passengers
and cargo that can be loaded into the vehicle.
If a trailer is being towed, the trailer tongue
weight must be included as part of the cargo
load. Please observe the chapter “LOADING
INFORMATION” on Page 207.
C Original tire size
Size of tires mounted at the factory.
D Recommended cold tire inflation pressure
These values are for cold tires (68°F/20 °C).
E Approved tire sizes
F Size and tire pressure for the collapsible spare
wheel
Example of a tire pressure plate BInformation on the tire pressure plate B
A Approved tire size
B Permissible tire pressure for the front axle
C Tire pressure for fully loaded or partially
loaded vehicle
D Permissible tire pressure for the rear axle
E Size and tire pressure for the collapsible spare
wheel
Page 294 of 387

294
Practical Tips, Minor Repairs
Removing and storing tiresfAfter changing, adjust tire pressure and torque
wheel bolts diagonally.
Please observe the chapter “CHANGING
WHEELS” on Page 303.
Tires must always remain on the same side of
the vehicle.
When wheels are removed, the direction of rota-
tion and position of each wheel should be marked.
Example
FR (front right), FL, RR and RL.
Wheels must always be fitted in accordance with
their marking.
The perception that tire durability and perform-
ance are not affected by storage and age is un-
founded.
Chemical additives, which make the rubber elas-
tic, lose their effectiveness over the course of
time and the rubber becomes brittle and cracks.
Therefore, the tires, especially the spare tire,
should be inspected from time to time.Note
Under no circumstances should tires older than
6 years be used on your Porsche.
The age of the tire can be obtained from the “DOT“
code number. If, for example, the last three num-
bers read 1202, then the tire was produced in the
12th week of 2002.
fStore tires in a cool and dry place.
fRotate periodically to avoid flat spots.
Page 296 of 387

296
Practical Tips, Minor Repairs
Snow chains
Warning!
Risk of damage to body, axle or brake com-
ponents.
fUse only the fine-link snow chains recommend-
ed and authorized by Porsche so that sufficient
clearance between the wheel well and the
chain is assured.
fFollow instructions issued by the supplier of the chains.
The best possible handling characteristics are
achieved when snow chains are fitted on all four
wheels of the vehicle. However, it is also possible
to fit snow chains on only one axle (preferably the
rear axle).
fRemove spacers if 18 inch tires, snow chains
or a collapsible spare wheel are mounted.
Caution!
Risk of damage to wheel housings if the
spacers on the rear axle are not removed be-
fore fitting the snow chains.
f17 mm spacers must always be removed from the rear axle when snow chains are to be fitted.
fFor information on the spacers:
Please observe the chapter “SPACERS” on
Page 302.
For information about removing the spacers:
Please observe the chapter “CHANGING A
WHEEL WITH REMOVAL OF 17 MM SPACER”
on Page 311.
Different states and countries have varying statu-
tory requirements regarding maximum speed.
fCheck with local authorities for possible re-
strictions.
fRemove chains as soon as the roads are free
of ice and snow.
Page 302 of 387

302
Practical Tips, Minor Repairs
SpacersfUse the spacers only together with wheels
approved by Porsche.
Before having spacers fitted, find out about the
current approval status.
fRemove spacers if 18 inch tires, snow chains
or a collapsible spare wheel are mounted.
Danger!
Risk of accident if the spacers are not re-
moved before mounting 18 inch tires or col-
lapsible spare wheel.
f17 mm spacers are always to be removed be-
fore mounting 18 inch tires or a collapsible
spare wheel, because the wheel cannot be fit-ted correctly. Caution!
Risk of damage to wheel housings if the
spacers on the rear axle are not removed be-
fore fitting the snow chains.
f17 mm spacers must always be removed from the rear axle when snow chains are to be fitted.Note on operation
fTo remove or mount the spacers:
Please observe the chapter “CHANGING A
WHEEL WITH REMOVAL OF 17 MM SPACER”
on Page 311.
Please observe the chapter “FITTING THE
17 MM SPACER” on Page 312.
Page 311 of 387
Practical Tips, Minor Repairs
311
Changing a wheel with removal of 17 mm
spacer
Danger!
Risk of accident if the spacers are not re-
moved before mounting 18 inch tires or col-
lapsible spare wheel.
f17 mm spacers are always to be removed be-
fore mounting 18 inch tires or a collapsible
spare wheel, because the wheel cannot be fit-ted correctly. Caution!
Risk of damage to wheel housings if the
spacers on the rear axle are not removed be-
fore fitting the snow chains.
f17 mm spacers must always be removed from the rear axle when snow chains are to be fitted.
fRemove spacers if 18 inch tires, snow chains
or a collapsible spare wheel are mounted.
fIt is not necessary to use a assembly aid for
mounting a wheel or spare wheel of the same
quality.
fFor information on the spacers: Please
observe the chapter “SPACERS” on Page 302.
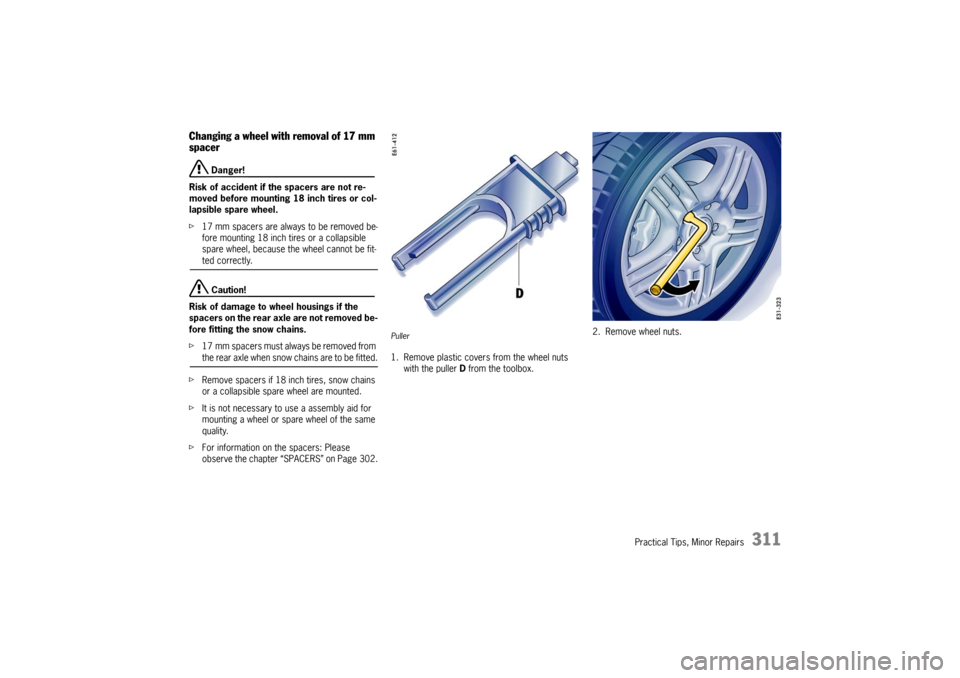
Puller1. Remove plastic covers from the wheel nuts
with the puller D from the toolbox.2. Remove wheel nuts.
Page 313 of 387
Practical Tips, Minor Repairs
313
Collapsible spare wheelThe collapsible spare wheel is fastened under the
floor in the luggage compartment.
On vehicles with 17 mm spacers:
fBefore fitting a collapsible spare wheel on the
rear axle always remove the corresponding
spacer.
For information on the spacers: Please
observe the chapter “SPACERS” on Page 302.
For information about removing the spacers:
Please observe the chapter “CHANGING A
WHEEL WITH REMOVAL OF 17 MM SPACER”
on Page 311.
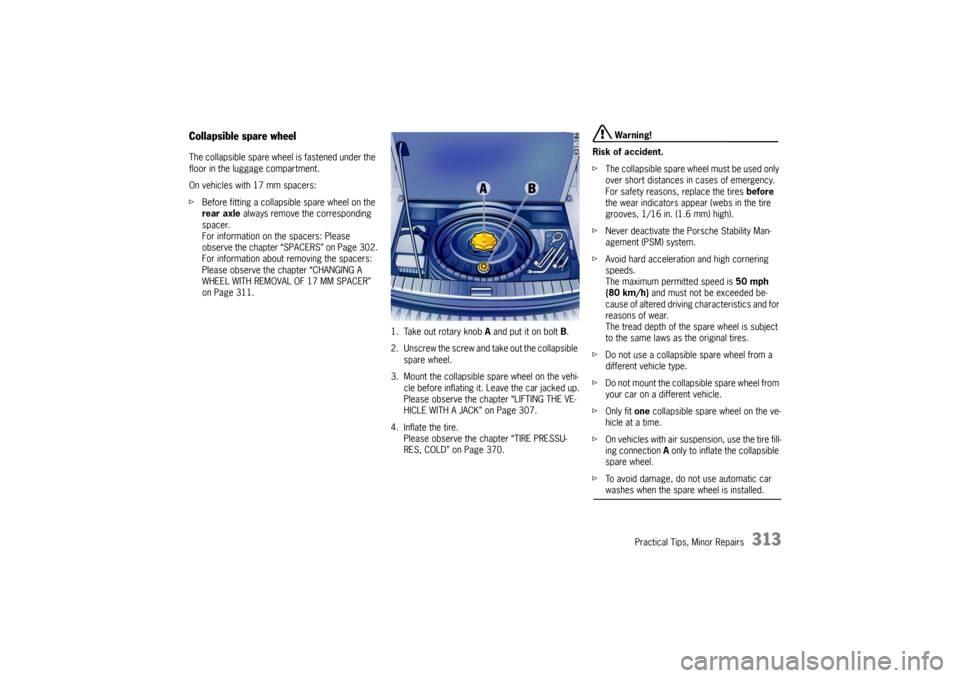
1. Take out rotary knob A and put it on bolt B.
2. Unscrew the screw and take out the collapsible
spare wheel.
3. Mount the collapsible spare wheel on the vehi-
cle before inflating it. Leave the car jacked up.
Please observe the chapter “LIFTING THE VE-
HICLE WITH A JACK” on Page 307.
4. Inflate the tire.
Please observe the chapter “TIRE PRESSU-
RES, COLD” on Page 370.
Warning!
Risk of accident.
fThe collapsible spare wheel must be used only
over short distances in cases of emergency.
For safety reasons, replace the tires before
the wear indicators appear (webs in the tire
grooves, 1/16 in. (1.6 mm) high).
fNever deactivate the Porsche Stability Man-
agement (PSM) system.
fAvoid hard acceleration and high cornering
speeds.
The maximum permitted speed is 50 mph
(80 km/h) and must not be exceeded be-
cause of altered driving characteristics and for
reasons of wear.
The tread depth of the spare wheel is subject
to the same laws as the original tires.
fDo not use a collapsible spare wheel from a
different vehicle type.
fDo not mount the collapsible spare wheel from
your car on a different vehicle.
fOnly fit one collapsible spare wheel on the ve-
hicle at a time.
fOn vehicles with air suspension, use the tire fill-
ing connection A only to inflate the collapsible
spare wheel.
fTo avoid damage, do not use automatic car washes when the spare wheel is installed.
Page 314 of 387

314
Practical Tips, Minor Repairs After using the collapsible spare wheel
fRelease air by unscrewing the valve insert.
Notes on operation
The tire will revert to its original shape only after
several hours. Only then can it be stowed in the
spare wheel recess in the luggage compartment.
There is a plastic sheet in the tool box to store the
damaged wheel.Maintenance note
The collapsible spare wheel must be repaired only
by the manufacturer.
fPlease consult your authorized Porsche dealer
if the collapsible spare wheel is defective.
Page 319 of 387
Practical Tips, Minor Repairs
319
Spare wheel
Warning!
Risk of accident. The wheel and tire size and
the tire quality of the spare wheel and normal
wheel may differ.
If a spare wheel that differs from the normal
tires is used, this may impair the driving be-
havior.
fThe spare wheel must be used only over short
distances in cases of emergency.
For safety reasons, replace the tires before
the wear indicators appear [webs in the tire
grooves, 1/16 in. (1.6 mm) high].
fNever deactivate the Porsche Stability
Management (PSM) system.
fIf the tire on the spare wheel is older than
4 years, the spare wheel should be used only
in the event of a flat.
fAvoid hard acceleration and high cornering
speeds.
The maximum permitted speed is 50 mph
(80 km/h) if the mounted spare wheel differs
from the other three wheels on the car. This
maximum speed must not be exceeded be-
cause of altered driving characteristics and for
reasons of wear.
fDo not use a spare wheel from a different vehi-
cle type.
fDo not mount the spare wheel from your car on a different vehicle.Removing spare wheel
Warning!
Danger of injury if the spare wheel is re-
moved improperly.
fRemove the spare wheel only when the spare
wheel bracket is locked.
fRemove the spare wheel from the spare wheel
bracket with care. The wheel is very heavy [approx. 77 lbs. (35 kg)].
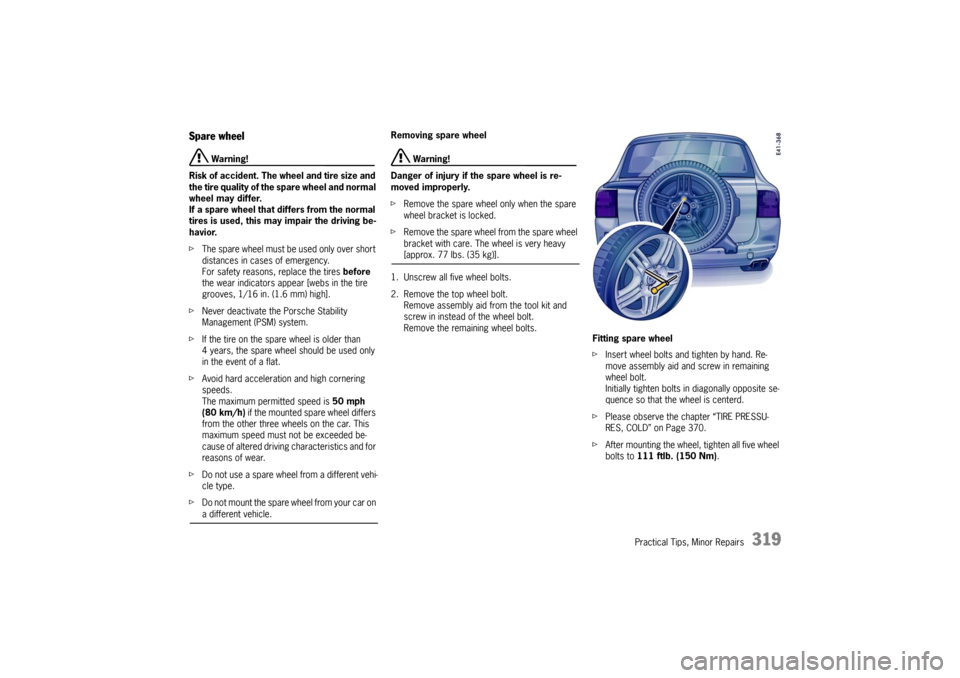
1. Unscrew all five wheel bolts.
2. Remove the top wheel bolt.
Remove assembly aid from the tool kit and
screw in instead of the wheel bolt.
Remove the remaining wheel bolts.
Fitting spare wheel
fInsert wheel bolts and tighten by hand. Re-
move assembly aid and screw in remaining
wheel bolt.
Initially tighten bolts in diagonally opposite se-
quence so that the wheel is centerd.
fPlease observe the chapter “TIRE PRESSU-
RES, COLD” on Page 370.
fAfter mounting the wheel, tighten all five wheel
bolts to 111 ftlb. (150 Nm).
Page 320 of 387
320
Practical Tips, Minor Repairs
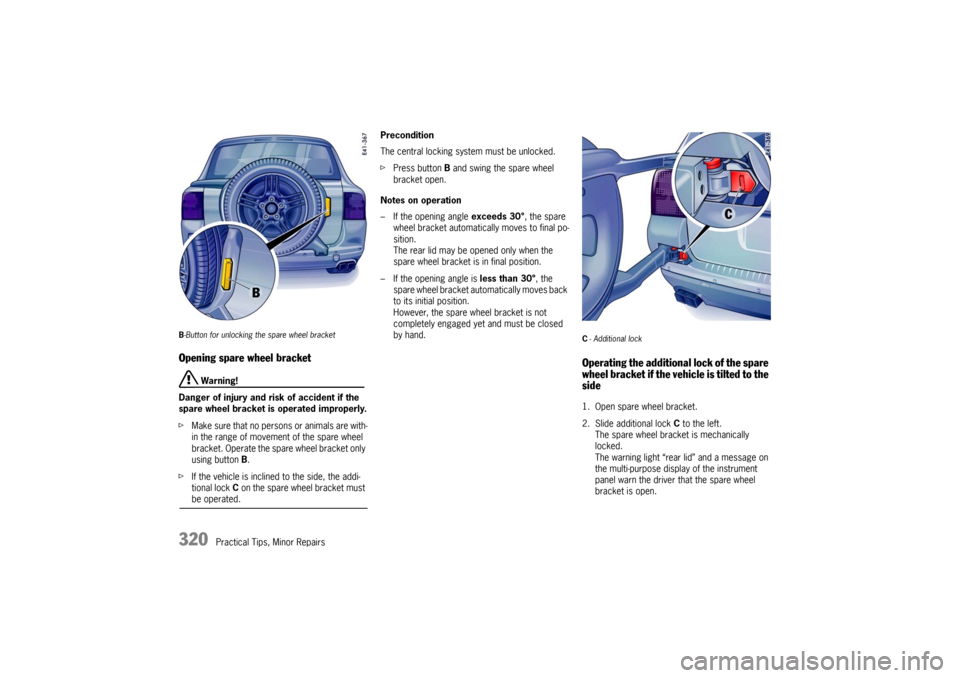
B-Button for unlocking the spare wheel bracketOpening spare wheel bracket
Warning!
Danger of injury and risk of accident if the
spare wheel bracket is operated improperly.
fMake sure that no persons or animals are with-
in the range of movement of the spare wheel
bracket. Operate the spare wheel bracket only
using button B.
fIf the vehicle is inclined to the side, the addi-
tional lock C on the spare wheel bracket must be operated.Precondition
The central locking system must be unlocked.
fPress button B and swing the spare wheel
bracket open.
Notes on operation
– If the opening angle exceeds 30°, the spare
wheel bracket automatically moves to final po-
sition.
The rear lid may be opened only when the
spare wheel bracket is in final position.
– If the opening angle is less than 30°, the
spare wheel bracket automatically moves back
to its initial position.
However, the spare wheel bracket is not
completely engaged yet and must be closed
by hand.
C- Additional lock Operating the additional lock of the spare
wheel bracket if the vehicle is tilted to the
side1. Open spare wheel bracket.
2. Slide additional lock C to the left.
The spare wheel bracket is mechanically
locked.
The warning light “rear lid” and a message on
the multi-purpose display of the instrument
panel warn the driver that the spare wheel
bracket is open.
Page 321 of 387
Practical Tips, Minor Repairs
321
Closing spare wheel bracket
Warning!
Danger of injury and risk of accident if the
spare wheel bracket is operated improperly.
fOperate the spare wheel bracket only using
button B.
fIf the vehicle is tilted to the side, more effort
will be required to swing the spare wheel
bracket.
fMake sure that no persons or animals are with-
in the range of movement of the spare wheel bracket.
1. Check whether additional lock C is engaged. If
necessary, slide additional lock C to the right.
2. Swing spare wheel bracket closed with force.
3. Check lock and observe indication on the multi-
purpose display of the instrument panel.
The indicator light must go out when the spare
wheel bracket is locked.
Automatic locking
In the multi-purpose display of the instrument pan-
el, you can set different variants of locking and un-
locking the doors and the rear lid as well as the
check-back signal when locking and unlocking the
vehicle and save them on the respective remote
control.
fPlease observe the chapter “TAILGATE” on
Page 117.
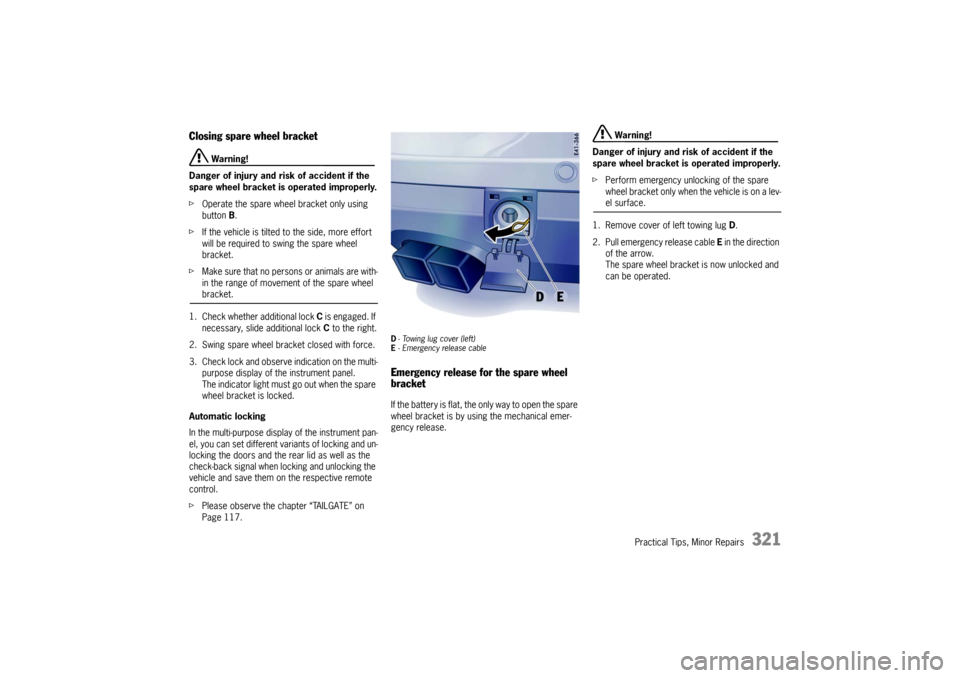
D- Towing lug cover (left)
E- Emergency release cableEmergency release for the spare wheel
bracketIf the battery is flat, the only way to open the spare
wheel bracket is by using the mechanical emer-
gency release.
Warning!
Danger of injury and risk of accident if the
spare wheel bracket is operated improperly.
fPerform emergency unlocking of the spare
wheel bracket only when the vehicle is on a lev-el surface.
1. Remove cover of left towing lug D.
2. Pull emergency release cable E in the direction
of the arrow.
The spare wheel bracket is now unlocked and
can be operated.