PORSCHE PANAMERA 2009 1.G Information Manual
Manufacturer: PORSCHE, Model Year: 2009, Model line: PANAMERA, Model: PORSCHE PANAMERA 2009 1.GPages: 343, PDF Size: 7.96 MB
Page 31 of 343
Opening and Locking
29
Close the tailgate automatically and lock
with Porsche Entry & Drive.
fPress the button B in the trim panel on the
tailgate.
The tailgate is closed and the vehicle is locked.
In order to close and then lock the tailgate on the
vehicle automatically, the key must be located:
– in the rear area and
– outside the vehicle.
A warning message appears on the multi-function
display in the instrument panel if these conditions
have not been met.
For information on warning messages on
the multi-function display:
f Please see the chapter “OVERVIEW OF
WARNING MESSAGES” on page 152.
Warning!
Risk of being locked out of vehicles with
Porsche Entry & Drive.
f Do not leave the key in the vehicle.
If locking button B is pressed after the tailgate
has closed, the vehicle is locked automatically.
If the key is left in th e vehicle, the emergency
flasher flashes once and a horn signal sounds.
Within approximately 30 seconds, the tailgate
can be opened again.
After 30 seconds have elapsed, the
vehicle can be unlocked again only with the second key. Interrupting the opening/closing operation in
the event of danger
The opening or closing op
eration is interrupted
immediately after:
f Pressing button on the key
or
Releasing button in the driver’s door
or
Briefly pressing button A or B in the trim panel
on the tailgate
or
Briefly pressing the release button on the
tailgate.
Automatic operation can be continued again at
any time. To do this, press the corresponding
button.
Caution!
Risk of damage to the tailgate caused by
striking garage roofs or roof transport
systems. If the luggage compartment cover
is not attached to the tailgate, the tailgate
continues to move slowly upwards beyond
the automatic stop.
f Only use the powerlift tailgate with the luggage compartment cover attached. Detection of obstacles during opening
The tailgate will stop movi
ng if opening is blocked
by an obstacle. A warning signal then sounds.
The opening operation can continue once the
obstacle is removed and after:
f Pressing button on the key
or
Pressing button in the driver’s door
or
Pressing the release button on the tailgate.
Page 32 of 343

30
Opening and Locking
Detection of obstacles during closing Warning!
Danger of crushing.
f Despite the presence of this detection system,
you are still responsible for keeping yourself
and others entirely out of the way of the door as it is closing.
The closing operation is interrupted if closing
of the tailgate is blocked by an obstacle.
A warning signal sounds and the tailgate opens
again.
When the obstacle has been removed, the tailgate
can be closed by pressing the button in the
tailgate trim panel.
Automatic stop in the event of unintentional
tailgate movement
If the tailgate is moved too abruptly or lowers
unaided immediately after opening, e.g. due to
the weight of snow, an electrical mechanism
brakes the tailgate and a series of brief warning
signals sounds until the tailgate stops moving.
f Bring the tailgate to rest for approx. 1 second.
The braking function is deactivated. Adjusting the opening height of the tailgate
The opening height of the tailgate can be
individually adjusted so
that the tailgate does not
collide with the garage ceiling, for example.
On vehicles with level control, the vehicle height
changes according to the level control setting.
f Always adjust the opening height with the
vehicle at the highest level setting so that the
tailgate cannot accidentally collide with the
garage ceiling, for example.
Caution!
Risk of damage to the tailgate. If the luggage
compartment cover is not attached to the
tailgate, the tailgate continues to move
slowly upwards beyond the automatic stop.
f Only use the powerlift tailgate with the luggage compartment cover attached.
1. Stand behind the vehicl e and open the tailgate.
2. Press button on the key to stop the automatic opening operation at around 2/3
of the opening height.
3. Now move the tailgate up by hand until the desired opening height is reached. Make sure
that there is a sufficient minimum clearance
from any obstacle. 4. Press the button
A in the trim panel on the
tailgate for approximately 3 seconds.
An acknowledgement signal sounds.
The opening height of the tailgate has now
been programmed.
The tailgate can now be closed by briefly
pressing the button.
This setting cannot be deleted. If a different
setting is required, repeat steps 1 to 4.
Malfunctions of the tailgate drive
The automatic function is not active if the battery
voltage is too low.
If a button is pressed, th e tailgate lock is unlocked
and three brief warning sign als sound. The tailgate
can now be opened by hand.
f Charge the vehicle battery.
Emergency operation of tailgate
If the automatic opening or closing operation is
interrupted by a fault:
f Slowly open or close the tailgate by hand.
Overload protection
If overloading of the tailgate drive is detected,
three brief warning signals sound.
The tailgate cannot be operated automatically
for approx. 30 seconds.
Page 33 of 343
Opening and Locking
31
Opening and Locking From InsideThe factory settings of the vehicle are described
in this section.
In the multi-function display in the instrument
panel, you can change the settings and store
them on the respective key for vehicles with
comfort memory.
For information on modifying the opening and
locking settings:
fPlease see the chapter “LOCKING SETTINGS”
on page 145.
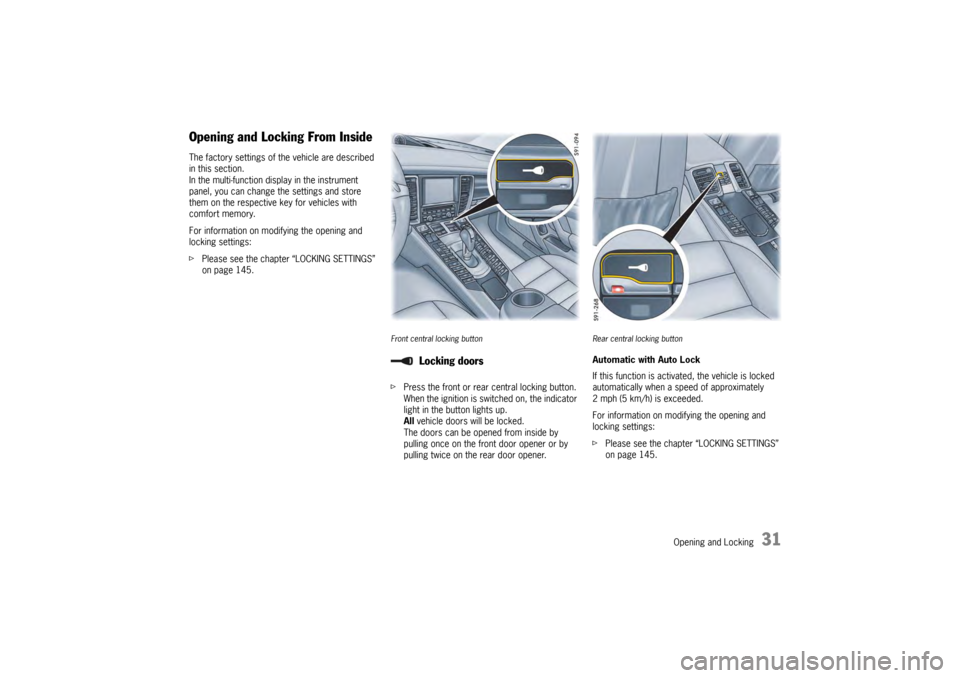
Front central locking buttonfPress the front or rear central locking button.
When the ignition is switched on, the indicator
light in the button lights up.
All vehicle doors will be locked.
The doors can be opened from inside by
pulling once on the front door opener or by
pulling twice on the rear door opener.
Rear central locking buttonAutomatic with Auto Lock
If this function is activate d, the vehicle is locked
automatically when a speed of approximately
2 mph (5 km/h) is exceeded.
For information on modifying the opening and
locking settings:
f Please see the chapter “LOCKING SETTINGS”
on page 145.
Locking doors
Page 34 of 343

32
Opening and Locking
f
Press the front or rear central locking button.
The indicator light on the button goes out.
All vehicle doors will be unlocked.
Automatic with Auto Unlock
The vehicle is automatically unlocked when the
ignition key is removed.
Note on operation
If the vehicle was locked by remote control or with
the key, it cannot be unlocked with the central
locking button.
Opening doorsOpening unlocked doors
f Pull door opener ( arrow) once.
Opening locked doors
f Pull once on the front door opener ( arrow) or
twice on the rear door opener.
Securing rear doorsYou can prevent passenge rs from accidentally
pulling the door opener and opening the rear
doors from inside.
Unlocking doors
Page 35 of 343
Opening and Locking
33
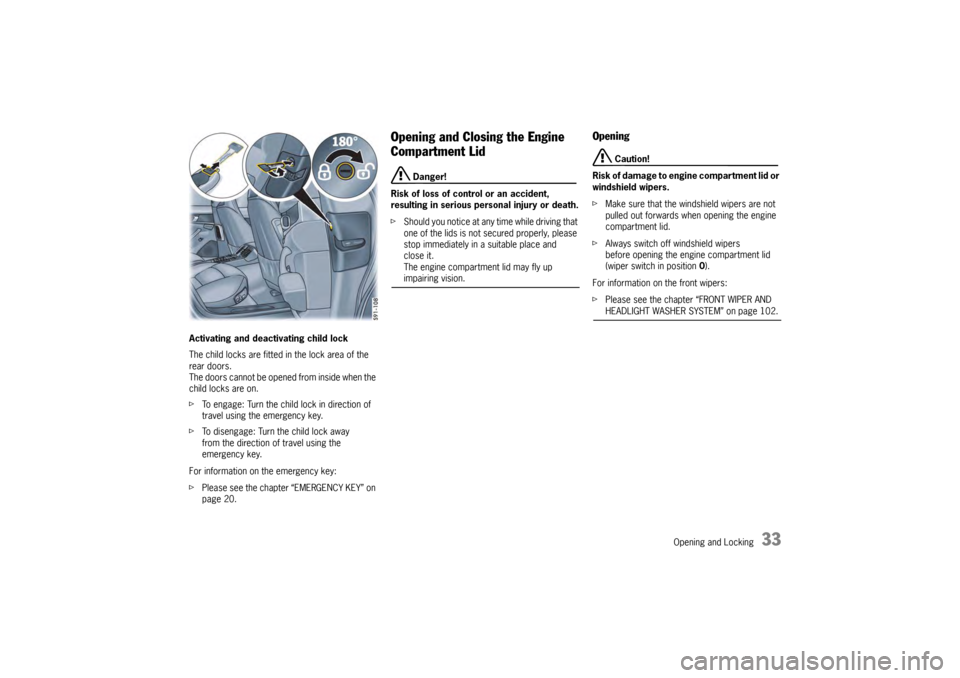
Activating and deactivating child lock
The child locks are fitted in the lock area of the
rear doors.
The doors cannot be opened from inside when the
child locks are on.
fTo engage: Turn the child lock in direction of
travel using the emergency key.
f To disengage: Turn the child lock away
from the direction of travel using the
emergency key.
For information on the emergency key:
f Please see the chapter “EMERGENCY KEY” on
page 20.
Opening and Closing the Engine
Compartment Lid
Danger!
Risk of loss of control or an accident,
resulting in serious personal injury or death.
f Should you notice at any time while driving that
one of the lids is not secured properly, please
stop immediately in a suitable place and
close it.
The engine compartment lid may fly up impairing vision.
Opening
Caution!
Risk of damage to engine compartment lid or
windshield wipers.
f Make sure that the windshield wipers are not
pulled out forwards when opening the engine
compartment lid.
f Always switch off windshield wipers
before opening the engine compartment lid
(wiper switch in position 0).
For information on the front wipers:
f Please see the chapter “FRONT WIPER AND HEADLIGHT WASHER SYSTEM” on page 102.
Page 36 of 343

34
Opening and Locking
1. Open the driver’s door.
2. Pull the release lever (
arrow).
The engine compartment lid is now unlocked. 3. Pull the unlocking handle (
arrow).
4. Open the engine compartment fully.
Closing1. Lower lid and let it fa ll into the lock. If
necessary, push the lid closed with the palm
of your hand in the area of the lock.
2. Check that the lid is en gaged correctly in the
lock and that the release lever is back in its
initial position.
When the vehicle is in motion, a message will
appear on the multi-function display in the
instrument panel if the lid is not closed properly.
Page 37 of 343

Opening and Locking
35
Malfunctions When Opening and
ClosingEmergency operation of tailgateIf the tailgate cannot be opened with the radio
remote control (e.g. if th e battery of the remote
control is dead), the emergency operation must
be performed:
1. Unlock and open the driver’s door with the car key.
2. Switch on the ignition within 10 seconds to prevent the alarm system from
triggering.
3. Press the central locking button on the front or rear center console.
The tailgate is now unlocked and can be
opened with the unlocking handle.
Only one door is unlockedOn the multi-function di splay in the instrument
panel, you can set different variants for locking
and unlocking the doors and tailgate. You can
open all doors irrespective of the setting made.
f Press button on the key twice within
2seconds.The vehicle cannot be unlockedThe remote control of the key may
– not function correctly due to radio waves (also
radio contact between remote control and
vehicle in the case of Porsche Entry & Drive),
– fail due to a fault,
– fail due to a flat key battery.
f Unlock the vehicle using the emergency key
in the door lock.
If the vehicle was unlocked using the
emergency key in the door lock, only the
driver’s door can be opened.
In order to prevent the alarm system from
being triggered, switch the ignition on
within 10 seconds of opening the door .
The vehicle cannot be lockedThis is recognizable by the fact that the
emergency flasher does not flash and there is no
locking noise.
The remote control of the key may
– not function correctly due to radio waves (also radio contact between remote control
and vehicle in the case of Porsche Entry &
Drive),
– fail due to a fault,
– fail due to a flat key battery.
f Lock the vehicle usin g the emergency key
in the door lock.
If the central locking system is defective,
operating the lock cylinder in the driver’s door will
lock all functioning lockin g elements of the central
locking system.
For information on lockin g the doors by means of
the emergency operation:
f Please see the chapter “NOT ALL VEHICLE
DOORS ARE LOCKED” on page 36.
f Have faults in the central locking system
repaired.
Please contact a qualified specialist workshop.
We recommend that you have an authorized
Porsche dealer to do this work as they have
trained workshop personnel and the necessary
parts and tools.
Page 38 of 343
36
Opening and Locking
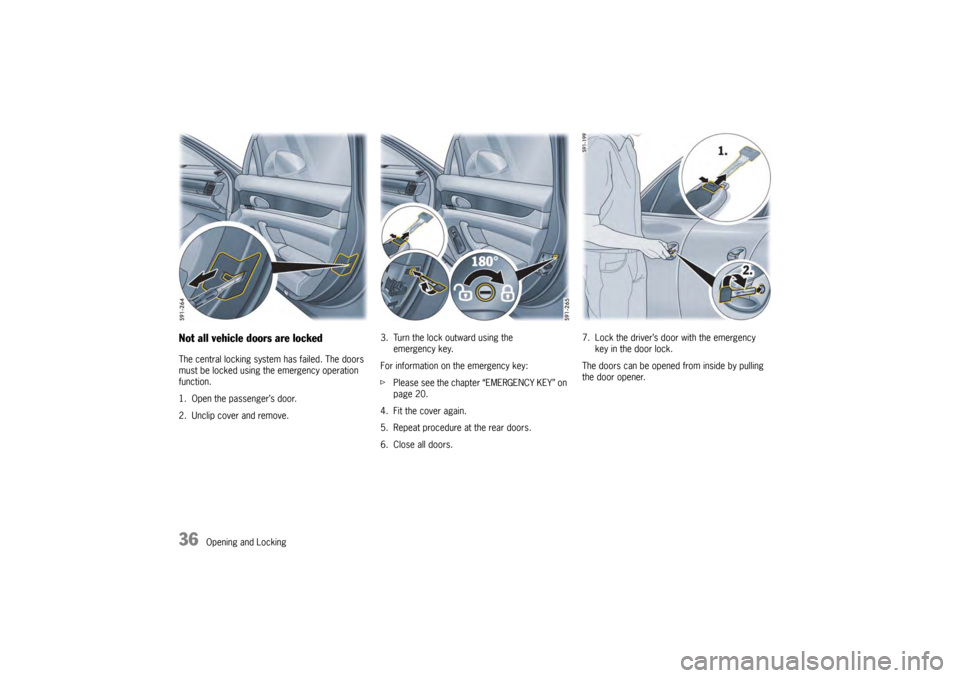
Not all vehicle doors are locked The central locking system has failed. The doors
must be locked using the emergency operation
function.
1. Open the passenger’s door.
2. Unclip cover and remove.3. Turn the lock outward using the
emergency key.
For information on the emergency key:
f Please see the chapter “EMERGENCY KEY” on
page 20.
4. Fit the cover again.
5. Repeat procedure at the rear doors.
6. Close all doors. 7. Lock the driver’s door with the emergency
key in the door lock.
The doors can be opened from inside by pulling
the door opener.
Page 39 of 343
Seats, Mirrors and Steering Wheel
37
Seats, Mirrors and Steering Wheel
Seat Adjustment and Head Restraints ............ 38
Adjusting Front Seats
................................... 39
Storing Vehicle Setting s ................................ 40
Easy Entry Function . ..................................... 42
Adjusting Rear Seats .................................... 42
Adjusting Passenger Seat From Rear ............. 43
Front and Rear Heated Seats ........................ 43
Front and Rear Seat Ve ntilation ..................... 44
Safety Belts ............ ..................................... 44
Air bag Systems...... ..................................... 47
Child Restraint System s ................................ 52
LATCH Child Seat Syst em ............................. 56
Exterior Mirrors....... ..................................... 58
Steering Wheel........ ..................................... 61
Heated steering whee l .................................. 61
Steering Wheel Adjustment ........... ................ 62
Multi-Function Steering Wheel ........................ 63
Sun Visors ................... ................................ 64
Vanity Mirror ........... ..................................... 64
Roll-Up Sunblinds, Rear Side Windows ............ 65
Roll-Up Sunblind, Rear Window ...................... 66
Page 40 of 343

38
Seats, Mirrors and Steering Wheel
Seat Adjustment and Head
Restraints
Danger!
The seat may move unexpectedly if you
attempt to adjust while driving. This could
cause sudden loss of control, resulting in
serious personal injury or death.
f Do not adjust seats while the vehicle is in mo-
tion.The backrest locks must be engaged at all
times while the vehicle is in motion.
Safety belts only offer protection when the
backrest is upright and the belts are properly
positioned on the body.
Improperly positioned sa fety belts or safety
belts worn by passengers in an excessively
reclined position can cause serious personal
injury or death in an accident.
f Do not operate the car with the driver or
passenger backrests excessively reclined.
f Please see the chapter “SEAT POSITION” on
page 38.
Danger of injury if pe rsons or animals are in
the movement range of the seat during seat
adjustment.
f Adjust the seat so that no-one is put at risk.
f Do not activate the comf ort memory button if
there is any risk of the seat crushing the
occupant. f
Cancel automatic adjustment by pressing any
of the seat adjustment buttons.
f Do not leave children in the vehicle unattended,
since they may depress the comfort setting
button and crush themselves or another
occupant. Caution!
Risk of damage to wi ndshield, sun visor,
windstop, etc. when the seat is adjusted or
folded back or forward.
f Adjust the seat so that the s e a t b a c k re s t i s n o t in contact with any other object.
The driver, front, and back passenger seats
provide integrated head restraints in the
backrests. The head restraints are not adjustable. Warning!
All occupants, including the driver, should not
operate a vehicle or sit in a vehicle’s seat until the
head restraints and backrests, respectively, are
placed in their proper posi tions so that the risk of
neck injuries is minimize d in the event of a crash.
For a proper positioning of the head restraint, the
seatback’s inclination should be adjusted such
that the head restraint is in an upright position.
Driver and passengers should be seated upright
and in the center of their seats.
Seat positionAn ergonomically correct sitting position is
important for safe and fatigue-free driving. We
recommend the following procedure for adjusting
the driver’s seat to suit individual requirements:
1. Adjust the seat until, with your left foot on the footrest, your left leg remains at a slight angle.
2. Rest your outstretched arm on the steering wheel. Set the backrest angle and the steering-
wheel position so that your wrist rests on the
outer rim of the steering wheel. At the same
time, the shoulders must still be in noticeable
contact with the backrest.
3. Adjust the seat height to give yourself enough headroom and a good overview of the vehicle.
4. Electrically adjustable seat: Adjust the seat angle until your thighs rest
lightly on the seat cushion.