change time PORSCHE PANAMERA 2009 1.G Information Manual
[x] Cancel search | Manufacturer: PORSCHE, Model Year: 2009, Model line: PANAMERA, Model: PORSCHE PANAMERA 2009 1.GPages: 343, PDF Size: 7.96 MB
Page 4 of 343

2Throughout this booklet, left is designated as the
driver's side of the vehicle, and right as the
passenger's side of the vehicle.
Text, illustrations and specifications in this manual
are based on the information available at the time
of printing.
It has always been Porsche’s policy to continu-
ously improve its products. Porsche, therefore,
reserves the right to make changes in design and
specification, and to make additions or improve-
ments in its product wi thout incurring any obliga-
tion to install them on products previously manu-
factured.
We wish you many miles of safe and pleasurable
driving in your Porsche.
Important!
For your own protection and longer service life of
your car, please heed all operating instructions
and special warnings. These special warnings use
the safety alert symbol, followed by the words
Danger, Warning and Caution . These special
warnings contain important messages regarding
your safety and/or the potential for damage to
your Porsche. Ignoring them could result in
serious mechanical failure, serious personal injury
or death. f
Do not alter your Porsche. Any alteration could
create dangerous conditions or defeat safety
engineering features built into your car.
f Do not misuse your Porsche. Use it safely, and
consistently with the law, according to the
driving conditions, and the instructions in this
manual.
Alteration or misuse of your Porsche could
cause accidents and seri ous personal injury
or death.
Note to ownersIn Canada, this manual is also available in French.
To obtain a copy contact your dealer or write to:Note aux proprietairesAu Canada on peut se procurer un exemplaire de
ce Manuel en français auprès du concessionaire
ou du:
Porsche Cars Canada, Ltd.
Automobiles Porsche Canada, LTEE
5925 Airport Road
Suite 420
Mississauga, Ontario
Canada, L4V 1W1
Telephone number for customer assistance:
1-800-PORSCHE / Option 3
Setting and operating vehicle compon-
ents when driving
Warning!
There is a danger of accident if you set or
operate the on-board computer, radio,
navigation system, telep hone or other equip-
ment when driving.
This could distract you from the traffic and
cause you to lose control of the vehicle
resulting in serious personal injury or death.
f Operate the components while driving only if
the traffic situation allows you to do so safely.
f Carry out any complicated operating or setting procedures only with the vehicle stationary.
Engine Exhaust
Danger!
Engine exhaust is dangerous if inhaled.
Engine exhaust fumes have many compo-
nents which you can smell. They also contain
carbon monoxide (CO), which is a colorless
and odorless gas.
Carbon monoxide can cause unconscious-
ness and even death if inhaled.
f Never start or let the engine run in an en-
closed, unventilated area.
It is not recommended to sit in your car for
prolonged periods with the engine on and the car not moving.
Page 95 of 343

Lights, Turn Signals and Windshield Wipers
93
Note
In the event of a fault in the automatic driving light
assistant/adaptive light system, the warning light
for the adaptive light system lights up in the
instrument panel and a warning message appears
on the multi-function display in the instrument
panel.
For information on indicator lights and warning
lights on the instrument panel:
f Please see the chapter “INSTRUMENT PANEL
USA MODELS” on page 107.
For information on warning messages on the
multi-function display:
f Please see the chapter “OVERVIEW OF
WARNING MESSAGES” on page 152.
Low beam/driving lightIf the light switch is set to the position , the
low beam is switched on automatically in the
following situations:
–Dusk
– Darkness
– Driving through tunnels
–Rain
– Highway driving (daytime driving lights
deactivated)
When the low beam is switched on, the indicator
light on the speedometer lights up.
Note on operation
Fog is not recognized.
f In the event of fog, the headlights must
be switched on manually.
Highway function in daylight
The low beam is switched on automatically at
vehicle speeds of more than approx. 90 mph
(140 km/h) in daylight conditions and when
daytime driving lights are deactivated.
If the vehicle is travelling at speeds of less than
approx. 40 mph (65 km/h), the low beam
switches off after a delay of approx. 4 minutes,
if the external lighting conditions permit. Highway function in darkness
The distribution characteristics of the low beam
change if the vehicle is travelling at speeds of
more than approx. 80 mph (130 km/h) in
darkness.
The light beam becomes longer and the field of
vision increases.
Rain function
The low beam is switched on automatically after
five seconds of continuous wiper operation.
If the wipers have not been used for approx.
4 minutes, the low beam is switched off.
Page 96 of 343

94
Lights, Turn Signals and Windshield Wipers
Automatic headlight levellingWhen the ignition and low beam are switched on,
the level of the headlight beam automatically
changes in accordance with the vehicle load.
The level of the headlight beam is automatically
kept constant during acceleration and braking.
Note on operation
Automatic headlight levellin g is also available
when the light switch is set to the position
(low beam/driving light).
Daytime driving lightsIf the light switch is in po sition (light switched
off), the daytime driving lights are switched on
automatically when the ignition is switched on.
If the light switch is in position , the daytime
driving lights are switched on automatically during
daylight when the ignition is switched on.
If the light switch is in position (low beam/
driving light), the daytime driving lights are not
active.
You can switch the daytime driving lights on and
off on the multi-function display in the instrument
panel (not available in Canada).
Regulations for switching daytime driving lights on
and off vary according to the legal requirements in
each country.
For information on setting the daytime driving
lights:
f Please see the chapter “ACTIVATING AND
DEACTIVATING AUTOMATIC DAYTIME DRIVING
LIGHTS” on page 142.
Static cornering lightThe static cornering light switches on if the
steering wheel is turned sharply.
Note on operation
The static cornering light is also available when
the light switch is set to the position (driving
light/low beam).Dynamic cornering lightAt speeds greater than 5 mph (8 km/h), the low
beam light is swivelled in the direction of the curve
to illuminate the road more clearly, depending on
the speed of the vehicle and the extent to which
the steering wheel is turned.
In the event of a fault in the dynamic cornering
light, the warning light for the adaptive light
system flashes in the instrument panel and
a warning message appears on the multi-function
display in the instrument panel.
For information on indicator lights and warning
lights on the instrument panel:
fPlease see the chapter “INSTRUMENT PANEL
USA MODELS” on page 107.
For information on warning messages on the
multi-function display:
f Please see the chapter “OVERVIEW OF
WARNING MESSAGES” on page 152.
Page 136 of 343

134
Instrument Panel and Multi-Function Display
If necessary, fill in ti
re sealant and set the
correct tire pressure.
This tire pressure warning also appears when
driving and can be acknowledged.
The tire pressure warning light on the instrument
panel goes out only when the tire pressure has
been corrected.
System learningTire Pressure Monitoring begins to “learn” the
wheels after a wheel change, wheel transmitter
replacement or update of the tire settings . During
this process, Tire Pressu re Monitoring recognizes
the wheels and their locations.
The following message appears on the multi-
function display (example):
“No monitoring, system is learning”.
The wheel learning process takes place
exclusively when the vehicle is being driven
(vehicle speed above 16 mph (25 km/h)).
Tire Pressure Monitoring requires a certain
amount of time to learn the wheels. During this
time, the current tire pressures are not available
on the multi-function display:
– The tire pressure warning light remains lit until all wheels have been learned.
– Lines (-.-) appear on the display of the “Tire pressure” function. – The required pressures for cold tires (68 °F
(20 °C)) are indicated under “Fill info” in the tire
pressure menu.
Position and pressure information is displayed as
soon as Tire Pressure Monitoring has assigned
the wheels recognized as belonging to the vehicle
to the correct wheel positions.
f Check the tire pressure for all wheels under
“Fill info ”.
f Correct the tire pressure to the required
pressure if necessary.
Changing a wheel and replacing tiresfNew wheels must be fitted with radio
transmitters for Tire Pressure Monitoring.
Before tires are changed, the battery charge
condition of the wheel transmitters should be
checked.
Please contact a qualified specialist workshop.
We recommend that you have an authorized
Porsche dealer to do this work as they have
trained workshop personnel and the necessary
parts and tools.
f Switch off the ignition when changing a wheel.
The tire settings on the mu lti-function display must
be updated after changing a wheel.
If the tire settings are not updated, the message
“Tire change? Update settings!” is displayed on the
multi-function display.
f Update the multi-function display settings the
next time the vehicle is stationary.
Pressure increase as the result of
temperature increaseIn accordance with physical principles, the tire
pressure changes as the temperature
changes.The tire pressure increases or decreases
by 0.1 bar (1.5 psi) for
every 18 °F (10 °C) change in temperature.Partial monitoringMonitoring of the other wheels is continued if there
is a fault in one or two wheel transmitters.
– The tire pressure warning light lights up.
– The message “Restricted monitoring” appears
on the multi-function display.
– No tire pressures are displayed on the multi-function display for wheels with faulty
wheel transmitters.
Page 137 of 343

Instrument Panel and Multi-Function Display
135
No monitoringIn the event of faults, Tire Pressure Monitoring
cannot monitor the tire pressure.
The warning light on the instrument panel lights up
and a corresponding message appears on the
multi-function display.
Monitoring is not active:
– if Tire Pressure Monitoring is faulty,
– if wheel transmitters for Tire Pressure Monitoring are missing,
– during the learning phase after the tire settings have been updated,
– after a wheel change without updating the tire settings,
– if more than four wheel transmitters are recognized,
– if there is external interference by other radio sources, e.g. wireless headphones,
– if tire temperatures are too high.
f Please see the chapter “OVERVIEW OF
WARNING MESSAGES” on page 152.
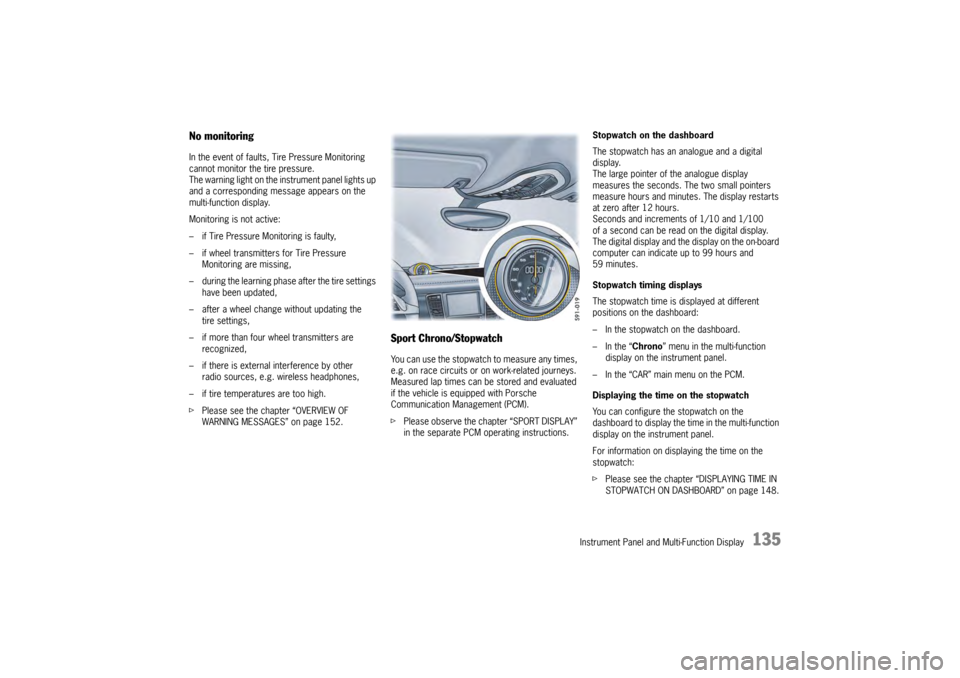
Sport Chrono/StopwatchYou can use the stopwatch to measure any times,
e.g. on race circuits or on work-related journeys.
Measured lap times can be stored and evaluated
if the vehicle is equipped with Porsche
Communication Management (PCM).
fPlease observe the chapter “SPORT DISPLAY”
in the separate PCM operating instructions. Stopwatch on the dashboard
The stopwatch has an analogue and a digital
display.
The large pointer of the analogue display
measures the seconds. The two small pointers
measure hours and minutes. The display restarts
at zero after 12 hours.
Seconds and increments of 1/10 and 1/100
of a second can be read on the digital display.
The digital display and the
display on the on-board
computer can indicate up to 99 hours and
59 minutes.
Stopwatch timing displays
The stopwatch time is displayed at different
positions on the dashboard:
– In the stopwatch on the dashboard.
– In the “ Chrono” menu in the multi-function
display on the instrument panel.
– In the “CAR” main menu on the PCM.
Displaying the time on the stopwatch
You can configure the stopwatch on the
dashboard to display the ti me in the multi-function
display on the instrument panel.
For information on displaying the time on the
stopwatch:
f Please see the chapter “DISPLAYING TIME IN
STOPWATCH ON DASHBOARD” on page 148.
Page 140 of 343

138
Instrument Panel and Multi-Function Display
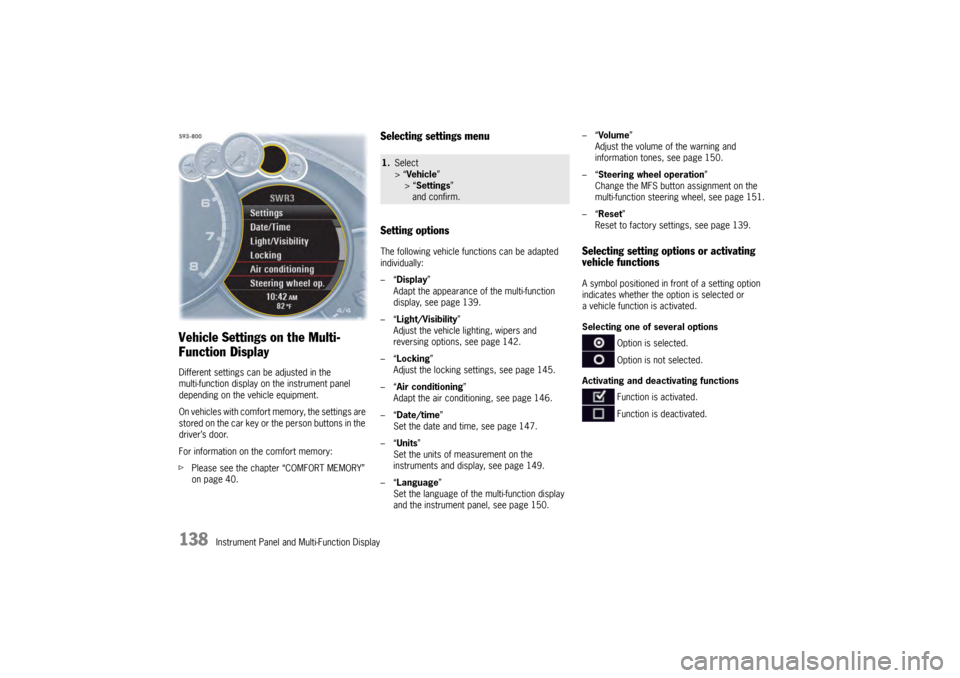
Vehicle Settings on the Multi-
Function DisplayDifferent settings can be adjusted in the
multi-function display on the instrument panel
depending on the vehicle equipment.
On vehicles with comfort memory, the settings are
stored on the car key or the person buttons in the
driver’s door.
For information on the comfort memory:
fPlease see the chapter “COMFORT MEMORY”
on page 40.
Selecting settings menu
Setting optionsThe following vehicle functions can be adapted
individually:
–“ Display ”
Adapt the appearance of the multi-function
display, see page 139.
–“ Light/Visibility ”
Adjust the vehicle lighting, wipers and
reversing options, see page 142.
–“ Locking ”
Adjust the locking settings, see page 145.
–“ Air conditioning ”
Adapt the air conditioning, see page 146.
–“ Date/time ”
Set the date and time, see page 147.
–“ Units ”
Set the units of measurement on the
instruments and display, see page 149.
–“ Language”
Set the language of the multi-function display
and the instrument panel, see page 150. –“
Volume ”
Adjust the volume of the warning and
information tones, see page 150.
–“ Steering wheel operation”
Change the MFS button assignment on the
multi-function steering wheel, see page 151.
–“ Reset ”
Reset to factory settings, see page 139.
Selecting setting options or activating
vehicle functionsA symbol positioned in front of a setting option
indicates whether the option is selected or
a vehicle function is activated.
Selecting one of several options
Option is selected.
Option is not selected.
Activating and deactivating functions Function is activated.
Function is deactivated.
1.Select
> “Vehicle ”
> “ Settings ”
and confirm.
Page 150 of 343

148
Instrument Panel and Multi-Function Display
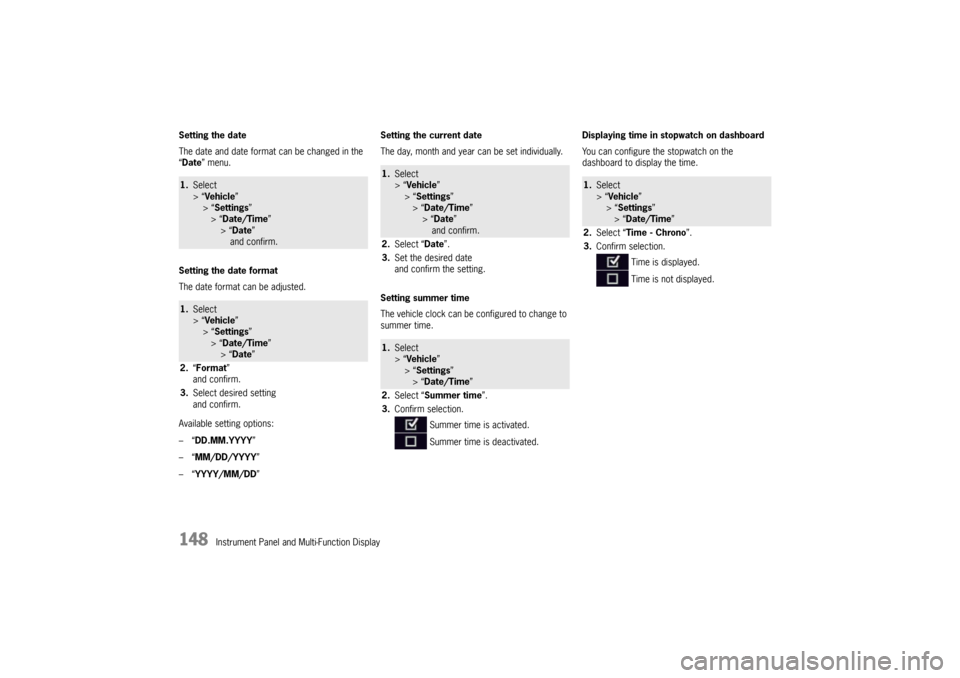
Setting the date
The date and date format
can be changed in the
“ Date ” menu.
Setting the date format
The date format can be adjusted.
Available setting options:
–“ DD.MM.YYYY”
–“ MM/DD/YYYY”
–“ YYYY/MM/DD ” Setting the current date
The day, month and year can be set individually.
Setting summer time
The vehicle clock can be configured to change to
summer time.
Displaying time in
stopwatch on dashboard
You can configure the stopwatch on the
dashboard to display the time.
1. Select
> “Vehicle ”
> “ Settings ”
> “Date/Time ”
> “Date ”
and confirm.1. Select
> “Vehicle ”
> “ Settings ”
> “Date/Time ”
> “Date ”
2. “Format”
and confirm.
3. Select desired setting
and confirm.
1.Select
> “Vehicle ”
> “ Settings ”
> “Date/Time ”
> “ Date ”
and confirm.
2. Select “ Date”.
3. Set the desired date
and confirm the setting.1.Select
> “Vehicle ”
> “ Settings ”
> “Date/Time ”
2. Select “ Summer time ”.
3. Confirm selection.
Summer time is activated.
Summer time is deactivated.
1.Select
> “Vehicle ”
> “Settings ”
> “Date/Time ”
2. Select “Time - Chrono”.
3. Confirm selection.
Time is displayed.
Time is not displayed.
Page 161 of 343

Instrument Panel and Multi-Function Display
159
Fault PDCCVehicle handling may be affected. Adapt your speed to the
changed conditions.
Have the fault corrected at a q ualified specialist workshop.*PDCC failure The lateral inclination of the vehicle is significantly greater when
cornering. Drive carefully at an appropriate speed to the nearest
qualified specialist workshop.*PDCC fault
PSM activated Vehicle handling may be affect
ed. Adapt your speed to the
changed conditions.
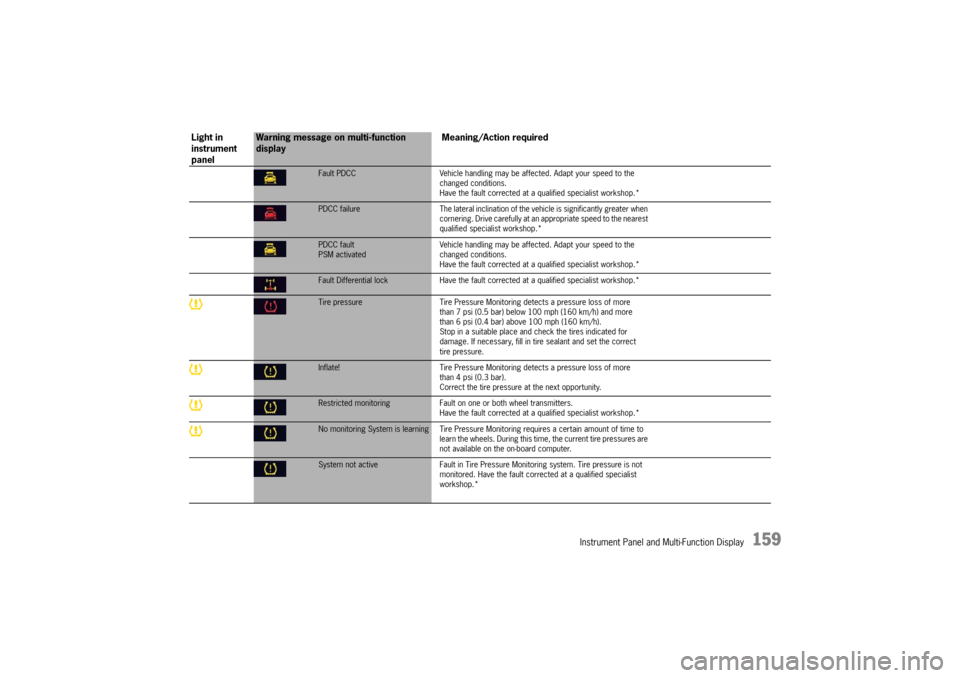
Have the fault corrected at a q ualified specialist workshop.*Fault Differential lock Have the fault corrected at a qualified sp ecialist workshop.*Tire pressure Tire Pressure Monitoring detects a pressure loss of more
than 7 psi (0.5 bar) below 100 mph (160 km/h) and more
than 6 psi (0.4 bar) above 100 mph (160 km/h).
Stop in a suitable place and check the tires indicated for
damage. If necessary, fill in ti re sealant and set the correct
tire pressure.Inflate! Tire Pressure Monitoring detects a pressure loss of more
than 4 psi (0.3 bar).
Correct the tire pressure at the next opportunity.Restricted monitoring Fault on one or both wheel transmitters.
Have the fault corrected at a q ualified specialist workshop.*No monitoring System is learning Tire Pressure Mo nitoring requires a certain amount of time to
learn the wheels. During this time , the current tire pressures are
not available on the on-board computer.System not active Fault in Tire Pressure Monitoring system. Tire pressure is not
monitored. Have the fault corrected at a qualified specialist
workshop.*
Light in
instrument
panel
Warning message on multi-function
display Meaning/Action required
Page 177 of 343

Driving and Driving Safety
175
Warning!
f Do not obstruct the pedal travel with floor mats
or other objects.
The brake booster is ready for operation only
while the engine is running.
If the engine is switched off or there is a defect in
the brake booster, much greater force has to be
applied to the pedal when braking.
f Vehicles with defective brakes must not
be towed and must be transported on a flat
bed.
For information on towing and tow-starting:
f Please see the chapter “TOWING” on
page 316.
In heavy rain, while driving through water or after
leaving a car wash, the braking action may be
delayed and increased pressure may be required.
f For this reason, keep further back from the
vehicle in front and “dry” the brakes by
applying them at interval s. Make sure that the
traffic behind you is not affected. After a long drive over salted or gritted roads,
a coating may form on the brake discs and pads
that significantly reduces
friction and therefore
also braking effect.
f Even though the brake discs consist of alloyed
grey cast iron, they will unavoidably start to
corrode if your vehicle is parked for an
extended period. The brakes will tend to “rub”
as a result.
The nature, extent and effects of corrosion
depend on the amount of time the vehicle was
parked, whether road salt or grit was spread
and whether grease-dissolving agents were
used in car washes (not on vehicles with
Porsche Ceramic Composite Brake).
To prevent corrosion of the brake discs,
“brake them dry” before parking the vehicle
(not on vehicles with Porsche Ceramic
Composite Brake).
If braking comfort is no ticeably impaired, we
recommend that you have the brake system
checked by an authorized Porsche dealer. f
To relieve the brake system on downhill
stretches, change down to a lower gear in
good time (engine braking).
If engine braking is insufficient on steep
stretches, operate the footbrake at intervals.
Avoid continuous braking as it overheats the
brakes and reduces the braking effect.
For information on brake fluid and checking the
brake fluid level:
f Please see the chapter “BRAKE FLUID” on
page 258.
Page 186 of 343

184
Driving and Driving Safety
Possible distance settings
Automatic braking to a stopIf the vehicle in front stops, adaptive cruise control
will slow your vehicle down
to a stop provided this
is possible within the control limits of the system.
The display lights up on the instrument panel.
The vehicle is actively held at a stop.
For information on the HOLD function:
f Please see the chapter “HOLD FUNCTION:
DRIVE-OFF ASSISTANT AND STANDSTILL
MANAGEMENT” on page 206.
Note
Depending on the traffic flow, e.g. slow moving
traffic, stopping is initiated by a slow crawling
phase which ends in vehicle standstill.
Caution!
Brake pedal feels different. When adaptive
cruise control is operating normally or when
the HOLD function is active, the brake pedal
may feel different and you may hear
hydraulic noises.
This behavior is no rmal for the system.
It is not a fault.
Driving off againThe vehicle can be driven off again after being
stopped and speed and distance control will be
resumed, depending on the operating state of the
adaptive cruise control system.
For information on the operating states of the
adaptive cruise control system:
fPlease see the chapter “OPERATING STATES
WHEN ADAPTIVE CRUISE CONTROL IS
SWITCHED ON” on page 182.
Adaptive cruise control active
1. Press the control stalk on the steering wheel up (position 4, RESUME ).
2. Briefly press the accelerator pedal. Your vehicle drives on automatically.
Note
Your vehicle will not drive off if the vehicle
detected in front is stationary.
Adaptive cruise control is ready
Automatic speed and distance control can only
be resumed when your vehicle is moving.
1. Drive off normally.
2. Press the control stalk on the steering wheel up (position 4, RESUME ).
or
Set or change the desired speed.
Suitable for speedy driving in lines of
traffic. The time headway is 1 second.
This corresponds to 36 yd. (33 meters)
at a speed of 75 mph (120 km/h).
Suitable for driving comfortably in lines
of traffic. The time headway is
1.3 seconds. This corresponds to
47 yd. (43 meters) at a speed of
75 mph (120 km/h).
Preset distance
Corresponds to the general
recommendation of the road traffic
safety regulation (“two seconds time
headway”). The time headway is
1.8 seconds. This corresponds to
66 yd. (60 meters) at a speed of
75 mph (120 km/h).
Suitable for driving on country roads.
The time headway is 2.3 seconds.
This corresponds to 63 yd. (58 meters)
at a speed of 56 mph (90 km/h).