interior lights PORSCHE PANAMERA 2010 1.G Owners Manual
[x] Cancel search | Manufacturer: PORSCHE, Model Year: 2010, Model line: PANAMERA, Model: PORSCHE PANAMERA 2010 1.GPages: 343, PDF Size: 7.96 MB
Page 6 of 343

4Dear Porsche Owner,A lot has gone into the manufacture of your
Porsche, including advanced engineering, rigid
quality control and demanding inspections. These
engineering and safety features will be enhanced
by you…the safe driver…– who knows her/his car and all controls,
– who maintains the vehicle properly,
– who uses driving skills wisely and always drives within her/his own capabilities and the
level of familiarity with the vehicle.
You will find helpful hints in this manual on how to
perform most of the checks listed on the following
pages. If in doubt, have these checks performed
by your authorized Porsche dealer.
Before driving off…Check the following items firstf Turn the engine off before you attempt any
checks or repairs on the vehicle.
f Be sure the tires are inflated correctly.
Check tires for damage and tire wear.
f See that wheel bolts are properly tightened
and not loose or missing.
f Check engine oil level, add if necessary. Make
it a habit to have engine oil checked with every
refueling.
f Check all fluid levels such as windshield
washer and brake fluid levels.
f Be sure the vehicle battery is well charged and
cranks the engine properly.
f Check all doors and lids for proper operation
and latch them properly.
f Check and if necessary replace worn or
cracked wiper blades.
f See that all windows are clear and unobst-
ructed.
f Check air intake slots and area between
engine compartment lid and windshield.
Ensure that these areas are free of snow and
ice, so the heater and the windshield wipers
work properly. f
If a child will be riding in the vehicle, check
child seat/child seat restraint system to ensure
that restraints are properly adjusted.
f Check all exterior and interior lights for opera-
tion and that the lenses are clean.
f Check the headlights for proper aim, and if
necessary, have them adjusted.
f Check under the vehicle for leaks.
f Be sure all luggage is stowed securely.
Emergency equipmentIt is good practice to carry emergency equipment
in your vehicle.
Some of the items you should have are: window
scraper, snow brush, container or bag of sand or
salt, emergency light, small shovel, first-aid kit,
etc.
Page 9 of 343
Contents
7
Contents
Overview Illustrations......................... 10Driver’s Cockpit ...............................
............. 11
Steering Wheel and Inst rument Panel .............. 12
Dashboard .......................................... ......... 13
Front Center Console . ................................... 14
Overhead Operating Co nsole ......................... 15
Rear ............................................................ 16Opening and Locking ......................... 17Never invite car theft! . ................................... 18
Notes on the Key and Central Locking
System ......................... .............................. 19
Central Locking System ................................ 20
Brief Overview – Opening and Locking
From Outside................................... ............. 21
Opening and Locking From Outside ................ 22
Opening and Locking From Inside................... 31
Opening and Closing the Engine
Compartment Lid ........ .................................. 33
Malfunctions When Open ing and Closing ......... 35Seats, Mirrors and Steering Wheel ..... 37Seat Adjustment and Head Restraints ............. 38
Adjusting Front Seats . ................................... 39
Storing Vehicle Settin gs ................................ 40
Easy Entry Function .... .................................. 42
Adjusting Rear Seats ..................................... 42
Adjusting Passenger Seat From Rear.............. 43
Front and Rear Heated Seats ......................... 43
Front and Rear Seat Ventilation ...................... 44 Safety Belts..............
.................................... 44
Air bag Systems ....... .................................... 47
Child Restraint System s................................. 52
LATCH Child Seat Syst em.............................. 56
Exterior Mirrors ........ .................................... 58
Steering Wheel ......... .................................... 61
Heated steering whee l ................................... 61
Steering Wheel Adjust ment ............................ 62
Multi-Function Steering Wheel......................... 63
Sun Visors .................... ................................ 64
Vanity Mirror ............. .................................... 64
Roll-Up Sunblinds, Rear Side Windows ............ 65
Roll-Up Sunblind, Rear Window ....................... 66
Air Conditioning .... ............................ 67Brief Overview – Front Control Panel ........ 68
Brief Overview – Rear Control Panel
(4-Zone Air-Conditioning) ................................ 69
Overview of Air Conditioning .......................... 70
General Functions ..... .................................... 71
Automatically Controlled Air Conditioning ........ 76
Air Vents ........................................... ........... 82
Heated Rear Window/Exterior Mirror
Heating ............................................. ........... 84Windows and Slide/Tilt Roof............... 85Power Windows ............................................ 86
Slide/Tilt Roof........... .................................... 88
Lights, Turn Signals and
Windshield Wipers. ............................ 91Automatic Driving Light Assistant/
Adaptive Light System ................................... 92
Instrument lighting ....... ................................. 95
Turn Signal/High Beam/Headlight
Flasher Stalk........... ...................................... 96
Emergency Flasher ...... ................................. 97
Interior Lighting............................ ................. 98
Brief Overview – Windshield Wipers ............ 101
Windshield Wiper/Washer Stalk .................... 102Instrument Panel and
Multi-Function Display ..................... 105Instrument Panel USA Mo dels ...................... 107
Instrument Panel Canada Models.................. 109
Tachometer ..................... ........................... 110
Speedometer .................. ........................... 110
Multi-Function Display .................................. 110
Engine Oil Temperature Gauge ..................... 110
Coolant Temperature Gauge ........................ 110
Engine Oil Pressure Ga uge .......................... 111
Fuel Gauge .................. ............................... 111
Digital Speedometer .... ............................... 112
Upshift Prompt Indicato r .............................. 112
Odometer........................ ........................... 112
Reset Button for Trip Counter Display/
Brightness Setting for In strument Lighting.... 112
PDK Display for Selector-Lever Position/
Engaged Gear ................. ........................... 112
Battery/Alternator ........ ............................... 113
Page 18 of 343
16
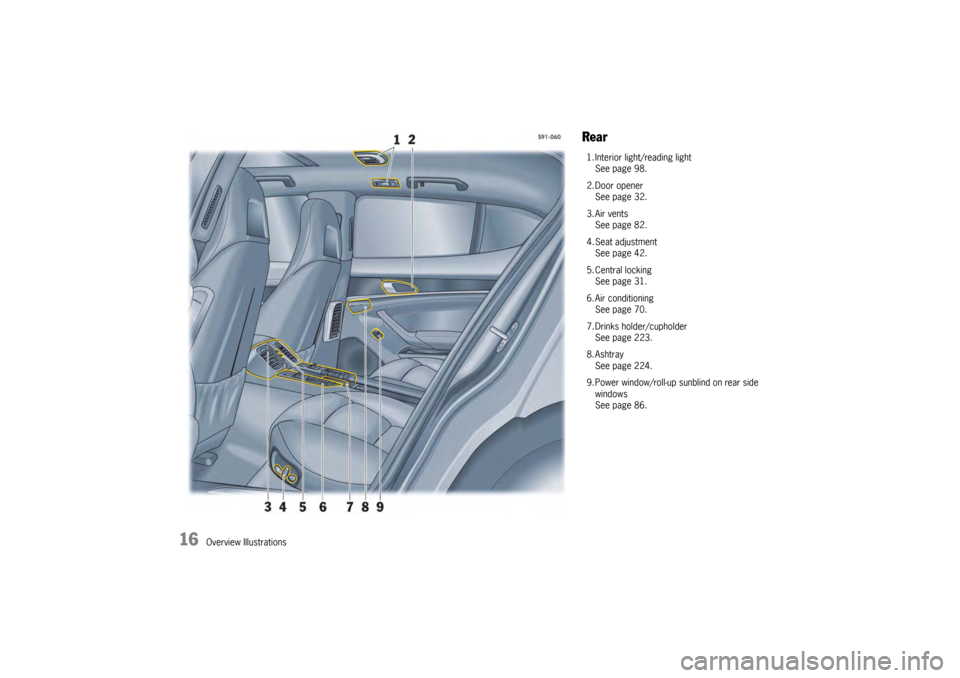
Overview Illustrations
Rear1. Interior light/reading lightSee page 98.
2. Door opener See page 32.
3. Air vents See page 82.
4. Seat adjustment See page 42.
5. Central locking See page 31.
6. Air conditioning See page 70.
7. Drinks holder/cupholder See page 223.
8. Ashtray See page 224.
9. Power window/roll-up sunblind on rear side windows
See page 86.
Page 46 of 343
44
Seats, Mirrors and Steering Wheel
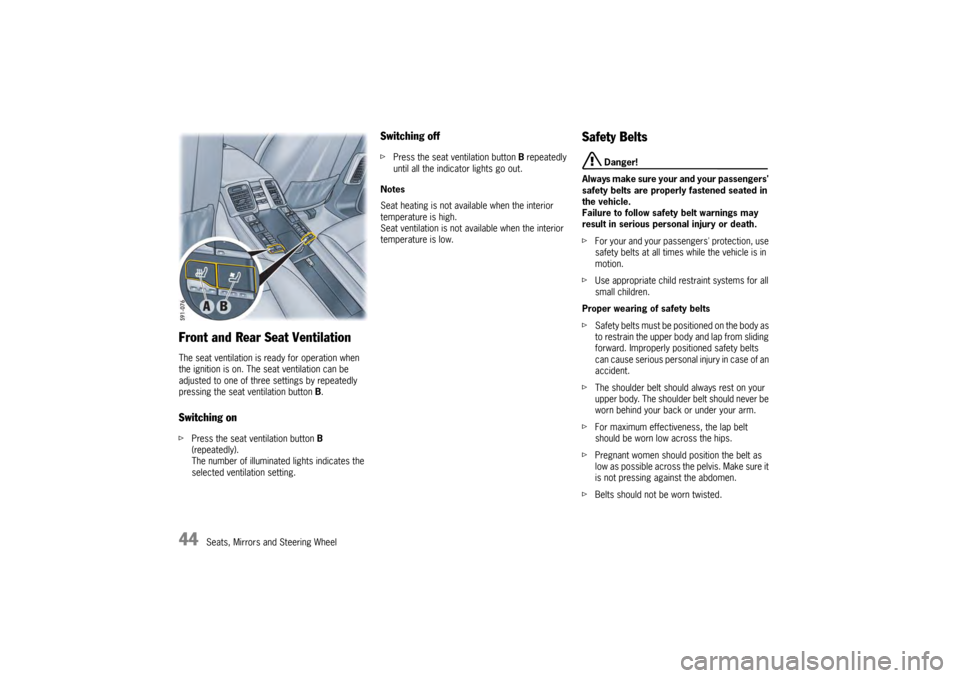
Front and Rear Seat VentilationThe seat ventilation is ready for operation when
the ignition is on. The seat ventilation can be
adjusted to one of three settings by repeatedly
pressing the seat ventilation button B.Switching onfPress the seat ventilation button B
(repeatedly).
The number of illuminated lights indicates the
selected ventilation setting.
Switching offf Press the seat ventilation button B repeatedly
until all the indicator lights go out.
Notes
Seat heating is not available when the interior
temperature is high.
Seat ventilation is not available when the interior
temperature is low.
Safety Belts
Danger!
Always make sure your and your passengers'
safety belts are properly fastened seated in
the vehicle.
Failure to follow safety belt warnings may
result in serious personal injury or death.
f For your and your passe ngers' protection, use
safety belts at all times while the vehicle is in
motion.
f Use appropriate child restraint systems for all
small children.
Proper wearing of safety belts
f S a f e t y b e l t s m u s t b e p o s i t i o n e d o n t h e b o d y a s
to restrain the upper bo dy and lap from sliding
forward. Improperly positioned safety belts
can cause serious personal injury in case of an
accident.
f The shoulder belt should always rest on your
upper body. The shoulder belt should never be
worn behind your back or under your arm.
f For maximum effectiveness, the lap belt
should be worn low across the hips.
f Pregnant women should position the belt as
low as possible across the pelvis. Make sure it
is not pressing against the abdomen.
f Belts should not be worn twisted.
Page 60 of 343
58
Seats, Mirrors and Steering Wheel
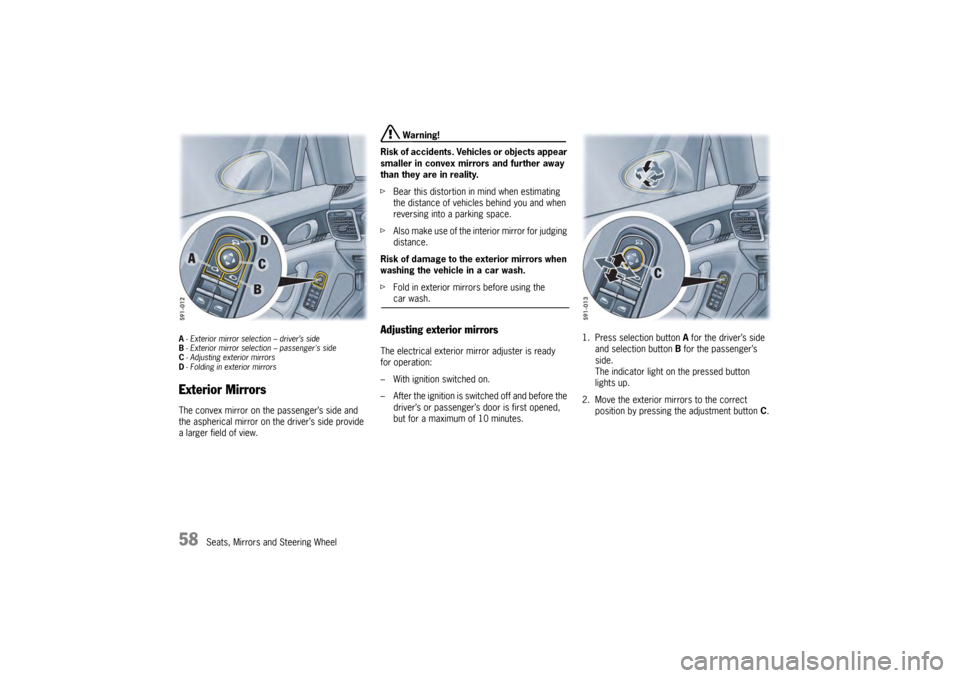
A- Exterior mirror selection – driver’s side
B - Exterior mirror selection – passenger's side
C - Adjusting exterior mirrors
D - Folding in exterior mirrorsExterior MirrorsThe convex mirror on the passenger’s side and
the aspherical mirror on the driver’s side provide
a larger field of view.
Warning!
Risk of accidents. Vehi cles or objects appear
smaller in convex mirrors and further away
than they are in reality.
f Bear this distortion in mind when estimating
the distance of vehicles behind you and when
reversing into a parking space.
f Also make use of the interior mirror for judging
distance.
Risk of damage to the exterior mirrors when
washing the vehicle in a car wash.
f Fold in exterior mirrors before using the car wash.
Adjusting exterior mirrors The electrical exterior mirror adjuster is ready
for operation:
– With ignition switched on.
– After the ignition is switched off and before the
driver’s or passenger’s door is first opened,
but for a maximum of 10 minutes. 1. Press selection button
A for the driver’s side
and selection button B for the passenger’s
side.
The indicator light on the pressed button
lights up.
2. Move the exterior mirrors to the correct position by pressing the adjustment button C.
Page 62 of 343
60
Seats, Mirrors and Steering Wheel
Automatic anti-dazzle exterior mirrorThe exterior mirrors change to anti-dazzle
position automatically in synchronisation with
the interior mirror.
For information on the automatic anti-dazzle
function of the interior mirror:
fPlease see the chapter “AUTOMATIC ANTI-
DAZZLE INTERIOR MIRROR” on page 60.Swivelling down mirror glass as
parking aid When reverse gear is engaged, the mirror on the
passenger’s side swivels down slightly to show
the curb area.
f Please see the chapter “SWIVELLING DOWN
MIRROR GLASS AS PARKING AID” on
page 242.
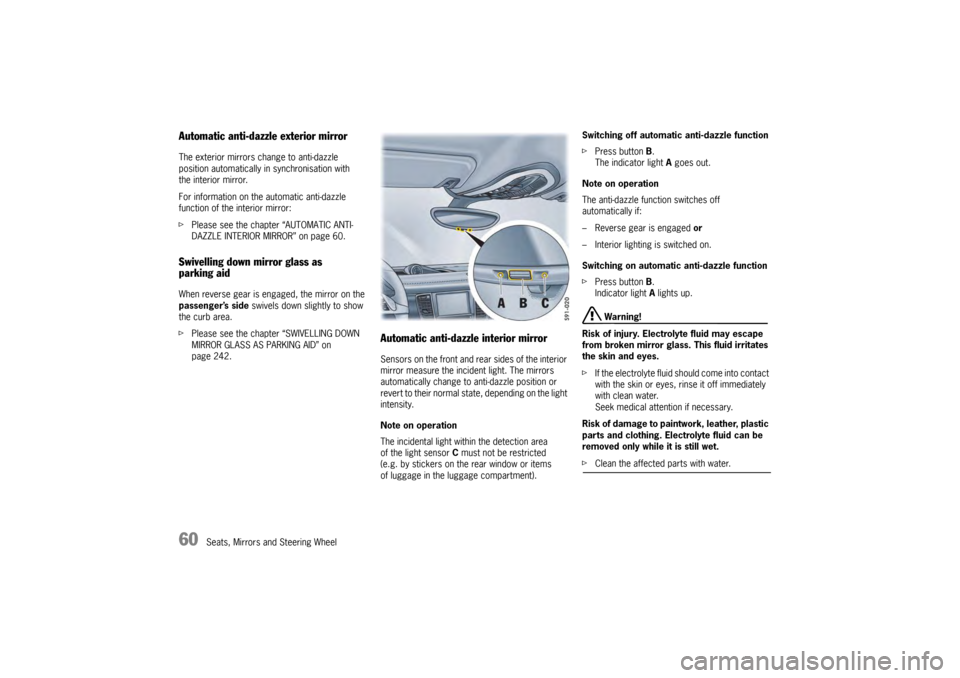
Automatic anti-dazzle interior mirrorSensors on the front and rear sides of the interior
mirror measure the incident light. The mirrors
automatically change to anti-dazzle position or
revert to their normal state, depending on the light
intensity.
Note on operation
The incidental light within the detection area
of the light sensor C must not be restricted
(e.g. by stickers on the rear window or items
of luggage in the luggage compartment). Switching off automatic anti-dazzle function
f
Press button B.
The indicator light A goes out.
Note on operation
The anti-dazzle function switches off
automatically if:
– Reverse gear is engaged or
– Interior lighting is switched on.
Switching on automatic anti-dazzle function
f Press button B.
Indicator light A lights up.
Warning!
Risk of injury. Electrolyte fluid may escape
from broken mirror glass. This fluid irritates
the skin and eyes.
f If the electrolyte fluid sh ould come into contact
with the skin or eyes, rinse it off immediately
with clean water.
Seek medical attention if necessary.
Risk of damage to paintwork, leather, plastic
parts and clothing. Electrolyte fluid can be
removed only while it is still wet.
f Clean the affected parts with water.
Page 73 of 343
Air Conditioning
71
General FunctionsNote on operation
Additional settings relating to the climate type and
extended ventilation panel can be adjusted in the
multi-function display on the instrument panel:
f Please see the chapter “AIR-CONDITIONING
SETTINGS ON THE MULTI-FUNCTION
DISPLAY” on page 83.
f Please see the chapter “SETTING AIR
CONDITIONING” on page 146.
On vehicles with comfort memory, all air-
conditioning settings are stored on the relevant
ignition key when the vehicle is locked.REST modeUsing engine residual heat
The residual heat of the engine can be used to
heat the interior for up to 20 minutes after the
ignition has been switched off.
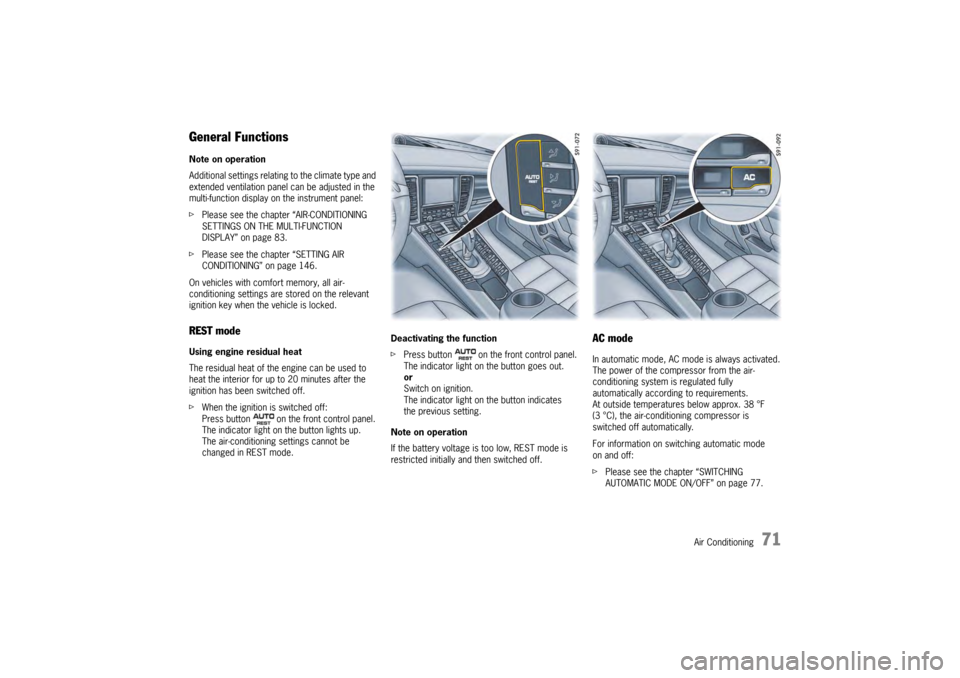
f When the ignition is switched off:
Press button on the front control panel.
The indicator light on the button lights up.
The air-conditioning settings cannot be
changed in REST mode. Deactivating the function
f
Press button on the front control panel.
The indicator light on the button goes out.
or
Switch on ignition.
The indicator light on the button indicates
the previous setting.
Note on operation
If the battery voltage is too low, REST mode is
restricted initially and then switched off.
AC modeIn automatic mode, AC mode is always activated.
The power of the compressor from the air-
conditioning system is regulated fully
automatically according to requirements.
At outside temperatures below approx. 38 °F
(3 °C), the air-conditioning compressor is
switched off automatically.
For information on switching automatic mode
on and off:
f Please see the chapter “SWITCHING
AUTOMATIC MODE ON/OFF” on page 77.
Page 74 of 343
72
Air Conditioning
Switching on AC mode
If you wish to cool th
e passenger compartment
to a temperature lower than the outside
temperature, AC mode must be activated.
f Press button .
The indicator light on the button lights up.
The air-conditioning compressor is
switched on.
or
Press button .
Switching off AC mode
AC mode can be switched off manually to save
fuel, for example.
f Press button .
The indicator light on the button goes out.
The air-conditioning compressor is
switched off.
The cooling function is deactivated.
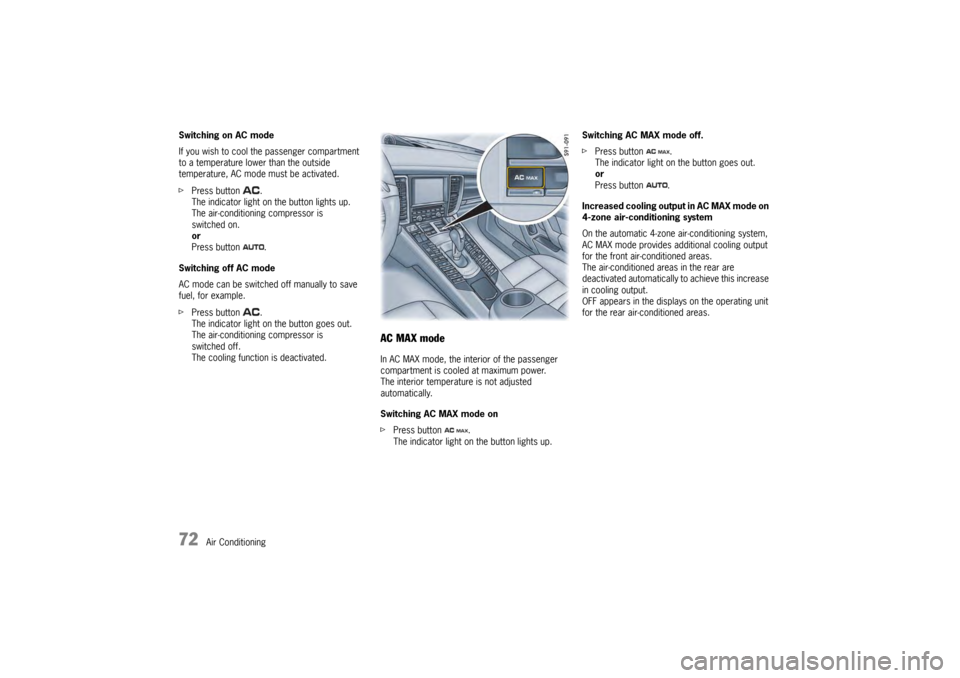
AC MAX modeIn AC MAX mode, the inte rior of the passenger
compartment is cooled at maximum power.
The interior temperature is not adjusted
automatically.
Switching AC MAX mode on
f Press button .
The indicator light on the button lights up. Switching AC MAX mode off.
f
Press button .
The indicator light on the button goes out.
or
Press button .
Increased cooling output in AC MAX mode on
4-zone air-conditioning system
On the automatic 4-zone air-conditioning system,
AC MAX mode provides a dditional cooling output
for the front air-conditioned areas.
The air-conditioned areas in the rear are
deactivated automatically to achieve this increase
in cooling output.
OFF appears in the displays on the operating unit
for the rear air-conditioned areas.
Page 93 of 343
Lights, Turn Signals and Windshield Wipers
91
Lights, Turn Signals and Windshield Wipers
Automatic Driving Light Assistant/
Adaptive Light System
.................................. 92
Instrument lighting... ..................................... 95
Turn Signal/High Beam/Headlight
Flasher Stalk ........... ..................................... 96
Emergency Flasher ...... ................................ 97
Interior Lighting ....... ..................................... 98
Brief Overview – Windshield Wipers ........... 101
Windshield Wiper/Washer Stalk ................... 102
Page 100 of 343
98
Lights, Turn Signals and Windshield Wipers
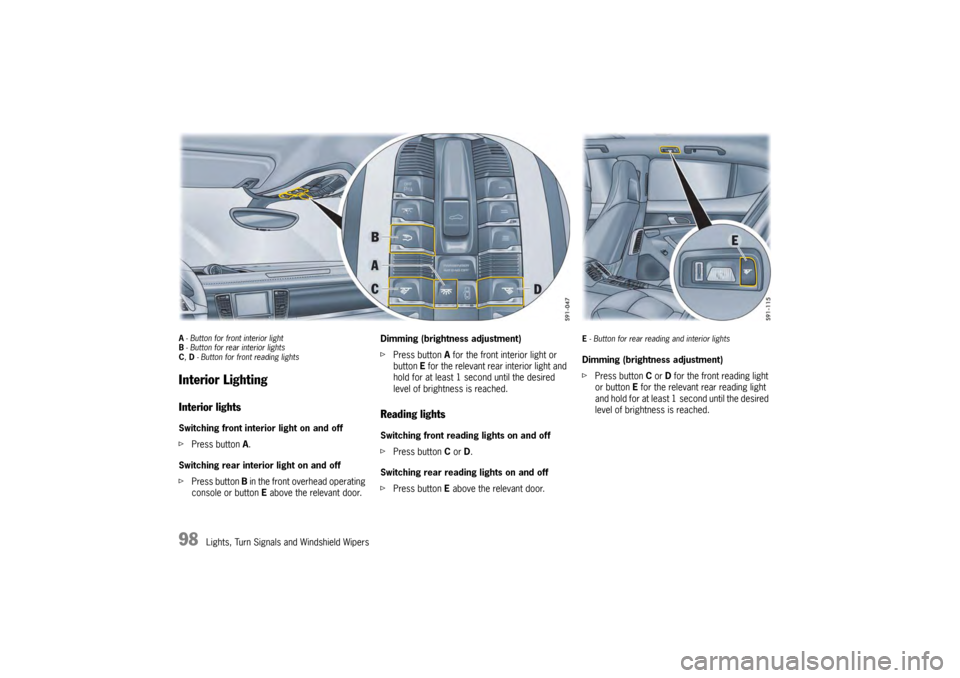
A- Button for front interior light
B - Button for rear interior lights
C , D - Button for front reading lightsInterior LightingInterior lightsSwitching front interior light on and off
f Press button A.
Switching rear interior light on and off
f Press button B in the front overhead operating
console or button E above the relevant door. Dimming (brightness adjustment)
f
Press button A for the front interior light or
button E for the relevant rear interior light and
hold for at least 1 second until the desired
level of brightness is reached.
Reading lights Switching front reading lights on and off
f Press button C or D.
Switching rear reading lights on and off
f Press button E above the relevant door.
E- Button for rear reading and interior lightsDimming (brightness adjustment)
f Press button C or D for the front reading light
or button E for the relevant rear reading light
and hold for at least 1 second until the desired
level of brightness is reached.