bumper Ram 1500 2014 User Guide
[x] Cancel search | Manufacturer: RAM, Model Year: 2014, Model line: 1500, Model: Ram 1500 2014Pages: 806, PDF Size: 5.78 MB
Page 512 of 806
8. Lock the clutch. Lock the winch drum by rotating theclutch lever on the winch to engage.
NOTE: Always ensure the clutch is fully engaged or
disengaged. 9. Connect the remote control to the winch control box,
located behind the front bumper. Be careful not to let
the remote control cord dangle in front of the winch. If
you choose to control the winch from inside your
vehicle, always pass the remote through a window to
avoid pinching the cord in the door. Always discon-
nect the remote control when not in use.
Clevis/D-Shackles
510 STARTING AND OPERATING
Page 597 of 806
Trailer Hitch Type and Maximum Trailer WeightHitch Type Max. Trailer Hitch Max. Trailer Weight
Class III Bumper
Hitch - 1500 Model 5,000 lbs (2 268 kg)
Class IV - 1500 Model 10,450 lbs (4 740 kg)
Class V - 2500/3500 Models 17,000 lbs (7 711 kg)
Fifth Wheel - 2500/ 3500 Models 25,000 lbs (11 339 kg)
Gooseneck - 2500 Model 20,000 lbs (9 071 kg)
Gooseneck - 3500 Model 30,000 lbs (13 636 kg)
Refer to the “Trailer Towing Weights (Maximum Trailer
Weight Ratings)” for the Maximum Gross Trailer
Weight (GTW) towable for your given drivetrain.
All trailer hitches should be professionally installed on
your vehicle.
Trailer Towing Weights (Maximum Trailer Weight
Ratings)
The rear bumper is intended to tow trailers up to a
5,000 lbs (2 268 kg) without added equipment or altera-
tions to the standard equipment.
5
STARTING AND OPERATING 595
Page 622 of 806
CAUTION!(Continued)
•Tow only in the forward direction. Towing this
vehicle backwards can cause severe damage to the
transfer case.
• Automatic transmissions must be placed in PARK
for recreational towing.
• Manual transmissions must be placed in gear (not
in Neutral) for recreational towing.
• Before recreational towing, perform the procedure
outlined under “Shifting Into NEUTRAL (N)” to be
certain that the transfer case is fully in NEUTRAL
(N). Otherwise, internal damage will result.
• Towing this vehicle in violation of the above re-
quirements can cause severe transmission and/or
transfer case damage. Damage from improper tow-
ing is not covered under the New Vehicle Limited
Warranty.
(Continued)
CAUTION! (Continued)
•Do not disconnect the rear drive shaft because fluid
will leak from the transfer case, causing damage to
internal parts.
• Do not use a bumper-mounted clamp-on tow bar
on your vehicle. The bumper face bar will be
damaged.
Shifting Into NEUTRAL (N)
Use the following procedure to prepare your vehicle for
recreational towing.
WARNING!
You or others could be injured or killed if you leave
the vehicle unattended with the transfer case in the
NEUTRAL (N) position without first fully engaging
(Continued)
620 STARTING AND OPERATING
Page 638 of 806
WARNING!(Continued)
you may experience abrupt stopping, rapid accelera-
tion or sharp turns. A loose jack, tools, bracket or
other objects in the vehicle may move around with
force, resulting in serious injury.
Removing The Spare Tire
1. Remove the spare tire before attempting to jack up the
truck. Attach the wheel wrench to the jack extension
tube with the curved angle facing away from the
vehicle. Insert the tube through the access hole be-
tween the lower tailgate and the top of the bumper
and into the winch mechanism tube.
Wheel Wrench And Jack Extension Tube Assembled
636 WHAT TO DO IN EMERGENCIES
Page 649 of 806
2. Lift the spare tire with one hand to give clearance totilt the retainer at the end of the cable and position it
properly across the wheel opening. 3. Attach the wheel wrench to the jack extension tube
with the curved angle facing away from the vehicle.
Insert the tube through the access hole between the
lower tailgate and the top of the bumper and into the
winch mechanism tube.
Reinstalling The RetainerPulling The Retainer Through The Center Of The Wheel
And Positioning It6
WHAT TO DO IN EMERGENCIES 647
Page 656 of 806
WARNING!
After using the jack and tools, always reinstall them
in the original carrier and location. While driving
you may experience abrupt stopping, rapid accelera-
tion or sharp turns. A loose jack, tools, bracket or
other objects in the vehicle may move around with
force, resulting in serious injury.
Removing The Spare Tire
1. Remove the spare tire before attempting to jack up thetruck. Attach the wheel wrench to the jack extension
tube with the curved angle facing away from the
vehicle. Insert the tube through the access hole be-
tween the lower tailgate and the top of the bumper
and into the winch mechanism tube.
Wheel Wrench And Jack Extension Tube Assembled
654 WHAT TO DO IN EMERGENCIES
Page 668 of 806
2. Lift the spare tire with one hand to give clearance totilt the retainer at the end of the cable and position it
properly across the wheel opening. 3. Attach the wheel wrench to the jack extension tube
with the curved angle facing away from the vehicle.
Insert the tube through the access hole between the
lower tailgate and the top of the bumper and into the
winch mechanism tube.
Reinstalling The RetainerPulling The Retainer Through The Center Of The Wheel
And Positioning It
666 WHAT TO DO IN EMERGENCIES
Page 685 of 806
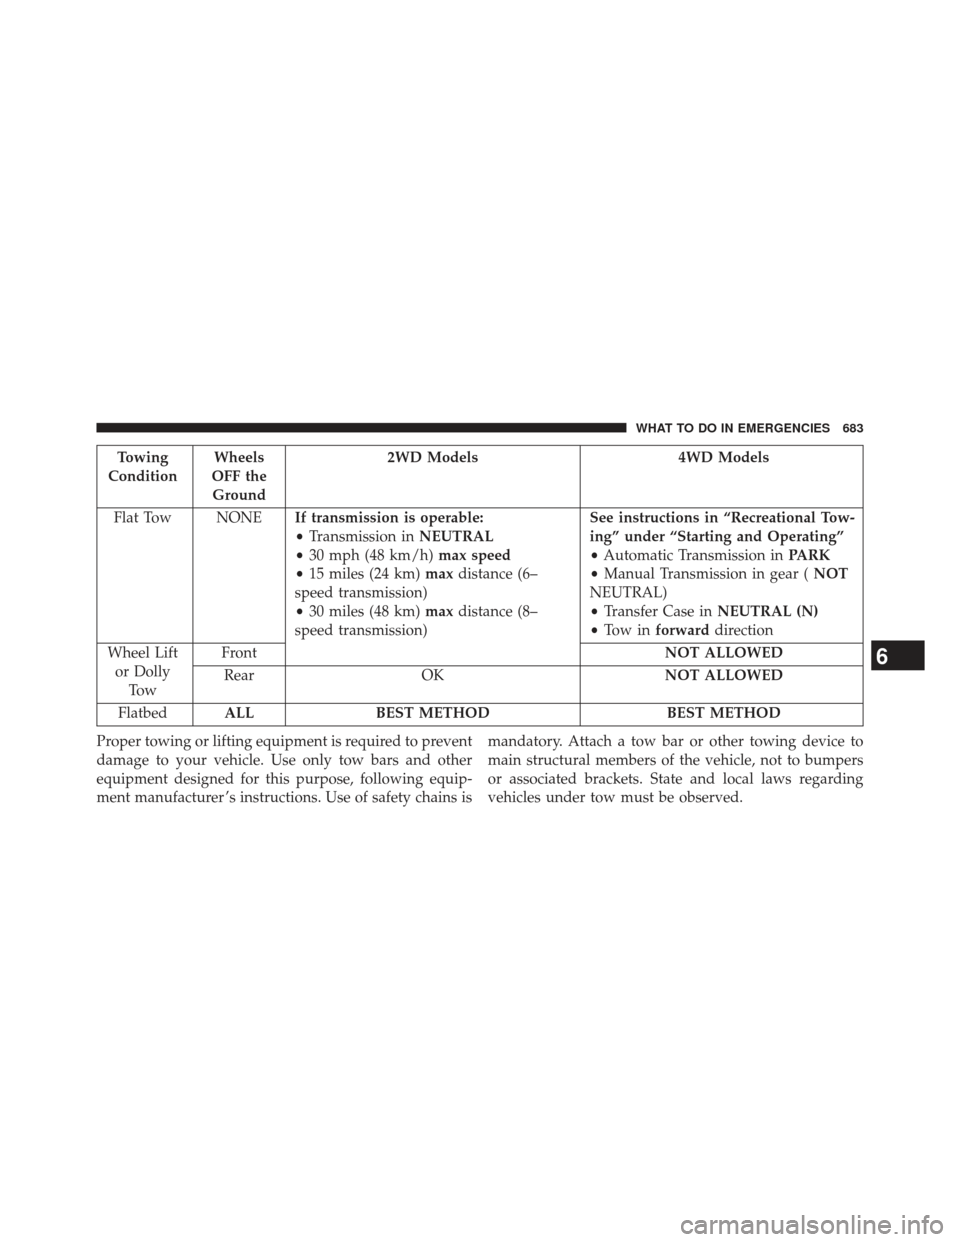
Towing
Condition Wheels
OFF the Ground 2WD Models 4WD Models
Flat Tow NONE If transmission is operable:
•Transmission in NEUTRAL
• 30 mph (48 km/h) max speed
• 15 miles (24 km) maxdistance (6–
speed transmission)
• 30 miles (48 km) maxdistance (8–
speed transmission) See instructions in “Recreational Tow-
ing” under “Starting and Operating”
•
Automatic Transmission in PARK
• Manual Transmission in gear ( NOT
NEUTRAL)
• Transfer Case in NEUTRAL (N)
• To w i n forward direction
Wheel Lift or Dolly To w Front
NOT ALLOWED
Rear OK NOT ALLOWED
Flatbed ALL BEST METHOD BEST METHOD
Proper towing or lifting equipment is required to prevent
damage to your vehicle. Use only tow bars and other
equipment designed for this purpose, following equip-
ment manufacturer ’s instructions. Use of safety chains is mandatory. Attach a tow bar or other towing device to
main structural members of the vehicle, not to bumpers
or associated brackets. State and local laws regarding
vehicles under tow must be observed.
6
WHAT TO DO IN EMERGENCIES 683
Page 750 of 806
Fog Lamps — If Equipped
1. Reach under and behind the front bumper to accessthe back of the front fog lamp housing.
2. Disconnect the fog lamp wiring harness connector from the fog lamp bulb.
3. Rotate the bulb counterclockwise ¼ turn to unlock the bulb from the housing.
4. Pull the bulb straight out from the housing.
CAUTION!
Do not contaminate the bulb glass by touching it
with your fingers or by allowing it to contact other
oily surfaces. Shortened bulb life will result.
Rear Tail/Stop, Turn Signal And Backup Lamps
1. Remove the two screws that pass through the bed sheetmetal.
Tail Lamp Screw Locations
748 MAINTAINING YOUR VEHICLE