EPS Ram 1500 2015 User Guide
[x] Cancel search | Manufacturer: RAM, Model Year: 2015, Model line: 1500, Model: Ram 1500 2015Pages: 871, PDF Size: 24.83 MB
Page 453 of 871
ENGINE START/STOP Button Functions — With
Driver ’s Foot OFF The Brake Pedal (In PARK Or
NEUTRAL Position)
The ENGINE START/STOP button operates similar to an
ignition switch. It has three positions, OFF, ACC, RUN.
To change the ignition switch positions without starting
the vehicle and use the accessories follow these steps:
1. Starting with the ignition in the OFF position:
2. Press the ENGINE START/STOP button once to
change the ignition to the ACC position.
3. Press the ENGINE START/STOP button a second time
to change the ignition to the RUN position.
4. Press the ENGINE START/STOP button a third time
to return the ignition to the OFF position.
Extreme Cold Weather (Below –20°F Or−29°C)
To ensure reliable starting at these temperatures, use of
an externally powered electric engine block heater (avail-
able from your authorized dealer) is recommended.
If Engine Fails To Start
If the engine fails to start after you have followed the
“Normal Starting” procedure, it may be flooded. Push
the accelerator pedal all the way to the floor and hold it
there while cranking the engine. This should clear any
excess fuel in case the engine is flooded.
CAUTION!
To prevent damage to the starter, do not crank the
engine for more than 10 seconds at a time. Wait 10 to
15 seconds before trying again.
5
STARTING AND OPERATING 451
Page 469 of 871

When frequent transmission shifting occurs (such as
when operating the vehicle under heavy loading condi-
tions, in hilly terrain, traveling into strong head winds, or
while towing heavy trailers), select TOW/HAUL mode
or use the Electronic Range Select (ERS) shift control
(refer to#Electronic Range Select (ERS) Operation#in this
section for further information) to select a lower gear
range. Under these conditions, using a lower gear range
will improve performance and extend transmission life
by reducing excessive shifting and heat buildup.
During extremely cold temperatures (-22°F [-30°C] or
below), transmission operation may be modified depend-
ing on engine and transmission temperature as well as
vehicle speed. Normal operation will resume once the
transmission temperature has risen to a suitable level.
Transmission Limp Home Mode
Transmission function is monitored electronically for
abnormal conditions. If a condition is detected that could
result in transmission damage, Transmission Limp Home
Mode is activated. In this mode, the transmission may
operate only in certain gears, or may not shift at all.
Vehicle performance may be severely degraded and the
engine may stall. In some situations, the transmission
may not re-engage if the engine is turned off and
restarted. The Malfunction Indicator Light (MIL) may be
illuminated. A message in the instrument cluster will
inform the driver of the more serious conditions, and
indicate what actions may be necessary.
In the event of a momentary problem, the transmission
can be reset to regain all forward gears by performing the
following steps:
NOTE:In cases where the instrument cluster message
indicates the transmission may not re-engage after en-
gine shutdown, perform this procedure only in a desired
location (preferably, at your authorized dealer).
1. Stop the vehicle.
5
STARTING AND OPERATING 467
Page 479 of 871

direct gears only. Normal operation will resume once the
transmission temperature has risen to a suitable level.
Transmission Limp Home Mode
Transmission function is monitored electronically for
abnormal conditions. If a condition is detected that could
result in transmission damage, Transmission Limp Home
Mode is activated. In this mode, the transmission remains
in direct gear regardless of which forward gear is se-
lected. PARK, REVERSE, and NEUTRAL will continue to
operate. The Malfunction Indicator Light (MIL) may be
illuminated. Limp Home Mode allows the vehicle to be
driven to an authorized dealer for service without dam-
aging the transmission.
In the event of a momentary problem, the transmission
can be reset to regain all forward gears by performing the
following steps:
1. Stop the vehicle.
2. Shift the transmission into PARK.
3. Turn the ignition switch to the OFF position.
4. Wait approximately 10 seconds.
5. Restart the engine.
6. Shift into the desired gear range. If the problem is no
longer detected, the transmission will return to normal
operation.
NOTE:Even if the transmission can be reset, we recom-
mend that you visit your authorized dealer at your
earliest possible convenience. Your authorized dealer has
diagnostic equipment to determine if the problem could
recur.
If the transmission cannot be reset, authorized dealer
service is required.
5
STARTING AND OPERATING 477
Page 491 of 871

During cold temperatures, transmission operation may
be modified depending on engine and transmission
temperature as well as vehicle speed. This feature im-
proves warm up time of the engine and transmission to
achieve maximum efficiency. Engagement of both the
torque converter clutch and the top overdrive gear are
inhibited until the transmission fluid is warm (refer to the
“Note” under “Torque Converter Clutch” in this section).
During extremely cold temperatures (-16°F [-27°C] or
below), operation may briefly be limited to first and
direct gears only. Normal operation will resume once the
transmission temperature has risen to a suitable level.
Transmission Limp Home Mode
Transmission function is monitored electronically for ab-
normal conditions. If a condition is detected that could
result in transmission damage, Transmission Limp Home
Mode is activated. In this mode, the transmission remains
in fourth gear regardless of which forward gear is selected.
PARK, REVERSE, and NEUTRAL will continue to operate.
The Malfunction Indicator Light (MIL) may be illuminated.
Limp Home Mode allows the vehicle to be driven to an
authorized dealer for service without damaging the trans-
mission.
In the event of a momentary problem, the transmission
can be reset to regain all forward gears by performing the
following steps:
1. Stop the vehicle.
2. Shift the transmission into PARK.
3. Turn the ignition switch to the OFF position.
4. Wait approximately 10 seconds.
5. Restart the engine.
6. Shift into the desired gear range. If the problem is no
longer detected, the transmission will return to normal
operation.
5
STARTING AND OPERATING 489
Page 505 of 871
2WD Or 4WD LOCK To 4WD LOW
NOTE:When shifting into or out of 4WD LOW some
gear noise may be heard. This noise is normal and is not
detrimental to the vehicle or occupants.
Shifting can be performed with the vehicle rolling 2 to
3 mph (3 to 5 km/h) or completely stopped. You can use
either of the following procedures:
Preferred Procedure
1. With the engine running, slow the vehicle to 2 to
3 mph (3 to 5 km/h).
2. Shift the transmission into NEUTRAL.
3. While still rolling, rotate the transfer case control
switch to the desired position.
4. After the desired position indicator light is ON (not
flashing), shift the transmission back into gear.
Alternate Procedure
1. Bring the vehicle to a complete stop.
2. With the ignition switch in the ON position and the
engine running, shift the transmission into NEUTRAL.
3. Rotate the transfer case control switch to the desired
position.
4. After the desired position indicator light is ON (not
flashing), shift the transmission back into gear.
NOTE:
•If Steps 1 or 2 of either the Preferred or Alternate
Procedure are not satisfied prior to attempting the
shift, then the desired position indicator light will flash
continuously while the original position indicator light
is ON, until all requirements have been met.
5
STARTING AND OPERATING 503
Page 517 of 871
Preferred Procedure
1. With the engine running, slow the vehicle to 2 to
3 mph (3 to 5 km/h).
2. Shift the transmission into NEUTRAL.
3. While still rolling, press the desired position on the
transfer case control switch.
4. After the desired position indicator light is ON (not
flashing), shift the transmission back into gear.
Alternate Procedure
1. Bring the vehicle to complete stop.
2. With the ignition switch in the ON position and the
engine running, shift the transmission into NEUTRAL.
3. Press the desired position on the transfer case control
switch.
4. After the desired position indicator light is ON (not
flashing), shift the transmission back into gear.
NOTE:
•If Steps 1 or 2 of either the Preferred or Alternate
Procedure are not satisfied prior to attempting the shift
or if they no longer are being met while the shift
attempt is in process, the desired position indicator
light will flash continuously while the original position
indicator light is ON, until all requirements have been
met.
•The ignition switch must be in the ON position for a
shift to take place and for the position indicator lights
to be operable. If the ignition switch is not in the ON
position, then the shift will not take place and no
position indicator lights will be on or flashing.
5
STARTING AND OPERATING 515
Page 521 of 871
(24 km/h) and 25 mph (40 km/h) for greater than 60
seconds, or the vehicle speed exceeds 25 mph
(40 km/h) the Entry/Exit change will be cancelled. To
return to Normal Height Mode, press the “Up” button
once while in Entry/Exit or drive the vehicle over
15 mph (24 km/h). Entry/Exit mode may not be
available due to vehicle payload, an EVIC/DID mes-
sage will be displayed when this occurs. Refer to
“Electronic Vehicle Information Center (EVIC) or
Driver Information Display (DID)” in “Understanding
Your Instrument Panel” for further information.
NOTE:Entry/Exit mode may be achieved using your
key fob for easier entry/loading. Refer to “A Word About
Your Keys” in “Things To Know Before Starting Your
Vehicle” for further information.
•When in ENTRY/EXIT setting, be aware of your sur-
roundings, you may not have the clearance required for
certain areas and vehicle damage may occur.
The system requires that the ignition be in ON/RUN
position or the engine running for all user requested
changes. When lowering the vehicle all of the doors,
must be closed. If a door is opened at any time while the
vehicle is lowering the change will not be completed
until the open door(s) is closed.
This system uses a lifting and lowering pattern which
keeps the headlights from incorrectly shining into on-
coming traffic. When raising the vehicle, the rear of the
vehicle will move up first and then the front. When
lowering the vehicle, the front will move down first and
then the rear.
After the engine is turned off, it may be noticed that the
air suspension system operates briefly, this is normal. The
system is correcting the position of the vehicle to ensure
a proper appearance.
To assist with changing a spare tire, the air suspension
system has a feature which allows the automatic leveling
5
STARTING AND OPERATING 519
Page 607 of 871
3. Tire size designed for your vehicle.
4. Cold tire inflation pressures for the front, rear, and
spare tires.
Loading
The vehicle maximum load on the tire must not exceed
the load carrying capacity of the tire on your vehicle. You
will not exceed the tire’s load carrying capacity if you
adhere to the loading conditions, tire size, and cold tire
inflation pressures specified on the Tire and Loading
Information placard and in the “Vehicle Loading” section
of this manual.
NOTE:Under a maximum loaded vehicle condition,
gross axle weight ratings (GAWRs) for the front and rear
axles must not be exceeded. For further information on
GAWRs, vehicle loading, and trailer towing, refer to
“Vehicle Loading” in this section.
To determine the maximum loading conditions of your
vehicle, locate the statement “The combined weight of
occupants and cargo should never exceed XXX lbs or
XXX kg” on the Tire and Loading Information placard.
The combined weight of occupants, cargo/luggage and
trailer tongue weight (if applicable) should never exceed
the weight referenced here.
Steps For Determining Correct Load Limit
1. Locate the statement “The combined weight of occu-
pants and cargo should never exceed XXX lbs or
XXX kg” on your vehicle’s placard.
2. Determine the combined weight of the driver and
passengers that will be riding in your vehicle.
3. Subtract the combined weight of the driver and pas-
sengers from XXX lbs or XXX kg.
5
STARTING AND OPERATING 605
Page 666 of 871
5. Press the RIGHT arrow on the steering wheel to enter
“TRAILER TOW”.
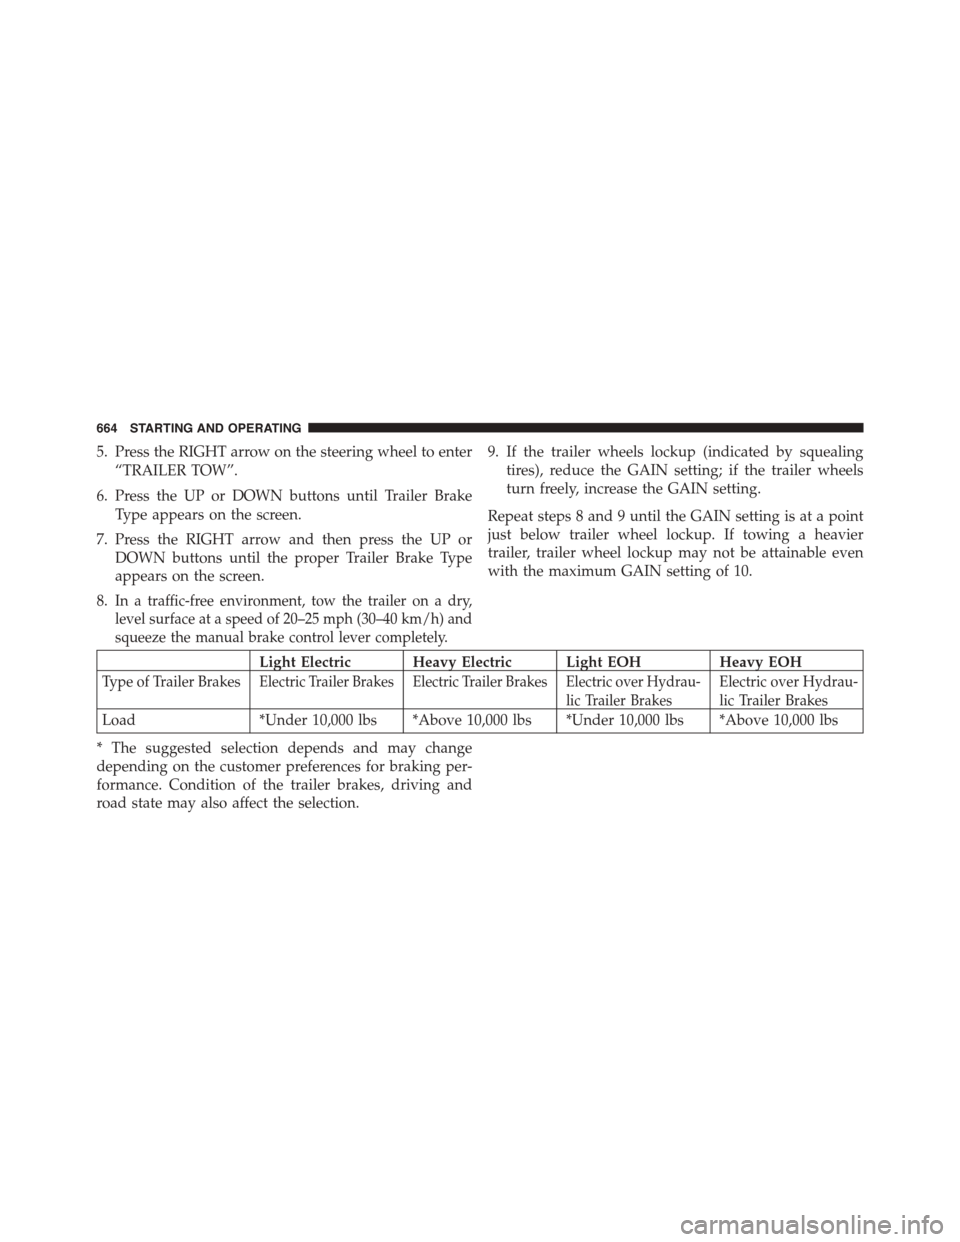
6. Press the UP or DOWN buttons until Trailer Brake
Type appears on the screen.
7. Press the RIGHT arrow and then press the UP or
DOWN buttons until the proper Trailer Brake Type
appears on the screen.
8.In a traffic-free environment, tow the trailer on a dry,
level surface at a speed of 20–25 mph (30–40 km/h) and
squeeze the manual brake control lever completely.
9. If the trailer wheels lockup (indicated by squealing
tires), reduce the GAIN setting; if the trailer wheels
turn freely, increase the GAIN setting.
Repeat steps 8 and 9 until the GAIN setting is at a point
just below trailer wheel lockup. If towing a heavier
trailer, trailer wheel lockup may not be attainable even
with the maximum GAIN setting of 10.
Light Electric Heavy Electric Light EOHHeavy EOH
Type of Trailer BrakesElectric Trailer Brakes Electric Trailer Brakes Electric over Hydrau-
lic Trailer Brakes
Electric over Hydrau-
lic Trailer Brakes
Load*Under 10,000 lbs *Above 10,000 lbs *Under 10,000 lbs *Above 10,000 lbs
* The suggested selection depends and may change
depending on the customer preferences for braking per-
formance. Condition of the trailer brakes, driving and
road state may also affect the selection.
664 STARTING AND OPERATING
Page 679 of 871

WARNING!(Continued)
the parking brake. The transfer case NEUTRAL (N)
position disengages both the front and rear drive-
shafts from the powertrain and will allow the vehicle
to roll, even if the transmission is in PARK. The
parking brake should always be applied when the
driver is not in the vehicle.
CAUTION!
It is necessary to follow these steps to be certain that
the transfer case is fully in NEUTRAL (N) before
recreational towing to prevent damage to internal
parts.
1. Bring the vehicle to a complete stop, with the engine
running. Firmly apply the parking brake.
2. Shift the transmission to NEUTRAL.
NOTE:If vehicle is equipped with air suspension, ensure
the vehicle is set to Normal Ride Height.
3. Press and hold the brake pedal.
4. Depress the clutch pedal on a manual transmission.
•With manual shift transfer case, shift the transfer
case lever into NEUTRAL (N).
•With electronic shift transfer case, press and hold the
transfer case NEUTRAL (N) button. Some models
have a small, recessed#N#button (at the center of the
transfer case switches) that must be pressed using a
ballpoint pen or similar object. Other models have a
rectangular NEUTRAL switch, below the rotary
transfer case control knob. The NEUTRAL (N) indi-
cator light will blink while the shift is in progress.
The light will stop blinking (stay on solid) when the
shift to NEUTRAL (N) is complete. After the shift is
completed and the NEUTRAL (N) light stays on,
release the NEUTRAL (N) button.
5
STARTING AND OPERATING 677