Locks Ram 1500 2015 User Guide
[x] Cancel search | Manufacturer: RAM, Model Year: 2015, Model line: 1500, Model: Ram 1500 2015Pages: 871, PDF Size: 24.83 MB
Page 100 of 871

Center Seat LATCH — Quad Cab®/Mega
Cab®/Crew Cab Split Bench
If a child restraint installed in the center position blocks
the seat belt webbing or buckle for the outboard position,
do not use that outboard position. If a child seat in the
center position blocks the outboard LATCH anchors or
seat belt, do not install a child seat in that outboard
position.
WARNING!
Never use the same lower anchorage to attach more
than one child restraint. Please refer to “Installing
The LATCH-Compatible Child Restraint System” for
typical installation instructions.
Always follow the directions of the child restraint manu-
facturer when installing your child restraint. Not all child
restraint systems will be installed as described here.
To Install A LATCH-Compatible Child Restraint
If the selected seating position has a Switchable Auto-
matic Locking Retractor (ALR) seat belt, stow the seat
belt, following the instructions below. See the section
“Installing Child Restraints Using the Vehicle Seat Belt”
to check what type of seat belt each seating position has.
1. Loosen the adjusters on the lower straps and on the
tether strap of the child seat so that you can more
easily attach the hooks or connectors to the vehicle
anchorages.
2. Place the child seat between the lower anchorages for
that seating position. For some second row seats, you
may need to recline the seat and/or raise the head
restraint to get a better fit. If the rear seat can be moved
forward and rearward in the vehicle, you may wish to
move it to its rear-most position to make room for the
child seat. You may also move the front seat forward
to allow more room for the child seat.
98 THINGS TO KNOW BEFORE STARTING YOUR VEHICLE
Page 272 of 871
5. Connect the tailgate plug (provided in the glove box)
to the tailgate wiring harness to ensure that the
terminals do not corrode.
6. Tape the tailgate harness and bracket against the
forward-facing surface of the tailgate. This will pre-
vent damaging the connector and bracket when stor-
ing or reinstalling the tailgate.
Removing The Tailgate
1. Disconnect the wiring harness for the rear camera and
or power locks (if equipped), refer to “Disconnecting
the Rear Camera — If Equipped” in this section.
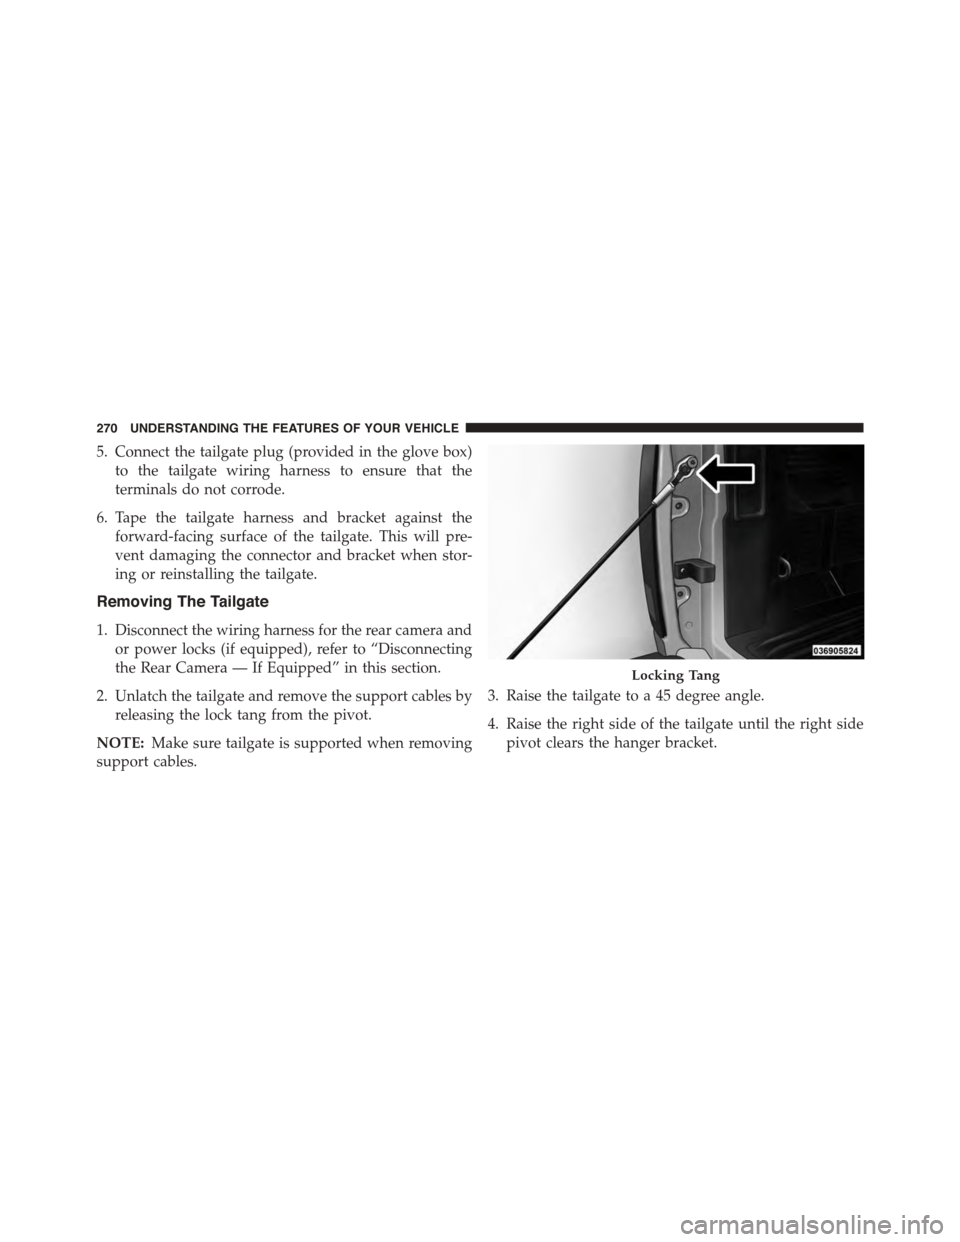
2. Unlatch the tailgate and remove the support cables by
releasing the lock tang from the pivot.
NOTE:Make sure tailgate is supported when removing
support cables.
3. Raise the tailgate to a 45 degree angle.
4. Raise the right side of the tailgate until the right side
pivot clears the hanger bracket.
Locking Tang
270 UNDERSTANDING THE FEATURES OF YOUR VEHICLE
Page 360 of 871
Buttons On The Touchscreen
Buttons on the touchscreen are accessible on the
Uconnect® display.
Customer Programmable Features — Uconnect®
5.0 Personal Settings
Push the Settings button on the faceplate to display the
settings menu screen. In this mode the Uconnect® system
allows you to access programmable features that may be
equipped such as Display, Voice, Clock, Safety & Assis-
tance, Lights, Doors & Locks, Auto-On Comfort (if
equipped), Engine Off Options, Suspension, Trailer
Brake, Audio, Compass Settings, Phone/Bluetooth®,
SiriusXM Setup (if equipped), Restore Settings, Clear
Personal Data and System Information.
NOTE:Only one category may be selected at a time.
When making a selection, press the button on the touch-
screen to enter the desired mode. Once in the desired
mode, press and release the preferred setting until the
button is highlighted. Once the setting is complete, either
press the back arrow or Done button on the touchscreen
or the Back button on the faceplate to return to the
previous menu. Pressing the Up or Down Arrow buttons
on the touchscreen on the right side of the screen will
allow you to toggle up or down through the list of
available settings.
NOTE:All settings should be changed with the ignition
in the “Run” position.
358 UNDERSTANDING YOUR INSTRUMENT PANEL
Page 366 of 871

•Auto Dim High Beams — If Equipped
When this feature is selected, the high beam headlights
will activate/deactivate automatically under certain con-
ditions. To make your selection, press the “Auto High
Beams” button on the touchscreen, and select from “On”
or “Off.” Press the back arrow/Done button on the
touchscreen to return to the previous menu. Refer to
”Automatic High Beam — If Equipped” in “Understand-
ing The Features Of Your Vehicle” for further informa-
tion.
•Daytime Running Lights — If Equipped
When this feature is selected, the headlights will turn on
whenever the engine is running. To make your selection,
press the “Daytime Running Lights” button on the touch-
screen, and select from “On” or “Off.” Press the back
arrow/Done button on the touchscreen to return to the
previous menu.
•Flash Lights With Lock
When this feature is selected, the exterior lights will flash
when the doors are locked or unlocked with the Remote
Keyless Entry (RKE) transmitter. This feature may be
selected with or without the sound horn on lock feature
selected. To make your selection, press the “Flash Lights
w/Lock” button on the touchscreen, and select from
“On” or “Off.” Press the back arrow/Done button on the
touchscreen to return to the previous menu.
Doors & Locks
After pressing the “Doors & Locks” button on the touch-
screen, the following settings will be available:
•Auto Door Locks
When this feature is selected, all doors will lock auto-
matically when the vehicle reaches a speed of 15 mph
(24 km/h). To make your selection, press the “Auto Door
Locks” button on the touchscreen and select from “On”
364 UNDERSTANDING YOUR INSTRUMENT PANEL
Page 367 of 871

or “Off.” Press the back arrow/Done button on the
touchscreen to return to the previous menu.
•Auto Unlock On Exit
When this feature is selected, all doors will unlock when
the vehicle is stopped, the transmission is in the PARK or
NEUTRAL position and the driver’s door is opened. To
make your selection, press the “Auto Unlock On Exit”
button on the touchscreen and select from “On” or “Off.”
Press the back arrow/Done button on the touchscreen to
return to the previous menu.
•Sound Horn With Lock
When this feature is selected, the horn will sound when
the door locks are activated. To make your selection,
press the “Horn w/Lock” Button and choose “Off,” “1st
Press” or “2nd Press.” Press the back arrow/Done button
on the touchscreen to return to the previous menu.
•Sound Horn With Remote Start
When this feature is selected, the horn will sound when the
remote start is activated. To make your selection, press the
“Horn w/Remote Start” button on the touchscreen and
select from “On” or “Off.” Press the back arrow/Done
button on the touchscreen to return to the previous menu.
•Remote Door Unlock
This feature will allow you to program your remote door
locks to open “All doors” or only the “Driver door” with
the first push of the Remote Keyless Entry (RKE) trans-
mitter or grabbing the Passive Entry door handle. To
make your selection, press the “Remote Door Unlock”
button on the touchscreen and choose from “All” or
“Driver.” Press the back arrow/Done button on the
touchscreen to return to the previous menu.
NOTE:If “Driver Door” is selected, the (RKE) transmitter
will have to be pushed two times in order to unlock all
doors.
4
UNDERSTANDING YOUR INSTRUMENT PANEL 365
Page 368 of 871

•Memory Linked to Fob — If Equipped
This feature provides automatic driver seat positioning to
enhance driver mobility when entering and exiting the
vehicle. To make your selection, press the “Memory
Linked to Fob” button on the touchscreen and select from
“On” or “Off.” Press the back arrow/Done button on the
touchscreen to return to the previous menu.
NOTE:The seat will return to the memorized seat
location if “Memory Linked to Fob” is set to (ON) when
the Remote Keyless Entry (RKE) transmitter is used to
unlock the door. Refer to “Driver Memory Seat” in
“Understanding The Features Of Your Vehicle” for fur-
ther information.
•Passive Entry
This feature allows you to lock and unlock the vehicle’s
door(s) without having to push the Remote Keyless Entry
(RKE) transmitter lock or unlock buttons. It automatically
unlocks the doors when the outside door handle is
grabbed. To make your selection, press the “Passive
Entry” button on the touchscreen and select from “On” or
“Off.” Press the back arrow/Done button on the touch-
screen to return to the previous menu. Refer to “Keyless
Enter-N-Go™” in “Things To Know Before Starting Your
Vehicle” for further information.
•Flash Lights With Lock
When this feature is selected, the exterior lights will flash
when the doors are locked or unlocked with the Remote
Keyless Entry (RKE) transmitter. This feature may be
selected with or without the sound horn on lock feature
selected. To make your selection, press the “Flash Lights
w/Lock” button on the touchscreen, and select from
“On” or “Off.” Press the back arrow/Done button on the
touchscreen to return to the previous menu.
366 UNDERSTANDING YOUR INSTRUMENT PANEL
Page 377 of 871
System Information
After pressing the “System Information” button on the
touchscreen the following information will be available:
•System Information
When System Information is selected, a System Informa-
tion screen will appear displaying the system software
version.
Customer Programmable Features — Uconnect®
8.4A/8.4AN Personal Settings
Press the “Settings” button on the touchscreen (if
equipped) or press the “Apps” button on the touchscreen
then press the “Settings” button on the touchscreen to
display the settings menu screen. In this mode the
Uconnect® system allows you to access programmable
features that may be equipped such as Display, Voice,
Clock, Safety & Driving Assistance, Lights, Doors &
Locks, Auto-On Comfort (if equipped), Engine Off Op-
tions, Suspension, Trailer Brake, Audio, Phone/
Bluetooth®, SiriusXM Setup (if equipped), Restore Set-
tings, Clear Personal Data and System Information.
NOTE:Only one category may be selected at a time.
When making a selection, press the button on the touch-
screen to enter the desired mode. Once in the desired
mode, press and release the preferred setting until a
check-mark appears next to the setting, showing that
setting has been selected. Once the setting is complete,
either press the back arrow button on the touchscreen or
the Back button on the faceplate to return to the previous
menu or press the “X” button on the touchscreen to close
out of the settings screen. Pressing the Up or Down
Arrow buttons on the touchscreen on the right side of the
screen will allow you to toggle up or down through the
list of available settings.
4
UNDERSTANDING YOUR INSTRUMENT PANEL 375
Page 387 of 871
Doors & Locks
After pressing the “Doors & Locks” button on the touch-
screen the following settings will be available:
•Auto Door Locks
When this feature is selected, all doors will lock auto-
matically when the vehicle reaches a speed of 15 mph
(24 km/h). To make your selection, press the “Auto Door
Lock” button on the touchscreen until a check-mark
appears next to setting, showing that setting has been
selected. Press the back arrow button on the touchscreen
to return to the previous menu.
•Auto Unlock On Exit
When this feature is selected, all doors will unlock when
the vehicle is stopped and the transmission is in the
PARK or NEUTRAL position and the driver’s door is
opened. To make your selection, press the “Auto Unlock
On Exit” button on the touchscreen until a check-mark
appears next to setting, showing that setting has been
selected. Press the back arrow button on the touchscreen
to return to the previous menu.
•Flash Lights With Lock
When this feature is selected, the front and rear turn
signals will flash when the doors are locked or unlocked
with the RKE transmitter. This feature may be selected
with or without the sound horn on lock feature selected.
To make your selection, press the “Flash Lights With
Lock” button on the touchscreen until a check-mark
appears next to setting, showing that setting has been
selected. Press the back arrow on the touchscreen to
return to the previous menu.
•Sound Horn With Lock
When this feature is selected, the horn will sound when
the door locks are activated. To make your selection,
4
UNDERSTANDING YOUR INSTRUMENT PANEL 385
Page 388 of 871
press the “Sound Horn With Lock” button on the touch-
screen and select from “Off”, “1st Press” or “2nd Press”.
Press the back arrow button on the touchscreen to return
to the previous menu.
•Sound Horn With Remote Start
When this feature is selected, the horn will sound when the
remote start is activated. To make your selection, press the
“Sound Horn With Remote Start” button on the touch-
screen until a check-mark appears next to setting, showing
that setting has been selected. Press the back arrow button
on the touchscreen to return to the previous menu.
•1st Press Of Key Fob Unlocks
When 1st Press Of Key Fob Unlocks “Driver Door” is
selected, only the driver’s door will unlock on the first
press of the Remote Keyless Entry (RKE) transmitter
UNLOCK button you must push the RKE transmitter
UNLOCK button twice to unlock the passenger’s doors.
When Unlock “All Doors” On 1st Press is selected, all of
the doors will unlock on the first push of the RKE
transmitter UNLOCK button.
NOTE:If the vehicle is programmed 1st Press Of Key Fob
Unlocks “All Doors”, all doors will unlock no matter
which Passive Entry equipped door handle is grasped. If
1st Press Of Key Fob Unlocks “Driver Door” is pro-
grammed, only the driver ’s door will unlock when the
driver ’s door is grasped. With Passive Entry, if 1st Press
Of Key Fob Unlocks “Driver Door” is programmed
pushing the handle more than once will only result in the
driver ’s door opening. If driver door is selected, once the
driver door is opened, the interior door lock/unlock
switch can be used to unlock all doors (or use RKE
transmitter).
386 UNDERSTANDING YOUR INSTRUMENT PANEL
Page 498 of 871
For additional information on the appropriate use of each
transfer case mode position, see the information below:
2H
Rear-Wheel Drive High Range — This range is for
normal street and highway driving on dry hard surfaced
roads.
4H
Four-Wheel Drive High Range — This range locks the
front and rear driveshafts together forcing the front and
rear wheels to rotate at the same speed. Additional
traction for loose, slippery road surfaces only.
Neutral (N)
Neutral — This range disengages the front and rear drive-
shafts from the powertrain. To be used for flat towing
behind another vehicle. Refer to “Recreational Towing” in
“Starting and Operating” for further information.
4L
Four-Wheel Drive Low Range — This range locks the
front and rear driveshafts together forcing the front and
rear wheels to rotate at the same speed. Additional
traction and maximum pulling power for loose, slippery
road surfaces only. Do not exceed 25 mph (40 km/h).
CAUTION!
Do not use 4L (Low) range when operating the
vehicle on dry pavement. Driveline hardware dam-
age can result.
Shifting Procedure — Manually Shifted Transfer
Case
2H To 4H
Shifting between 2H and 4H can be made with the
vehicle stopped or in motion. If the vehicle is in motion,
shifts can be made up to 55 mph (88 km/h). With the
496 STARTING AND OPERATING