Controls Ram 1500 2016 Owner's Guide
[x] Cancel search | Manufacturer: RAM, Model Year: 2016, Model line: 1500, Model: Ram 1500 2016Pages: 916, PDF Size: 7.55 MB
Page 403 of 916
ŌĆóControls Screen Time-Out ŌĆö If Equipped
When this feature is selected, the Controls Screen will
stay open for five seconds before the screen times out.
With the feature deselected, the screen will stay open
until it is manually closed. Press the ŌĆ£Controls Screen
Time-OutŌĆØ button on the touchscreen, until a check-mark
appears next to the setting, showing that setting has been
selected.
ŌĆóFuel Saver Display ŌĆö If Equipped
This feature will allow you to enable fuel saver mode and
will be displayed in the DID. Press the ŌĆ£Fuel Saver
DisplayŌĆØ button on the touchscreen, until a check-mark
appears next to the setting, showing that setting has been
selected.
Units
After pressing the ŌĆ£UnitsŌĆØ button on the touchscreen you
may select each unit of measure independently displayedin the Driver Information Display (DID), and navigation
system (if equipped). The following selectable units of
measure are listed below:
ŌĆóSpeed
Select from: ŌĆ£MPHŌĆØ or ŌĆ£km/h.ŌĆØ
ŌĆóDistance
Select from: ŌĆ£miŌĆØ or ŌĆ£km.ŌĆØ
ŌĆóFuel Consumption
Select from: ŌĆ£MPGŌĆØ (US), ŌĆ£MPGŌĆØ (UK), ŌĆ£L/100 kmŌĆØ or
ŌĆ£km/L.ŌĆØ
ŌĆóCapacity
Select from: ŌĆ£galŌĆØ (US), ŌĆ£galŌĆØ (UK), ŌĆ£L/100 kmŌĆØ or ŌĆ£L.ŌĆØ
ŌĆóPressure
Select from: ŌĆ£psi,ŌĆØ ŌĆ£kPa,ŌĆØ or ŌĆ£bar.ŌĆØ
4
UNDERSTANDING YOUR INSTRUMENT PANEL 401
Page 420 of 916
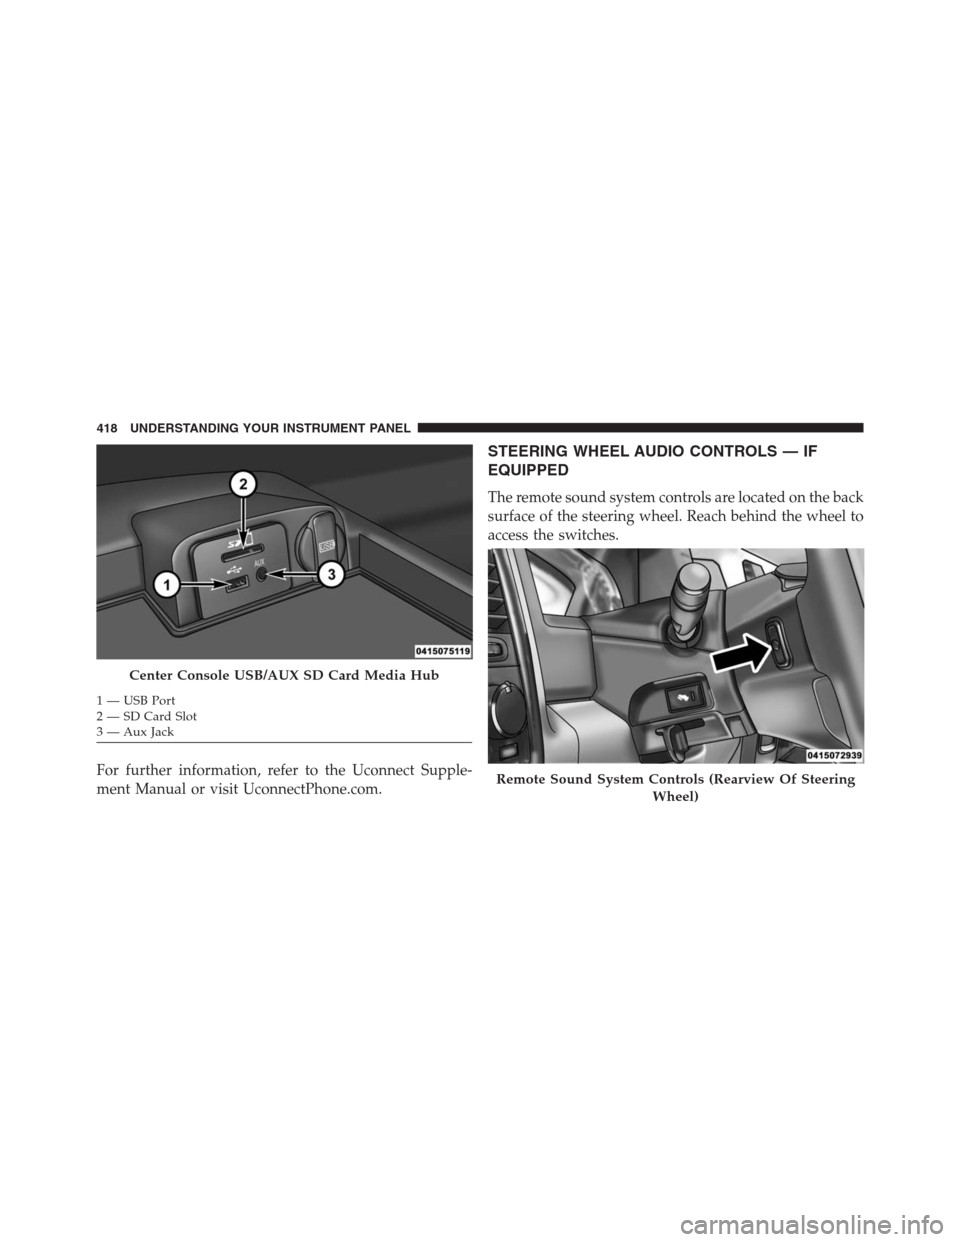
For further information, refer to the Uconnect Supple-
ment Manual or visit UconnectPhone.com.
STEERING WHEEL AUDIO CONTROLS ŌĆö IF
EQUIPPED
The remote sound system controls are located on the back
surface of the steering wheel. Reach behind the wheel to
access the switches.
Center Console USB/AUX SD Card Media Hub
1 ŌĆö USB Port
2 ŌĆö SD Card Slot
3 ŌĆö Aux Jack
Remote Sound System Controls (Rearview Of Steering
Wheel)
418 UNDERSTANDING YOUR INSTRUMENT PANEL
Page 424 of 916
by turning the equipment off and on, the user is
encouraged to try to correct the interference by one or
more of the following measures:
ŌĆóIncrease the separation between the equipment and
receiver.
ŌĆóConsult the dealer or an experienced radio technician
for help.
CLIMATE CONTROLS
The Climate Control System allows you to regulate the
temperature, amount, and direction of air circulating
throughout the vehicle. The controls are located on the
instrument panel below the radio.
Manual Climate Controls Without Touchscreen ŌĆö
If Equipped
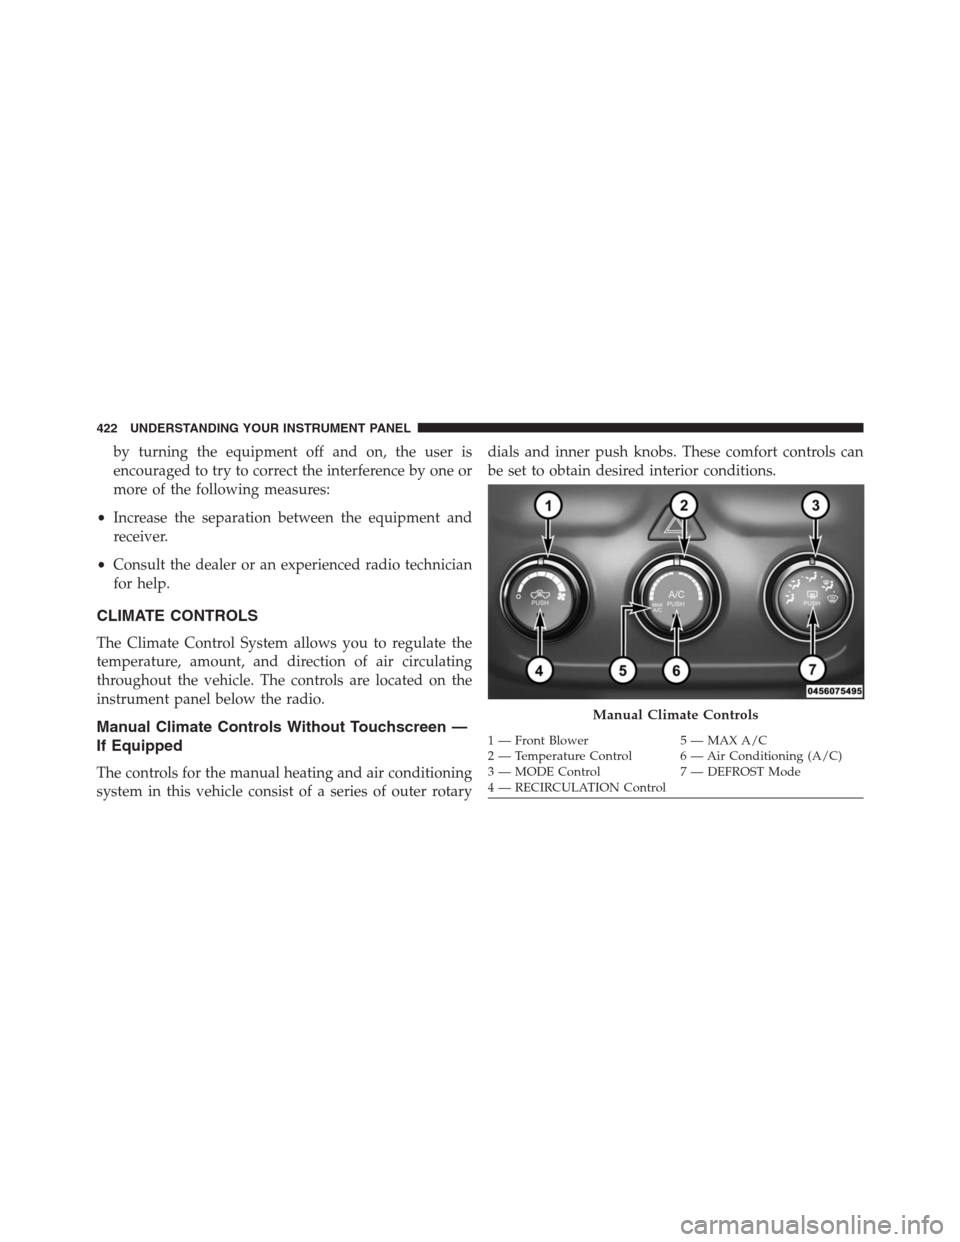
The controls for the manual heating and air conditioning
system in this vehicle consist of a series of outer rotarydials and inner push knobs. These comfort controls can
be set to obtain desired interior conditions.
Manual Climate Controls
1 ŌĆö Front Blower 5 ŌĆö MAX A/C
2 ŌĆö Temperature Control 6 ŌĆö Air Conditioning (A/C)
3 ŌĆö MODE Control 7 ŌĆö DEFROST Mode
4 ŌĆö RECIRCULATION Control 422 UNDERSTANDING YOUR INSTRUMENT PANEL
Page 429 of 916
Economy Mode
If ECONOMY mode is desired, push the A/C button to
turn off the LED indicator and the A/C compressor.
Rotate the temperature control knob to the desired tem-
perature. Also, make sure to select only Panel, Bi-Level or
Floor modes.
Stop/Start System ŌĆö If Equipped
While in an Autostop, the Climate Controls system may
automatically adjust airflow to maintain cabin comfort.
Customer settings will be maintained upon return to an
engine running condition.
Manual Climate Controls With Touchscreen ŌĆö If
Equipped
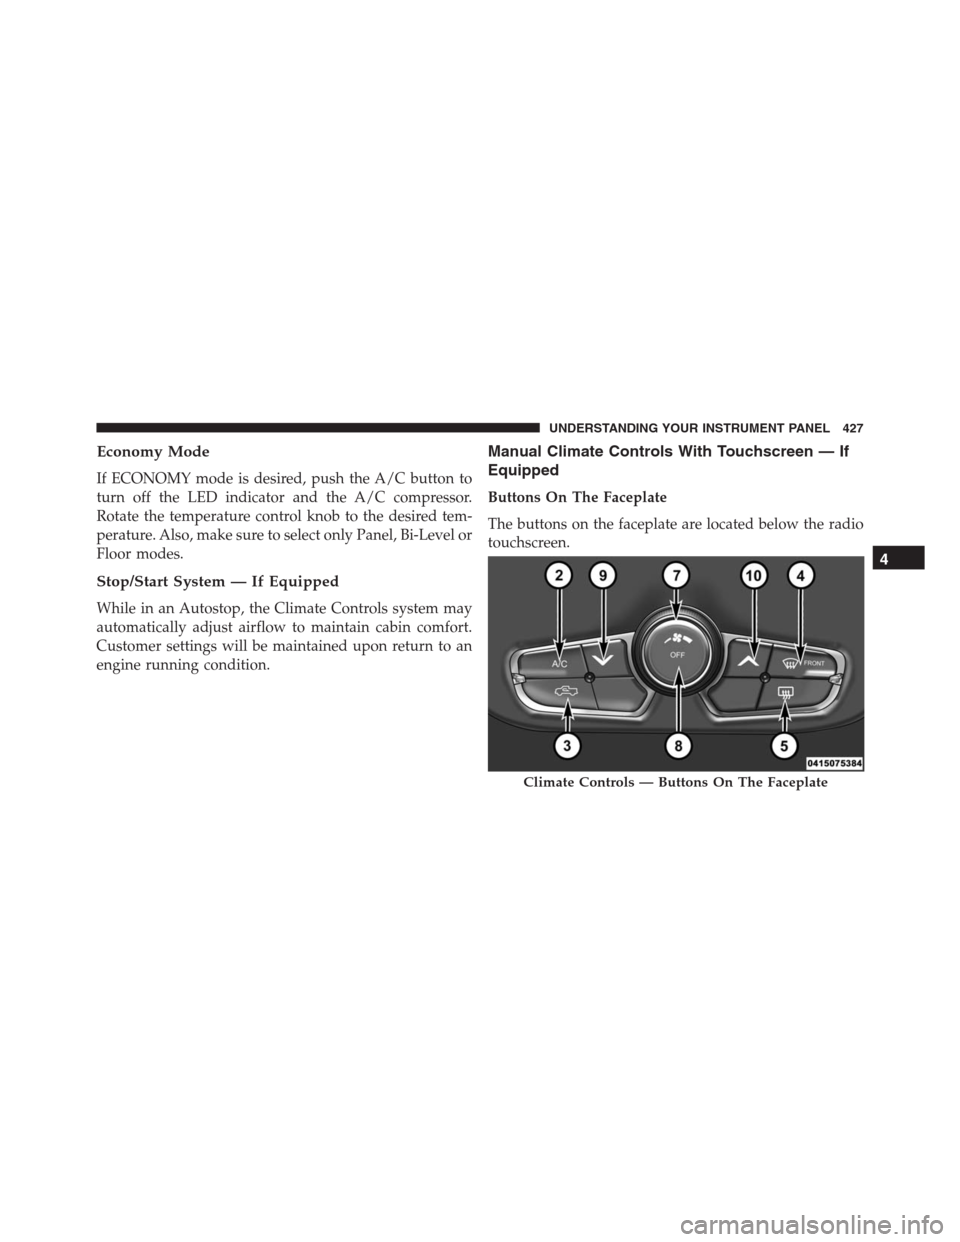
Buttons On The Faceplate
The buttons on the faceplate are located below the radio
touchscreen.
Climate Controls ŌĆö Buttons On The Faceplate
4
UNDERSTANDING YOUR INSTRUMENT PANEL 427
Page 430 of 916
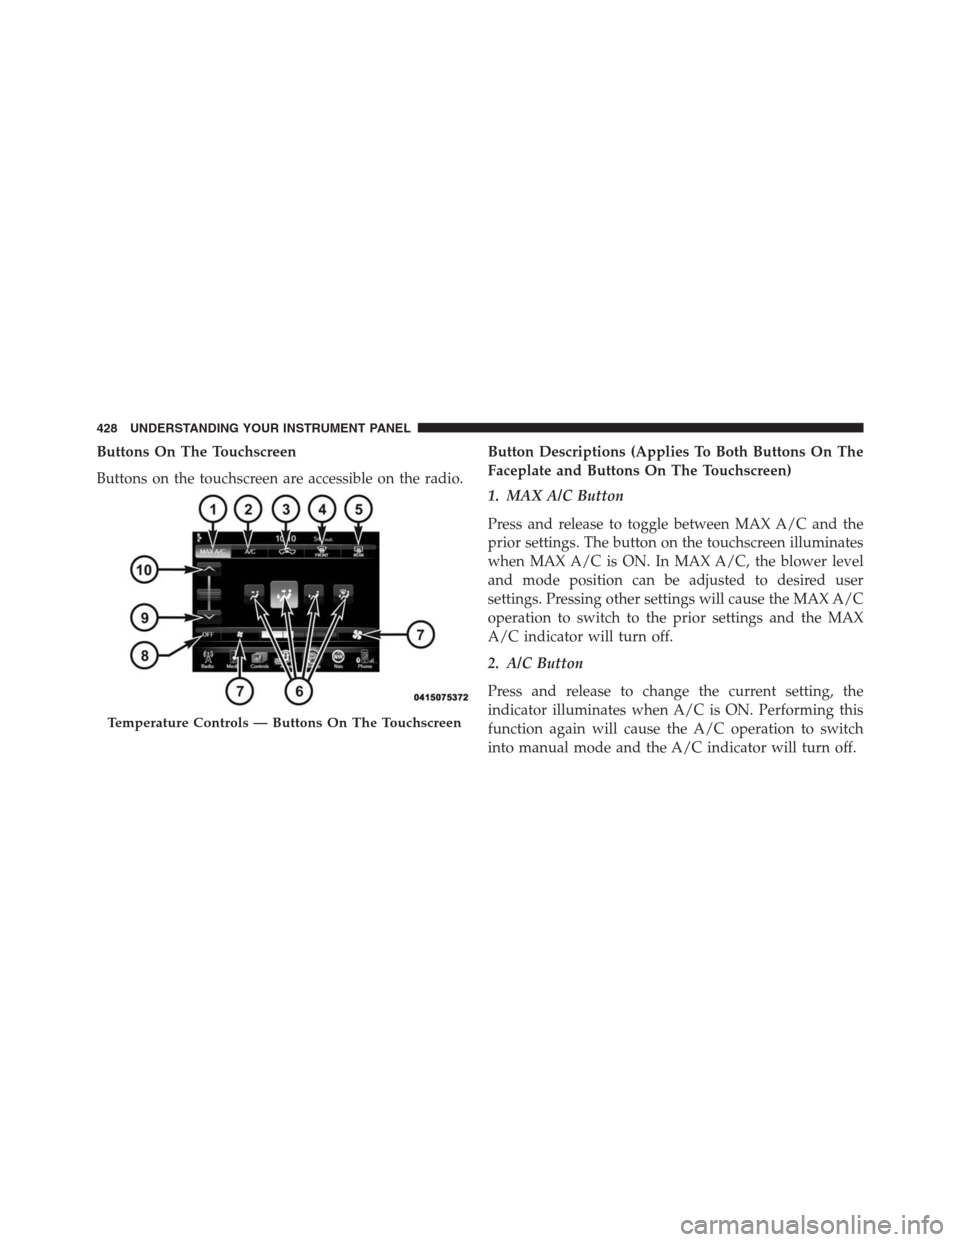
Buttons On The Touchscreen
Buttons on the touchscreen are accessible on the radio.Button Descriptions (Applies To Both Buttons On The
Faceplate and Buttons On The Touchscreen)
1. MAX A/C Button
Press and release to toggle between MAX A/C and the
prior settings. The button on the touchscreen illuminates
when MAX A/C is ON. In MAX A/C, the blower level
and mode position can be adjusted to desired user
settings. Pressing other settings will cause the MAX A/C
operation to switch to the prior settings and the MAX
A/C indicator will turn off.
2. A/C Button
Press and release to change the current setting, the
indicator illuminates when A/C is ON. Performing this
function again will cause the A/C operation to switch
into manual mode and the A/C indicator will turn off.
Temperature Controls ŌĆö Buttons On The Touchscreen
428 UNDERSTANDING YOUR INSTRUMENT PANEL
Page 434 of 916
Recirculation Control
When outside air contains smoke, odors, or
high humidity, or if rapid cooling is desired,
you may wish to recirculate interior air by
pressing the RECIRCULATION control button.
Recirculation mode should only be used temporarily. The
recirculation LED will illuminate on the blower control
knob when this button is selected. Push the button a
second time to turn off the Recirculation mode LED and
allow outside air into the vehicle.
NOTE:In cold weather, use of Recirculation mode may
lead to excessive window fogging. The Recirculation
mode is not allowed in Defrost mode to improve window
clearing operation. Recirculation will be disabled auto-
matically if these modes are selected.
Automatic Climate Controls With Touchscreen ŌĆö
If Equipped
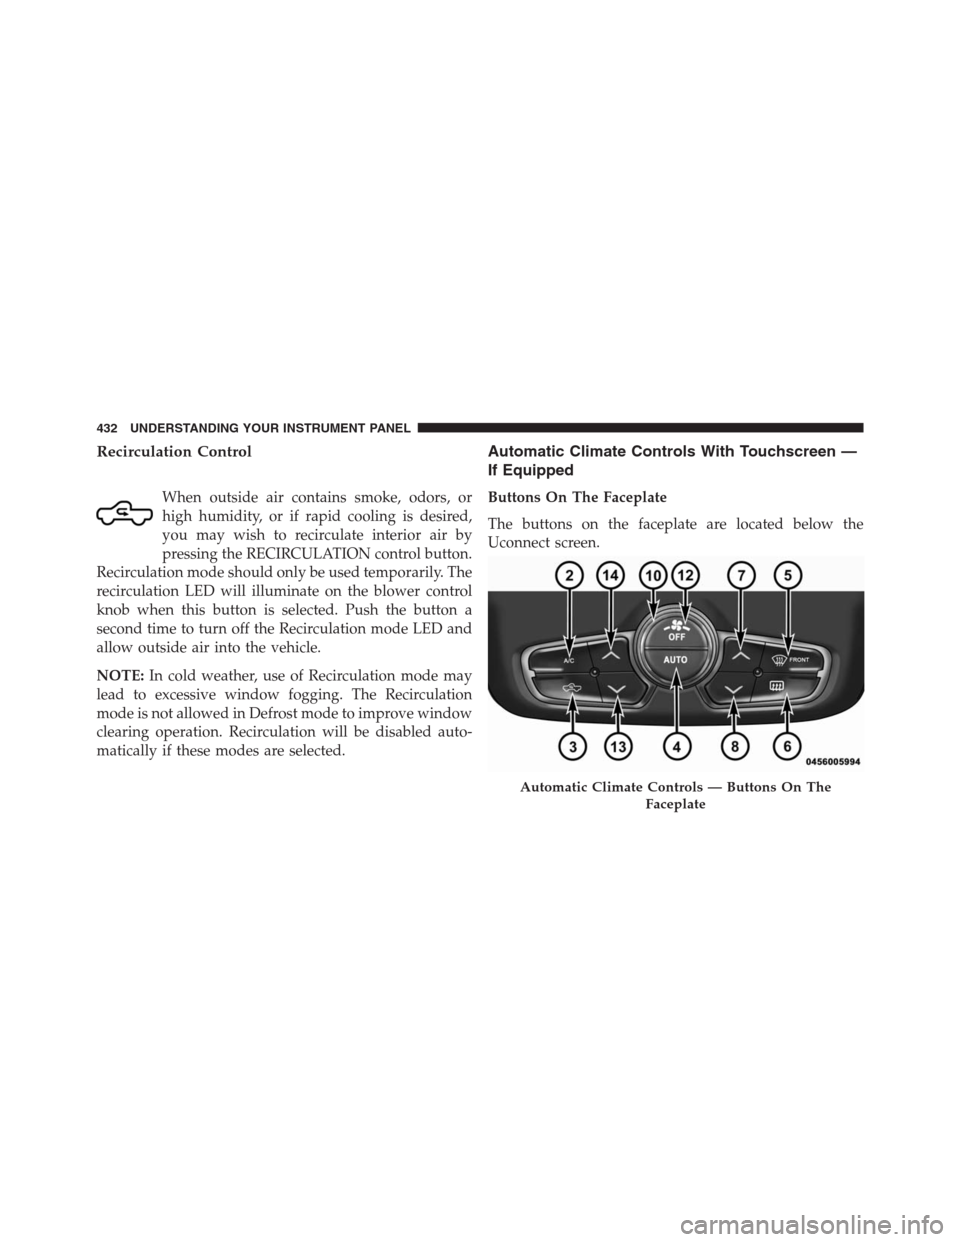
Buttons On The Faceplate
The buttons on the faceplate are located below the
Uconnect screen.
Automatic Climate Controls ŌĆö Buttons On The
Faceplate
432 UNDERSTANDING YOUR INSTRUMENT PANEL
Page 435 of 916
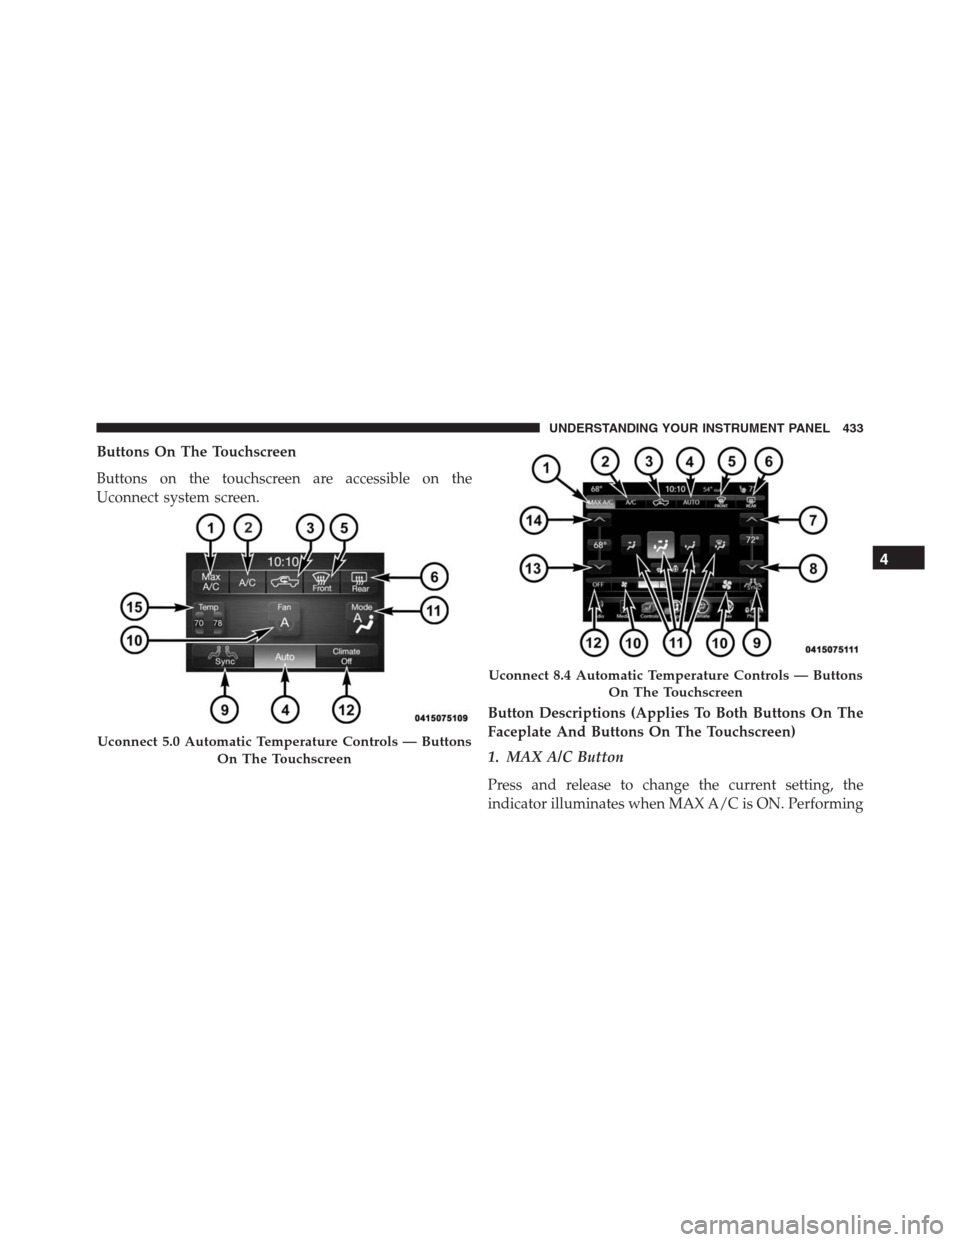
Buttons On The Touchscreen
Buttons on the touchscreen are accessible on the
Uconnect system screen.
Button Descriptions (Applies To Both Buttons On The
Faceplate And Buttons On The Touchscreen)
1. MAX A/C Button
Press and release to change the current setting, the
indicator illuminates when MAX A/C is ON. Performing
Uconnect 5.0 Automatic Temperature Controls ŌĆö Buttons
On The Touchscreen
Uconnect 8.4 Automatic Temperature Controls ŌĆö Buttons
On The Touchscreen
4
UNDERSTANDING YOUR INSTRUMENT PANEL 433
Page 436 of 916
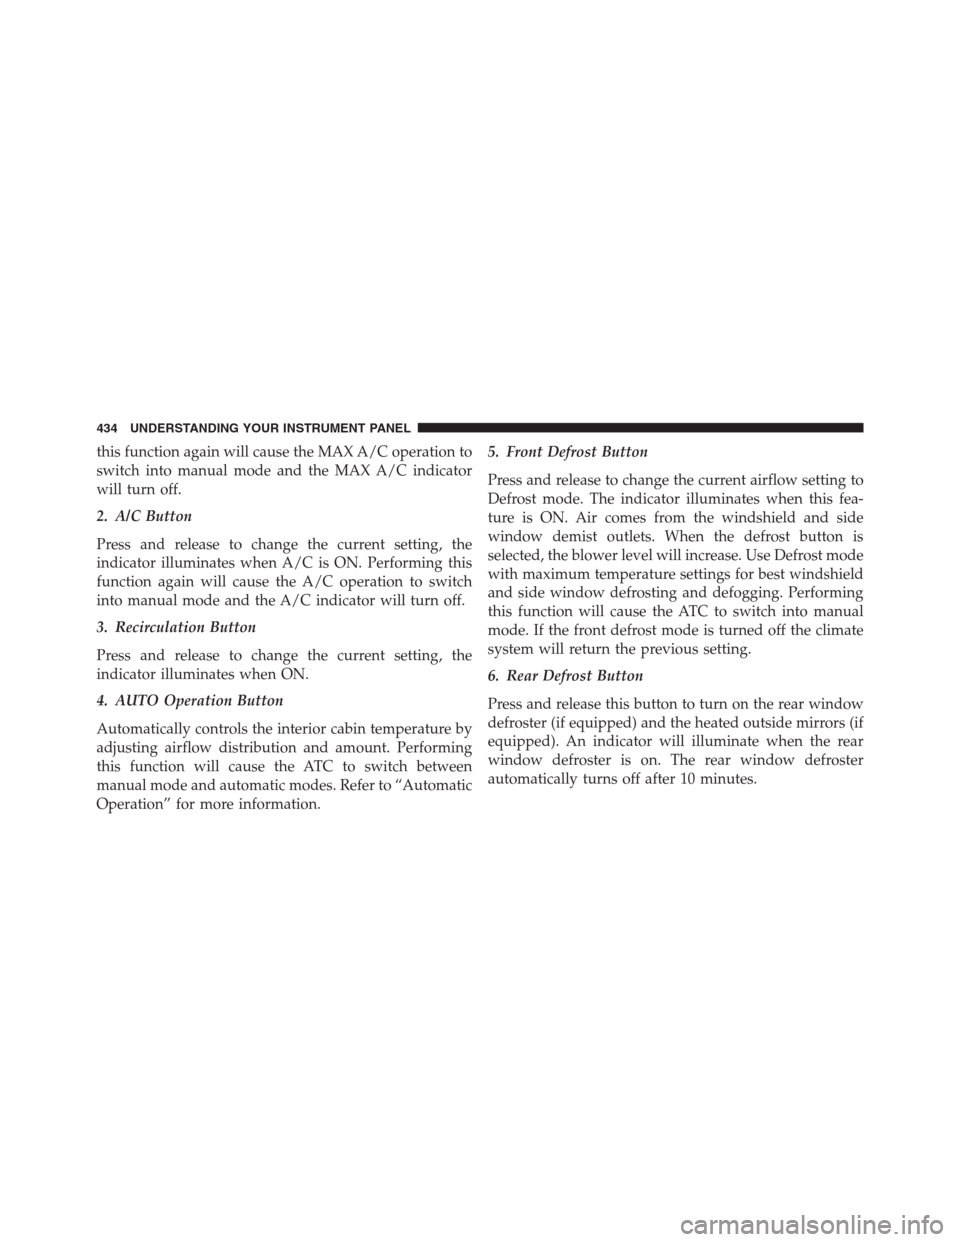
this function again will cause the MAX A/C operation to
switch into manual mode and the MAX A/C indicator
will turn off.
2. A/C Button
Press and release to change the current setting, the
indicator illuminates when A/C is ON. Performing this
function again will cause the A/C operation to switch
into manual mode and the A/C indicator will turn off.
3. Recirculation Button
Press and release to change the current setting, the
indicator illuminates when ON.
4. AUTO Operation Button
Automatically controls the interior cabin temperature by
adjusting airflow distribution and amount. Performing
this function will cause the ATC to switch between
manual mode and automatic modes. Refer to ŌĆ£Automatic
OperationŌĆØ for more information.5. Front Defrost Button
Press and release to change the current airflow setting to
Defrost mode. The indicator illuminates when this fea-
ture is ON. Air comes from the windshield and side
window demist outlets. When the defrost button is
selected, the blower level will increase. Use Defrost mode
with maximum temperature settings for best windshield
and side window defrosting and defogging. Performing
this function will cause the ATC to switch into manual
mode. If the front defrost mode is turned off the climate
system will return the previous setting.
6. Rear Defrost Button
Press and release this button to turn on the rear window
defroster (if equipped) and the heated outside mirrors (if
equipped). An indicator will illuminate when the rear
window defroster is on. The rear window defroster
automatically turns off after 10 minutes.
434 UNDERSTANDING YOUR INSTRUMENT PANEL
Page 440 of 916
14.Driver Temperature Control Up Button (Uconnect 8.4)
Provides the driver with independent temperature con-
trol. Push the button on the faceplate button for warmer
temperature settings or on the touchscreen, press and
slide the temperature bar towards the red arrow for
warmer temperature settings.
NOTE:In Sync mode, this button will also automatically
adjust the passenger temperature setting at the same
time.
15. Temperature Control (Uconnect 5.0)
Press the temperature button on the touchscreen to
regulate the temperature of the air inside the passenger
compartment. Moving the temperature bar into the red
area, indicates warmer temperatures. Moving the tem-
perature bar into the blue area indicates cooler tempera-
tures.
Climate Control Functions
A/C (Air Conditioning)
The Air Conditioning (A/C) button allows the operator
to manually activate or deactivate the air conditioning
system. When the air conditioning system is turned on,
cool dehumidified air will flow through the outlets into
the cabin. For improved fuel economy, press the A/C
button to turn off the air conditioning and manually
adjust the blower and airflow mode settings. Also, make
sure to select only Panel, Bi-Level or Floor modes.
NOTE:
ŌĆóFor Manual Climate Controls, if the system is in Mix,
Floor or Defrost Mode, the A/C can be turned off, but
the A/C system shall remain active to prevent fogging
of the windows.
438 UNDERSTANDING YOUR INSTRUMENT PANEL
Page 442 of 916
NOTE:In cold weather, use of Recirculation mode may
lead to excessive window fogging. The recirculation
feature may be unavailable (button on the touchscreen
greyed out) if conditions exist that could create fogging
on the inside of the windshield. On systems with Manual
Climate Controls, the recirculation mode is not allowed
in Defrost mode to improve window clearing operation.
Recirculation will be disabled automatically if this mode
is selected. Attempting to use Recirculation while in this
mode will cause the LED in the control button on the
faceplate to blink and then turn off.
Automatic Temperature Control (ATC)
Automatic Operation
1. Push the AUTO button on the faceplate or press the
ŌĆ£AUTOŌĆØ button on the touchscreen.2. Adjust the temperature you would like the system to
maintain by adjusting the driver and passenger tem-
perature buttons on the faceplate or buttons on the
touchscreen. Once the desired temperature is dis-
played, the system will achieve and automatically
maintain that comfort level.
3. When the system is set up for your comfort level, it is
not necessary to change the temperature. You will
experience the greatest efficiency by simply allowing
the system to function automatically.
NOTE:
ŌĆóIt is not necessary to move the temperature settings.
The system automatically adjusts the temperature,
mode, and blower speed to provide comfort as quickly
as possible.
440 UNDERSTANDING YOUR INSTRUMENT PANEL