display Ram 1500 2018 Manual PDF
[x] Cancel search | Manufacturer: RAM, Model Year: 2018, Model line: 1500, Model: Ram 1500 2018Pages: 372, PDF Size: 7.1 MB
Page 254 of 372
DEALER SERVICE — 6.7L DIESEL
ENGINE
Your authorized dealer has the qualified ser-
vice personnel, special tools, and equipment
to perform all service operations in an expert
manner. Service Manuals are available which
include detailed service information for your
vehicle. Refer to these Service Manuals be-
fore attempting any procedure yourself.
NOTE:
Intentional tampering with emissions control
systems may void your warranty and could
result in civil penalties being assessed
against you.
WARNING!
You can be badly injured working on or
around a motor vehicle. Only do service
work for which you have the knowledge
and the proper equipment. If you have any
doubt about your ability to perform a ser-
vice job, take your vehicle to a competent
mechanic.
Engine Air Cleaner Filter
CAUTION!
All air entering the engine intake must be
filtered. The abrasive particles in unfil-
tered air will cause rapid wear to engine
components.
WARNING!
The air induction system (air cleaner,
hoses, etc.) provides a measure of protec-
tion. Do not remove the air induction sys-
tem (air cleaner, hoses, etc.) unless such
removal is necessary for repair or mainte-
nance. Make sure that no one is near the
engine compartment before starting the
vehicle with the air induction system (air
cleaner, hoses, etc.) removed. Failure to
do so can result in serious personal injury.
The condition of the air cleaner filter is moni-
tored by the Engine Control Module. The
“SERVICE AIR FILTER” message will display
in the instrument cluster when service is required. Refer to “Instrument Cluster Dis-
play” in “Getting To Know Your Instrument
Panel” for further information.
The “SERVICE AIR FILTER” message could
be displayed periodically. This is because
engine air flow requirements change based
on driving conditions. As the filter becomes
more restrictive and air flow requirements
increase the “SERVICE AIR FILTER” mes-
sage will be displayed. The message may not
be displayed in subsequent drive cycles if the
same conditions are not met. The air filter
element should be replaced within 250 miles
(402 km) from the first time this message is
displayed to ensure proper engine operation
during all driving conditions.
CAUTION!
Driving with a restricted air filter can
cause engine damage. Driving in dusty
environments for extended periods will
lead to rapid air filter plugging. Action
should be taken as soon as the “SERVICE
AIR FILTER” message is displayed.
SERVICING AND MAINTENANCE
252
Page 291 of 372
MULTIMEDIA
CYBERSECURITY..............291
RADIO 3.0 ................. .292
Clock Setting.................293
Audio Setting .................293
Radio Operation ...............293
Disc Operation — If Equipped ......293
USB/Audio Jack (AUX) Manual
Operation ...................294
UCONNECT 3.0 ...............295
Clock Setting.................296
Audio Setting .................296
Radio Operation ...............296
Disc Operation — If Equipped ......296
USB/Audio Jack (AUX) Manual
Operation ...................297
UCONNECT 3 WITH 5-INCH DISPLAY . .298
Controls On The Front Panel .......298
Clock Setting .................299
Equalizer, Balance And Fade .......299
Radio Mode ..................300
Media Mode .................301 Bluetooth Source
..............304
UCONNECT 4C/4C NAV WITH 8.4-INCH
DISPLAY.................. .306
Uconnect 4C/4C NAV At A Glance . . . .306
Personalized Menu Bar...........309
Radio .....................310
Android Auto .................310
Apple CarPlay Integration .........314
SIRIUSXM GUARDIAN — IF EQUIPPED.316
SiriusXM Guardian — If Equipped
(Available on Uconnect 4C NAV) .....316
SiriusXM Guardian Activation ......317
Download The Uconnect App .......318
Renewing Subscriptions (Uconnect 4C
NAV)......................318
Maintaining Your SiriusXM Guardian
Account ...................318
Built-In Features ..............318
SiriusXM Guardian Remote Features . .321
UCONNECT SETTINGS ...........324
TIPS CONTROLS AND GENERAL
INFORMATION ............... .325
Steering Wheel Audio Controls ......325
Reception Conditions ............325
Care And Maintenance ...........325
Anti-Theft Protection ............325
IPOD/USB/MEDIA PLAYER CONTROL . .325
Audio Jack (AUX)..............326
USB Port ...................326
Bluetooth Streaming Audio ........326
NAVIGATION................ .327
Changing The Navigation Voice Prompt
Volume....................327
Finding Points Of Interest .........329
Finding A Place By Spelling The Name .329
One-Step Voice Destination Entry . . . .329
Setting Your Home Location ........329
Home .....................330
Adding A Stop ................330
Taking A Detour ...............330
SiriusXM Traffic Plus (4C NAV) .....330
SiriusXM Travel Link (4C NAV) ......331
UCONNECT PHONE............332
MULTIMEDIA
289
Page 295 of 372
Clock Setting
1. Push the Menu button at the bottom ofthe radio, and push the Enter/Browse but-
ton for System Settings. Next, select the
Time and Format setting and then select
Set Time by pushing the Enter/Browse
button.
2. Adjust the hours or minutes by turning the Tune/Scroll knob, then pushing the Enter/
Browse button to move to the next entry.
You can also select 12hr or 24hr format by
turning the Tune/Scroll knob, then push-
ing the Enter/Browse button on the de-
sired selection.
3. Once the time is set, press the “Ok” button to exit the time screen.
Audio Setting
• Push the AUDIO button on the radio face-plate.
• The Audio Menu shows the following op- tions for you to customize your audio
settings. Treble, Mid, Bass, Fade, Balance, Speed Ad-
justed Volume, Loudness and AUX Offset
• Select the desired setting to adjust, then
push the ENTER/BROWSE button. Turn the
TUNE/SCROLL knob to adjust the setting +
or - . Push the “Back” button when done.
Radio Operation
Seek Up/Down Buttons
• Push the up or down button to seek throughradio stations in AM, FM or SXM bands.
• Hold either button to bypass stations with- out stopping.
Store Radio Presets Manually
The presets are available for all Radio Modes,
and are activated by pushing any of the six
preset buttons. The Radio stores up to
18 presets in each of the Radio modes. Push
the A-B-C button on the faceplate to select
the A, B, or C preset list.
To store a radio preset manually, follow the
steps below:
1. Tune to the desired station. 2. Push and hold the desired numbered but-
ton for more than two seconds, or until you
hear a confirmation beep.
Disc Operation — If Equipped
Your vehicle may have a remote CD player
located in the lower center console storage
bin, or in the lower center bench seat bin.
• CD/Disc Mode is entered by either insertinga CD/Disc or by pushing the MEDIA button
located on the side of the display. Once in
Media Mode, select “Disc.”
Gently insert one CD into the CD player with
the CD label facing as indicated on the illus-
tration located on the Disc player.
Seek Up/Down Buttons
• Push to seek through CD tracks.
• Hold either button to bypass tracks without stopping.
293
Page 296 of 372
USB/Audio Jack (AUX) Manual
Operation
To select a specific audio source, push the
MEDIA button on the faceplate and select
from the following modes:
USB/iPod
• USB/iPod Mode is entered by either insert-ing a USB Jump Drive or iPod cable into the
USB port or by pushing the MEDIA button
located left of the display.
Audio Jack (AUX)
• The AUX allows a device such as an MP3 player or an iPod to be plugged into
the radio and utilize the vehicle’s audio
system, using a 3.5 mm audio cable, to
amplify the source and play through the
vehicle’s speakers.
• The functions of the device are controlled using the device buttons, not the buttons
on the radio. The volume may be controlled
using the radio or the device.
MULTIMEDIA
294
Page 298 of 372
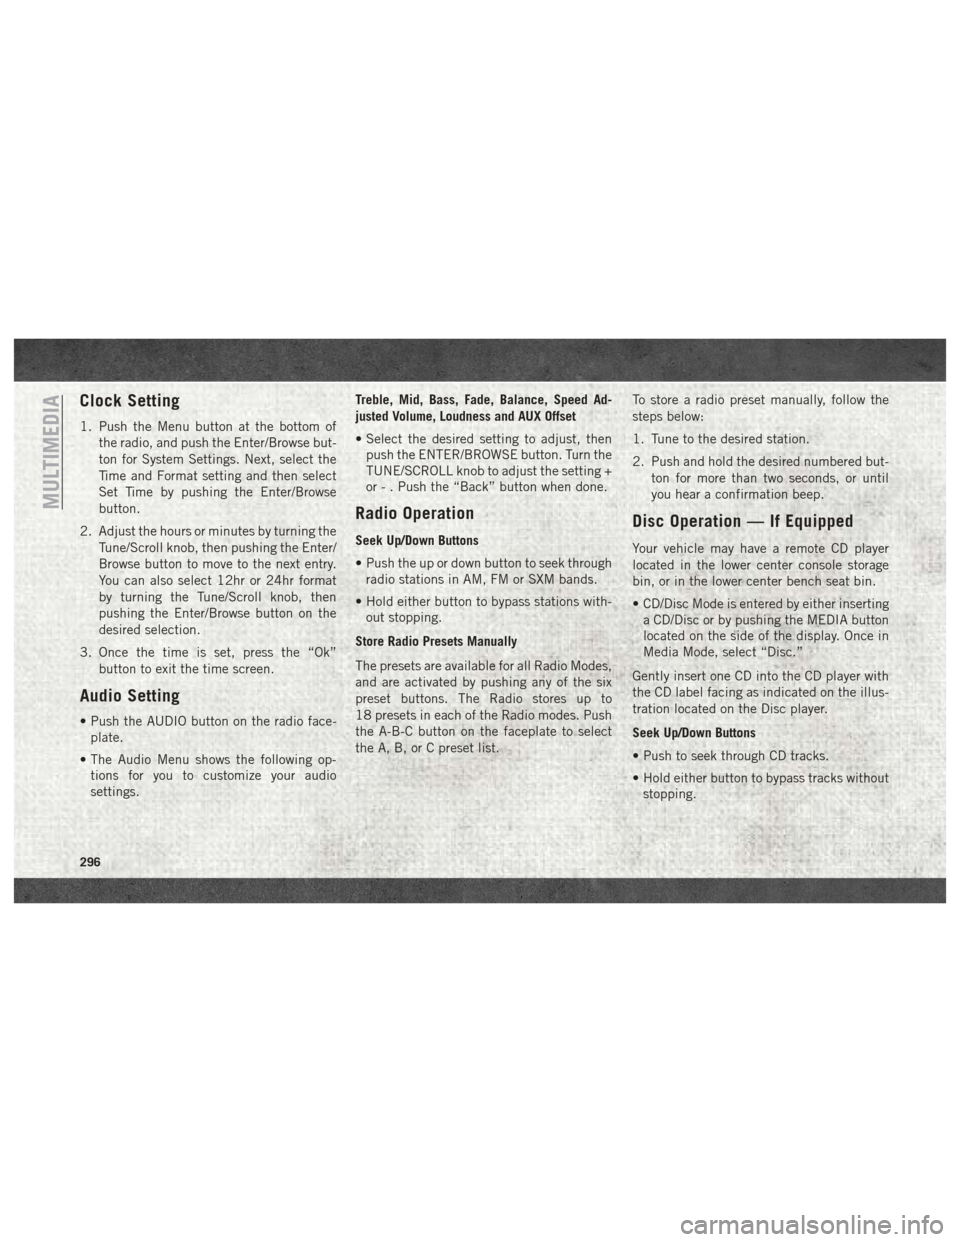
Clock Setting
1. Push the Menu button at the bottom ofthe radio, and push the Enter/Browse but-
ton for System Settings. Next, select the
Time and Format setting and then select
Set Time by pushing the Enter/Browse
button.
2. Adjust the hours or minutes by turning the Tune/Scroll knob, then pushing the Enter/
Browse button to move to the next entry.
You can also select 12hr or 24hr format
by turning the Tune/Scroll knob, then
pushing the Enter/Browse button on the
desired selection.
3. Once the time is set, press the “Ok” button to exit the time screen.
Audio Setting
• Push the AUDIO button on the radio face-plate.
• The Audio Menu shows the following op- tions for you to customize your audio
settings. Treble, Mid, Bass, Fade, Balance, Speed Ad-
justed Volume, Loudness and AUX Offset
• Select the desired setting to adjust, then
push the ENTER/BROWSE button. Turn the
TUNE/SCROLL knob to adjust the setting +
or - . Push the “Back” button when done.
Radio Operation
Seek Up/Down Buttons
• Push the up or down button to seek throughradio stations in AM, FM or SXM bands.
• Hold either button to bypass stations with- out stopping.
Store Radio Presets Manually
The presets are available for all Radio Modes,
and are activated by pushing any of the six
preset buttons. The Radio stores up to
18 presets in each of the Radio modes. Push
the A-B-C button on the faceplate to select
the A, B, or C preset list. To store a radio preset manually, follow the
steps below:
1. Tune to the desired station.
2. Push and hold the desired numbered but-
ton for more than two seconds, or until
you hear a confirmation beep.
Disc Operation — If Equipped
Your vehicle may have a remote CD player
located in the lower center console storage
bin, or in the lower center bench seat bin.
• CD/Disc Mode is entered by either insertinga CD/Disc or by pushing the MEDIA button
located on the side of the display. Once in
Media Mode, select “Disc.”
Gently insert one CD into the CD player with
the CD label facing as indicated on the illus-
tration located on the Disc player.
Seek Up/Down Buttons
• Push to seek through CD tracks.
• Hold either button to bypass tracks without stopping.
MULTIMEDIA
296
Page 299 of 372
USB/Audio Jack (AUX) Manual
Operation
To select a specific audio source, push the
MEDIA button on the faceplate and select
from the following modes:
USB/iPod
• USB/iPod Mode is entered by either insert-ing a USB Jump Drive or iPod cable into the
USB port or by pushing the MEDIA button
located left of the display.
Audio Jack (AUX)
• The AUX allows a device such as an MP3 player or an iPod to be plugged into
the radio and utilize the vehicle’s audio
system, using a 3.5 mm audio cable, to
amplify the source and play through the
vehicle’s speakers.
• The functions of the device are controlled using the device buttons, not the buttons
on the radio. The volume may be controlled
using the radio or the device.
297
Page 300 of 372
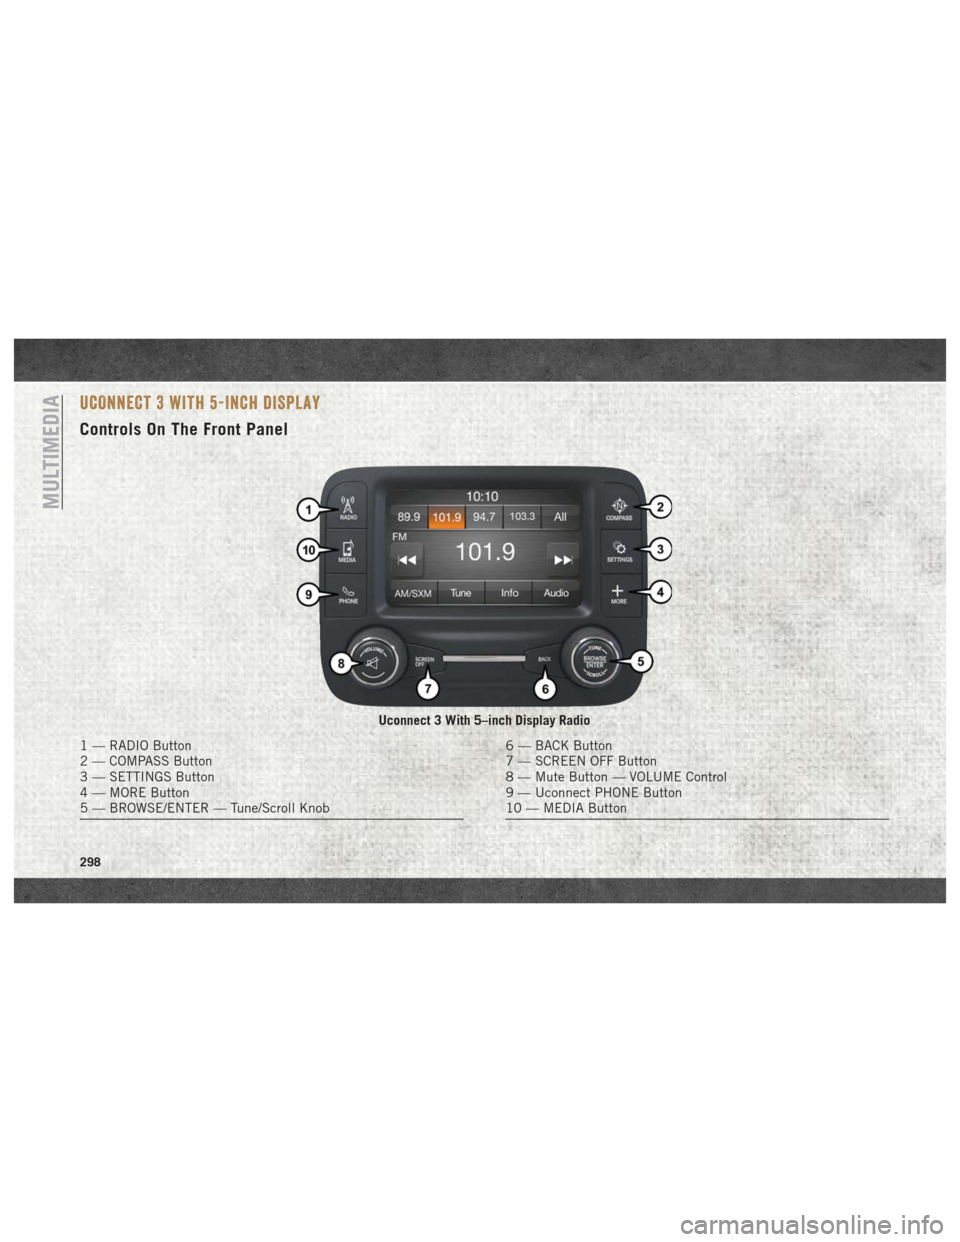
UCONNECT 3 WITH 5-INCH DISPLAY
Controls On The Front Panel
Uconnect 3 With 5–inch Display Radio
1 — RADIO Button
2 — COMPASS Button
3 — SETTINGS Button
4 — MORE Button
5 — BROWSE/ENTER — Tune/Scroll Knob6 — BACK Button
7 — SCREEN OFF Button
8 — Mute Button — VOLUME Control
9 — Uconnect PHONE Button
10 — MEDIA Button
MULTIMEDIA
298
Page 301 of 372
Clock Setting
To start the clock setting procedure:
1. Push the MORE button on the faceplate.Next press the “Settings” button on the
touchscreen and then press the “Clock
and Date” button on the touchscreen.
2. Press the “Set Time” button on the touchscreen.
3. Press the “Up” or “Down” arrows to adjust the hours or minutes, next select the
“AM” or “PM” button on the touchscreen.
You can also select 12hr or 24hr format by
pressing the desired button on the
touchscreen.
4. Once the time is set press the “Done” button on the touchscreen to exit the time
screen.
NOTE:
In the Clock Setting Menu you can also select
the “Show Time Status” button on the touch-
screen, then select from “On” or “Off” to
display the time in the status bar.
Equalizer, Balance And Fade
1. Push the MORE button on the faceplate. Next press the “Settings” button on the
touchscreen.
2. Then scroll down and press the “Audio” button on the touchscreen to get to the
Audio menu.
3. The Audio Menu shows the following op- tions for you to customize your audio
settings.
Equalizer
Press the “Equalizer” button on the touch-
screen to adjust the Bass, Mid and Treble.
Use the “+” or “–” button on the touchscreen
to adjust the equalizer to your desired set-
tings. Press the “Back Arrow” button on the
touchscreen when done.
Balance/Fade
Press the “Balance/Fade” button on the
touchscreen to adjust the sound from the
speakers. Use the arrow button on the touch-
screen to adjust the sound level from the
front and rear or right and left side speakers.
Press the Center “C” button on the touch- screen to reset the balance and fade to the
factory setting. Press the “Back Arrow” but-
ton on the touchscreen when done.
Speed Adjusted Volume
Press the “Speed Adjusted Volume” button
on the touchscreen to select between OFF, 1,
2 or 3. This will decrease the radio volume
relative to a decrease in vehicle speed. Press
the “Back Arrow” button on the touchscreen
when done.
Loudness
Press the “Loudness” button on the touch-
screen to select the Loudness feature. When
this feature is activated it improves sound
quality at lower volumes.
Surround Sound
Press the “Surround Sound” button on the
touchscreen, select “On” or “Off” followed
by pressing the “Back Arrow” button on the
touchscreen. When this feature is activated,
it provides simulated surround sound mode.
299
Page 302 of 372
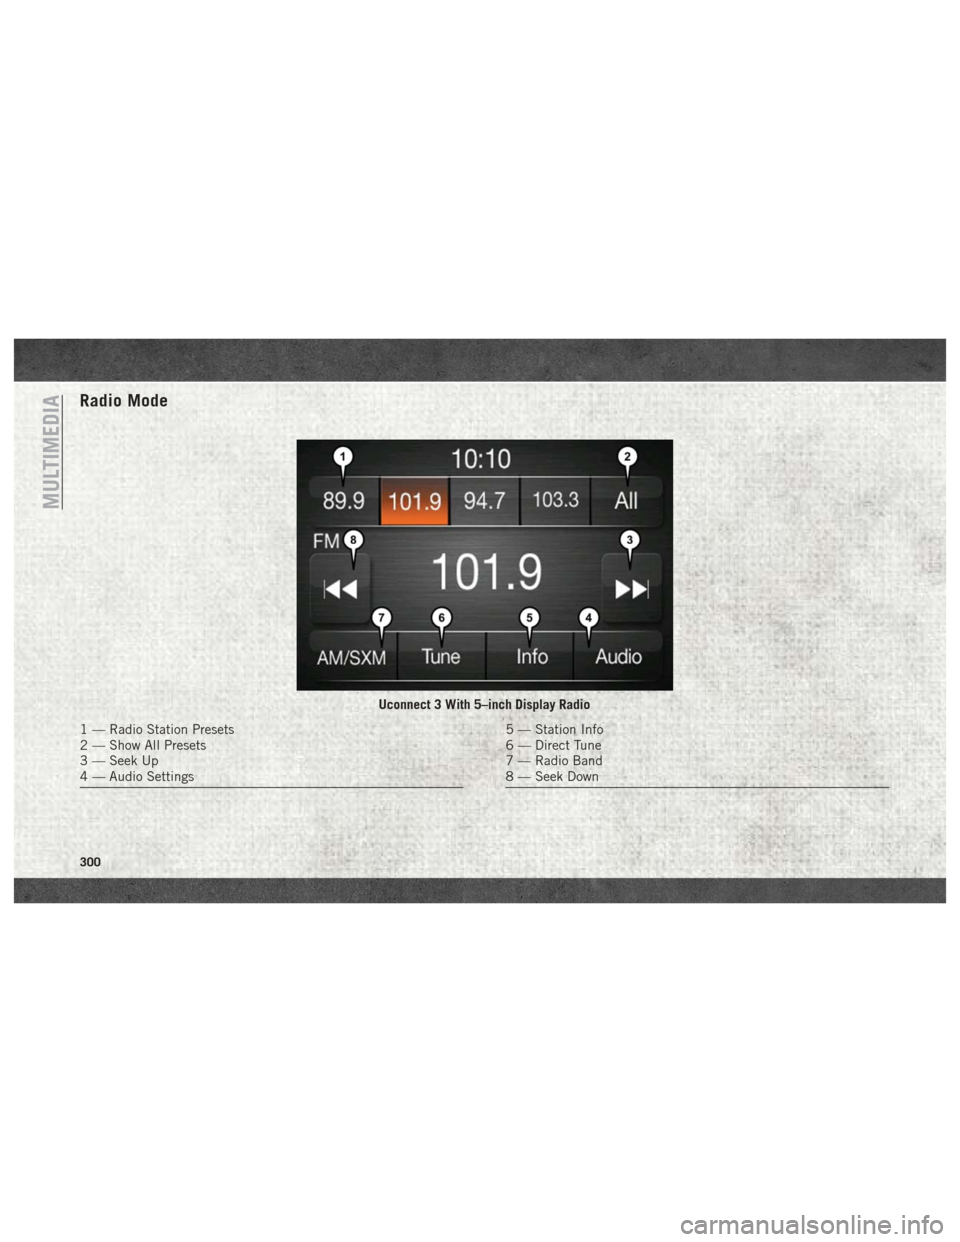
Radio Mode
Uconnect 3 With 5–inch Display Radio
1 — Radio Station Presets
2 — Show All Presets
3 — Seek Up
4 — Audio Settings5 — Station Info
6 — Direct Tune
7 — Radio Band
8 — Seek Down
MULTIMEDIA
300
Page 303 of 372
Seek Previous/Next Buttons
Seek Up
Press and release the “Seek Up”button
on the touchscreen to tune the radio to the
next listenable station or channel.
During a Seek Up function, if the radio
reaches the starting station after passing
through the entire band two times, the radio
will stop at the station where it began.
Fast Seek Up
Press and hold the “Seek Up”button on
the touchscreen to advance the radio through
the available stations or channels at a faster
rate, the radio stops at the next available
station or channel when the button on the
touchscreen is released.
Seek Down
Press and release the “Seek Down”but-
ton on the touchscreen to tune the radio to
the next listenable station or channel.
During a Seek Down function, if the radio
reaches the starting station after passing
through the entire band two times, the radio
will stop at the station where it began. Fast Seek Down
Press and hold the “Seek Down”button
on the touchscreen to advance the radio
through the available stations or channel at a
faster rate, the radio stops at the next avail-
able station or channel when the button on
the touchscreen is released.
Store Radio Presets
The Radio stores up to 12 presets in each of
the Radio modes. There are four visible pre-
sets at the top of the radio screen. Pressing
the “All” button on the touchscreen on the
radio home screen will display all of the
preset stations for that mode.
To store a radio preset manually, follow the
steps below:
1. Tune to the desired station.
2. Press and hold the desired numbered but- ton on the touchscreen for more than two
seconds or until you hear a confirmation
beep.
Media Mode
Audio Source Selection
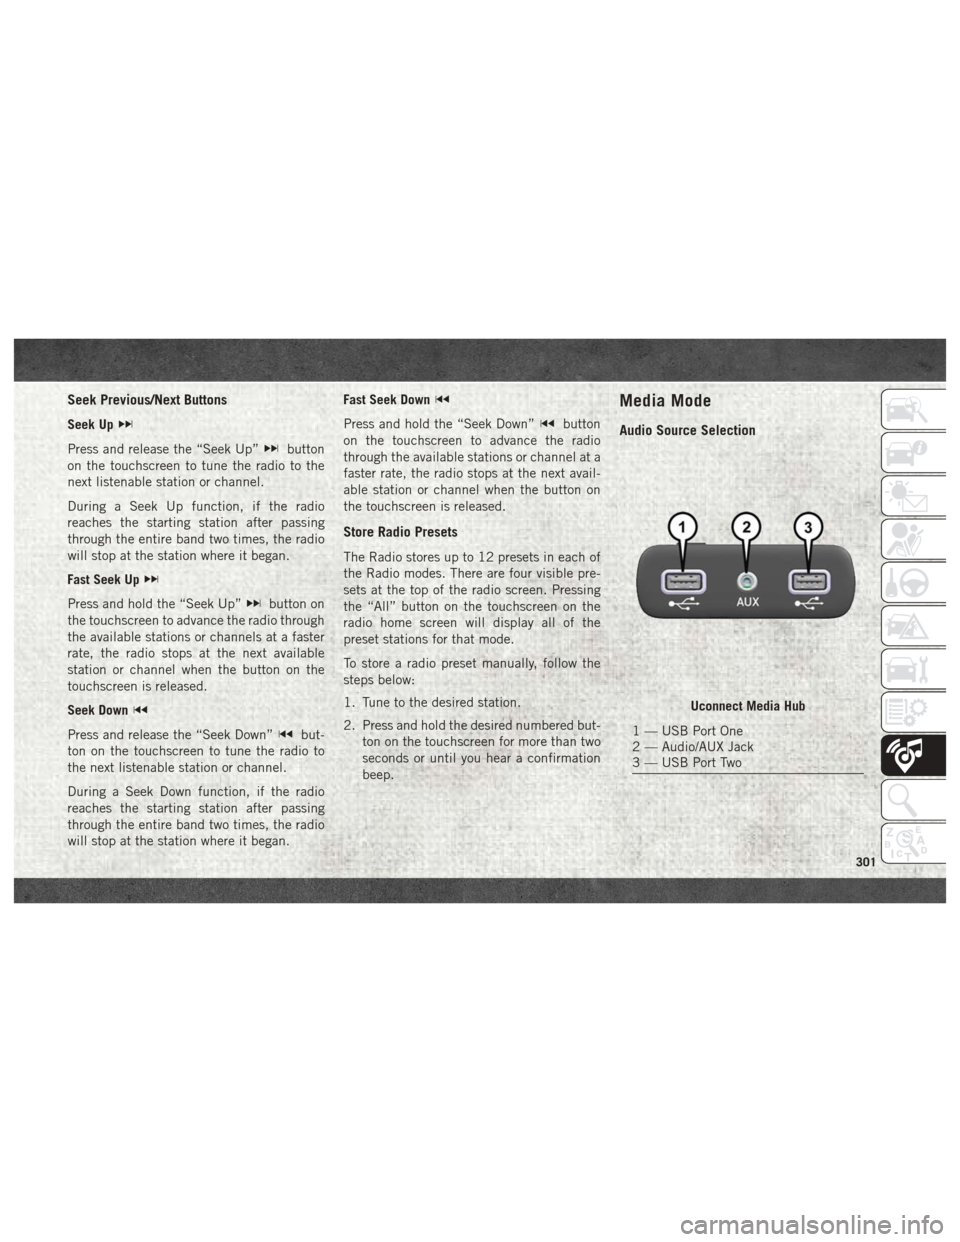
Uconnect Media Hub
1 — USB Port One
2 — Audio/AUX Jack
3 — USB Port Two
301