weight Ram 1500 2018 User Guide
[x] Cancel search | Manufacturer: RAM, Model Year: 2018, Model line: 1500, Model: Ram 1500 2018Pages: 372, PDF Size: 7.1 MB
Page 60 of 372

WARNING!
stalled to transfer the weight of the load
to the pickup box floor or vehicle dam-
age may result. The use of proper sup-
ports will permit loading up to the rated
payload.
• Unrestrained cargo may be thrown for-
ward in an accident causing serious or
fatal injury.
There are stampings in the sheet metal on the
inner side bulkheads of the box in front of
and behind both wheel housings. Place
wooden boards across the box from side to
side to create separate load compartments in
the pickup box.
There are four tie-down cleats bolted to the
lower sides of the pickup box that can sustain
loads up to 1000 lbs (450 kg) total.
Cargo Camera — If Equipped
Your vehicle may be equipped with the Cargo
Camera that allows you to see an image of the
inside of the pickup box. The image will be
displayed in the Uconnect screen. The Cargo Camera is located in the bottom
center area of the center high-mounted sto-
plamp (CHMSL).
A touchscreen button
to indicate the
current active camera image being displayed
is made available whenever the Cargo Cam-
era image is displayed.
Also, a touchscreen button
to switch
the display to rear view camera image is
made available whenever the Cargo Camera
image is displayed.
A touchscreen button "X" to disable display of
the camera image is made available when the
vehicle is not in REVERSE gear.
A display timer is initiated when the Cargo
Camera image is displayed. The image will
continue to be displayed until the display
timer exceeds 10 seconds and the vehicle
speed is above 8 mph (13 km/h) or the
touchscreen button "X" to disable display of
the Cargo Camera image is pressed. NOTE:
• If the vehicle speed remains below 8 mph
(13 km/h), the Cargo Camera image will be
displayed continuously until the touch-
screen button "X" to disable display of the
Cargo Camera image is pressed.
• If snow, ice, mud, or any foreign substance builds up on the camera lens, clean the
lens, rinse with water, and dry with a soft
cloth. Do not cover the lens.
Turning Cargo Camera On Or Off — With
Uconnect 4C/4C NAV
1. Press the “Controls” button located on
the bottom of the Uconnect display.
2. Press the “Cargo Camera” button
to
turn the Cargo Camera system on.
GETTING TO KNOW YOUR VEHICLE
58
Page 61 of 372

NOTE:
Once initiated by the "Cargo Camera" button,
the Cargo Camera image may be deactivated
by pressing the "X" soft button. On deactiva-
tion, the previous selected screen will appear.
RAMBOX — IF EQUIPPED
The RamBox system is an integrated pickup
box storage and cargo management system
consisting of three features:
• Integrated box side storage bins• Cargo extender/divider
• Bed rail tie-down system
RamBox Integrated Box Side
Storage Bins
Cargo storage bins are located on both sides
of the pickup box. The cargo storage bins
provide watertight, lockable, illuminated
storage for up to 150 lbs (68 kg) for 1500 se-
ries vehicles or 300 lbs (136 kg) for
2500 and 3500 series vehicles of evenly
distributed cargo.
CAUTION!
Failure to follow the following items could
cause damage to the vehicle:
• Assure that all cargo inside the storage
bins is properly secured.
• Do not exceed cargo weight rating of
150 lb (68 kg) 1500 series vehicles or
300 lbs (136 kg) for 2500 and 3500 se-
ries vehicles per bin.
To open a storage bin with the RamBox un-
locked, push and release the button located
on the lid. The RamBox lid will open upward
to allow hand access. Lift the lid to fully
open.
NOTE:
RamBox will not open when the pushbutton
is pushed if the RamBox is locked.
Cargo Camera Display
RamBox Features
1 — Bed Extender
2 — Bed Rail Tie-Down System Adjust-
able Cleats
3 — Storage Bin
4 — Push The Button To Open
59
Page 118 of 372

WARNING!
could not hold the child, no matter how
strong you are. The child and others could
be badly injured or killed. Any child riding
in your vehicle should be in a proper re-
straint for the child’s size.
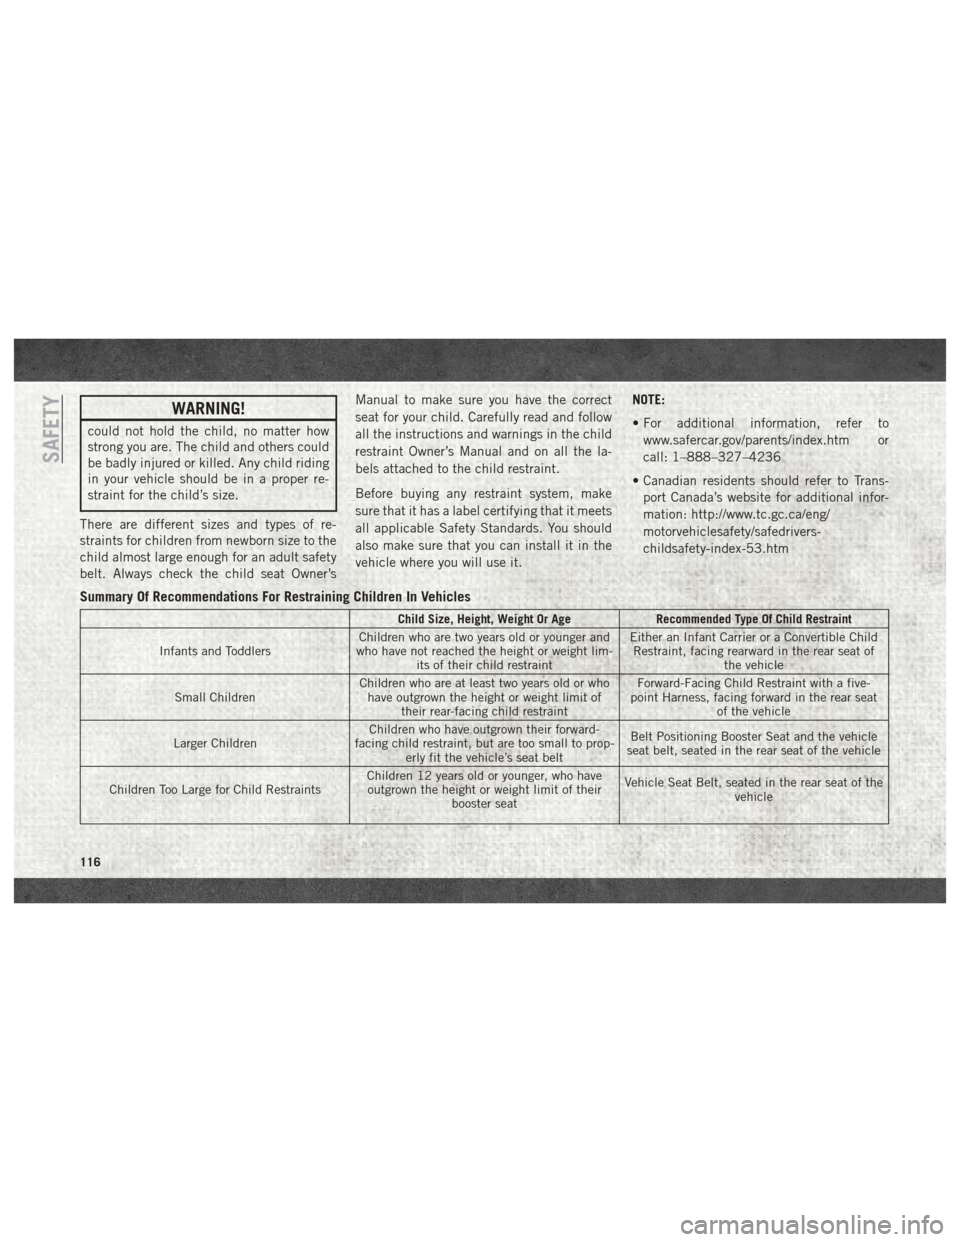
There are different sizes and types of re-
straints for children from newborn size to the
child almost large enough for an adult safety
belt. Always check the child seat Owner’s Manual to make sure you have the correct
seat for your child. Carefully read and follow
all the instructions and warnings in the child
restraint Owner’s Manual and on all the la-
bels attached to the child restraint.
Before buying any restraint system, make
sure that it has a label certifying that it meets
all applicable Safety Standards. You should
also make sure that you can install it in the
vehicle where you will use it.
NOTE:
• For additional information, refer to
www.safercar.gov/parents/index.htm or
call: 1–888–327–4236
• Canadian residents should refer to Trans- port Canada’s website for additional infor-
mation: http://www.tc.gc.ca/eng/
motorvehiclesafety/safedrivers-
childsafety-index-53.htm
Summary Of Recommendations For Restraining Children In Vehicles
Child Size, Height, Weight Or Age Recommended Type Of Child Restraint
Infants and Toddlers Children who are two years old or younger and
who have not reached the height or weight lim- its of their child restraint Either an Infant Carrier or a Convertible Child
Restraint, facing rearward in the rear seat of the vehicle
Small Children Children who are at least two years old or who
have outgrown the height or weight limit of their rear-facing child restraint Forward-Facing Child Restraint with a five-
point Harness, facing forward in the rear seat of the vehicle
Larger Children Children who have outgrown their forward-
facing child restraint, but are too small to prop- erly fit the vehicle’s seat belt Belt Positioning Booster Seat and the vehicle
seat belt, seated in the rear seat of the vehicle
Children Too Large for Child Restraints Children 12 years old or younger, who have
outgrown the height or weight limit of their booster seat Vehicle Seat Belt, seated in the rear seat of the
vehicle
SAFETY
116
Page 119 of 372

Infant And Child Restraints
Safety experts recommend that children ride
rear-facing in the vehicle until they are two
years old or until they reach either the height
or weight limit of their rear-facing child re-
straint. Two types of child restraints can be
used rear-facing: infant carriers and convert-
ible child seats.
The infant carrier is only used rear-facing in
the vehicle. It is recommended for children
from birth until they reach the weight or
height limit of the infant carrier. Convertible
child seats can be used either rear-facing or
forward-facing in the vehicle. Convertible
child seats often have a higher weight limit in
the rear-facing direction than infant carriers
do, so they can be used rear-facing by chil-
dren who have outgrown their infant carrier
but are still less than at least two years old.
Children should remain rear-facing until they
reach the highest weight or height allowed by
their convertible child seat.WARNING!
• Never place a rear-facing child restraintin front of an air bag. A deploying pas-
senger front air bag can cause death or
serious injury to a child 12 years or
younger, including a child in a rear-
facing child restraint.
• Only use a rear-facing child restraint in a
vehicle with a rear seat.
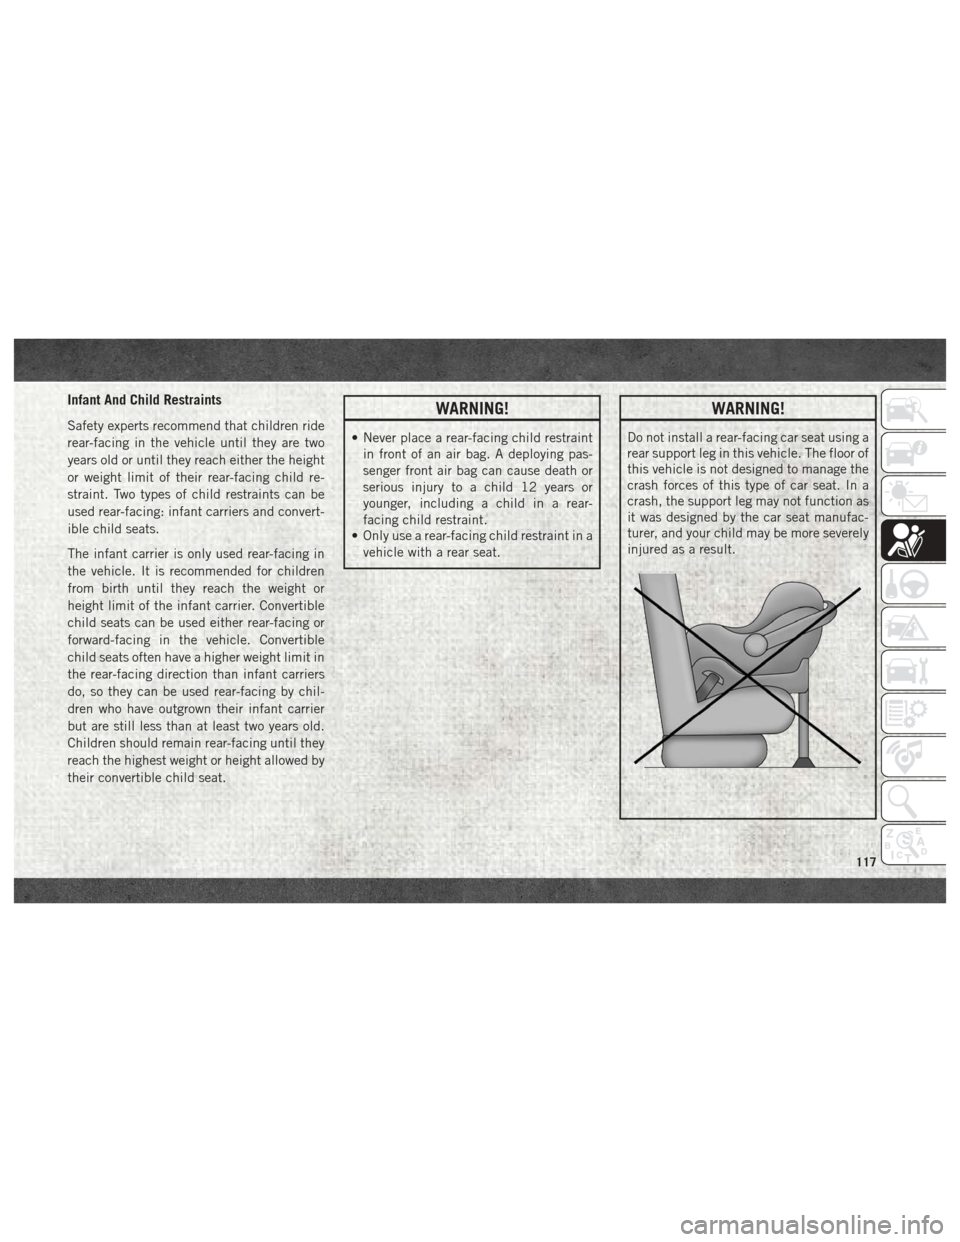
WARNING!
Do not install a rear-facing car seat using a
rear support leg in this vehicle. The floor of
this vehicle is not designed to manage the
crash forces of this type of car seat. In a
crash, the support leg may not function as
it was designed by the car seat manufac-
turer, and your child may be more severely
injured as a result.
117
Page 120 of 372

Older Children And Child Restraints
Children who are two years old or who have
outgrown their rear-facing convertible child
seat can ride forward-facing in the vehicle.
Forward-facing child seats and convertible
child seats used in the forward-facing direc-
tion are for children who are over two years
old or who have outgrown the rear-facing
weight or height limit of their rear-facing
convertible child seat. Children should re-
main in a forward-facing child seat with a
harness for as long as possible, up to the
highest weight or height allowed by the child
seat.
All children whose weight or height is above
the forward-facing limit for the child seat
should use a belt-positioning booster seat
until the vehicle’s seat belts fit properly. If
the child cannot sit with knees bent over the
vehicle’s seat cushion while the child’s back
is against the seatback, they should use a
belt-positioning booster seat. The child and
belt-positioning booster seat are held in the
vehicle by the seat belt.WARNING!
• Improper installation can lead to failureof an infant or child restraint. It could
come loose in a collision. The child
could be badly injured or killed. Follow
the child restraint manufacturer’s direc-
tions exactly when installing an infant or
child restraint.
• After a child restraint is installed in the
vehicle, do not move the vehicle seat
forward or rearward because it can
loosen the child restraint attachments.
Remove the child restraint before ad-
justing the vehicle seat position. When
the vehicle seat has been adjusted, re-
install the child restraint.
• When your child restraint is not in use,
secure it in the vehicle with the seat belt
or LATCH anchorages, or remove it from
the vehicle. Do not leave it loose in the
vehicle. In a sudden stop or accident, it
could strike the occupants or seatbacks
and cause serious personal injury.
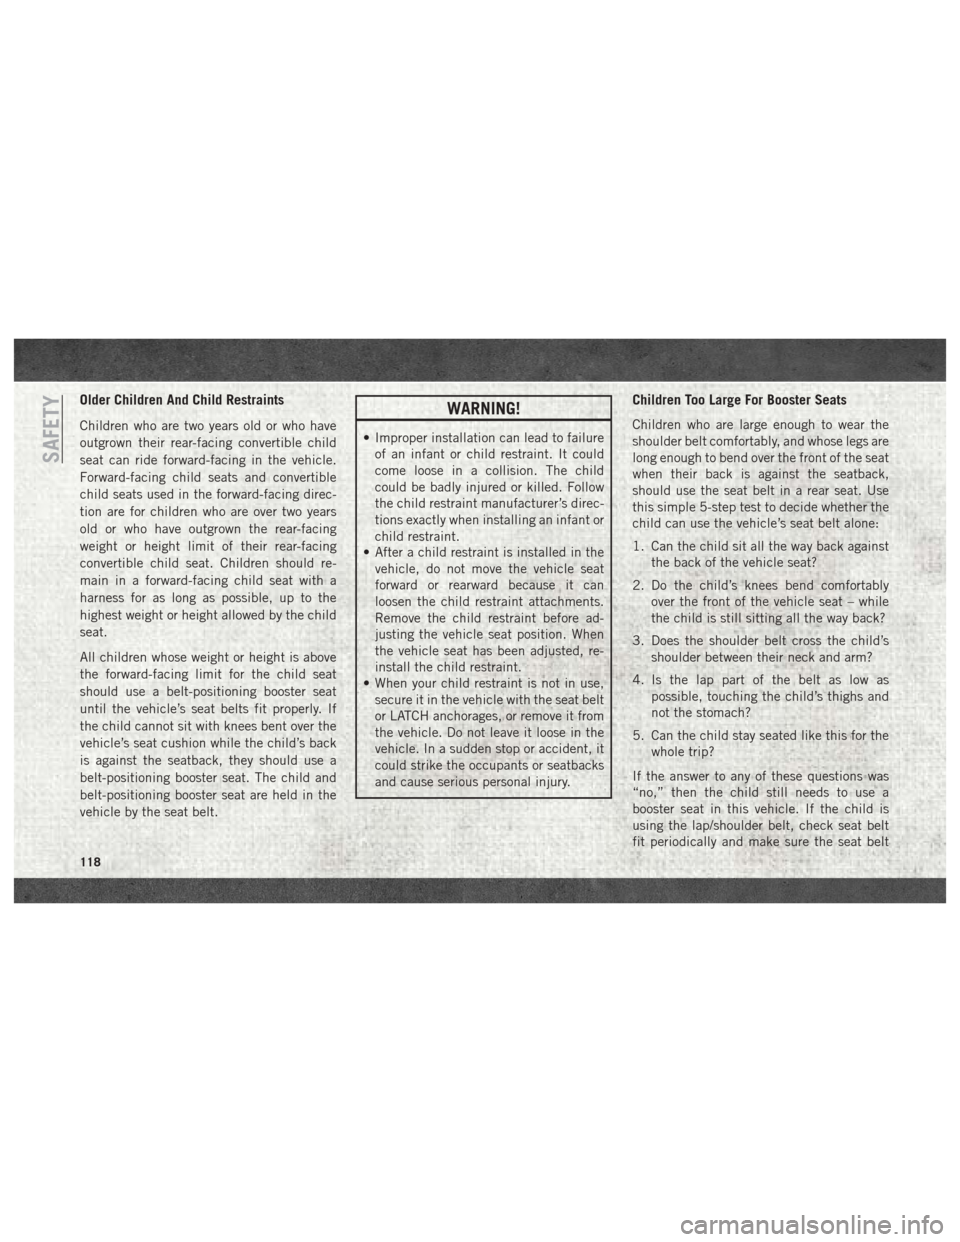
Children Too Large For Booster Seats
Children who are large enough to wear the
shoulder belt comfortably, and whose legs are
long enough to bend over the front of the seat
when their back is against the seatback,
should use the seat belt in a rear seat. Use
this simple 5-step test to decide whether the
child can use the vehicle’s seat belt alone:
1. Can the child sit all the way back against the back of the vehicle seat?
2. Do the child’s knees bend comfortably over the front of the vehicle seat – while
the child is still sitting all the way back?
3. Does the shoulder belt cross the child’s shoulder between their neck and arm?
4. Is the lap part of the belt as low as possible, touching the child’s thighs and
not the stomach?
5. Can the child stay seated like this for the whole trip?
If the answer to any of these questions was
“no,” then the child still needs to use a
booster seat in this vehicle. If the child is
using the lap/shoulder belt, check seat belt
fit periodically and make sure the seat belt
SAFETY
118
Page 121 of 372

buckle is latched. A child’s squirming or
slouching can move the belt out of position. If
the shoulder belt contacts the face or neck,
move the child closer to the center of the
vehicle, or use a booster seat to position the
seat belt on the child correctly.WARNING!
Never allow a child to put the shoulder belt
under an arm or behind their back. In a
crash, the shoulder belt will not protect a
child properly, which may result in serious
WARNING!
injury or death. A child must always wear
both the lap and shoulder portions of the
seat belt correctly.
Recommendations For Attaching Child Restraints
Restraint Type Combined Weight of theChild + Child Restraint Use Any Attachment Method Shown With An “X” Below
LATCH – Lower Anchors Only Seat Belt Only LATCH – Lower Anchors
+ Top Tether Anchor Seat Belt + Top Tether
Anchor
Rear-Facing Child Re- straint Up to 65 lbs (29.5 kg)
XX
Rear-Facing Child Re- straint More than 65 lbs
(29.5 kg) X
Forward-Facing Child Restraint Up to 65 lbs (29.5 kg)
XX
Forward-Facing Child Restraint More than 65 lbs
(29.5 kg) X
119
Page 123 of 372

Frequently Asked Questions About Installing Child Restraints With LATCH
What is the weight limit (child’s weight +
weight of the child restraint) for using the
LATCH anchorage system to attach the child restraint? 65 lbs (29.5 kg)Use the LATCH anchorage system until the
combined weight of the child and the child
restraint is 65 lbs (29.5 kg). Use the seat belt
and tether anchor instead of the LATCH system once the combined weight is more than 65 lbs (29.5 kg).
Quad Cab 60/40 Split Bench LATCHPositions
Lower Anchorage Symbol (2 An-
chorages Per Seating Position)
Top Tether Anchorage SymbolCrew/Mega Cabs 60/40 Split Bench
LATCH Positions
Lower Anchorage Symbol (2 An-
chorages Per Seating Position)
Top Tether Anchorage Symbol
Quad/Crew Cabs Full Bench LATCH
Positions
Lower Anchorage Symbol (2 An-
chorages Per Seating Position)
Top Tether Anchorage Symbol
121
Page 128 of 372

seat belts are designed to keep the lap por-
tion of the seat belt tight around the child
restraint so that it is not necessary to use a
locking clip. The ALR retractor can be
“switched” into a locked mode by pulling all
of the webbing out of the retractor and then
letting the webbing retract back into the
retractor. If it is locked, the ALR will make a
clicking noise while the webbing is pulled
back into the retractor. Refer to the “Auto-
matic Locking Mode” description in “Switch-
able Automatic Locking Retractors (ALR)”
under “Occupant Restraint Systems” for ad-
ditional information on ALR. The cinching
latch plate is designed to hold the lap portion
of the seat belt tight when webbing is pulled
tight and straight through a child restraint’s
belt path.
Please see the table below and the following
sections for more information.Lap/Shoulder Belt Systems For Installing
Child Restraints In This Vehicle
Frequently Asked Questions About Installing Child Restraints With Seat Belts
What is the weight limit (child’s weight +
weight of the child restraint) for using the
Tether Anchor with the seat belt to attach a forward facing child restraint? Weight limit of the Child RestraintAlways use the tether anchor when using the
seat belt to install a forward facing child re-
straint, up to the recommended weight limit of the child restraint.
Regular Cab Automatic Locking Retractor(ALR) Locations
ALR = Switchable Automatic Locking
Retractor
Top Tether Anchorage Symbol
Quad Cab/Mega Cab/Crew Cab AutomaticLocking Retractor (ALR) Locations
CINCH = Cinching Latchplate
ALR = Switchable Automatic Locking
Retractor
Top Tether Anchorage Symbol
SAFETY
126
Page 140 of 372

To Accelerate For Passing.........178
To Resume Speed .............178
To Deactivate ................178
PARKSENSE FRONT AND REAR PARK AS-
SIST — IF EQUIPPED ...........179
Cleaning The ParkSense System .....179
PARKVIEW REAR BACK UP CAMERA — IF
EQUIPPED................. .179
REFUELING THE VEHICLE —
GAS ENGINE ................ .181
Materials Added To Fuel ..........182
REFUELING THE VEHICLE— 1500 DIESEL
MODELS................... .182
Diesel Exhaust Fluid............183
Adding Diesel Exhaust Fluid........184
REFUELING THE VEHICLE — 2500/
3500 DIESEL MODELS ...........186
Diesel Exhaust Fluid............188
TRAILER TOWING.............191
Trailer Towing Weights (Maximum
Trailer Weight Ratings) ...........191
Towing Requirements ...........191
RECREATIONAL TOWING (BEHIND
MOTORHOME, ETC.)............196
Towing This Vehicle Behind Another
Vehicle....................196
Recreational Towing — Two-Wheel
Drive Models .................197
Recreational Towing — Four-Wheel
Drive Models .................197
STARTING AND OPERATING
138
Page 156 of 372

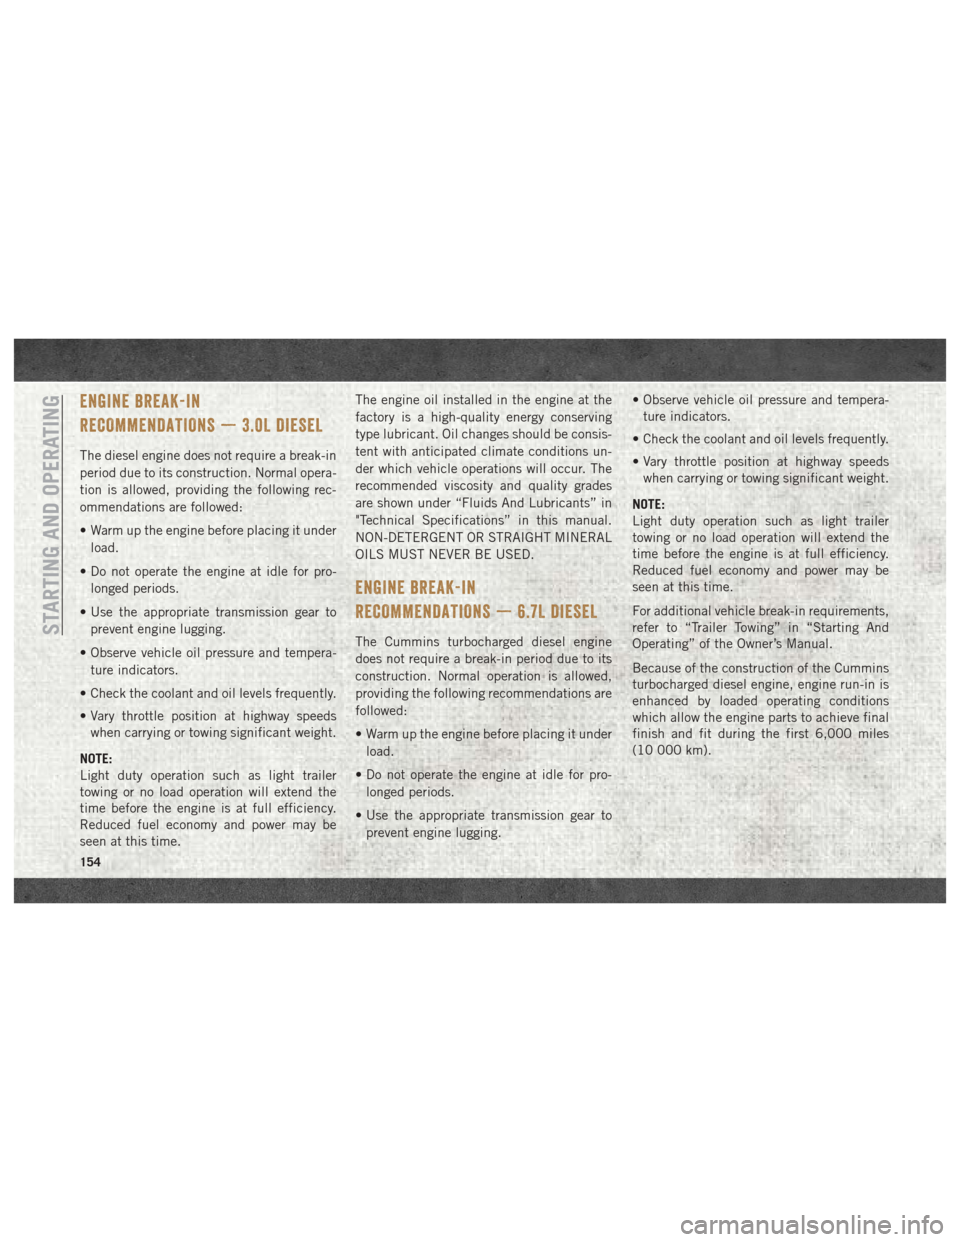
ENGINE BREAK-IN
RECOMMENDATIONS — 3.0L DIESEL
The diesel engine does not require a break-in
period due to its construction. Normal opera-
tion is allowed, providing the following rec-
ommendations are followed:
• Warm up the engine before placing it underload.
• Do not operate the engine at idle for pro- longed periods.
• Use the appropriate transmission gear to prevent engine lugging.
• Observe vehicle oil pressure and tempera- ture indicators.
• Check the coolant and oil levels frequently.
• Vary throttle position at highway speeds when carrying or towing significant weight.
NOTE:
Light duty operation such as light trailer
towing or no load operation will extend the
time before the engine is at full efficiency.
Reduced fuel economy and power may be
seen at this time. The engine oil installed in the engine at the
factory is a high-quality energy conserving
type lubricant. Oil changes should be consis-
tent with anticipated climate conditions un-
der which vehicle operations will occur. The
recommended viscosity and quality grades
are shown under “Fluids And Lubricants” in
"Technical Specifications” in this manual.
NON-DETERGENT OR STRAIGHT MINERAL
OILS MUST NEVER BE USED.
ENGINE BREAK-IN
RECOMMENDATIONS — 6.7L DIESEL
The Cummins turbocharged diesel engine
does not require a break-in period due to its
construction. Normal operation is allowed,
providing the following recommendations are
followed:
• Warm up the engine before placing it under
load.
• Do not operate the engine at idle for pro- longed periods.
• Use the appropriate transmission gear to prevent engine lugging. • Observe vehicle oil pressure and tempera-
ture indicators.
• Check the coolant and oil levels frequently.
• Vary throttle position at highway speeds when carrying or towing significant weight.
NOTE:
Light duty operation such as light trailer
towing or no load operation will extend the
time before the engine is at full efficiency.
Reduced fuel economy and power may be
seen at this time.
For additional vehicle break-in requirements,
refer to “Trailer Towing” in “Starting And
Operating” of the Owner’s Manual.
Because of the construction of the Cummins
turbocharged diesel engine, engine run-in is
enhanced by loaded operating conditions
which allow the engine parts to achieve final
finish and fit during the first 6,000 miles
(10 000 km).STARTING AND OPERATING
154