tow Ram 1500 2019 Owners Manual
[x] Cancel search | Manufacturer: RAM, Model Year: 2019, Model line: 1500, Model: Ram 1500 2019Pages: 698, PDF Size: 9.04 MB
Page 494 of 698
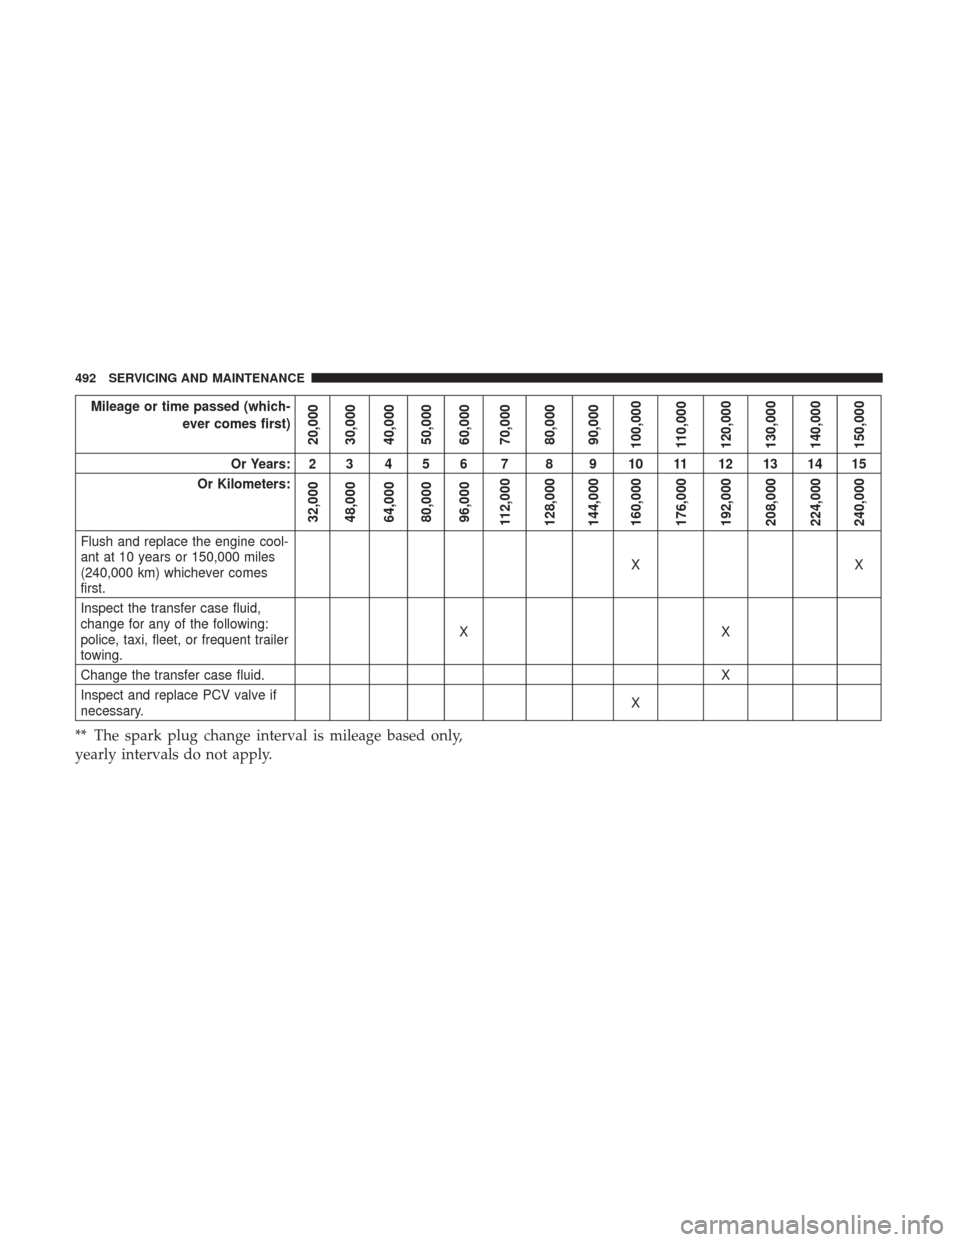
Mileage or time passed (which-ever comes first)
20,000
30,000
40,000
50,000
60,000
70,000
80,000
90,000
100,000
110,000
120,000
130,000
140,000
150,000
Or Years: 2 3 4 5 6 7 8 9 10 11 12 13 14 15
Or Kilometers:
32,000
48,000
64,000
80,000
96,000
112,000
128,000
144,000
160,000
176,000
192,000
208,000
224,000
240,000
Flush and replace the engine cool-
ant at 10 years or 150,000 miles
(240,000 km) whichever comes
first. XX
Inspect the transfer case fluid,
change for any of the following:
police, taxi, fleet, or frequent trailer
towing. XX
Change the transfer case fluid. X
Inspect and replace PCV valve if
necessary. X
** The spark plug change interval is mileage based only,
yearly intervals do not apply.
492 SERVICING AND MAINTENANCE
Page 499 of 698
Checking Oil Level
To assure proper lubrication of your vehicle’s engine, the
engine oil must be maintained at the correct level. Check
the oil level at regular intervals, such as every fuel stop.
The best time to check the engine oil level is about five
minutes after a fully warmed up engine is shut off.
Checking the oil while the vehicle is on level ground will
improve the accuracy of the oil level readings. Always
maintain the oil level within the SAFE zone on the dipstick.
Adding one quart of oil when the reading is at the bottom
of the SAFE zone will result in a reading at the top of the
safe zone on these engines.
CAUTION!
Overfilling or underfilling will cause oil aeration or
loss of oil pressure. This could damage your engine.
Adding Washer Fluid
The fluid reservoir is located under the hood and should be
checked for fluid level at regular intervals. Fill the reservoir
with windshield washer solvent only (not radiator anti-
freeze). When refilling the washer fluid reservoir, take
some washer fluid and apply it to a cloth or towel and wipe
the wiper blades clean. This will help blade performance.To prevent freeze-up of your windshield washer system in
cold weather, select a solution or mixture that meets or
exceeds the temperature range of your climate. This rating
information can be found on most washer fluid containers.
WARNING!
Commercially available windshield washer solvents
are flammable. They could ignite and burn you. Care
must be exercised when filling or working around the
washer solution.
After the engine has warmed up, operate the defroster for
a few minutes to reduce the possibility of smearing or
freezing the fluid on the cold windshield. Windshield
washer solution used with water as directed on the con-
tainer, aids cleaning action, reduces the freezing point to
avoid line clogging, and is not harmful to paint or trim.
Maintenance-Free Battery
Your vehicle is equipped with a maintenance-free battery.
You will never have to add water, nor is periodic mainte-
nance required.
8
SERVICING AND MAINTENANCE 497
Page 507 of 698

2. With the glove compartment door open, remove theglove compartment tension tether and tether clip by
sliding the clip toward the face of the glove compart-
ment door. Lift the clip out of glove compartment door
and release into dash panel. 3. There are glove compartment travel stops on both sides
of the glove compartment door, push inward on both
sides of the glove compartment to release the glove
compartment travel stops.
4. Disengage the glove compartment door from its hinges by opening the glove compartment past the travel stop
and pulling it toward you.
Right Side Of Glove Compartment
1 — Glove Compartment Door
2 — Glove Compartment Tension Tether
Glove Compartment
1 — Glove Compartment Travel Stop
2 — Glove Compartment Tension Tether
3 — Glove Compartment Door
8
SERVICING AND MAINTENANCE 505
Page 509 of 698
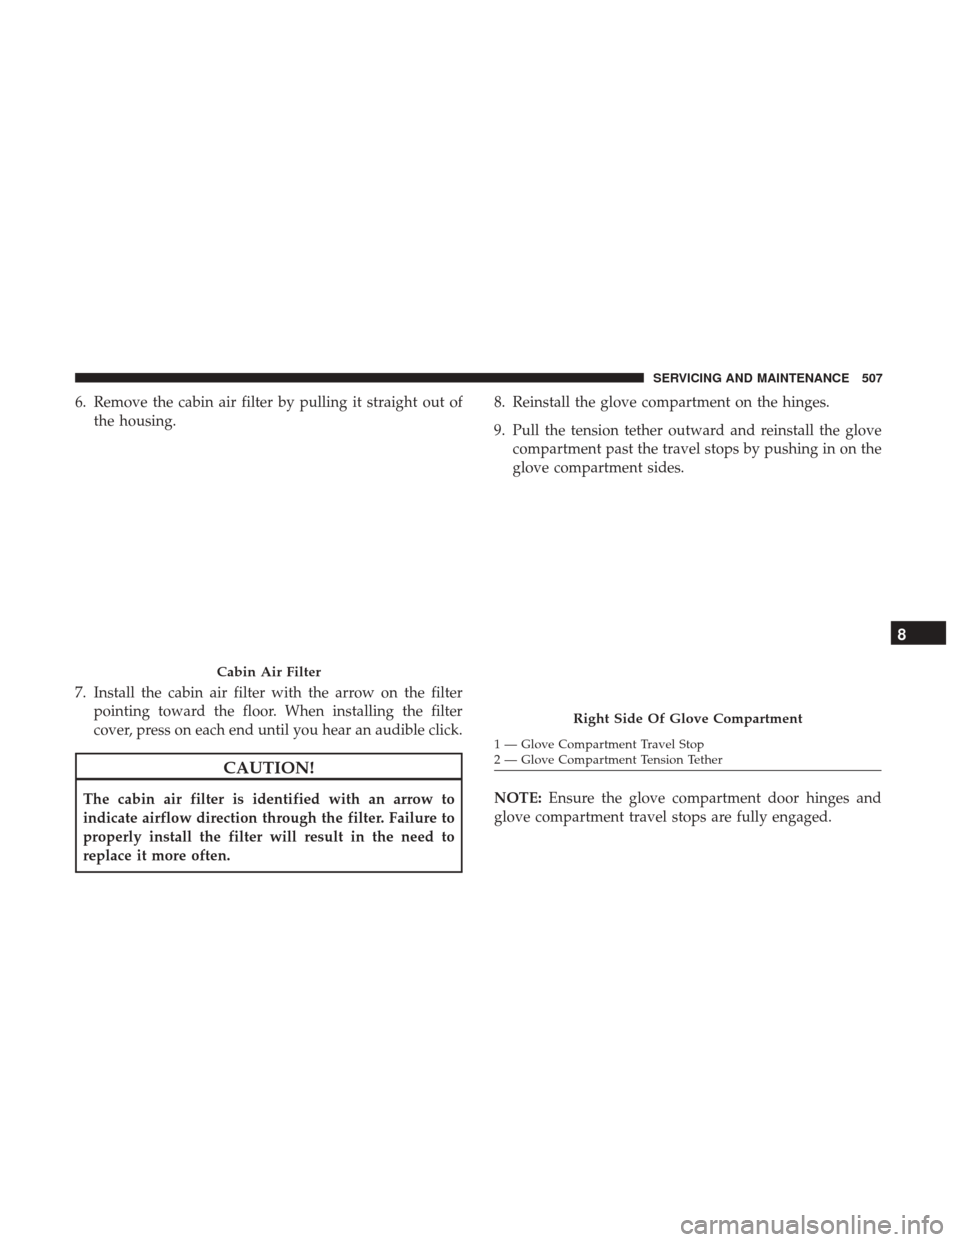
6. Remove the cabin air filter by pulling it straight out ofthe housing.
7. Install the cabin air filter with the arrow on the filter pointing toward the floor. When installing the filter
cover, press on each end until you hear an audible click.
CAUTION!
The cabin air filter is identified with an arrow to
indicate airflow direction through the filter. Failure to
properly install the filter will result in the need to
replace it more often. 8. Reinstall the glove compartment on the hinges.
9. Pull the tension tether outward and reinstall the glove
compartment past the travel stops by pushing in on the
glove compartment sides.
NOTE: Ensure the glove compartment door hinges and
glove compartment travel stops are fully engaged.
Cabin Air Filter
Right Side Of Glove Compartment
1 — Glove Compartment Travel Stop
2 — Glove Compartment Tension Tether
8
SERVICING AND MAINTENANCE 507
Page 513 of 698
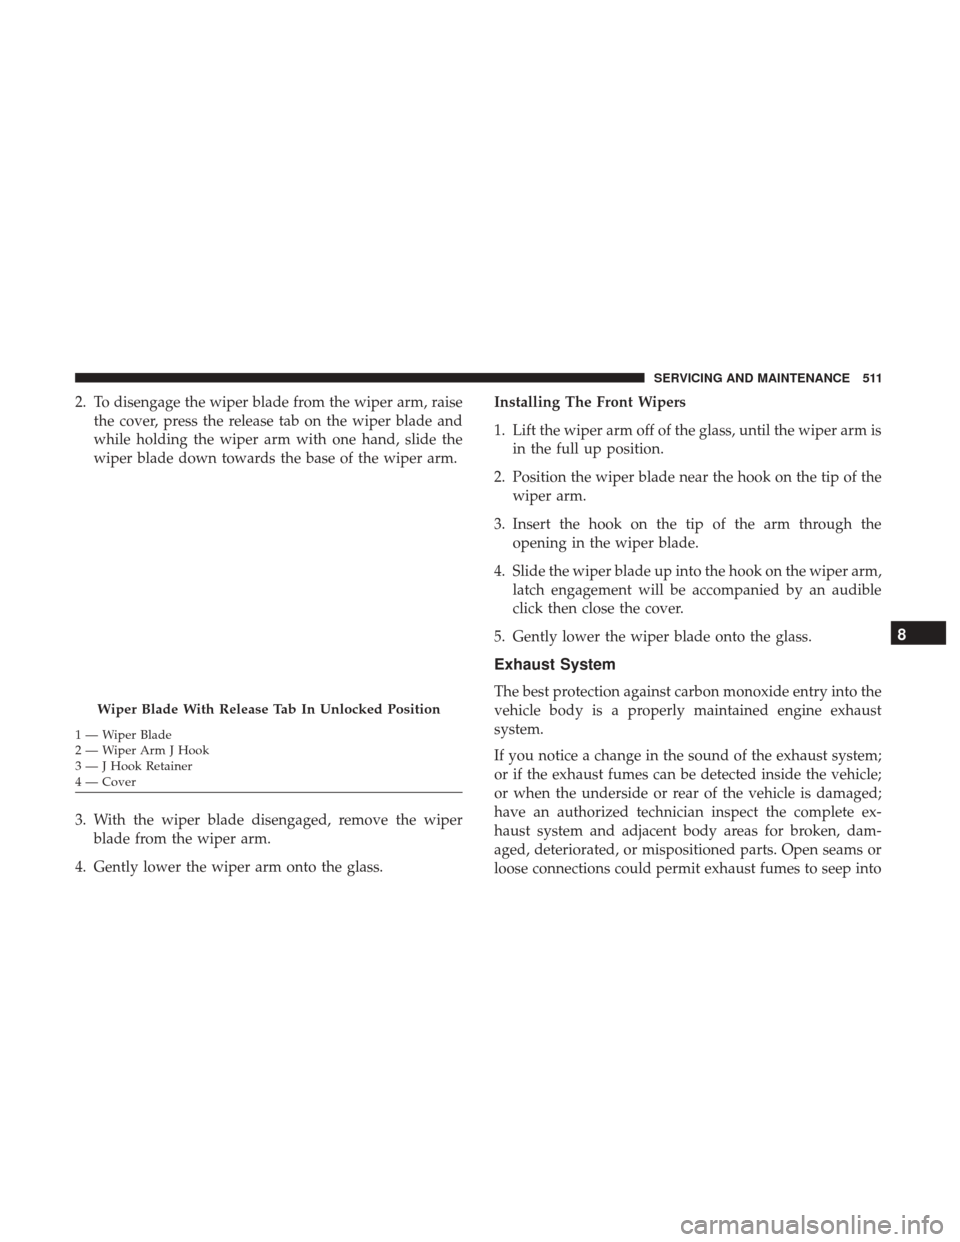
2. To disengage the wiper blade from the wiper arm, raisethe cover, press the release tab on the wiper blade and
while holding the wiper arm with one hand, slide the
wiper blade down towards the base of the wiper arm.
3. With the wiper blade disengaged, remove the wiper blade from the wiper arm.
4. Gently lower the wiper arm onto the glass. Installing The Front Wipers
1. Lift the wiper arm off of the glass, until the wiper arm is
in the full up position.
2. Position the wiper blade near the hook on the tip of the wiper arm.
3. Insert the hook on the tip of the arm through the opening in the wiper blade.
4. Slide the wiper blade up into the hook on the wiper arm, latch engagement will be accompanied by an audible
click then close the cover.
5. Gently lower the wiper blade onto the glass.
Exhaust System
The best protection against carbon monoxide entry into the
vehicle body is a properly maintained engine exhaust
system.
If you notice a change in the sound of the exhaust system;
or if the exhaust fumes can be detected inside the vehicle;
or when the underside or rear of the vehicle is damaged;
have an authorized technician inspect the complete ex-
haust system and adjacent body areas for broken, dam-
aged, deteriorated, or mispositioned parts. Open seams or
loose connections could permit exhaust fumes to seep into
Wiper Blade With Release Tab In Unlocked Position
1—WiperBlade
2 — Wiper Arm J Hook
3 — J Hook Retainer
4 — Cover
8
SERVICING AND MAINTENANCE 511
Page 515 of 698
To minimize the possibility of catalytic converter damage:
•Do not interrupt the ignition when the transmission is in
gear and the vehicle is in motion.
• Do not try to start the vehicle by pushing or towing the
vehicle.
• Do not idle the engine with any ignition components
disconnected or removed, such as when diagnostic
testing, or for prolonged periods during very rough idle
or malfunctioning operating conditions.
Cooling System
WARNING!
• You or others can be badly burned by hot engine
coolant (antifreeze) or steam from your radiator. If
you see or hear steam coming from under the hood,
do not open the hood until the radiator has had time
to cool. Never open a cooling system pressure cap
when the radiator or coolant bottle is hot.
• Keep hands, tools, clothing, and jewelry away from
the radiator cooling fan when the hood is raised. The
fan starts automatically and may start at any time,
whether the engine is running or not.
(Continued)
WARNING! (Continued)
•When working near the radiator cooling fan, discon-
nect the fan motor lead or turn the ignition to the
OFF mode. The fan is temperature controlled and can
start at any time the ignition is in the ON mode.
Engine Coolant Checks
Check the engine coolant (antifreeze) protection every 12
months (before the onset of freezing weather, where appli-
cable). If the engine coolant (antifreeze) is dirty or rusty in
appearance, the system should be drained, flushed and
refilled with fresh coolant. Check the front of the A/C
condenser (if equipped) or radiator for any accumulation
of bugs, leaves, etc. If dirty, clean by gently spraying water
from a garden hose vertically down the face of the A/C
condenser (if equipped) or the back of the radiator core.
Check the engine cooling system hoses for brittle rubber,
cracking, tears, cuts and tightness of the connection at the
coolant recovery bottle and radiator. Inspect the entire
system for leaks.
DO NOT REMOVE THE COOLANT PRESSURE CAP
WHEN THE COOLING SYSTEM IS HOT.
8
SERVICING AND MAINTENANCE 513
Page 531 of 698
Tire And Loading Information Placard
This placard tells you important information about the:
1. Number of people that can be carried in the vehicle.
2. Total weight your vehicle can carry.
3. Tire size designed for your vehicle.
4. Cold tire inflation pressures for the front, rear, and sparetires.Loading
The vehicle maximum load on the tire must not exceed the
load carrying capacity of the tire on your vehicle. You will
not exceed the tire’s load carrying capacity if you adhere to
the loading conditions, tire size, and cold tire inflation
pressures specified on the Tire and Loading Information
placard in “Vehicle Loading” in the “Starting And Operat-
ing” section of this manual.
NOTE: Under a maximum loaded vehicle condition, gross
axle weight ratings (GAWRs) for the front and rear axles
must not be exceeded.
For further information on GAWRs, vehicle loading, and
trailer towing, refer to “Vehicle Loading” in the “Starting
And Operating” section of this manual.
To determine the maximum loading conditions of your
vehicle, locate the statement “The combined weight of
occupants and cargo should never exceed XXX kg or
XXX lbs” on the Tire and Loading Information placard. The
combined weight of occupants, cargo/luggage and trailer
tongue weight (if applicable) should never exceed the
weight referenced here.
Tire And Loading Information Placard
8
SERVICING AND MAINTENANCE 529
Page 532 of 698
Steps For Determining Correct Load Limit—
(1) Locate the statement “The combined weight of
occupants and cargo should never exceed XXX kg or
XXX lbs.” on your vehicle’s placard.
(2) Determine the combined weight of the driver and
passengers that will be riding in your vehicle.
(3) Subtract the combined weight of the driver and
passengers from XXX kg or XXX lbs.
(4) The resulting figure equals the available amount of
cargo and luggage load capacity. For example, if “XXX”
amount equals 1400 lbs. and there will be five 150 lb
passengers in your vehicle, the amount of available
cargo and luggage load capacity is 650 lbs. (1400-750
(5x150) = 650 lbs.)
(5) Determine the combined weight of luggage and
cargo being loaded on the vehicle. That weight may not
safely exceed the available cargo and luggage load
capacity calculated in Step 4.
(6) If your vehicle will be towing a trailer, load from
your trailer will be transferred to your vehicle. Consult
this manual to determine how this reduces the available
cargo and luggage load capacity of your vehicle.Metric Example For Load Limit
For example, if “XXX” amount equals 635 kg and there will
be five 68 kg passengers in your vehicle, the amount of
available cargo and luggage load capacity is 295 kg (635-
340 (5x68) = 295 kg) as shown in step 4.
NOTE:
•If your vehicle will be towing a trailer, load from your
trailer will be transferred to your vehicle. The following
table shows examples on how to calculate total load,
cargo/luggage, and towing capacities of your vehicle
with varying seating configurations and number and
size of occupants. This table is for illustration purposes
only and may not be accurate for the seating and load
carry capacity of your vehicle.
• For the following example, the combined weight of
occupants and cargo should never exceed 865 lbs
(392 kg).
530 SERVICING AND MAINTENANCE
Page 537 of 698
Run Flat Tires — If Equipped
Run Flat tires allow you the capability to drive 50 miles
(80 km) at 50 mph (80 km/h) after a rapid loss of inflation
pressure. This rapid loss of inflation is referred to as the
Run Flat mode. A Run Flat mode occurs when the tire
inflation pressure is of/or below 14 psi (96 kPa). Once a
Run Flat tire reaches the run flat mode it has limited
driving capabilities and needs to be replaced immediately.
A Run Flat tire is not repairable.
It is not recommended driving a vehicle loaded at full
capacity or to tow a trailer while a tire is in the run flat
mode.
See the tire pressure monitoring section for more informa-
tion.
Tire Spinning
When stuck in mud, sand, snow, or ice conditions, do not
spin your vehicle’s wheels above 30 mph (48 km/h) or for
longer than 30 seconds continuously without stopping.
Refer to “Freeing A Stuck Vehicle” in “In Case Of Emer-
gency” for further information.
WARNING!
Fast spinning tires can be dangerous. Forces generated
by excessive wheel speeds may cause tire damage or
failure. A tire could explode and injure someone. Do
not spin your vehicle’s wheels faster than 30 mph
(48 km/h) for more than 30 seconds continuously when
you are stuck, and do not let anyone near a spinning
wheel, no matter what the speed.
8
SERVICING AND MAINTENANCE 535
Page 552 of 698
To Help Maintain The Appearance Of Your Spray-On
Bedliner, Follow The Steps Below:
1. Rinse your truck bed out with water to remove anyloose dirt and debris.
2. Mix a mild soap or detergent with water with a soft cloth or brush.
3. Rinse bedliner with water.
4. Once dry, apply a small amount of Mopar Spray-On Bedliner Conditioner to a moist towel or sponge and
wipe over the entire surface of the truck bedliner.
WARNING!
Do not use silicon-based protection products to clean
your bedliner. Silicon-based products can become slip-
pery and may result in personal injury.
Spray-On Bedliners are chemically-resistant to many dif-
ferent types of chemicals (including gasoline, oil, hydraulic
fluids) for short periods of time. If a spill occurs on your
Spray-On Bedliner, rinse the truck out as soon as possible
to avoid permanent damage. Repairing The Spray-On Bedliner
While extremely tough, it is possible to damage a Spray-On
Bedliner. One common condition is when loading a heavy
pallet and dragging that pallet across the floor of the bed.
If a nail or sharp point is exposed under the weight of the
pallet a scratch or tear is possible. While not covered by
your new vehicle warranty, a cosmetic fix to cover the
metal exposed by the scratch is required. To repair a tear or
gouge, follow the directions provided in the Mopar Quick
Repair Kit.
INTERIORS
Seats And Fabric Parts
Use Mopar Total Clean to clean fabric upholstery and
carpeting.
WARNING!
Do not use volatile solvents for cleaning purposes.
Many are potentially flammable, and if used in closed
areas they may cause respiratory harm.
550 SERVICING AND MAINTENANCE