key RAM 1500 2022 Owner's Manual
[x] Cancel search | Manufacturer: RAM, Model Year: 2022, Model line: 1500, Model: RAM 1500 2022Pages: 496, PDF Size: 18.03 MB
Page 41 of 496

GETTING TO KNOW YOUR VEHICLE39
Power Lumbar — If Equipped
Vehicles equipped with power driver or passenger
seats may also be equipped with a 2-way or a
4-way power lumbar adjustment. The power
lumbar switch is located on the outboard side of
the power seat. Push the switch forward to
increase the lumbar support. Push the switch
rearward to decrease the lumbar support. If
equipped with a 4-way adjustment, pushing
upward or downward on the switch will raise and
lower the position of the support.
Power Lumbar Switch
Easy Entry/Exit Seat — If Equipped
This feature provides automatic driver’s seat
positioning to enhance driver mobility when
entering and exiting the vehicle.
The distance the driver’s seat moves depends on
where you have the driver’s seat positioned when
you place the vehicle’s ignition in the OFF position.
When you place the vehicle’s ignition in the
OFF position, the driver’s seat will move about
2.4 inches (6 cm) rearward if the driver’s seat
position is greater than or equal to 2.7 inches
(6.77 cm) forward of the rear stop. The seat will
return to its previously set position when you
place the ignition into the ACC or ON/RUN posi -
tion.
When you remove the key fob from the ignition,
the driver’s seat will move to a position
0.3 inches (0.77 cm) forward of the rear stop if
the driver’s seat position is between 0.9 inches
and 2.7 inches (2.27 cm and 6.77 cm) forward
of the rear stop. The seat will return to its previ -
ously set position when you place the ignition to
the ACC or ON/RUN position.
The Easy Entry/Easy Exit feature is disabled
when the driver’s seat position is less than
0.9 inches (2.27 cm) forward of the rear stop. At
this position, there is no benefit to the driver by
moving the seat for Easy Exit or Easy Entry. When enabled in Uconnect Settings, Easy Entry
and Easy Exit positions are stored in each memory
setting profile Ú
page 34.
NOTE:The Easy Entry/Exit feature is enabled or disabled
through the programmable features in the
Uconnect system Ú page 234.
HEATED SEATS — IF EQUIPPED
WARNING!
Persons who are unable to feel pain to the
skin because of advanced age, chronic illness,
diabetes, spinal cord injury, medication,
alcohol use, exhaustion or other physical
condition must exercise care when using the
seat heater. It may cause burns even at low
temperatures, especially if used for long
periods of time.
Do not place anything on the seat or seatback
that insulates against heat, such as a blanket
or cushion. This may cause the seat heater to
overheat. Sitting in a seat that has been over -
heated could cause serious burns due to the
increased surface temperature of the seat.
2
22_DT_OM_EN_USC_t.book Page 39
Page 45 of 496

GETTING TO KNOW YOUR VEHICLE43
UCONNECT VOICE RECOGNITION —
IF EQUIPPED
INTRODUCING VOICE RECOGNITION
Start using Uconnect Voice Recognition with these
helpful quick tips. It provides the key Voice
Commands and tips you need to know to control
your vehicle’s Voice Recognition (VR) system. This
system is only available on the Uconnect 3 With
5-inch Display, Uconnect 5 NAV With 8.4-inch
Display, and the Uconnect 5 NAV With 12-inch
Display.
Uconnect 3 With 5-inch Display
If you see the NAV icon on the bottom bar or in the
Apps menu of your 8.4-inch touchscreen, you have
the Uconnect 5 NAV system. If not, you have a
Uconnect 5 with 8.4-inch display system.BASIC VOICE COMMANDS
The basic Voice Commands below can be given at
any point while using your Uconnect system.
Push the VR button or for the Uconnect 5/
5 NAV, say the vehicle’s Wake Up word, “Hey
Uconnect”. After the beep, say:
“
Cancel ” to stop a current voice session.
“Help ” to hear a list of suggested Voice
Commands.
“ Repeat ” to listen to the system prompts again.
Notice the visual cues that inform you of your Voice
Recognition system’s status.
NOTE:On Uconnect 5 systems, the factory default Wake
Up word is set to “Hey Uconnect” and can be repro -
grammed through the Uconnect Settings.
GET STARTED
The VR button is used to activate/deactivate
your Voice Recognition system.
Helpful hints for using Voice Recognition:
1. Visit
UconnectPhone.com
to check mobile
device and feature compatibility and to find
phone pairing instructions.
2. Reduce background noise. Wind noise and passenger conversations are examples of
noise that may impact recognition.
3. Speak clearly at a normal pace and volume while facing straight ahead. The microphone is
located in the headliner and aimed at the
driver.
4. Each time you give a Voice Command, you must first push either the VR or Phone button,
wait until after the beep, then say your Voice
Command. You can also say the vehicle “Wake
Up” word and state your command. Some
examples of “Wake Up” words include “Hey
Uconnect” or “Hey Ram”.2
22_DT_OM_EN_USC_t.book Page 43
Page 47 of 496
GETTING TO KNOW YOUR VEHICLE45
For vehicles equipped with Driver Memory
Settings Úpage 34, you can use your key fob or
the memory switch on the driver’s door trim
panel to return the adjustable pedals to
pre-programmed positions.MIRRORS
INSIDE REARVIEW MIRROR
Manual Mirror — If Equipped
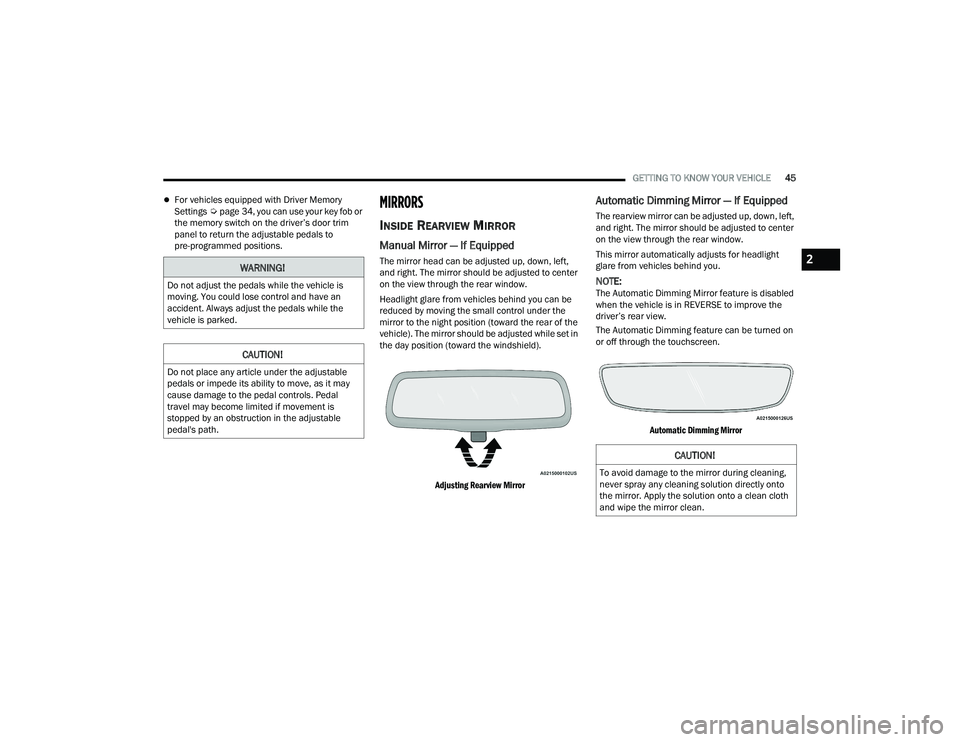
The mirror head can be adjusted up, down, left,
and right. The mirror should be adjusted to center
on the view through the rear window.
Headlight glare from vehicles behind you can be
reduced by moving the small control under the
mirror to the night position (toward the rear of the
vehicle). The mirror should be adjusted while set in
the day position (toward the windshield).
Adjusting Rearview Mirror
Automatic Dimming Mirror — If Equipped
The rearview mirror can be adjusted up, down, left,
and right. The mirror should be adjusted to center
on the view through the rear window.
This mirror automatically adjusts for headlight
glare from vehicles behind you.
NOTE:The Automatic Dimming Mirror feature is disabled
when the vehicle is in REVERSE to improve the
driver’s rear view.
The Automatic Dimming feature can be turned on
or off through the touchscreen.
Automatic Dimming Mirror
WARNING!
Do not adjust the pedals while the vehicle is
moving. You could lose control and have an
accident. Always adjust the pedals while the
vehicle is parked.
CAUTION!
Do not place any article under the adjustable
pedals or impede its ability to move, as it may
cause damage to the pedal controls. Pedal
travel may become limited if movement is
stopped by an obstruction in the adjustable
pedal's path.
CAUTION!
To avoid damage to the mirror during cleaning,
never spray any cleaning solution directly onto
the mirror. Apply the solution onto a clean cloth
and wipe the mirror clean.
2
22_DT_OM_EN_USC_t.book Page 45
Page 54 of 496

52GETTING TO KNOW YOUR VEHICLE
PROGRAMMING HOMELINK® TO A
M
ISCELLANEOUS DEVICE
The procedure on how to program HomeLink® to a
miscellaneous device follows the same procedure
as programming to a garage door opener
Ú page 51. Be sure to determine if the device has
a rolling code, or non-rolling code before beginning
the programming process.
NOTE:Canadian Radio Frequency (RF) laws require trans -
mitter signals to time-out (or quit) after several
seconds of transmission, which may not be long
enough for HomeLink® to pick up the signal during
programming. Similar to this Canadian law, some
U.S. gate operators are designed to time-out in the
same manner. The procedure may need to be
performed multiple times to successfully pair the
device to your HomeLink® buttons.
REPROGRAMMING A SINGLE
H
OMELINK® BUTTON
To reprogram a single HomeLink® button that has
been previously trained, without erasing all the
channels, follow the procedure below. Be sure to
determine whether the new device you want to
program the HomeLink® button to has a rolling
code, or non-rolling code.
1. Place the ignition in the ON/RUN position,
without starting the engine.
2. Push and hold the desired HomeLink® button until the HomeLink® indicator light begins to
flash after 20 seconds. Do not release the
button.
3. Without releasing the button , proceed with
Step 2 in “Programming HomeLink® To A
Garage Door Opener” Ú page 51, and follow
all remaining steps.
CANADIAN/GATE OPERATOR
P
ROGRAMMING
For programming transmitters in Canada/United
States that require the transmitter signals to
“time-out” after several seconds of transmission:
Canadian Radio Frequency (RF) laws require
transmitter signals to time-out (or quit) after
several seconds of transmission, which may not be
long enough for HomeLink® to pick up the signal
during programming. Similar to this Canadian law,
some U.S. gate operators are designed to time-out
in the same manner. It may be helpful to unplug the device during the
cycling process to prevent possible overheating of
the garage door or gate motor.
1. Place the ignition in the ON/RUN position.
NOTE:For vehicles equipped with Keyless Enter ‘n Go™,
place the ignition in the RUN position. Make sure
while programming HomeLink® with the engine on
that your vehicle is outside of your garage, or that
the garage door remains open at all times.
2. Place the hand-held transmitter 1 to 3 inches
(3 to 8 cm) away from the HomeLink® button
you wish to program while keeping the
HomeLink® indicator light in view.
3. Continue to push and hold the HomeLink® button while you push and release (cycle) your
hand-held transmitter every two seconds until
HomeLink® has successfully accepted the
frequency signal. The indicator light will flash
slowly and then rapidly when fully trained.
4. Watch for the HomeLink® indicator to change flash rates. When it changes, it is
programmed. It may take up to 30 seconds or
longer in rare cases. The garage door may
open and close while you are programming.
22_DT_OM_EN_USC_t.book Page 52
Page 60 of 496

58GETTING TO KNOW YOUR VEHICLE
Cargo/Bed Lights Button On Headlight Switch (Vehicles Sold In Canada)
Cargo Lights
When the vehicle is stationary, these lights can
also be turned on using the switch located just
inside the pickup box, on the lower part of the bed
light lens. A telltale will illuminate in the instrument
cluster display when these lights are on. Pushing
the switch a second time will turn the lights off.
Bed Light Switch (Without RamBox)
The cargo light and bed lights (if equipped) will turn
on for approximately 30 seconds when a key fob
unlock button is pushed, as part of the Illuminated
Entry feature. When these lights are activated using the button
on the headlight switch the cargo lights, trailer
spotter lights, and trailer hitch light will remain
illuminated when the vehicle transmission is in
PARK, NEUTRAL, or REVERSE. The lights will turn
off when the vehicle transmission is placed in
DRIVE.
When the vehicle is placed in the REVERSE
position, the trailer hitch light will turn on
automatically. The trailer hitch light will turn off
when the vehicle is placed in the DRIVE position.
NOTE:The bed lights are not affected by gear selection.
NOTE:For vehicles shipped to or sold in the states of
California or Mississippi, the cargo, bed, and mirror
spotter lights will not work while the vehicle is in
motion. In every other state, the cargo and mirror
spotter lights will turn off when the vehicle is in
motion, but the bed light will remain on.
22_DT_OM_EN_USC_t.book Page 58
Page 61 of 496

GETTING TO KNOW YOUR VEHICLE59
BATTERY SAVER
Timers are set to both the interior and exterior
lights to protect the life of your vehicle’s battery.
After 10 minutes, if the ignition is OFF and any door
is left open or the dimmer control is rotated all the
way up to the topmost position, the interior lights
will automatically turn off.
NOTE:Battery saver mode is canceled if the ignition is ON.
The headlights will automatically turn off after
eight minutes while the ignition is in the OFF
position.
INTERIOR LIGHTS
COURTESY LIGHTS
Courtesy and dome lights are turned on when the
doors are opened or the Dome ON button is
pushed on the overhead console. If your vehicle is
equipped with Remote Keyless Entry and the
unlock button is pushed on the key fob, the
courtesy and dome lights will turn on. When a door
is open and the interior lights are on, and the Dome
Defeat button on the overhead console is pressed,
the interior lights will turn off.
Front Map/Reading Lights
The overhead console lights can also be operated
individually as reading lights by pushing the
corresponding buttons.
Front Courtesy/Reading Lights Front Courtesy/Reading Lights
Three types of rear courtesy/reading lights are
available for your vehicle.
Push button on/off
Push lens on/off
Push round puck lens on/off (if equipped with
Dual Pane Sunroof)
1 — Reading Light On/Off Buttons
2 — Dome Defeat Button
3 — Dome ON Button
1 — Driver’s Reading Light On/Off Button
2 — Dome Defeat Button
3 — Passenger’s Reading Light On/Off Button
4 — Dome On Button
2
22_DT_OM_EN_USC_t.book Page 59
Page 62 of 496
60GETTING TO KNOW YOUR VEHICLE
NOTE:The courtesy/reading lights will remain on until the
switch is pushed a second time, so be sure they
have been turned off before exiting the vehicle. If
the interior lights are left on after the ignition is
turned off, they will automatically turn off after
10 minutes.
Dimmer Controls
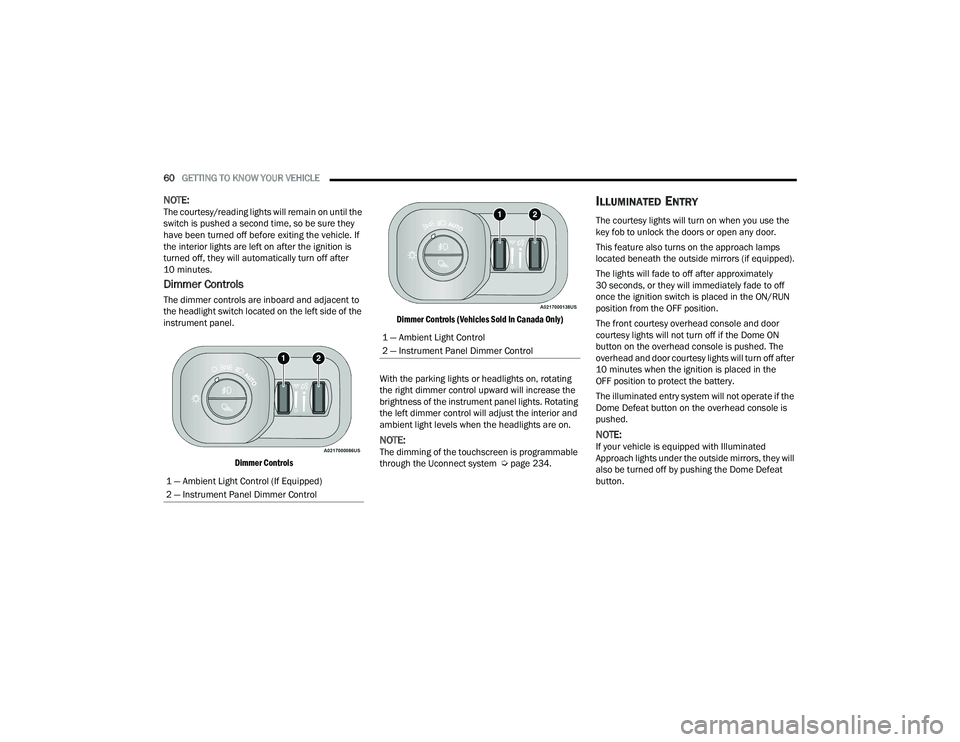
The dimmer controls are inboard and adjacent to
the headlight switch located on the left side of the
instrument panel.
Dimmer Controls Dimmer Controls (Vehicles Sold In Canada Only)
With the parking lights or headlights on, rotating
the right dimmer control upward will increase the
brightness of the instrument panel lights. Rotating
the left dimmer control will adjust the interior and
ambient light levels when the headlights are on.
NOTE:The dimming of the touchscreen is programmable
through the Uconnect system Ú page 234.
ILLUMINATED ENTRY
The courtesy lights will turn on when you use the
key fob to unlock the doors or open any door.
This feature also turns on the approach lamps
located beneath the outside mirrors (if equipped).
The lights will fade to off after approximately
30 seconds, or they will immediately fade to off
once the ignition switch is placed in the ON/RUN
position from the OFF position.
The front courtesy overhead console and door
courtesy lights will not turn off if the Dome ON
button on the overhead console is pushed. The
overhead and door courtesy lights will turn off after
10 minutes when the ignition is placed in the
OFF position to protect the battery.
The illuminated entry system will not operate if the
Dome Defeat button on the overhead console is
pushed.
NOTE:If your vehicle is equipped with Illuminated
Approach lights under the outside mirrors, they will
also be turned off by pushing the Dome Defeat
button.
1 — Ambient Light Control (If Equipped)
2 — Instrument Panel Dimmer Control
1 — Ambient Light Control
2 — Instrument Panel Dimmer Control
22_DT_OM_EN_USC_t.book Page 60
Page 78 of 496
76GETTING TO KNOW YOUR VEHICLE
(Continued)
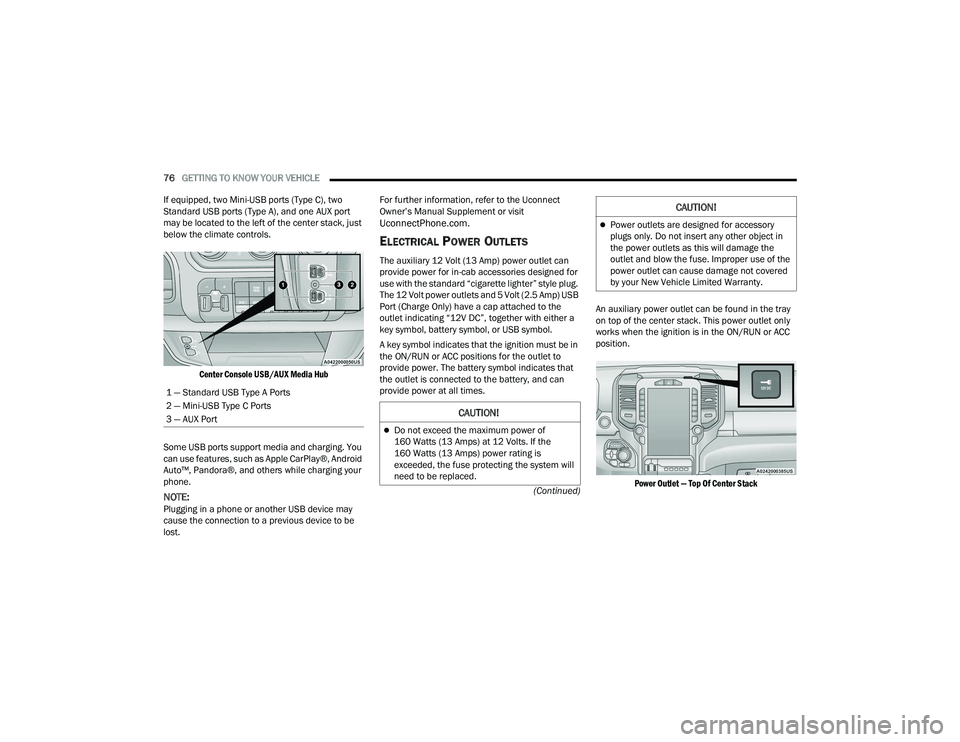
If equipped, two Mini-USB ports (Type C), two
Standard USB ports (Type A), and one AUX port
may be located to the left of the center stack, just
below the climate controls.
Center Console USB/AUX Media Hub
Some USB ports support media and charging. You
can use features, such as Apple CarPlay®, Android
Auto™, Pandora®, and others while charging your
phone.
NOTE:Plugging in a phone or another USB device may
cause the connection to a previous device to be
lost. For further information, refer to the Uconnect
Owner’s Manual Supplement or visit
UconnectPhone.com.
ELECTRICAL POWER OUTLETS
The auxiliary 12 Volt (13 Amp) power outlet can
provide power for in-cab accessories designed for
use with the standard “cigarette lighter” style plug.
The 12 Volt power outlets and 5 Volt (2.5 Amp) USB
Port (Charge Only) have a cap attached to the
outlet indicating “12V DC”, together with either a
key symbol, battery symbol, or USB symbol.
A key symbol indicates that the ignition must be in
the ON/RUN or ACC positions for the outlet to
provide power. The battery symbol indicates that
the outlet is connected to the battery, and can
provide power at all times.
An auxiliary power outlet can be found in the tray
on top of the center stack. This power outlet only
works when the ignition is in the ON/RUN or ACC
position.
Power Outlet — Top Of Center Stack
1 — Standard USB Type A Ports
2 — Mini-USB Type C Ports
3 — AUX Port
CAUTION!
Do not exceed the maximum power of
160 Watts (13 Amps) at 12 Volts. If the
160 Watts (13 Amps) power rating is
exceeded, the fuse protecting the system will
need to be replaced.
Power outlets are designed for accessory
plugs only. Do not insert any other object in
the power outlets as this will damage the
outlet and blow the fuse. Improper use of the
power outlet can cause damage not covered
by your New Vehicle Limited Warranty.
CAUTION!
22_DT_OM_EN_USC_t.book Page 76
Page 81 of 496
GETTING TO KNOW YOUR VEHICLE79
WIRELESS CHARGING PAD —
I
F EQUIPPED
Wireless Charging Pad
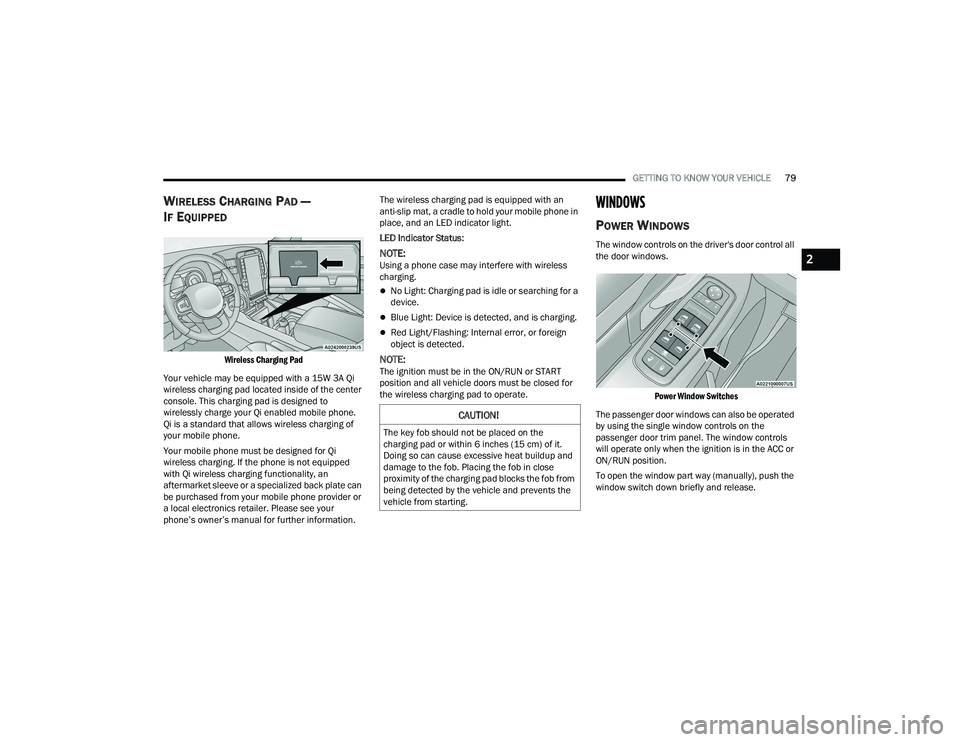
Your vehicle may be equipped with a 15W 3A Qi
wireless charging pad located inside of the center
console. This charging pad is designed to
wirelessly charge your Qi enabled mobile phone.
Qi is a standard that allows wireless charging of
your mobile phone.
Your mobile phone must be designed for Qi
wireless charging. If the phone is not equipped
with Qi wireless charging functionality, an
aftermarket sleeve or a specialized back plate can
be purchased from your mobile phone provider or
a local electronics retailer. Please see your
phone’s owner’s manual for further information. The wireless charging pad is equipped with an
anti-slip mat, a cradle to hold your mobile phone in
place, and an LED indicator light.
LED Indicator Status:
NOTE:Using a phone case may interfere with wireless
charging.
No Light: Charging pad is idle or searching for a
device.
Blue Light: Device is detected, and is charging.
Red Light/Flashing: Internal error, or foreign
object is detected.
NOTE:The ignition must be in the ON/RUN or START
position and all vehicle doors must be closed for
the wireless charging pad to operate.
WINDOWS
POWER WINDOWS
The window controls on the driver's door control all
the door windows.
Power Window Switches
The passenger door windows can also be operated
by using the single window controls on the
passenger door trim panel. The window controls
will operate only when the ignition is in the ACC or
ON/RUN position.
To open the window part way (manually), push the
window switch down briefly and release.
CAUTION!
The key fob should not be placed on the
charging pad or within 6 inches (15 cm) of it.
Doing so can cause excessive heat buildup and
damage to the fob. Placing the fob in close
proximity of the charging pad blocks the fob from
being detected by the vehicle and prevents the
vehicle from starting.
2
22_DT_OM_EN_USC_t.book Page 79
Page 82 of 496
80GETTING TO KNOW YOUR VEHICLE
NOTE:The power window switches will remain active for
up to 10 minutes after the ignition is placed in the
OFF position. Opening either front door will cancel
this feature. The time is programmable within
Uconnect Settings Úpage 234.
AUTOMATIC WINDOW FEATURES
Auto-Down Feature
The driver and front passenger door power window
switches have an Auto-Down feature. Push the
window switch down for a short period of time,
then release, and the window will go down
automatically. To stop the window from going all the way down
during the Auto-Down operation, pull up or push
down on the switch briefly.
Auto-Up Feature With Anti-Pinch Protection
Lift the window switch up for a short period of time
and release; the window will go up automatically.
To stop the window from going all the way up
during the Auto-Up operation, push down on the
switch briefly.
To close the window part way, lift the window
switch briefly and release it when you want the
window to stop.
If the window runs into any obstacle during
auto-closure, it will reverse direction and then go
back down. Remove the obstacle and use the
window switch again to close the window.
NOTE:Any impact due to rough road conditions may
trigger the auto-reverse function unexpectedly
during auto-closure. If this happens, pull the switch
lightly and hold to close the window manually.
RESET AUTO-UP
Should the Auto-Up feature stop working, the
window probably needs to be reset. To reset
Auto-Up:
1. Pull the window switch up to close the window
completely and continue to hold the switch up
for an additional two seconds after the
window is closed.
2. Push the window switch down firmly to open the window completely and continue to hold
the switch down for an additional two seconds
after the window is fully open.
WARNING!
Never leave children unattended in a vehicle. Do
not leave the key fob in or near the vehicle or in
a location accessible to children, and do not
leave the Keyless Enter ‘n Go™ Ignition in the
ACC or ON/RUN position. Occupants, particularly
unattended children, can become entrapped by
the windows while operating the power window
switches. Such entrapment may result in serious
injury or death.
WARNING!
There is no anti-pinch protection when the
window is almost closed. To avoid personal
injury be sure to clear your arms, hands, fingers
and all objects from the window path before
closing.
22_DT_OM_EN_USC_t.book Page 80