RamBox RAM 1500 2022 Owners Manual
[x] Cancel search | Manufacturer: RAM, Model Year: 2022, Model line: 1500, Model: RAM 1500 2022Pages: 496, PDF Size: 18.03 MB
Page 6 of 496
4
TAILGATE ................................................................ 86 Opening .............................................................86
Closing...............................................................86
Locking Tailgate................................................86
Multifunction Tailgate — If Equipped ..............87
Tailgate Removal .............................................88
Bed Step — If Equipped....................................90
PICKUP BOX .......................................................... 92
Bed Rail Tie-Down System — If Equipped ......93
RAMBOX — IF EQUIPPED ...................................... 94
Locking And Unlocking RamBox ......................94
RamBox Cargo Storage Bins............................94
RamBox Safety Warning ..................................96
Bed Divider — If Equipped................................97
TRI-FOLD TONNEAU COVER — IF EQUIPPED ...... 98
Tonneau Cover Components ...........................98
Tri-Fold Tonneau Cover Folding For
Driving Or Removal...........................................99
Tri-Fold Tonneau Cover Installation ............. 102
Tri-Fold Tonneau Cover Cleaning ................. 105
GETTING TO KNOW YOUR
INSTRUMENT PANEL
BASE / MIDLINE INSTRUMENT CLUSTER —
GASOLINE .............................................................106
Base / Midline Instrument Cluster
Descriptions — Gasoline ............................... 107 PREMIUM INSTRUMENT CLUSTER —
GASOLINE............................................................. 108
Premium Instrument Cluster
Descriptions — Gasoline ............................... 109
BASE / MIDLINE INSTRUMENT CLUSTER —
DIESEL .................................................................. 110
Base / Midline Instrument Cluster
Descriptions — Diesel.................................... 111
PREMIUM INSTRUMENT CLUSTER —
DIESEL .................................................................. 113
Premium Instrument Cluster
Descriptions — Diesel ................................... 114
INSTRUMENT CLUSTER DISPLAY...................... 114
Instrument Cluster Display Location and
Controls.......................................................... 115Oil Life Reset ................................................. 116
Display Menu Items ...................................... 116
Head-Up Display (HUD) — If Equipped ........ 122
Diesel Particulate Filter (DPF) Messages .... 124
Displays.......................................................... 125Diesel Exhaust Fluid (DEF) Warning
Messages....................................................... 125
Diesel Exhaust Fluid (DEF) Fault Warning
Messages....................................................... 126
Battery Saver On/Battery Saver Mode
Message — Electrical Load Reduction
Actions — If Equipped.................................... 127 WARNING LIGHTS AND MESSAGES ................. 128
Red Warning Lights ....................................... 128
Yellow Warning Lights ................................... 131
Yellow Indicator Lights .................................. 134Green Indicator Lights .................................. 136White Indicator Lights ................................... 137
Blue Indicator Lights ..................................... 137
ONBOARD DIAGNOSTIC SYSTEM — OBD II ...... 138
Onboard Diagnostic System (OBD II)
Cybersecurity ................................................. 138
EMISSIONS INSPECTION AND
MAINTENANCE PROGRAMS............................... 139
STARTING AND OPERATING
STARTING THE ENGINE ...................................... 140
Automatic Transmission ............................... 141
Tip Start Feature .......................................... 141Keyless Enter ‘n Go™ — Ignition .................. 141
Normal Starting Using ENGINE START/
STOP Button — Gasoline Engine .................. 141
AutoPark ........................................................ 142
If Engine Fails To Start ................................. 143
Normal Starting Using ENGINE START/
STOP Button — Diesel Engine....................... 144
Cold Weather Operation
(Below –22°F Or −30°C) ............................ 145
After Starting ................................................. 145
Starting Fluids — Diesel Engine Only ........... 145
22_DT_OM_EN_USC_t.book Page 4
Page 21 of 496
19
GETTING TO KNOW YOUR VEHICLE
KEYS
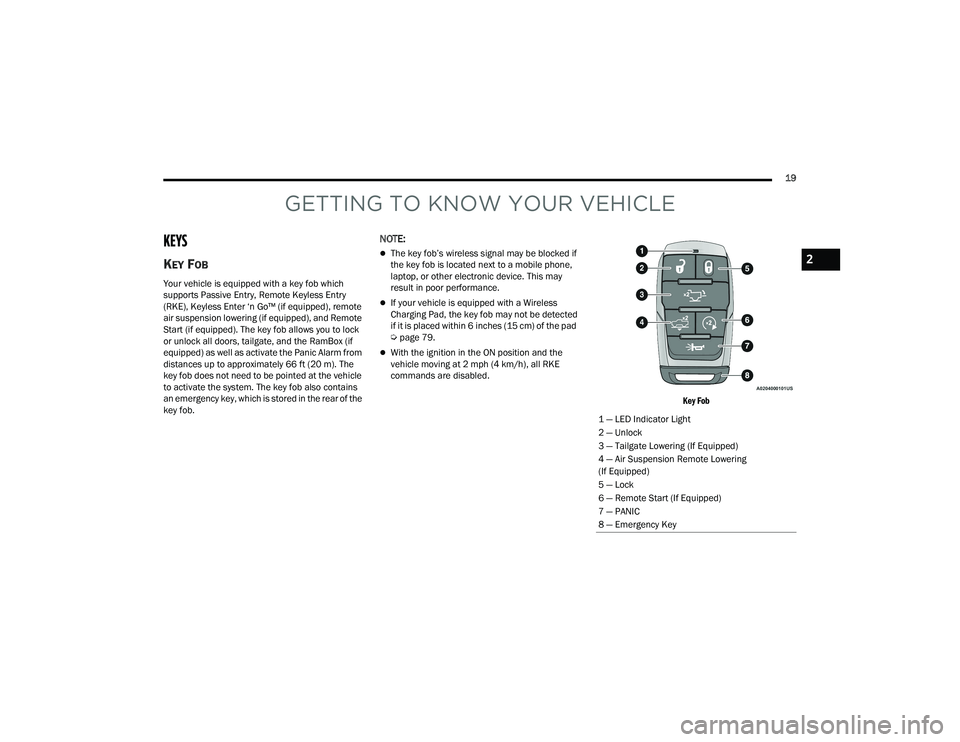
KEY FOB
Your vehicle is equipped with a key fob which
supports Passive Entry, Remote Keyless Entry
(RKE), Keyless Enter ‘n Go™ (if equipped), remote
air suspension lowering (if equipped), and Remote
Start (if equipped). The key fob allows you to lock
or unlock all doors, tailgate, and the RamBox (if
equipped) as well as activate the Panic Alarm from
distances up to approximately 66 ft (20 m). The
key fob does not need to be pointed at the vehicle
to activate the system. The key fob also contains
an emergency key, which is stored in the rear of the
key fob.
NOTE:
The key fob’s wireless signal may be blocked if
the key fob is located next to a mobile phone,
laptop, or other electronic device. This may
result in poor performance.
If your vehicle is equipped with a Wireless
Charging Pad, the key fob may not be detected
if it is placed within 6 inches (15 cm) of the pad
Úpage 79.
With the ignition in the ON position and the
vehicle moving at 2 mph (4 km/h), all RKE
commands are disabled.
Key Fob
1 — LED Indicator Light
2 — Unlock
3 — Tailgate Lowering (If Equipped)
4 — Air Suspension Remote Lowering
(If Equipped)
5 — Lock
6 — Remote Start (If Equipped)
7 — PANIC
8 — Emergency Key
2
22_DT_OM_EN_USC_t.book Page 19
Page 22 of 496
20GETTING TO KNOW YOUR VEHICLE
In case the ignition switch does not change with
the push of a button, the key fob may have a low or
fully depleted battery. A low key fob battery can be
verified by referring to the instrument cluster
display, which will display directions to follow.
NOTE:A low key fob battery condition may be indicated by
a message in the instrument cluster display, or by
the LED light on the key fob. If the LED key fob light
no longer illuminates from key fob button pushes,
then the key fob battery requires replacement
Ú page 480.
To Lock/Unlock The Doors And Tailgate
Push and release the unlock button on the key fob
once to unlock the driver’s door, or, twice within
five seconds to unlock all doors, the tailgate and
the RamBox (if equipped). To lock all the doors and
the tailgate, push the lock button once.
When the doors are unlocked, the turn signals will
flash and the illuminated entry system will be
activated. When the doors are locked, the turn
signals will flash and the horn will chirp.
All doors can be programmed to unlock on the first
push of the unlock button. The horn chirp when the
lock button is pushed can be programmed on/off
within Uconnect Settings Ú page 234.
Key Left Vehicle Feature
If a valid key fob is no longer detected inside the
vehicle while the vehicle’s ignition system is in the
ON/RUN or START position, the message “Key Left
Vehicle” will be shown in the instrument cluster
display along with an interior chime. An exterior
audible and visual alert will also be activated to
warn the driver.
The vehicle’s horn will rapidly chirp three times
along with a single flash of the vehicle’s exterior
lights.
NOTE:
The doors have to be open and then closed in
order for the vehicle to check for the presence of
a key fob; the Key Left Vehicle feature will not
activate until all of the doors are closed.
These alerts will not be activated in situations
where the vehicle’s engine is left running with
the key fob inside.
Air Suspension (Remote Lowering Of The
Vehicle) — If Equipped
For easy entry and loading, your vehicle
can be lowered by pushing the key fob air
suspension lowering button two times.
When air suspension lowering is
requested using the key fob, the vehicle will send a
series of chirps and flashes to alert the customer
that the operation has begun and will continue
these alerts until it successfully lowers. The following conditions must be met for the
vehicle to lower remotely:
The vehicle must not already be in Entry/Exit
ride height.
The vehicle battery must be fully charged.
All doors must be closed.
The key fob must be out of the vehicle.
Gear selector must be in PARK.
NOTE:Ensure the vehicle is clear of all objects, pets, and
people prior to remote lowering.
Canceling Remote Lowering
Vehicle lowering can be canceled at anytime.
When vehicle lowering is canceled, the vehicle will
raise to the next defined level and lock out the
remote lowering feature for five seconds until a
new request is made.
To cancel vehicle lowering, push the key fob air
suspension lowering button one time during the
lowering process. When vehicle lowering is
canceled, the horn will chirp two times and the turn
signal lamps will flash four times. Once raising is
completed, the horn will chirp one time.
NOTE:More information on air suspension is provided
later in this manual, see Ú
page 165.
22_DT_OM_EN_USC_t.book Page 20
Page 60 of 496

58GETTING TO KNOW YOUR VEHICLE
Cargo/Bed Lights Button On Headlight Switch (Vehicles Sold In Canada)
Cargo Lights
When the vehicle is stationary, these lights can
also be turned on using the switch located just
inside the pickup box, on the lower part of the bed
light lens. A telltale will illuminate in the instrument
cluster display when these lights are on. Pushing
the switch a second time will turn the lights off.
Bed Light Switch (Without RamBox)
The cargo light and bed lights (if equipped) will turn
on for approximately 30 seconds when a key fob
unlock button is pushed, as part of the Illuminated
Entry feature. When these lights are activated using the button
on the headlight switch the cargo lights, trailer
spotter lights, and trailer hitch light will remain
illuminated when the vehicle transmission is in
PARK, NEUTRAL, or REVERSE. The lights will turn
off when the vehicle transmission is placed in
DRIVE.
When the vehicle is placed in the REVERSE
position, the trailer hitch light will turn on
automatically. The trailer hitch light will turn off
when the vehicle is placed in the DRIVE position.
NOTE:The bed lights are not affected by gear selection.
NOTE:For vehicles shipped to or sold in the states of
California or Mississippi, the cargo, bed, and mirror
spotter lights will not work while the vehicle is in
motion. In every other state, the cargo and mirror
spotter lights will turn off when the vehicle is in
motion, but the bed light will remain on.
22_DT_OM_EN_USC_t.book Page 58
Page 96 of 496

94GETTING TO KNOW YOUR VEHICLE
(Continued)
Cleat Removal (Without Tonneau Cover)
Remove the end cap by pushing upward on the
release button located beneath the end cap while
pulling the cap away from the rail. The cleat can
now be removed by sliding it off the end of the rail.
End Cap Release Button Without Tonneau Cover
Pull End Cap Away From Rail
RAMBOX — IF EQUIPPED
The RamBox system is an integrated pickup box
storage and cargo management system consisting
of three features:
Cargo storage bins
Cargo divider
Bed rail tie-down system Ú page 93
NOTE:Bed rail tie-down system is also available for
vehicles not equipped with a RamBox.
LOCKING AND UNLOCKING RAMBOX
Push and release the lock or unlock button on the
key fob to lock and unlock all doors, the tailgate
and the RamBox Úpage 19. To unlatch the
storage bin manually, insert the emergency key
into the keyhole and turn clockwise. Always return
the key to the upright (vertical) position before
removing it from the keyhole.
RAMBOX CARGO STORAGE BINS
Cargo storage bins are located on both sides of the
pickup box. The cargo storage bins provide
watertight, lockable, illuminated storage for up to
150 lb (68 kg) of evenly distributed cargo.
RamBox Cargo Storage Bins
CAUTION!
Ensure cargo bin lids are closed and latched
before moving or driving vehicle.
Loads applied to the top of the bin lid should
be minimized to prevent damage to the lid and
latching/hinging mechanisms.
Damage to the RamBox bin may occur due to
heavy/sharp objects placed in bin that shift
due to vehicle motion. In order to minimize
potential for damage, secure all cargo to
prevent movement and protect inside
surfaces of bin from heavy/sharp objects with
appropriate padding.
CAUTION!
22_DT_OM_EN_USC_t.book Page 94
Page 97 of 496
GETTING TO KNOW YOUR VEHICLE95
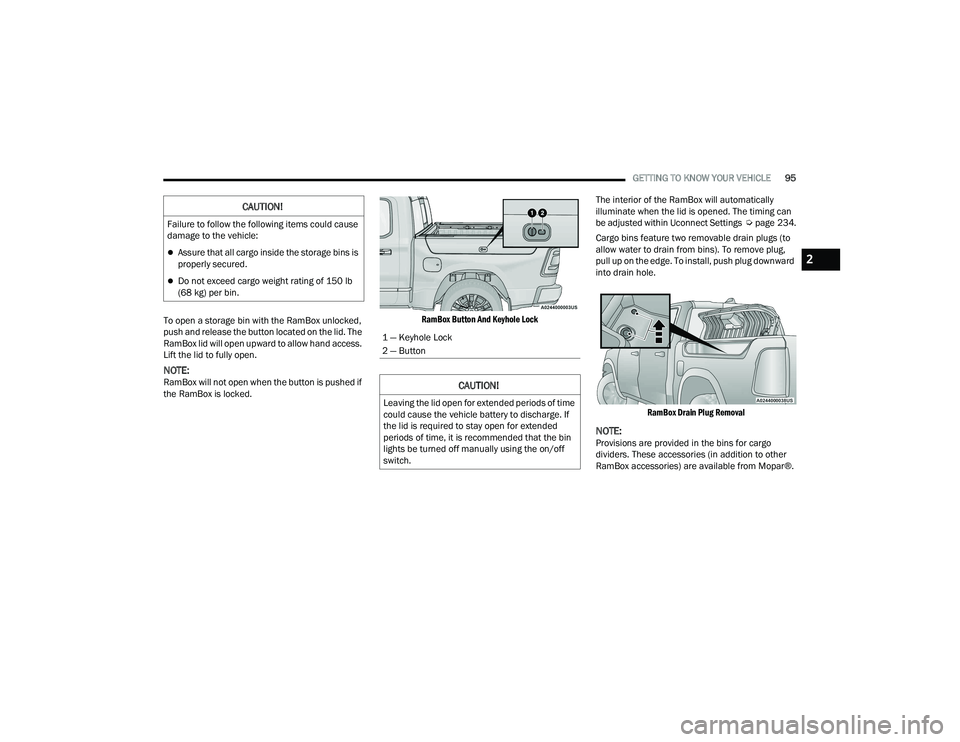
To open a storage bin with the RamBox unlocked,
push and release the button located on the lid. The
RamBox lid will open upward to allow hand access.
Lift the lid to fully open.
NOTE:RamBox will not open when the button is pushed if
the RamBox is locked.
RamBox Button And Keyhole Lock
The interior of the RamBox will automatically
illuminate when the lid is opened. The timing can
be adjusted within Uconnect Settings
Úpage 234.
Cargo bins feature two removable drain plugs (to
allow water to drain from bins). To remove plug,
pull up on the edge. To install, push plug downward
into drain hole.
RamBox Drain Plug Removal
NOTE:Provisions are provided in the bins for cargo
dividers. These accessories (in addition to other
RamBox accessories) are available from Mopar®.
CAUTION!
Failure to follow the following items could cause
damage to the vehicle:
Assure that all cargo inside the storage bins is
properly secured.
Do not exceed cargo weight rating of 150 lb
(68 kg) per bin.
1 — Keyhole Lock
2 — Button
CAUTION!
Leaving the lid open for extended periods of time
could cause the vehicle battery to discharge. If
the lid is required to stay open for extended
periods of time, it is recommended that the bin
lights be turned off manually using the on/off
switch.
2
22_DT_OM_EN_USC_t.book Page 95
Page 98 of 496
96GETTING TO KNOW YOUR VEHICLE
(Continued)
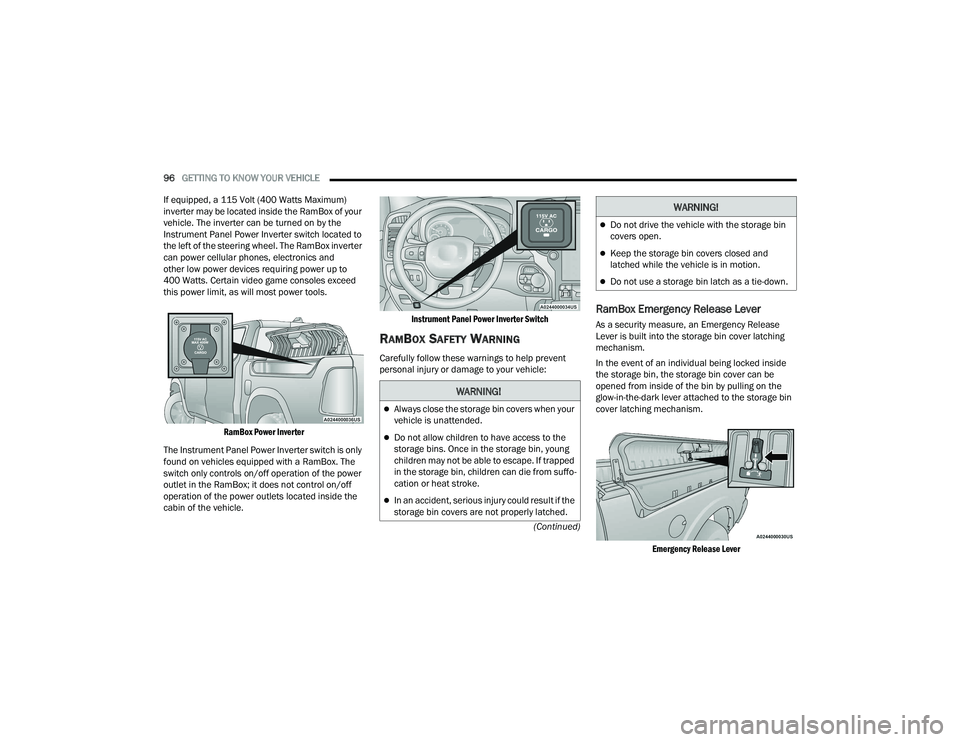
If equipped, a 115 Volt (400 Watts Maximum)
inverter may be located inside the RamBox of your
vehicle. The inverter can be turned on by the
Instrument Panel Power Inverter switch located to
the left of the steering wheel. The RamBox inverter
can power cellular phones, electronics and
other low power devices requiring power up to
400 Watts. Certain video game consoles exceed
this power limit, as will most power tools.
RamBox Power Inverter
The Instrument Panel Power Inverter switch is only
found on vehicles equipped with a RamBox. The
switch only controls on/off operation of the power
outlet in the RamBox; it does not control on/off
operation of the power outlets located inside the
cabin of the vehicle.
Instrument Panel Power Inverter Switch
RAMBOX SAFETY WARNING
Carefully follow these warnings to help prevent
personal injury or damage to your vehicle:
RamBox Emergency Release Lever
As a security measure, an Emergency Release
Lever is built into the storage bin cover latching
mechanism.
In the event of an individual being locked inside
the storage bin, the storage bin cover can be
opened from inside of the bin by pulling on the
glow-in-the-dark lever attached to the storage bin
cover latching mechanism.
Emergency Release Lever
WARNING!
Always close the storage bin covers when your
vehicle is unattended.
Do not allow children to have access to the
storage bins. Once in the storage bin, young
children may not be able to escape. If trapped
in the storage bin, children can die from suffo -
cation or heat stroke.
In an accident, serious injury could result if the
storage bin covers are not properly latched.
Do not drive the vehicle with the storage bin
covers open.
Keep the storage bin covers closed and
latched while the vehicle is in motion.
Do not use a storage bin latch as a tie-down.
WARNING!
22_DT_OM_EN_USC_t.book Page 96
Page 490 of 496

488 Power Steering
.............................................. 173Pregnant Women And Seat Belts...................340Presets.......................................................... 268Pressure Washing.......................................... 408Pretensioners Seat Belts.................................................. 340Profile Settings.............................................. 236
R
Radial Ply Tires.............................................. 452Radiator Cap
(Coolant Pressure Cap)........................ 421, 423RadioOff Road Pages......................................... 306Presets...................................................... 268Settings..................................................... 234Sound Setting............................................ 255Radio Controls............................................... 262Radio Mode................................................... 262Radio Operation.................................. 262, 302Radio Remote Controls.................................. 262Rain Sensitive Wiper System........................... 62RamBox........................................................... 94RamBox Safety................................................ 96Rear Axle (Differential)................................... 427Rear Cargo Area Utility Rails............................ 93Rear Cross Path............................................. 322Rear ParkSense System................................ 186Rear Window, Sliding....................................... 81Reclining Rear Seats....................................... 37
Recreational Towing..................................... 227Four-Wheel Drive Models......................... 228Shifting Into Transfer Case Neutral (N)..... 229Shifting Out Of Transfer CaseNeutral (N)........................................... 230Two-Wheel Drive Models.......................... 228Reformulated Gasoline................................. 468Refrigerant.................................................... 415Registering SiriusXM Guardian..................... 284Release, Hood................................................. 85Release, Tailgate............................................. 86Reminder, Seat Belt...................................... 335Remote Features, Door Lock/Unlock... 290, 298Remote Features, Horn And Lights............... 291Remote Features, Starting................... 290, 299Remote Keyless EntryProgramming Additional Key Fobs............... 22Remote Sound System (Radio) Control......... 262Remote Start (Diesel)...................................... 27Remote Start (Gasoline).................................. 24Remote StartingComfort Systems......................................... 26Exit Remote Start Mode.............................. 25Remote Starting System........................... 24, 27Remove, Tailgate............................................. 88Replacement Bulbs...................................... 438Replacement Tires........................................ 454Reporting Safety Defects.............................. 479Restraints, Child........................................... 354Restraints, Head.............................................. 41
Roadside Assistance............................ 291, 298Rotation, Tires............................................... 460
S
Safety............................................................ 261Safety Checks Inside Vehicle........................ 368Safety Checks Outside Vehicle...................... 369Safety Defects, Reporting............................. 479Safety Features............................................. 261Safety Information, Tire................................. 444Safety Tips.................................................... 368Safety, Exhaust Gas...................................... 370Satellite Radio............................................... 264Saved Radio Stations.................................... 268Schedule, Maintenance..............393, 398, 399Seat Belt Reminder....................................... 130Seat Belts............................................ 335, 368Adjustable Shoulder Belt.......................... 339Adjustable Upper Shoulder Anchorage..... 339Adjustable Upper Shoulder BeltAnchorage............................................ 339Automatic Locking Retractor (ALR)........... 340Child Restraints........................................ 354Energy Management Feature................... 340Extender................................................... 339Front Seat............................... 335, 336, 338Inspection................................................. 368Lap/Shoulder Belt Operation.................... 338Lap/Shoulder Belt Untwisting................... 338Lap/Shoulder Belts................................... 336
22_DT_OM_EN_USC_t.book Page 488