display Ram 2500 2013 Service Manual
[x] Cancel search | Manufacturer: RAM, Model Year: 2013, Model line: 2500, Model: Ram 2500 2013Pages: 743, PDF Size: 5.43 MB
Page 297 of 743
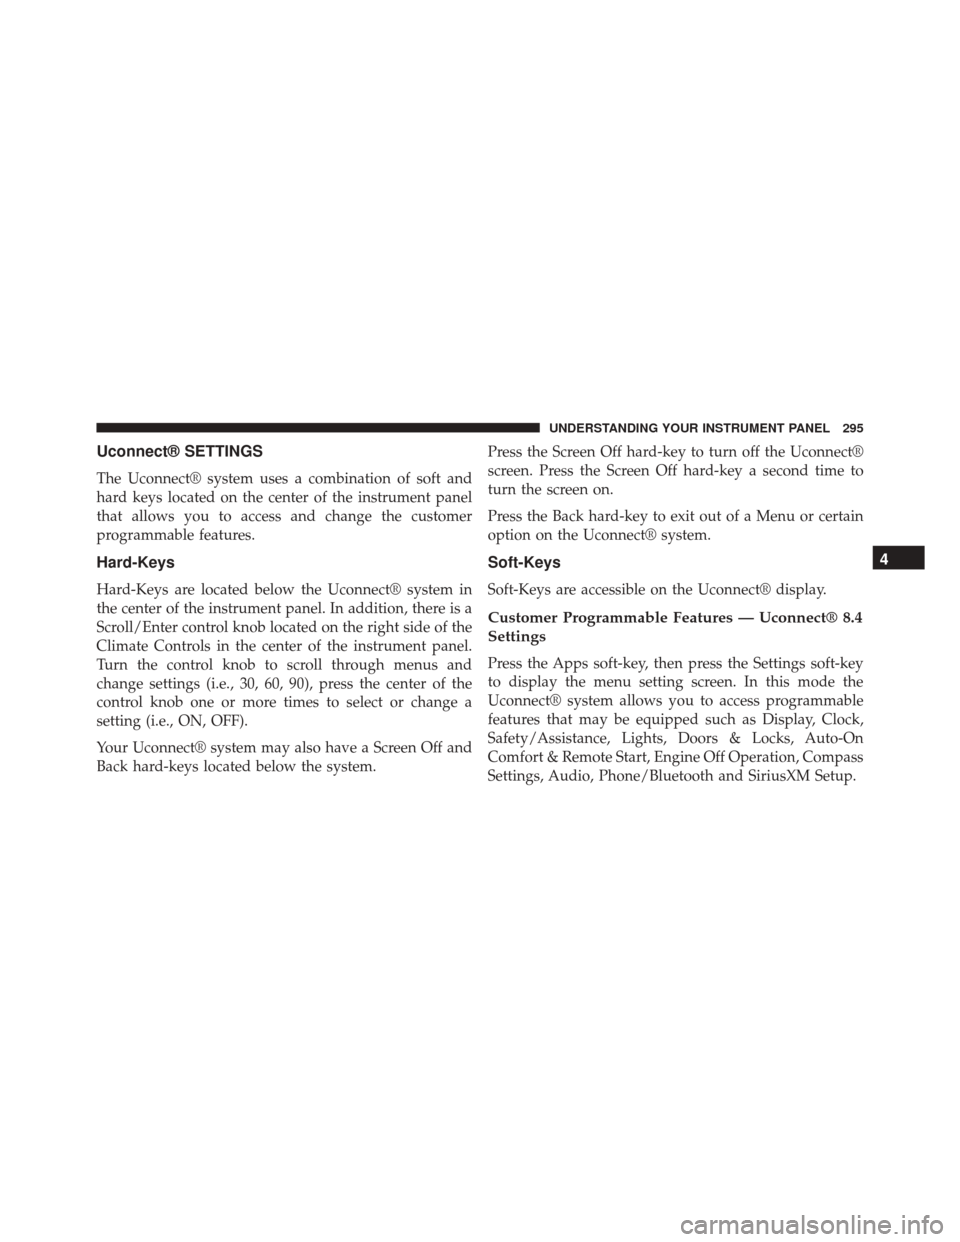
Uconnect® SETTINGS
The Uconnect® system uses a combination of soft and
hard keys located on the center of the instrument panel
that allows you to access and change the customer
programmable features.
Hard-Keys
Hard-Keys are located below the Uconnect® system in
the center of the instrument panel. In addition, there is a
Scroll/Enter control knob located on the right side of the
Climate Controls in the center of the instrument panel.
Turn the control knob to scroll through menus and
change settings (i.e., 30, 60, 90), press the center of the
control knob one or more times to select or change a
setting (i.e., ON, OFF).
Your Uconnect® system may also have a Screen Off and
Back hard-keys located below the system.Press the Screen Off hard-key to turn off the Uconnect®
screen. Press the Screen Off hard-key a second time to
turn the screen on.
Press the Back hard-key to exit out of a Menu or certain
option on the Uconnect® system.
Soft-Keys
Soft-Keys are accessible on the Uconnect® display.
Customer Programmable Features — Uconnect® 8.4
Settings
Press the Apps soft-key, then press the Settings soft-key
to display the menu setting screen. In this mode the
Uconnect® system allows you to access programmable
features that may be equipped such as Display, Clock,
Safety/Assistance, Lights, Doors & Locks, Auto-On
Comfort & Remote Start, Engine Off Operation, Compass
Settings, Audio, Phone/Bluetooth and SiriusXM Setup.
4
UNDERSTANDING YOUR INSTRUMENT PANEL 295
Page 298 of 743
NOTE:Only one touchscreen area may be selected at a
time.
When making a selection, press the soft-key to enter the
desired mode. Once in the desired mode press and
release the preferred setting until a check-mark appears
next to the setting, showing that setting has been se-
lected. Once the setting is complete either press the Back
Arrow soft-key or the Back hard-key to return to the
previous menu or press the X soft-key to close out of the
settings screen. Pressing the Up or Down Arrow soft-keys
on the right side of the screen will allow you to toggle up
or down through the available settings.
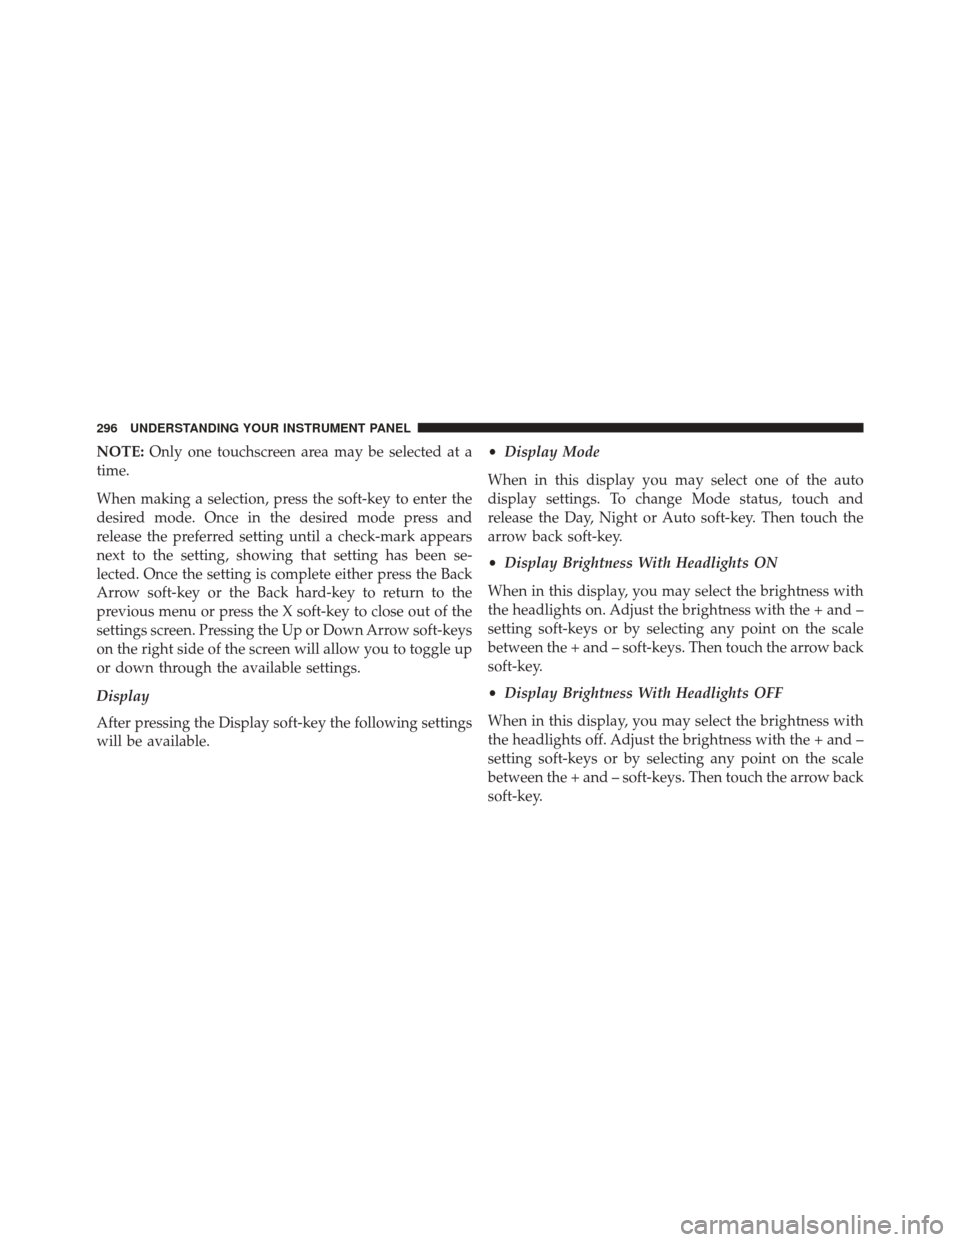
Display
After pressing the Display soft-key the following settings
will be available. •
Display Mode
When in this display you may select one of the auto
display settings. To change Mode status, touch and
release the Day, Night or Auto soft-key. Then touch the
arrow back soft-key.
• Display Brightness With Headlights ON
When in this display, you may select the brightness with
the headlights on. Adjust the brightness with the + and –
setting soft-keys or by selecting any point on the scale
between the + and – soft-keys. Then touch the arrow back
soft-key.
• Display Brightness With Headlights OFF
When in this display, you may select the brightness with
the headlights off. Adjust the brightness with the + and –
setting soft-keys or by selecting any point on the scale
between the + and – soft-keys. Then touch the arrow back
soft-key.
296 UNDERSTANDING YOUR INSTRUMENT PANEL
Page 299 of 743
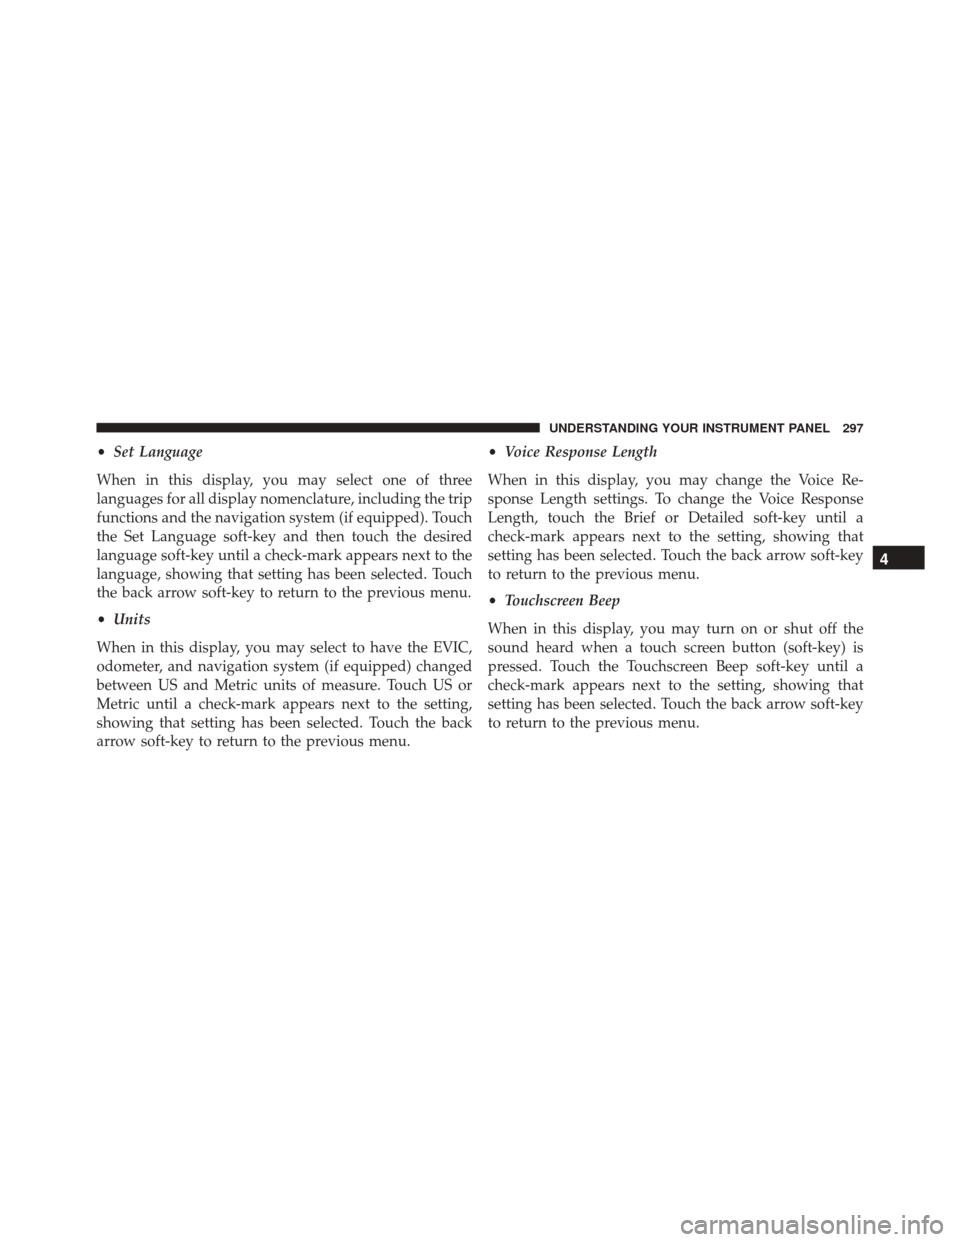
•Set Language
When in this display, you may select one of three
languages for all display nomenclature, including the trip
functions and the navigation system (if equipped). Touch
the Set Language soft-key and then touch the desired
language soft-key until a check-mark appears next to the
language, showing that setting has been selected. Touch
the back arrow soft-key to return to the previous menu.
• Units
When in this display, you may select to have the EVIC,
odometer, and navigation system (if equipped) changed
between US and Metric units of measure. Touch US or
Metric until a check-mark appears next to the setting,
showing that setting has been selected. Touch the back
arrow soft-key to return to the previous menu. •
Voice Response Length
When in this display, you may change the Voice Re-
sponse Length settings. To change the Voice Response
Length, touch the Brief or Detailed soft-key until a
check-mark appears next to the setting, showing that
setting has been selected. Touch the back arrow soft-key
to return to the previous menu.
• Touchscreen Beep
When in this display, you may turn on or shut off the
sound heard when a touch screen button (soft-key) is
pressed. Touch the Touchscreen Beep soft-key until a
check-mark appears next to the setting, showing that
setting has been selected. Touch the back arrow soft-key
to return to the previous menu.
4
UNDERSTANDING YOUR INSTRUMENT PANEL 297
Page 300 of 743

•Navigation Turn-By-Turn In Cluster — If Equipped
When this feature is selected, the turn-by-turn directions
will appear in the display as the vehicle approaches a
designated turn within a programmed route. To make
your selection, touch the Navigation Turn-By-Turn In
Cluster soft-key, until a check-mark appears next to the
setting, showing that setting has been selected. Touch the
back arrow soft-key to return to the previous menu.
• Fuel Saver Display In Cluster
The “ECO” message is located in the instrument cluster
display, this message can be turned on or off. To make
your selection, touch the Fuel Saver Display soft-key,
until a check-mark appears next to the setting, showing
that setting has been selected. Touch the back arrow
soft-key to return to the previous menu. Clock
After pressing the Clock soft-key the following settings
will be available.
•
Sync Time With GPS
When in this display, you may automatically have the
radio set the time. To change the Sync Time setting touch
the Sync with GPS Time soft-key until a check-mark
appears next to the setting, showing that setting has been
selected. Touch the back arrow soft-key to return to the
previous menu.
• Set Time Hours
When in this display, you may adjust the hours. The Sync
with GPS Time soft-key must be unchecked. To make
your selection touch the + or - soft-keys to adjust the
hours up or down. Touch the back arrow soft-key to
return to the previous menu or touch the X soft-key to
close out of the settings screen.
298 UNDERSTANDING YOUR INSTRUMENT PANEL
Page 301 of 743
•Set Time Minutes
When in this display, you may adjust the minutes. The
Sync with GPS Time soft-key must be unchecked. To
make your selection touch the + or - soft-keys to adjust
the minutes up or down. Touch the back arrow soft-key
to return to the previous menu or touch the X soft-key to
close out of the settings screen.
• Time Format
When in this display, you may select the time format
display setting. Touch the Time Format soft-key until a
check-mark appears next to the 12hrs or 24hrs setting,
showing that setting has been selected. Touch the back
arrow soft-key to return to the previous menu.
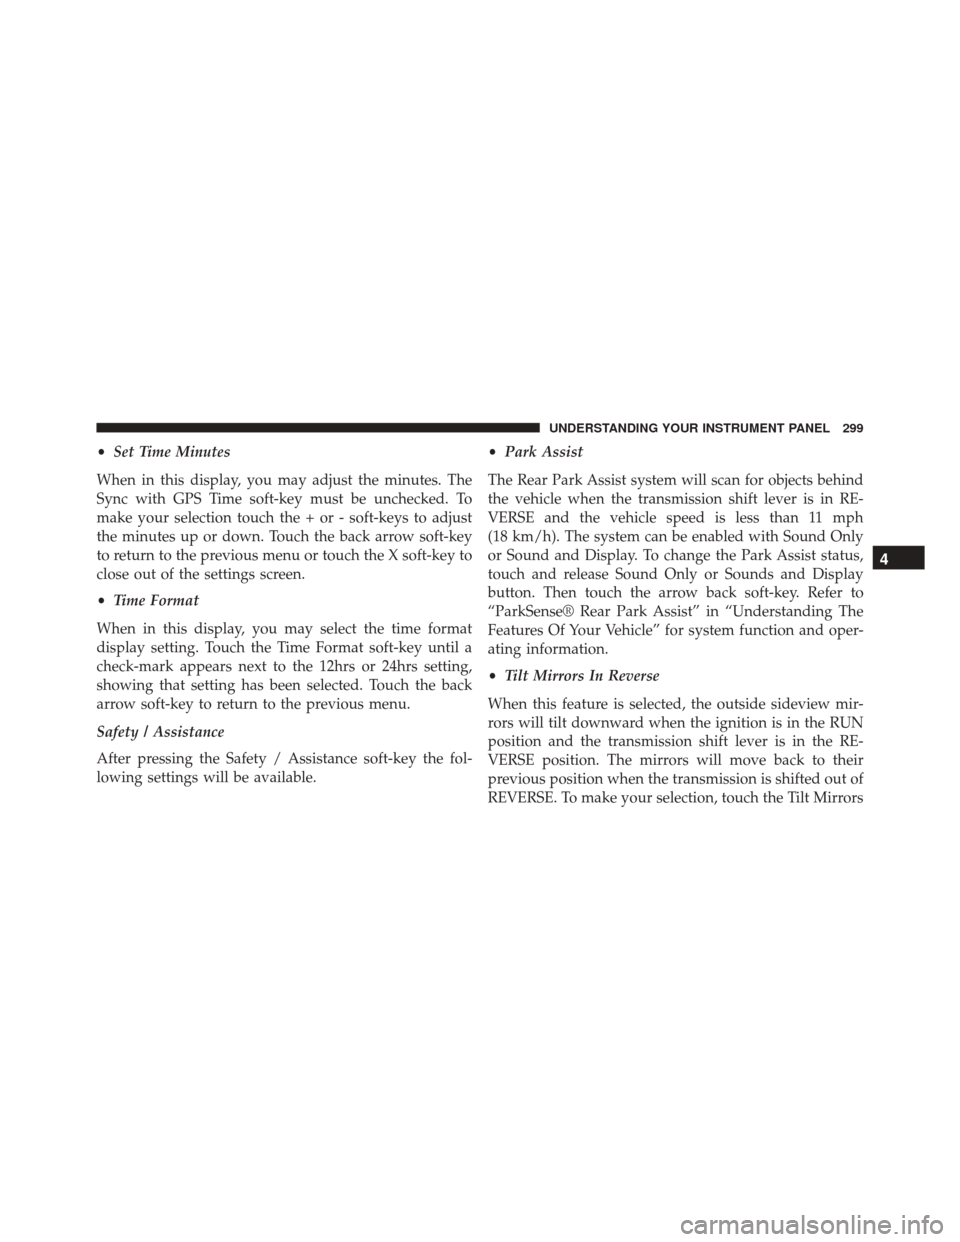
Safety / Assistance
After pressing the Safety / Assistance soft-key the fol-
lowing settings will be available. •
Park Assist
The Rear Park Assist system will scan for objects behind
the vehicle when the transmission shift lever is in RE-
VERSE and the vehicle speed is less than 11 mph
(18 km/h). The system can be enabled with Sound Only
or Sound and Display. To change the Park Assist status,
touch and release Sound Only or Sounds and Display
button. Then touch the arrow back soft-key. Refer to
“ParkSense® Rear Park Assist” in “Understanding The
Features Of Your Vehicle” for system function and oper-
ating information.
• Tilt Mirrors In Reverse
When this feature is selected, the outside sideview mir-
rors will tilt downward when the ignition is in the RUN
position and the transmission shift lever is in the RE-
VERSE position. The mirrors will move back to their
previous position when the transmission is shifted out of
REVERSE. To make your selection, touch the Tilt Mirrors
4
UNDERSTANDING YOUR INSTRUMENT PANEL 299
Page 302 of 743

In Reverse soft-key, until a check-mark appears next to
setting, showing that setting has been selected. Touch the
back arrow soft-key to return to the previous menu.
•ParkView® Backup Camera
Your vehicle may be equipped with the ParkView® Rear
Back Up Camera that allows you to see an on-screen
image of the rear surroundings of your vehicle whenever
the shift lever is put into REVERSE. The image will be
displayed on the radio touchscreen display along with a
caution note to “check entire surroundings” across the
top of the screen. After five seconds, this note will
disappear. The ParkView® camera is located on the rear
of the vehicle above the rear License plate. To make your
selection, touch the ParkView® Backup Camera soft-key,
until a check-mark appears next to setting, showing that
setting has been selected. Touch the back arrow soft-key
to return to the previous menu. •
Rain Sensing Auto Wipers
When this feature is selected, the system will automati-
cally activate the windshield wipers if it senses moisture
on the windshield. To make your selection, touch the
Rain Sensing soft-key, until a check-mark appears next to
setting, showing that setting has been selected. Touch the
back arrow soft-key to return to the previous menu.
• Hill Start Assist — If Equipped
When this feature is selected, the Hill Start Assist (HSA)
system is active. Refer to “Electronic Brake Control
System” in “Starting And Operating” for system function
and operating information. To make your selection, touch
the Hill Start Assist soft-key, until a check-mark appears
next to setting, showing that setting has been selected.
Touch the back arrow soft-key to return to the previous
menu.
300 UNDERSTANDING YOUR INSTRUMENT PANEL
Page 308 of 743
•Variance
Compass Variance is the difference between Magnetic
North and Geographic North. To compensate for the
differences the variance should be set for the zone where
the vehicle is driven, per the zone map. Once properly
set, the compass will automatically compensate for the
differences, and provide the most accurate compass
heading.
NOTE: Keep magnetic materials away from the top of
the instrument panel, such as iPod’s, Mobile Phones,
Laptops and Radar Detectors. This is where the compass
module is located, and it can cause interference with the
compass sensor, and it may give false readings. •
Perform Compass Calibration
Touch the Calibration soft-key to change this setting. This
compass is self-calibrating, which eliminates the need to
manually reset the compass. When the vehicle is new, the
compass may appear erratic and the EVIC will display
CAL until the compass is calibrated. You may also
Compass Variance Map
306 UNDERSTANDING YOUR INSTRUMENT PANEL
Page 309 of 743
calibrate the compass by pressing the ON soft-key and
completing one or more 360-degree turns (in an area free
from large metal or metallic objects) until the CAL
indicator displayed in the EVIC turns off. The compass
will now function normally.
Audio
After pressing the Audio soft-key the following settings
will be available.
•Balance/Fade
When in this display you may adjust the Balance and
Fade settings.
• Equalizer
When in this display you may adjust the Bass, Mid and
Treble settings. Adjust the settings with the + and –
setting soft-keys or by selecting any point on the scale
between the + and – soft-keys. Then touch the arrow back
soft-key. NOTE:
Bass/Mid/Treble allow you to simply slide your
finger up or down to change the setting as well as touch
directly on the desired setting.
• Speed Adjusted Volume
This feature increases or decreases volume relative to
vehicle speed. To change the Speed Adjusted Volume
touch the Off, 1, 2 or 3 soft-key. Then touch the arrow
back soft-key.
• Surround Sound
This feature provides simulated surround sound mode.
To make your selection, touch the Surround Sound
soft-key, select On or Off followed by pressing the arrow
back soft-key.
• AUX Volume Match
This feature provides the ability to tune the audio level
for portable devices connected through the AUX input.
4
UNDERSTANDING YOUR INSTRUMENT PANEL 307
Page 311 of 743

system has been activated or the check-mark is removed
showing the system has been deactivated.
•Suspension Display Messages
When All is selected, all the Air Suspension Alerts will be
displayed. When Warnings Only is selected only the Air
Suspension Warnings will be displayed.
• Automatic Aero Mode
When this feature is selected the Ride Height will auto-
matically be adjusted depending on the vehicle speed.
Touch the box next to your selection and a check-mark
appears next to the feature showing the system has been
activated or the check-mark is removed showing the
system has been deactivated.
• Tire Jack Mode
When this feature is selected the air suspension system is
disabled to assist with changing a spare tire. Touch the
box next to your selection and a check-mark appears next to the feature showing the system has been activated or
the check-mark is removed showing the system has been
deactivated.
•
Transport Mode
When this feature is selected the air suspension system is
disabled to assist with flat bed towing. Touch the box
next to your selection and a check-mark appears next to
the feature showing the system has been activated or the
check-mark is removed showing the system has been
deactivated.
• Wheel Alignment Mode
Before performing a wheel alignment this mode must be
enabled. Refer to your authorized dealer for further
information.
SiriusXM Setup
After pressing the SIRIUS Setup soft-key the following
settings will be available.
4
UNDERSTANDING YOUR INSTRUMENT PANEL 309
Page 331 of 743

10. AUTO Temperature Control
Controls airflow temperature, distribution, volume, and
the amount of air recirculation automatically. Press and
release to select. Refer to “Automatic Operation” for
more information. Performing this function will cause
the ATC to switch between manual mode and automatic
modes.
11. SYNC
Press the Sync soft-key to toggle the Sync feature On/Off.
The Sync indicator is illuminated when this feature is
enabled. Sync is used to synchronize the passenger
temperature setting with the driver temperature setting.
Changing the passenger temperature setting while in
Sync will automatically exit this feature.
Automatic Operation
1. Press the AUTO hard-key or soft-key button on theAutomatic Temperature Control (ATC) Panel. 2. Next, adjust the temperature you would like the
system to maintain by adjusting the driver and pas-
senger temperature hard or soft control buttons. Once
the desired temperature is displayed, the system will
achieve and automatically maintain that comfort level.
3. When the system is set up for your comfort level, it is not necessary to change the settings. You will experi-
ence the greatest efficiency by simply allowing the
system to function automatically.
NOTE:
• It is not necessary to move the temperature settings for
cold or hot vehicles. The system automatically adjusts
the temperature, mode, and blower speed to provide
comfort as quickly as possible.
4
UNDERSTANDING YOUR INSTRUMENT PANEL 329