fuel Ram 2500 2014 Diesel Supplement
[x] Cancel search | Manufacturer: RAM, Model Year: 2014, Model line: 2500, Model: Ram 2500 2014Pages: 360, PDF Size: 2.02 MB
Page 132 of 360
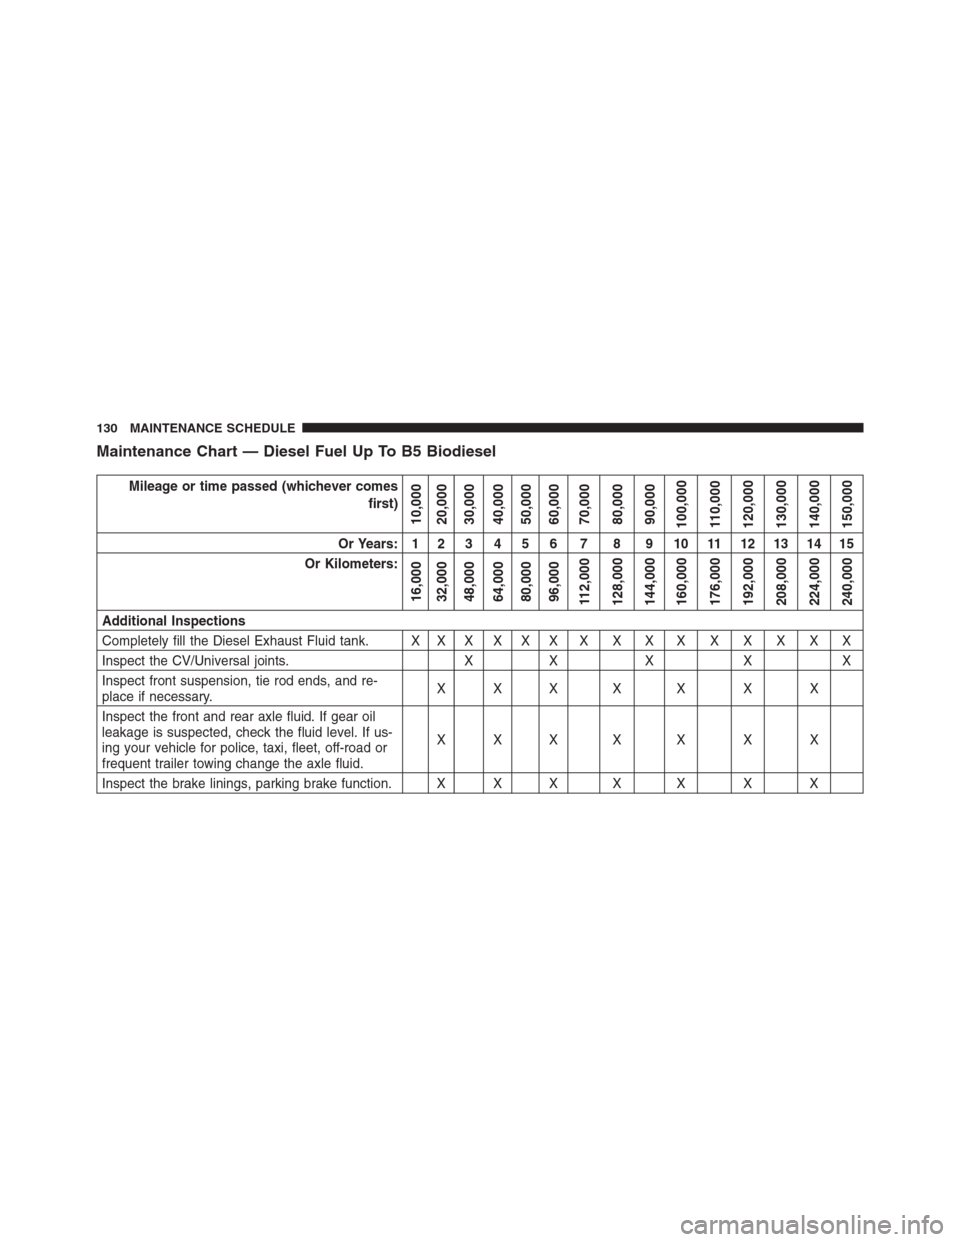
Maintenance Chart — Diesel Fuel Up To B5 Biodiesel
Mileage or time passed (whichever comes
first)
10,000
20,000
30,000
40,000
50,000
60,000
70,000
80,000
90,000
100,000
110,000
120,000
130,000
140,000
150,000
Or Years: 1 2 3 4 5 6 7 8 9 10 11 12 13 14 15
Or Kilometers:
16,000
32,000
48,000
64,000
80,000
96,000
112,000
128,000
144,000
160,000
176,000
192,000
208,000
224,000
240,000
Additional Inspections
Completely fill the Diesel Exhaust Fluid tank. X X X X X X X X X X X X X X X
Inspect the CV/Universal joints. X X X X X
Inspect front suspension, tie rod ends, and re-
place if necessary.XXX X X X X
Inspect the front and rear axle fluid. If gear oil
leakage is suspected, check the fluid level. If us-
ing your vehicle for police, taxi, fleet, off-road or
frequent trailer towing change the axle fluid.XXX X X X X
Inspect the brake linings, parking brake function. X X X X X X X
130 MAINTENANCE SCHEDULE
Page 133 of 360
Mileage or time passed (whichever comes
first)
10,000
20,000
30,000
40,000
50,000
60,000
70,000
80,000
90,000
100,000
110,000
120,000
130,000
140,000
150,000
Or Years: 1 2 3 4 5 6 7 8 9 10 11 12 13 14 15
Or Kilometers:
16,000
32,000
48,000
64,000
80,000
96,000
112,000
128,000
144,000
160,000
176,000
192,000
208,000
224,000
240,000
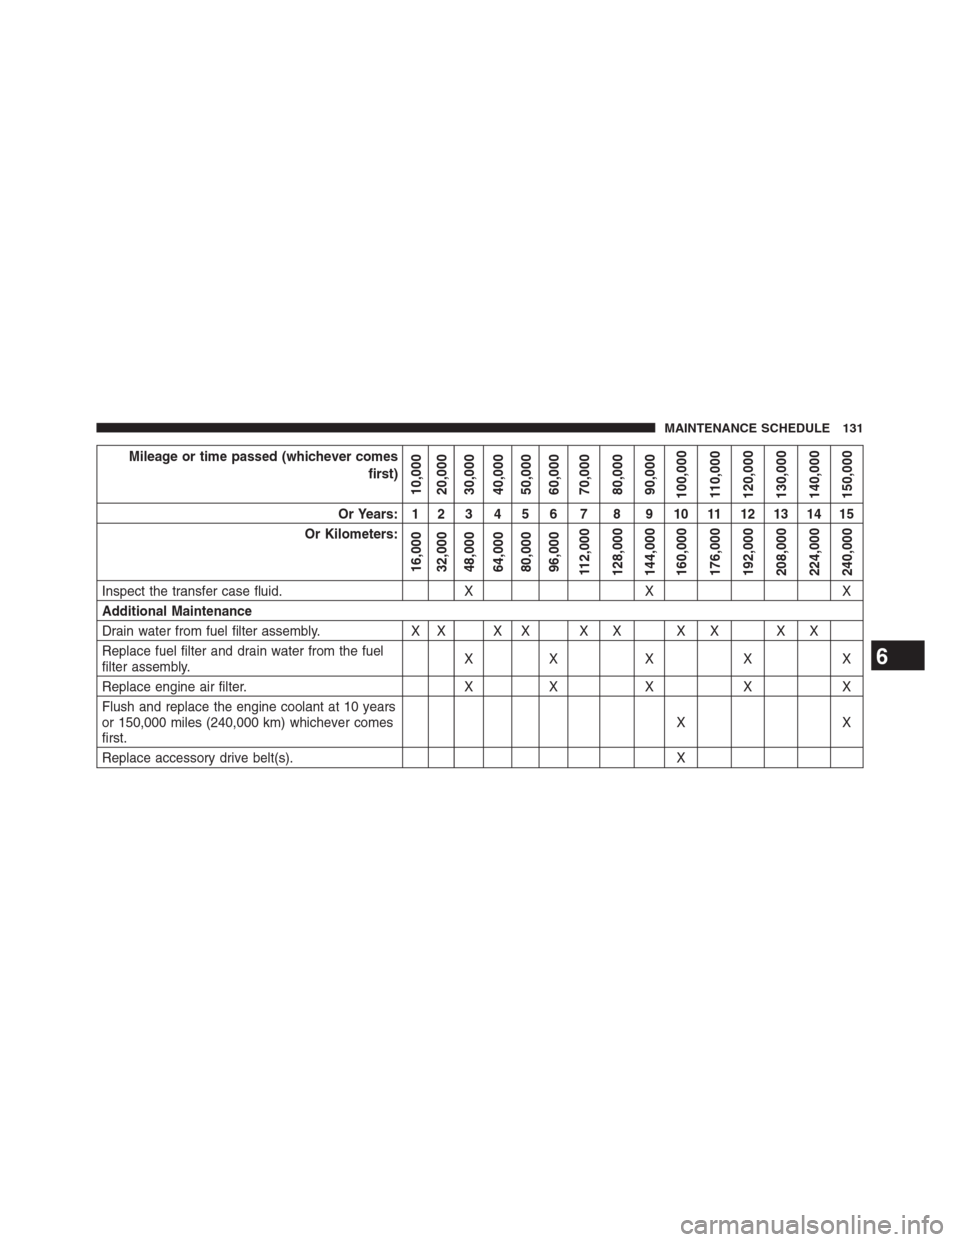
Inspect the transfer case fluid. X X X
Additional Maintenance
Drain water from fuel filter assembly. X X X X X X X X X X
Replace fuel filter and drain water from the fuel
filter assembly.XX X X X
Replace engine air filter. X X X X X
Flush and replace the engine coolant at 10 years
or 150,000 miles (240,000 km) whichever comes
first.XX
Replace accessory drive belt(s). X
6
MAINTENANCE SCHEDULE 131
Page 135 of 360
WARNING!
•You can be badly injured working on or around a
motor vehicle. Do only service work for which you
have the knowledge and the right equipment. If
you have any doubt about your ability to perform a
service job, take your vehicle to a competent me-
chanic.
•Failure to properly inspect and maintain your ve-
hicle could result in a component malfunction and
effect vehicle handling and performance. This
could cause an accident.
Additional Maintenance — B6 To B20 Biodiesel
NOTE:
•Under no circumstances should oil change intervals
exceed 8,000 miles (12 875 km) or six months, which-
ever comes first when using Biodiesel blends greater
than 5% (B5).
•The owner is required to monitor mileage for B6-B20
biodiesel, the automatic oil change indicator system
does not reflect the use of biofuels.
6
MAINTENANCE SCHEDULE 133
Page 136 of 360
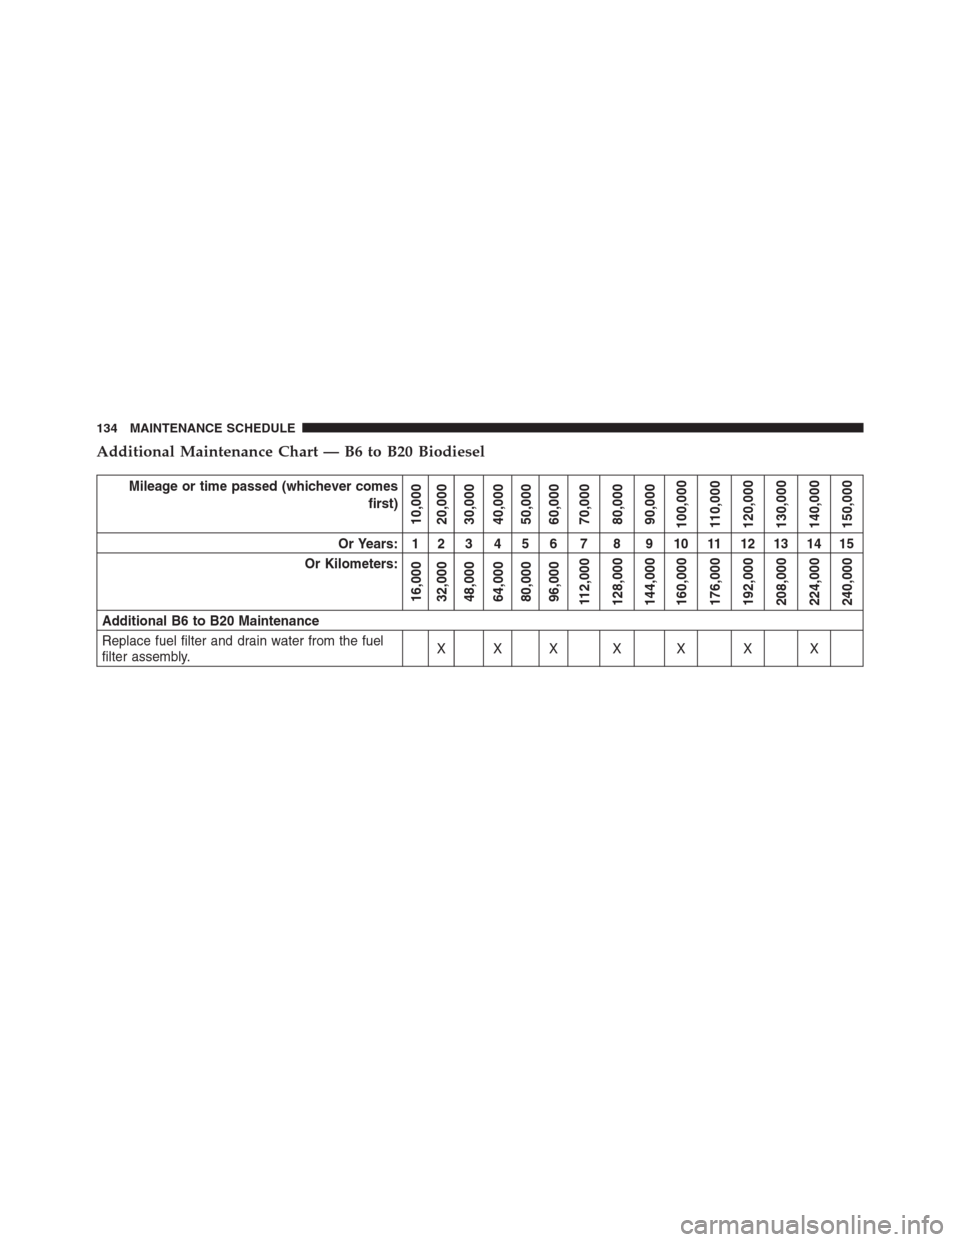
Additional Maintenance Chart — B6 to B20 Biodiesel
Mileage or time passed (whichever comes
first)
10,000
20,000
30,000
40,000
50,000
60,000
70,000
80,000
90,000
100,000
110,000
120,000
130,000
140,000
150,000
Or Years: 1 2 3 4 5 6 7 8 9 10 11 12 13 14 15
Or Kilometers:
16,000
32,000
48,000
64,000
80,000
96,000
112,000
128,000
144,000
160,000
176,000
192,000
208,000
224,000
240,000
Additional B6 to B20 Maintenance
Replace fuel filter and drain water from the fuel
filter assembly.XXX X X X X
134 MAINTENANCE SCHEDULE
Page 144 of 360
A MESSAGE FROM FCA US LLC
FCA US LLC and Cummins® welcome you as a Cum-
mins® turbocharged diesel-powered truck owner. Your
diesel truck will sound, feel, drive, and operate differ-
ently from a gasoline-powered truck. It is important that
you read and understand this manual.
Almost 100% of the heavy duty trucks in the United
States and Canada are diesel-powered because of the fuel
economy, rugged durability, and high torque which per-
mits pulling heavy loads. Cummins® engines power well
over half of these trucks. Now this same technology and
proven performance is yours in your truck equipped
with the Cummins® turbocharged diesel engine.You may find that some of the starting, operating, and
maintenance procedures are different. However, they are
simple to follow and careful adherence to them will
ensure that you take full advantage of the features of this
engine.
NOTE:
•Some aftermarket products may cause severe engine/
transmission and/or exhaust system damage. Your
vehicle’s Powertrain Control Systems can detect and
store information about vehicle modifications that
increase horsepower and torque output such as
whether or not performance-enhancing powertrain
components, commonly referred to as downloaders,
power boxes, or performance chips have been used.
142 INTRODUCTION
Page 149 of 360
•Fuel meets minimum requirement
•Water In Fuel Indicator Light is not illuminated
•Wait To Start Light is not illuminated
WARNING!
•Do not start or run an engine in a closed garage or
confined area. Exhaust gas contains Carbon Mon-
oxide (CO) which is odorless and colorless. Carbon
Monoxide is poisonous and can cause serious in-
jury or death when inhaled.
•Keep Remote Keyless Entry (RKE) transmitters
away from children. Operation of the Remote Start
System, windows, door locks or other controls
could cause serious injury or death.
Remote Start Abort Message On Electronic Vehicle
Information Center (EVIC) — If Equipped
The following messages will display in the EVIC if the
vehicle fails to remote start or exits remote start prema-
turely:
•Remote Start Aborted - Door Ajar
•Remote Start Aborted - Hood Ajar
•Remote Start Aborted - Fuel Low
•Remote Start Aborted - System Fault
The EVIC message stays active until the ignition is turned
to the ON/RUN position.
2
THINGS TO KNOW BEFORE STARTING YOUR VEHICLE 147
Page 150 of 360
To Enter Remote Start Mode
Press and release the REMOTE START button
on the RKE transmitter twice, within five sec-
onds. The parking lights will flash and the horn
will chirp twice (if programmed). In cold am-
bient temperature conditions, the diesel vehicle may
delay crank up to 30 seconds for the fuel and grid heater.
Once the vehicle has started, the engine will run for 15
minutes.
NOTE:
•The park lamps will turn on and remain on during
Remote Start mode.
•For security, power window and power sunroof op-
eration (if equipped) are disabled when the vehicle is
in the Remote Start mode.•The engine can be started two consecutive times (two
15-minute cycles) with the RKE transmitter. However,
the ignition switch must be cycled to the ON position
before you can repeat the start sequence for a third
cycle.
To Exit Remote Start Mode Without Driving The
Vehicle
Press and release the REMOTE START button one time or
allow the engine to run for the entire fifteen minute cycle.
NOTE:To avoid unintentional shut downs, the system
will disable the one time press of the REMOTE START
button for two seconds after receiving a valid Remote
Start request.
To Exit Remote Start Mode And Drive The Vehicle
To exit Remote start Mode and Drive the vehicle Before
the end of the 15-minute cycle, press and release the
unlock button on the RKE transmitter to unlock the door
148 THINGS TO KNOW BEFORE STARTING YOUR VEHICLE
Page 152 of 360
•Use the appropriate transmission gear to prevent
engine lugging.
•Observe vehicle oil pressure and temperature indica-
tors.
•Check the coolant and oil levels frequently.
•Vary throttle position at highway speeds when carry-
ing or towing significant weight.
NOTE:Light duty operation such as light trailer towing
or no load operation will extend the time before the
engine is at full efficiency. Reduced fuel economy and
power may be seen at this time.For additional vehicle break-in requirements, refer to
“Trailer Towing” in “Starting And Operating” of the
Owners Manual.
Because of the construction of the Cummins® turbo-
charged diesel engine, engine run-in is enhanced by
loaded operating conditions which allow the engine
parts to achieve final finish and fit during the first 6,000
miles (10 000 km).
150 THINGS TO KNOW BEFORE STARTING YOUR VEHICLE
Page 157 of 360
testing the light will come on when the ignition is first
turned on and remain on for 15 seconds, then blink for 5
seconds, and remain on until the vehicle is started. If the
bulb does not come on during starting, have the condi-
tion investigated promptly.
If this light comes on and remains on while driving, it
suggests a potential engine control problem and the need
for system service.
Although your vehicle will usually be drivable and not
need towing, see your authorized dealer for service as
soon as possible.
CAUTION!
Prolonged driving with the Malfunction Indicator
Light (MIL) on could cause damage to the engine
control system. It also could affect fuel economy and
driveability. If the MIL is flashing, severe catalytic
(Continued)
CAUTION!(Continued)
converter damage and power loss will soon occur.
Immediate service is required.
WARNING!
A malfunctioning catalytic converter, as referenced
above, can reach higher temperatures than in normal
operating conditions. This can cause a fire if you drive
slowly or park over flammable substances such as dry
plants, wood, cardboard, etc. This could result in death
or serious injury to the driver, occupants or others.
4. Turn Signal Indicators
The arrow will flash with the exterior turn
signal when the turn signal lever is operated.
3
UNDERSTANDING YOUR INSTRUMENT PANEL 155
Page 162 of 360
12. Park/Headlight ON Indicator — If Equipped
This indicator will illuminate when the park
lights or headlights are turned on.
13. Cargo Light
The cargo light will illuminate when the cargo
light is activated by pressing the cargo light
button on the headlight switch.
14. Fuel Gauge
Shows level of fuel in tank when ignition switch is in the
ON/RUN position.
15. Vehicle Security Light — If Equipped
This light will flash at a fast rate for approxi-
mately 15 seconds, when the vehicle security
alarm is arming, and then will flash slowly
until the vehicle is disarmed.16. Tire Pressure Monitoring Telltale Light
Each tire, including the spare (if provided),
should be checked monthly when cold and
inflated to the inflation pressure recommended
by the vehicle manufacturer on the vehicle
placard or tire inflation pressure label. (If your vehicle
has tires of a different size than the size indicated on the
vehicle placard or tire inflation pressure label, you should
determine the proper tire inflation pressure for those
tires.)
As an added safety feature, your vehicle has been
equipped with a Tire Pressure Monitoring System
(TPMS) that illuminates a low tire pressure telltale when
one or more of your tires is significantly under-inflated.
Accordingly, when the low tire pressure telltale illumi-
nates, you should stop and check your tires as soon as
possible, and inflate them to the proper pressure. Driving
on a significantly under-inflated tire causes the tire to
overheat and can lead to tire failure. Under-inflation also
160 UNDERSTANDING YOUR INSTRUMENT PANEL