seats Ram 2500 2018 User Guide
[x] Cancel search | Manufacturer: RAM, Model Year: 2018, Model line: 2500, Model: Ram 2500 2018Pages: 372, PDF Size: 7.1 MB
Page 9 of 372
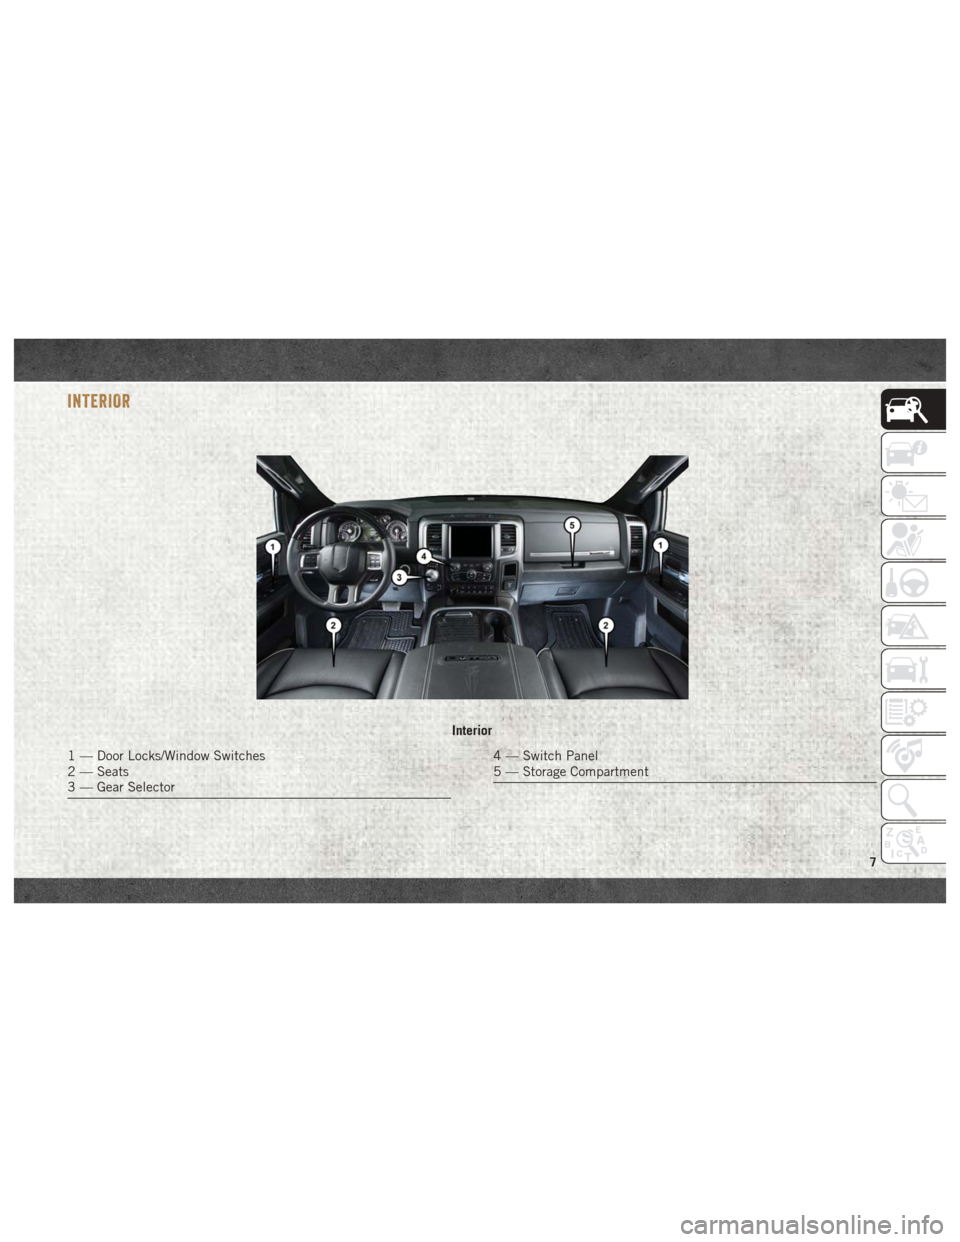
INTERIOR
Interior
1 — Door Locks/Window Switches
2 — Seats
3 — Gear Selector4 — Switch Panel
5 — Storage Compartment
7
Page 11 of 372
GETTING TO KNOW YOUR VEHICLE
VEHICLE USER GUIDE — IF EQUIPPED .11
KEYS......................13
Key Fobs ....................13
IGNITION SWITCH ..............17
Wireless Ignition Node (WIN) — If
Equipped....................17
Keyless Push Button Ignition — If
Equipped ....................17
REMOTE START — IF EQUIPPED .....17
To Enter Remote Start Mode........17
To Exit Remote Start Mode Without
Driving The Vehicle .............18
To Exit Remote Start Mode And Drive
The Vehicle ...................18
General Information .............18
VEHICLE SECURITY ALARM ........18
To Arm The System..............18
To Disarm The System ............19
DOORS.....................19
Keyless Enter-N-Go — Passive Entry . . .19
SEATS .....................22
Driver Memory Seat — If Equipped ....22
Heated Seats ..................25
HEAD RESTRAINTS ..............27
Front Head Restraint Adjustment .....27
Rear Head Restraint Adjustment ......28
Front Head Restraint Removal .......28
Rear Head Restraint Removal ........28
STEERING WHEEL..............29
Tilt Steering Column .............29
Heated Steering Wheel — If Equipped . .29
DRIVER ADJUSTABLE PEDALS — IF
EQUIPPED ...................30
MIRRORS ...................31
Power Folding Outside Mirrors For Standard
And Trailer Tow — If Equipped .......31
EXTERIOR LIGHTS..............32
Headlight Switch...............32
Headlights ...................32
Multifunction Lever .............32
High/Low Beam Switch ...........32Automatic High Beam Headlamp Control —
If Equipped
..................33
Automatic Headlights — If Equipped . .33
Parking Lights And Panel Lights ......33
Turn Signals ..................33
Lane Change Assist — If Equipped ....34
Cargo Light With Bed Lights —
If Equipped ..................34
WINDSHIELD WIPERS AND WASHERS .35
Windshield Wipers ..............35
CLIMATE CONTROLS .............36
Manual Climate Controls With A
Touchscreen..................36
Automatic Climate Controls With A
Touchscreen ..................41
Climate Control Functions ..........46
Automatic Temperature Control (ATC) —
If Equipped ...................47
Operating Tips .................48
POWER SUNROOF — IF EQUIPPED ....49
Opening Sunroof...............49
Closing Sunroof ................49
GETTING TO KNOW YOUR VEHICLE
9
Page 24 of 372
2. This device must accept any interferencereceived, including interference that may
cause undesired operation.
NOTE:
Changes or modifications not expressly ap-
proved by the party responsible for compli-
ance could void the user’s authority to oper-
ate the equipment.
SEATS
Seats are a part of the Occupant Restraint
System of the vehicle.
WARNING!
• It is dangerous to ride in a cargo area, inside or outside of a vehicle. In a colli-
sion, people riding in these areas are
more likely to be seriously injured or
killed.
• Do not allow people to ride in any area of
your vehicle that is not equipped with
seats and seat belts. In a collision,
people riding in these areas are more
likely to be seriously injured or killed.
WARNING!
• Be sure everyone in your vehicle is in aseat and using a seat belt properly.
Driver Memory Seat — If
Equipped
This feature allows the driver to store up to
two different memory profiles for easy recall
through a memory switch. Each memory pro-
file contains desired position settings for the
driver’s seat, side mirrors, adjustable pedals
(if equipped) and a set of desired radio sta-
tion presets. Your remote keyless entry key
fob can also be programmed to recall the
same positions when the unlock button is
pushed.
NOTE:
Your vehicle is equipped with two key fobs,
one key fob can be linked to memory position
1 and the other key fob can be linked to
memory position 2.
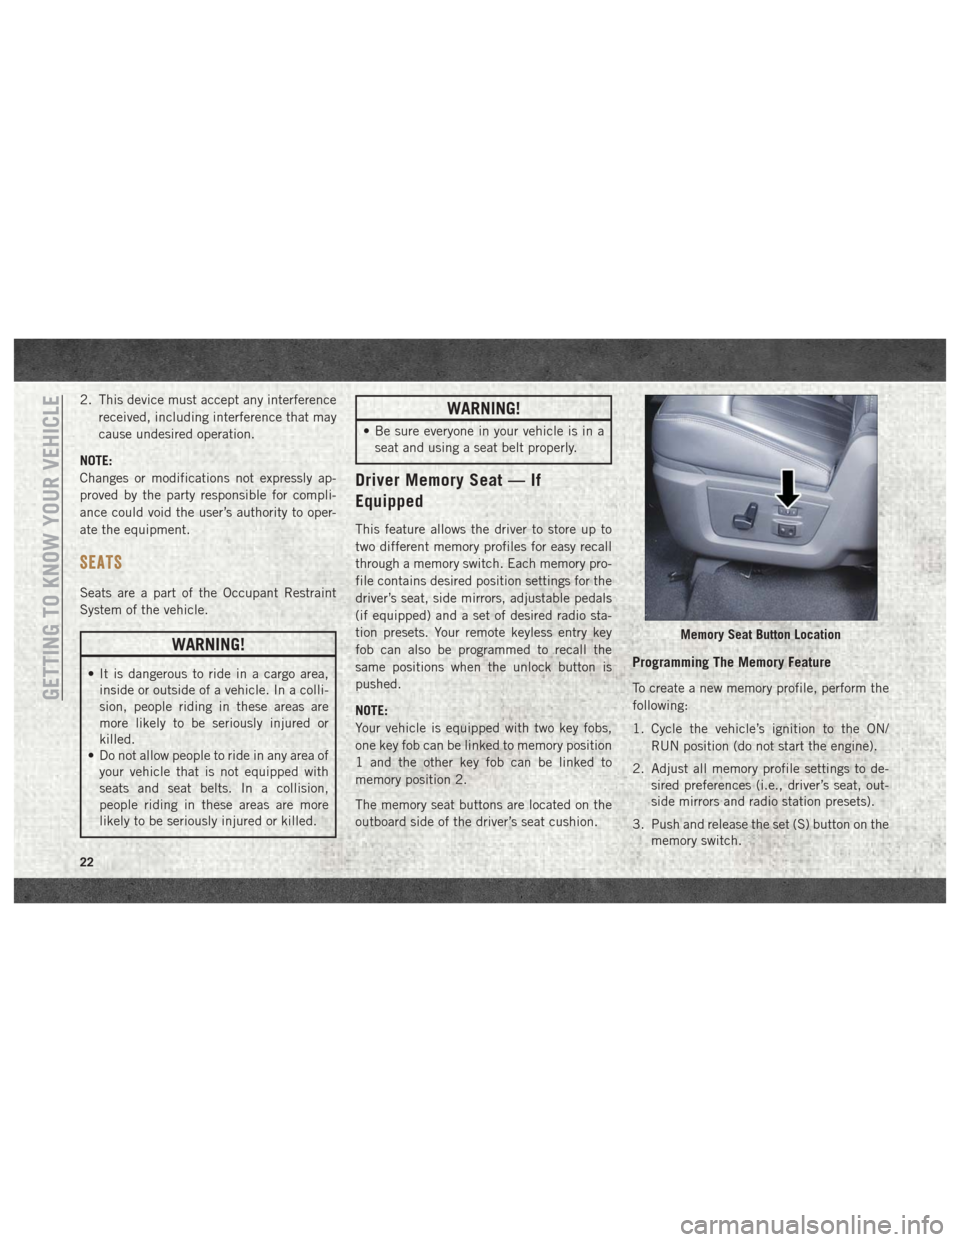
The memory seat buttons are located on the
outboard side of the driver’s seat cushion.
Programming The Memory Feature
To create a new memory profile, perform the
following:
1. Cycle the vehicle’s ignition to the ON/
RUN position (do not start the engine).
2. Adjust all memory profile settings to de- sired preferences (i.e., driver’s seat, out-
side mirrors and radio station presets).
3. Push and release the set (S) button on the memory switch.
Memory Seat Button Location
GETTING TO KNOW YOUR VEHICLE
22
Page 27 of 372
Each stored memory setting will have an
associated Easy Entry and Easy Exit position.
NOTE:
The Easy Entry/Exit feature is not enabled
when the vehicle is delivered from the fac-
tory. The Easy Entry/Exit feature is enabled
(or later disabled) through the programmable
features in the Uconnect system. Refer to
“Uconnect Settings” in “Multimedia” in the
Owner’s Manual for further information.
Heated Seats
On some models, the front and rear seats may
be equipped with heaters located in the seat
cushions and seat backs.
WARNING!
• Persons who are unable to feel pain tothe skin because of advanced age,
chronic illness, diabetes, spinal cord in-
jury, medication, alcohol use, exhaus-
tion or other physical condition must
exercise care when using the seat
heater. It may cause burns even at low
WARNING!
temperatures, especially if used for long
periods of time.
•
Do not place anything on the seat or
seatback that insulates against heat, such
as a blanket or cushion. This may cause
the seat heater to overheat. Sitting in a
seat that has been overheated could
cause serious burns due to the increased
surface temperature of the seat.
Front Heated Seats
The front heated seats control buttons are
located on the center instrument panel below
the climate controls.
If your vehicle is equipped with a touch-
screen, the front heated seats control buttons
are also located within the climate or controls
screen of the touchscreen.
• Press the heated seat button
once to
turn the HI setting on.
• Press the heated seat button
a second
time to turn the LO setting on.
• Press the heated seat button
a third
time to turn the heating elements off. When the HI-level setting is selected, the
heater will provide a boosted heat level dur-
ing the first four minutes of operation. Then,
the heat output will drop to the normal HI-
level. If the HI-level setting is selected, the
system will automatically switch to LO-level
after approximately 60 minutes of continu-
ous operation. At that time, the display will
change from HI to LO, indicating the change.
The LO-level setting will turn off automati-
cally after approximately 45 minutes.
NOTE:
The engine must be running for the heated
seats to operate.
Vehicles Equipped With Remote Start
On models that are equipped with remote
start, the driver’s seat can be programmed to
come on during a remote start.
If your vehicle is equipped with a touch-
screen, this feature can be programmed
through the Uconnect system. Refer to
“Uconnect Settings” in “Multimedia” in the
Owner’s Manual for further information.
If your vehicle is not equipped with a touch-
screen, this feature can be programmed
through the instrument cluster display. Refer
25
Page 28 of 372
to “Instrument Cluster Display” in “Getting
To Know Your Instrument Panel” in the Own-
er’s Manual for further information.
Rear Heated Seats
On some models, the two outboard seats are
equipped with heated seats. The heated seat
switches for these seats are located on the
rear of the center console.
There are two heated seat switches that allow
the rear passengers to operate the seats in-
dependently. You can choose from HI, LO or
OFF heat settings. Amber indicator lights in
each switch indicate the level of heat in use.
Two indicator lights will illuminate for HI, one
for LO and none for OFF.Push the switch once
to select HI-level heat-
ing. Push the switch a
second time to select
LO-level heating. Push
the switch a third time
to shut the heating el-
ements OFF. NOTE:
• Once a heat setting is selected, heat will be
felt within two to five minutes.
• The engine must be running for the heated seats to operate.
When the HI-level setting is selected, the
heater will provide a boosted heat level dur-
ing the first four minutes of operation. Then,
the heat output will drop to the normal HI-
level. If the HI-level setting is selected, the
system will automatically switch to LO-level
after approximately 60 minutes of continu-
ous operation. At that time, the number of
illuminated LEDs changes from two to one,
indicating the change. The LO-level setting
will turn OFF automatically after approxi-
mately 45 minutes.
Ventilated Seats — If Equipped
Located in the seat cushion are small fans
that draw the air from the passenger compart-
ment and move air through fine perforations
in the seat cover to help keep the driver and
front passenger cooler in higher ambient
temperatures. The fans operate at two
speeds, HI and LO. The front ventilated seats control buttons are
located on the center instrument panel below
the climate controls.
If your vehicle is equipped with a touch-
screen, the front ventilated seats control but-
tons are also located within the climate or
controls screen of the touchscreen.
• Press the ventilated seat button
once to
choose HI.
• Press the ventilated seat button
a
second time to choose LO.
• Press the ventilated seat button
a third
time to turn the ventilated seat OFF.
NOTE:
The engine must be running for the venti-
lated seats to operate.
Vehicles Equipped With Remote Start
On models that are equipped with remote
start, the ventilated seats can be pro-
grammed to come on during a remote start.
GETTING TO KNOW YOUR VEHICLE
26
Page 30 of 372
Rear Head Restraint Adjustment
The rear seats are equipped with adjustable
and removable head restraints. To raise the
head restraint, pull upward on the head re-
straint. To lower the head restraint, push the
adjustment button located on the base of the
head restraint and push downward on the
head restraint.
NOTE:
• The rear center head restraint (Crew Caband Quad Cab) has only one adjustment
position that is used to aid in the routing of
a tether. Refer to “Occupant Restraints” in
“Safety” in the Owner's Manual for further
information.
• Do not reposition the head restraint 180 degrees to the incorrect position in an
attempt to gain additional clearance to the
back of the head.
Front Head Restraint Removal
To remove the head restraint, raise it up as far
as it can go. Then, push the adjustment
button and the release button at the base of
each post while pulling the head restraint up. To reinstall the head restraint, put the head
restraint posts into the holes. Then, adjust it
to the appropriate height.
NOTE:
Do not reposition the head restraint 180 de-
grees to the incorrect position in an attempt
to gain additional clearance to the back of the
head.
WARNING!
• A loose head restraint thrown forward in
a collision or hard stop could cause
serious injury or death to occupants of
the vehicle. Always securely stow re-
moved head restraints in a location out-
side the occupant compartment.
• ALL the head restraints MUST be rein-
stalled in the vehicle to properly protect
the occupants. Follow the re-installation
instructions above prior to operating the
vehicle or occupying a seat.
Rear Head Restraint Removal
To remove the head restraint, push the ad-
justment button and the release button while
pulling upward on the whole assembly. To
reinstall the head restraint, put the head
restraint posts into the holes and adjust it to
the appropriate height.
NOTE:
To remove outboard restraints, the rear seat
bottom must be folded up.
WARNING!
• A loose head restraint thrown forward ina collision or hard stop could cause
serious injury or death to occupants of
the vehicle. Always securely stow re-
moved head restraints in a location out-
side the occupant compartment.
• ALL the head restraints MUST be rein-
stalled in the vehicle to properly protect
the occupants. Follow the re-installation
instructions above prior to operating the
vehicle or occupying a seat.
GETTING TO KNOW YOUR VEHICLE
28
Page 59 of 372

The power inverter is designed with built-in
overload protection. If the power rating of
150 Watts is exceeded, the power inverter
will automatically shut down. Once the elec-
trical device has been removed from the out-
let the inverter should automatically reset.
To turn on the power outlet, simply plug in the
device. The outlet automatically turns off
when the device is unplugged.NOTE:
• The Power Inverter will only turn on if the
ignition is in the ACC or ON/RUN position
• Due to built-in overload protection, the power inverter will shut down if the power
rating is exceeded.
WARNING!
To avoid serious injury or death:
• Do not insert any objects into the recep-
tacles.
• Do not touch with wet hands.
• Close the lid when not in use.
• If this outlet is mishandled, it may cause
an electric shock and failure.
PICKUP BOX
The pickup box has many features designed
for utility and convenience.
NOTE:
If you are installing a Toolbox, Ladder Rack or
Headache Rack at the front of the Pickup Box,
you must use Mopar Box Reinforcement Brack-
ets that are available from your authorized
dealer.
You can carry wide building materials (sheets
of plywood, etc.) by building a raised load
floor. Place lumber across the box in the
indentations provided above the wheel hous-
ings and in the bulkhead dividers to form the
floor.
WARNING!
• The pickup box is intended for load car-rying purposes only, not for passengers,
who should sit in seats and use seat
belts.
• Care should always be exercised when
operating a vehicle with unrestrained
cargo. Vehicle speeds may need to be
reduced. Severe turns or rough roads
may cause shifting or bouncing of the
cargo that may result in vehicle damage.
If wide building materials are to be fre-
quently carried, the installation of a sup-
port is recommended. This will restrain
the cargo and transfer the load to the
pickup box floor.
• If you wish to carry more than 600 lbs
(272 kg) of material suspended above
the wheelhouse, supports must be in-
Power Inverter
57
Page 95 of 372
• Installing aftermarket window tinting thatcontains materials that may block radio
wave signals.
• Accumulation of snow or ice around the wheels or wheel housings.
• Using tire chains on the vehicle.
• Using wheels/tires not equipped with TPM sensors.
General Information
This device complies with Part 15 of the FCC
rules and RSS 210 of Industry Canada. Op-
eration is subject to the following conditions:
1. This device may not cause harmful
interference.
2. This device must accept any interference received, including interference that may
cause undesired operation.
NOTE:
Changes or modifications not expressly ap-
proved by the party responsible for compli-
ance could void the user’s authority to oper-
ate the equipment.
OCCUPANT RESTRAINT SYSTEMS
Some of the most important safety features in
your vehicle are the restraint systems:
Occupant Restraint Systems
Features
• Seat Belt Systems
• Supplemental Restraint Systems (SRS) Air Bags
• Child Restraints
Some of the safety features described in this
section may be standard equipment on some
models, or may be optional equipment on
others. If you are not sure, ask your autho-
rized dealer.
Important Safety Precautions
Please pay close attention to the information
in this section. It tells you how to use your
restraint system properly, to keep you and
your passengers as safe as possible. Here are some simple steps you can take to
minimize the risk of harm from a deploying
air bag:
1. Children 12 years old and under should
always ride buckled up in a vehicle with a
rear seat.
2. If a child from 2 to 12 years old (not in a rear-facing child restraint) must ride in
the front passenger seat, move the seat as
far back as possible and use the proper
child restraint (refer to “Child Restraints”
in this section for further information).
3. Children that are not big enough to wear the vehicle seat belt properly (refer to
“Child Restraints” in this section for fur-
ther information) should be secured in a
vehicle with a rear seat in child restraints
or belt-positioning booster seats. Older
children who do not use child restraints or
belt-positioning booster seats should ride
properly buckled up in a vehicle with a
rear seat.
4. Never allow children to slide the shoulder belt behind them or under their arm.
93
Page 96 of 372
5. You should read the instructions providedwith your child restraint to make sure that
you are using it properly.
6. All occupants should always wear their lap and shoulder belts properly.
7. The driver and front passenger seats should be moved back as far as practical
to allow the front air bags room to inflate.
8. Do not lean against the door or window. If your vehicle has side air bags, and deploy-
ment occurs, the side air bags will inflate
forcefully into the space between occu-
pants and the door and occupants could
be injured.
9. If the air bag system in this vehicle needs to be modified to accommodate a dis-
abled person, refer to the “Customer As-
sistance” section for customer service
contact information.
WARNING!
• Never place a rear-facing child restraintin front of an air bag. A deploying pas-
senger front air bag can cause death or
WARNING!
serious injury to a child 12 years or
younger, including a child in a rear-
facing child restraint.
• Only use a rear-facing child restraint in a
vehicle with a rear seat.
Seat Belt Systems
Buckle up even though you are an excellent
driver, even on short trips. Someone on the
road may be a poor driver and could cause a
collision that includes you. This can happen
far away from home or on your own street.
Research has shown that seat belts save
lives, and they can reduce the seriousness of
injuries in a collision. Some of the worst
injuries happen when people are thrown from
the vehicle. Seat belts reduce the possibility
of ejection and the risk of injury caused by
striking the inside of the vehicle. Everyone in
a motor vehicle should be belted at all times.
Enhanced Seat Belt Use Reminder System
(BeltAlert)
Driver and Passenger BeltAlert (if equipped)
BeltAlert is a feature intended to remind
the driver and outboard front seat passenger
(if equipped with outboard front passenger
seat BeltAlert) to buckle their seat belts. The
Belt Alert feature is active whenever the igni-
tion switch is in the START or ON/RUN posi-
tion.
Initial Indication
If the driver is unbuckled when the ignition
switch is first in the START or ON/RUN posi-
tion, a chime will signal for a few seconds. If
the driver or outboard front seat passenger (if
equipped with outboard front passenger seat
BeltAlert) is unbuckled when the ignition
switch is first in the START or ON/RUN posi-
tion the Seat Belt Reminder Light will turn on
and remain on until both outboard front seat
belts are buckled. The outboard front passen-
ger seat BeltAlert is not active when an out-
board front passenger seat is unoccupied.SAFETY
94
Page 98 of 372

WARNING!
• Relying on the air bags alone could leadto more severe injuries in a collision. The
air bags work with your seat belt to
restrain you properly. In some collisions,
the air bags won’t deploy at all. Always
wear your seat belt even though you have
air bags.
• In a collision, you and your passengers
can suffer much greater injuries if you
are not properly buckled up. You can
strike the interior of your vehicle or other
passengers, or you can be thrown out of
the vehicle. Always be sure you and
others in your vehicle are buckled up
properly.
• It is dangerous to ride in a cargo area,
inside or outside of a vehicle. In a colli-
sion, people riding in these areas are
more likely to be seriously injured or
killed.
• Do not allow people to ride in any area of
your vehicle that is not equipped with
seats and seat belts.
WARNING!
• Be sure everyone in your vehicle is in aseat and using a seat belt properly. Oc-
cupants, including the driver, should al-
ways wear their seat belts whether or not
an air bag is also provided at their seat-
ing position to minimize the risk of se-
vere injury or death in the event of a
crash.
• Wearing your seat belt incorrectly could
make your injuries in a collision much
worse. You might suffer internal injuries,
or you could even slide out of the seat
belt. Follow these instructions to wear
your seat belt safely and to keep your
passengers safe, too.
• Two people should never be belted into a
single seat belt. People belted together
can crash into one another in a collision,
hurting one another badly. Never use a
lap/shoulder belt or a lap belt for more
than one person, no matter what their
size.
WARNING!
• A lap belt worn too high can increase therisk of injury in a collision. The seat belt
forces won’t be at the strong hip and
pelvic bones, but across your abdomen.
Always wear the lap part of your seat belt
as low as possible and keep it snug.
• A twisted seat belt may not protect you
properly. In a collision, it could even cut
into you. Be sure the seat belt is flat
against your body, without twists. If you
can’t straighten a seat belt in your ve-
hicle, take it to your authorized dealer
immediately and have it fixed.
• A seat belt that is buckled into the wrong
buckle will not protect you properly. The
lap portion could ride too high on your
body, possibly causing internal injuries.
Always buckle your seat belt into the
buckle nearest you.
• A seat belt that is too loose will not
protect you properly. In a sudden stop,
you could move too far forward, increas-
ing the possibility of injury. Wear your
seat belt snugly.
SAFETY
96