bluetooth Ram 2500 2019 Owner's Manual
[x] Cancel search | Manufacturer: RAM, Model Year: 2019, Model line: 2500, Model: Ram 2500 2019Pages: 696, PDF Size: 13.89 MB
Page 466 of 696

464 IN CASE OF EMERGENCY
F67–10 Amp Red CD / DVD / UCI Port – If Equipped (HD Only)
Bluetooth Hands-Free Module / CD – If
Equipped (DS 1500 Only)
F68 –10 Amp Red AEB RACAM HTR – If Equipped (HD Only)
F69 –15 Amp Blue SCR Module – If Equipped (HD Only)
F70 –30 Amp Green Fuel Pump Motor / K09 RLY Coil Feed
(Cummins Diesel) – If Equipped
F71 –25 Amp Clear Amplifier / Active Noise Cancelation – If
Equipped (HD Only)
F72 –10 Amp Red PCM / DC/DC Converter Voltage– If Equipped
(DS 1500 Only)
F73 –20 Amp Yellow Fuel Transfer Pump (Rear Tank) – If Equipped
(HD Only)
F74 –20 Amp Yellow Brake Vacuum Pump Gas/Diesel – If Equipped
(DS 1500 Only)
F74 –10 Amp Red Backup Alarm – If Equipped (HD Only)
F75 –10 Amp Red ATMM / Coil-SCR Module RLY– If Equipped
(HD Only)
Coolant Temperature Valve – If Equipped (DS
1500 Only)
Cavity
Cartridge Fuse Micro Fuse Description
Page 580 of 696

578 MULTIMEDIA
UCONNECT SETTINGS
The Uconnect system uses a combination of buttons on the
touchscreen and buttons on the faceplate located on the
center of the instrument panel that allows you to access and
change the customer programmable features. Many features
can vary by vehicle.
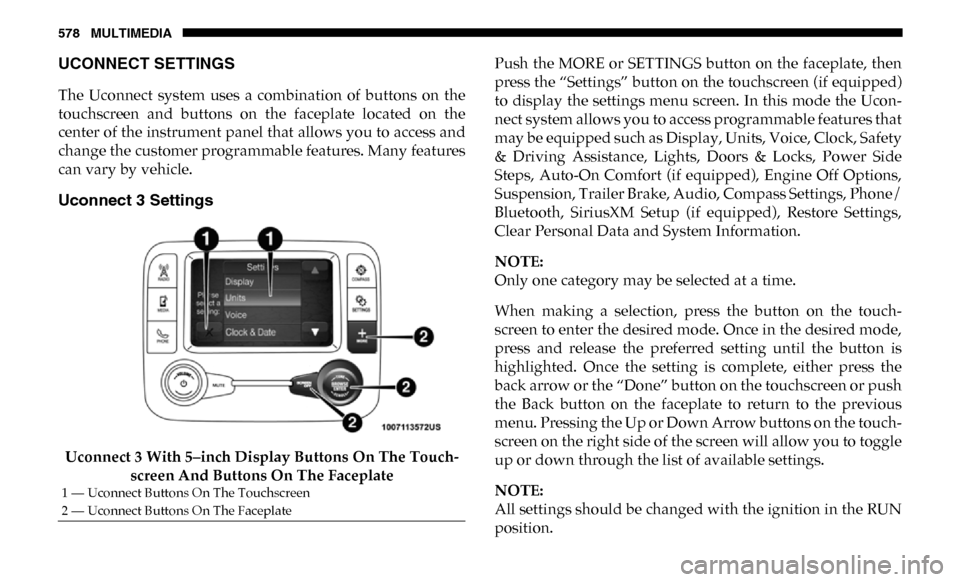
Uconnect 3 Settings
Uconnect 3 With 5–inch Display Buttons On The Touch-
screen And Buttons On The Faceplate Push the MORE or SETTINGS button on the faceplate, then
press the “Settings” button on the touchscreen (if equipped)
to display the settings menu screen. In this mode the Ucon
-
nect system allows you to access programmable features that
may be equipped such as Display, Units, Voice, Clock, Safety
& Driving Assistance, Lights, Doors & Locks, Power Side
Steps, Auto-On Comfort (if equipped), Engine Off Options,
Suspension, Trailer Brake, Audio, Compass Settings, Phone/
Bluetooth, SiriusXM Setup (if equipped), Restore Settings,
Clear Personal Data and System Information.
NOTE:
Only one category may be selected at a time.
When making a selection, press the button on the touch -
screen to enter the desired mode. Once in the desired mode,
press and release the preferred setting until the button is
highlighted. Once the setting is complete, either press the
back arrow or the “Done” button on the touchscreen or push
the Back button on the faceplate to return to the previous
menu. Pressing the Up or Down Arrow buttons on the touch -
screen on the right side of the screen will allow you to toggle
up or down through the list of available settings.
NOTE:
All settings should be changed with the ignition in the RUN
position.
1 — Uconnect Buttons On The Touchscreen
2 — Uconnect Buttons On The Faceplate
Page 596 of 696

594 MULTIMEDIA
Phone/Bluetooth
After pressing the “Phone/Bluetooth” button on the touchscreen, the following settings will be available:
SiriusXM Setup — If Equipped
After pressing the “SiriusXM Setup” button on the touchscreen, the following settings will be available:Setting Name
Selectable Options
Paired Phones List of Paired Phones
NOTE:
The “Paired Phones” feature shows which phones are paired to the Phone/Bluetooth system. For further information, refer
to the Uconnect Owner’s Manual Supplement.
Setting Name Selectable Options
Tune Start OnOff
Channel Skip List of Channels
NOTE:
SiriusXM can be programmed to exclude undesirable channels while scanning. To make your selection, press the “Channel
Skip” button on the touchscreen, select the channels you would like to skip. Subscription Info Sirius ID
Page 598 of 696

596 MULTIMEDIA
Clear Personal Data
After pressing the “Clear Personal Data Settings” button on the touchscreen, the following settings will be available:
System Information
After pressing the “System Information” button on the touchscreen, the following settings will be available:Setting Name
Selectable Options
Clear Personal Data YesCancel
NOTE:
When this feature is selected it will remove all personal data including Bluetooth devices and presets. If “Yes” is selected a
pop-up will appear asking "Are you sure you want to clear all personal data?” select “Yes” to Clear, or “Cancel” to exit.
Setting Name Selectable Options
System Information System Software Information Screen
NOTE:
When the “System Information” feature is selected, a “System Software Information” screen will appear, displaying the
system software version. You can also update your maps with a USB device. Please see an authorized dealer for further infor -
mation.
Page 599 of 696

MULTIMEDIA 597
Uconnect 4/4C/4C NAV Settings
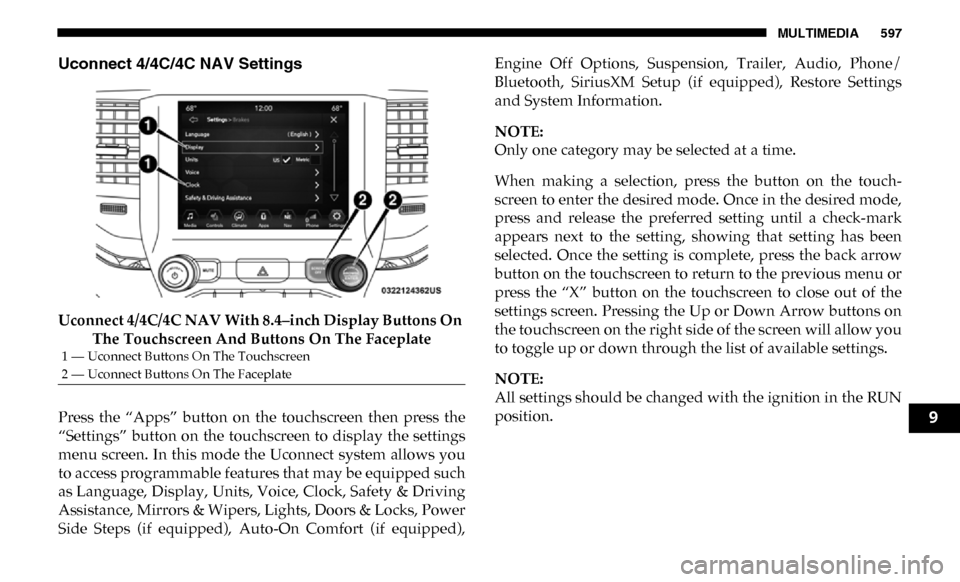
Uconnect 4/4C/4C NAV With 8.4–inch Display Buttons On The Touchscreen And Buttons On The Faceplate
Press the “Apps” button on the touchscreen then press the
“Settings” button on the touchscreen to display the settings
menu screen. In this mode the Uconnect system allows you
to access programmable features that may be equipped such
as Language, Display, Units, Voice, Clock, Safety & Driving
Assistance, Mirrors & Wipers, Lights, Doors & Locks, Power
Side Steps (if equipped), Auto-On Comfort (if equipped), Engine Off Options, Suspension, Trailer, Audio, Phone/
Bluetooth, SiriusXM Setup (if equipped), Restore Settings
and System Information.
NOTE:
Only one category may be selected at a time.
When making a selection, press the button on the touch
-
screen to enter the desired mode. Once in the desired mode,
press and release the preferred setting until a check-mark
appears next to the setting, showing that setting has been
selected. Once the setting is complete, press the back arrow
button on the touchscreen to return to the previous menu or
press the “X” button on the touchscreen to close out of the
settings screen. Pressing the Up or Down Arrow buttons on
the touchscreen on the right side of the screen will allow you
to toggle up or down through the list of available settings.
NOTE:
All settings should be changed with the ignition in the RUN
position.
1 — Uconnect Buttons On The Touchscreen
2 — Uconnect Buttons On The Faceplate
9
Page 620 of 696

618 MULTIMEDIA
Phone/Bluetooth Settings
After pressing the “Phone/Bluetooth Settings” button on the touchscreen, the following settings will be available:
SiriusXM Setup — If Equipped
After pressing the “SiriusXM Setup” button on the touchscreen, the following settings will be available:Setting Name
Selectable Options
Phone Pop-ups Displayed in Cluster — If Equipped On
Off
Do Not Disturb List of Settings
NOTE:
Press “Do Not Disturb” to access the available settings. The following settings are: Auto Reply (both, text, call), Auto Reply
Message (custom, default) and Custom Auto Reply Message (create message). Paired Phones and Audio Devices List Of Paired Phones and Audio Sources
NOTE:
The “Paired Phones and Audio Devices” feature shows which phones and audio sources are paired to the Phone and Audio
Sources Settings system. For further information, refer to the Uconnect Owner’s Manual Supplement. Smartphone Projection Manager OnOff
Setting Name Selectable Options
Tune Start OnOff
Page 623 of 696

MULTIMEDIA 621
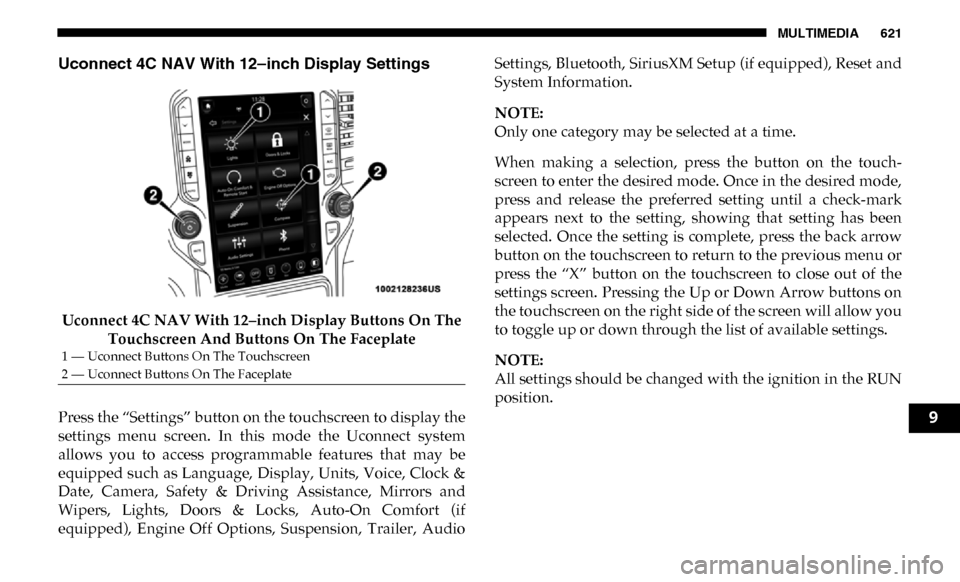
Uconnect 4C NAV With 12–inch Display Settings
Uconnect 4C NAV With 12–inch Display Buttons On The Touchscreen And Buttons On The Faceplate
Press the “Settings” button on the touchscreen to display the
settings menu screen. In this mode the Uconnect system
allows you to access programmable features that may be
equipped such as Language, Display, Units, Voice, Clock &
Date, Camera, Safety & Driving Assistance, Mirrors and
Wipers, Lights, Doors & Locks, Auto-On Comfort (if
equipped), Engine Off Options, Suspension, Trailer, Audio Settings, Bluetooth, SiriusXM Setup (if equipped), Reset and
System Information.
NOTE:
Only one category may be selected at a time.
When making a selection, press the button on the touch
-
screen to enter the desired mode. Once in the desired mode,
press and release the preferred setting until a check-mark
appears next to the setting, showing that setting has been
selected. Once the setting is complete, press the back arrow
button on the touchscreen to return to the previous menu or
press the “X” button on the touchscreen to close out of the
settings screen. Pressing the Up or Down Arrow buttons on
the touchscreen on the right side of the screen will allow you
to toggle up or down through the list of available settings.
NOTE:
All settings should be changed with the ignition in the RUN
position.
1 — Uconnect Buttons On The Touchscreen
2 — Uconnect Buttons On The Faceplate
9
Page 640 of 696

638 MULTIMEDIA
Bluetooth
After pressing the “Bluetooth” button on the touchscreen, the following settings will be available:AUX Volume Offset
— If Equipped
On
Off
NOTE:
The “AUX Volume Offset” feature provides the ability to tune the audio level for portable devices connected through the
AUX input.
Auto Play On Off
Setting Name
Selectable Options
Setting NameSelectable Options
Phone Pop-Ups Displayed in Cluster On
Off
Do Not Disturb List of Settings
NOTE:
Press “Do Not Disturb” to access the available settings. The following settings are: Auto Reply (both, text, call), Auto Reply
Message (custom, default) and Custom Auto Reply Message (create message). Paired Phones and Audio Devices List Of Paired Phones and Audio Sources
NOTE:
The “Paired Phones and Audio Sources” feature shows which phones and audio sources are paired to the Phone and Audio
Sources Settings system. For further information, refer to the Uconnect Owner’s Manual Supplement.
Page 643 of 696

MULTIMEDIA 641
Reset
After pressing the “Reset” button on the touchscreen, the following settings will be available:
System Information
After pressing the “System Information” button on the touchscreen, the following settings will be available:Setting Name
Selectable Options
Reset App Drawer YesCancel
Restore Settings YesCancel
NOTE:
When the “Restore Settings” feature is selected it resets all settings to their default settings. Clear Personal Data YesCancel
NOTE:
When the “Clear Personal Data” feature is selected it removes all personal data including Bluetooth devices and presets. Clear Sirius XM Data YesCancel
Setting Name Selectable Options
System Information System Software Information Screen
NOTE:
When the “System Information” feature is selected, a “System Software Information” screen will appear, displaying the
system software version.
9
Page 644 of 696

642 MULTIMEDIA
STEERING WHEEL AUDIO CONTROLS — IF
EQUIPPED
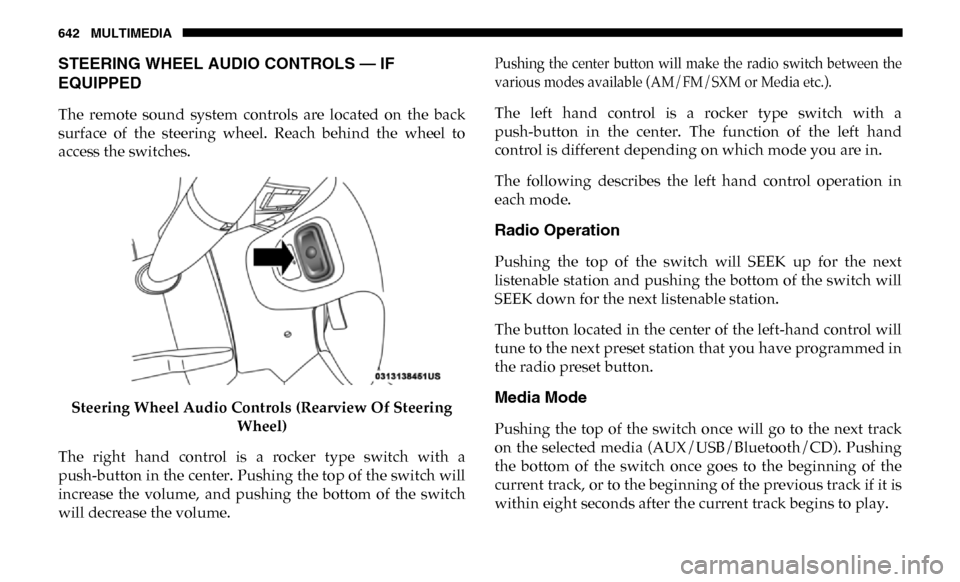
The remote sound system controls are located on the back
surface of the steering wheel. Reach behind the wheel to
access the switches.Steering Wheel Audio Controls (Rearview Of Steering Wheel)
The right hand control is a rocker type switch with a
push-button in the center. Pushing the top of the switch will
increase the volume, and pushing the bottom of the switch
will decrease the volume.
Pushing the center button will make the radio switch between the
various modes available (AM/FM/SXM or Media etc.).
The left hand control is a rocker type switch with a
push-button in the center. The function of the left hand
control is different depending on which mode you are in.
The following describes the left hand control operation in
each mode.
Radio Operation
Pushing the top of the switch will SEEK up for the next
listenable station and pushing the bottom of the switch will
SEEK down for the next listenable station.
The button located in the center of the left-hand control will
tune to the next preset station that you have programmed in
the radio preset button.
Media Mode
Pushing the top of the switch once will go to the next track
on the selected media (AUX/USB/Bluetooth/CD). Pushing
the bottom of the switch once goes to the beginning of the
current track, or to the beginning of the previous track if it is
within eight seconds after the current track begins to play.