light Ram 2500 2020 Owner's Manual
[x] Cancel search | Manufacturer: RAM, Model Year: 2020, Model line: 2500, Model: Ram 2500 2020Pages: 553, PDF Size: 21.99 MB
Page 502 of 553

500MULTIMEDIA
Mirrors & Wipers
After pressing the Mirror & Wipers button on the touchscreen, the following settings will be available:
Lights
After pressing the Lights button on the touchscreen, the following settings will be available:
Setting Name Selectable Options
Tilt Side Mirrors In Reverse — If Equipped OnOff
NOTE:
When the “Tilt Side Mirrors In Reverse” feature is selected, the outside side-view mirrors will tilt downward when the ignition is in the ON/RUN position
and the transmission gear selector is in the REVERSE position. The mirrors will move back to their previous position when the transmission is shifted
out of REVERSE. Rain Sensing Auto Wipers OnOff
NOTE:
Automatically adjusts the wiper speed based on the amount of precipitation. Headlights with Wipers OnOff
Setting Name Selectable Options
Headlight Off Delay-+
NOTE:
When the “Headlight Off Delay” feature is selected, the driver can choose to have the headlights remain on for 0, 30, 60, or 90 seconds when exiting
the vehicle. Headlight Illumination On Approach –+
NOTE:
When the “Headlight Illumination On Approach” feature is selected, the headlights will activate and remain on for 0, 30, 60, or 90 seconds when the
doors are unlocked with the key fob.
20_DJD2_OM_EN_USC_t.book Page 500
Page 503 of 553
MULTIMEDIA501
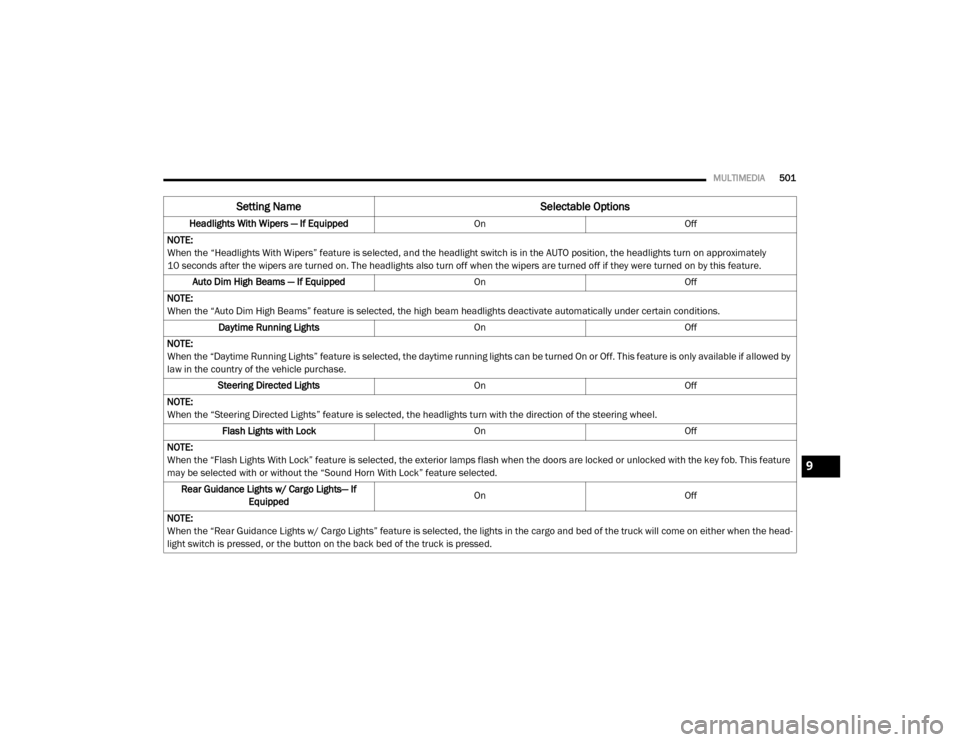
Headlights With Wipers — If Equipped OnOff
NOTE:
When the “Headlights With Wipers” feature is selected, and the headlight switch is in the AUTO position, the headlights turn on approximately
10 seconds after the wipers are turned on. The headlights also turn off when the wipers are turned off if they were turned on by this feature. Auto Dim High Beams — If Equipped OnOff
NOTE:
When the “Auto Dim High Beams” feature is selected, the high beam headlights deactivate automatically under certain conditions. Daytime Running Lights OnOff
NOTE:
When the “Daytime Running Lights” feature is selected, the daytime running lights can be turned On or Off. This feature is only available if allowed by
law in the country of the vehicle purchase. Steering Directed Lights OnOff
NOTE:
When the “Steering Directed Lights” feature is selected, the headlights turn with the direction of the steering wheel. Flash Lights with Lock OnOff
NOTE:
When the “Flash Lights With Lock” feature is selected, the exterior lamps flash when the doors are locked or unlocked with the key fob. This feature
may be selected with or without the “Sound Horn With Lock” feature selected. Rear Guidance Lights w/ Cargo Lights— If Equipped On
Off
NOTE:
When the “Rear Guidance Lights w/ Cargo Lights” feature is selected, the lights in the cargo and bed of the truck will come on either when the head -
light switch is pressed, or the button on the back bed of the truck is pressed.
Setting Name Selectable Options
9
20_DJD2_OM_EN_USC_t.book Page 501
Page 504 of 553

502MULTIMEDIA
Doors & Locks
After pressing the Doors & Locks button on the touchscreen, the following settings will be available:
Setting Name Selectable Options
Auto Door LocksOn Off
Auto Unlock On Exit OnOff
NOTE:
When the “Auto Unlock On Exit” feature is selected, all doors unlock when the vehicle is stopped, the transmission is in the PARK or NEUTRAL position,
and the driver's door is opened. Flash Lights With Lock OnOff
NOTE:
When the “Flash Lights With Lock” feature is selected, the front and rear turn signals flash when the doors are locked or unlocked with the key fob.
This feature may be selected with or without the “Sound Horn With Lock” feature selected. Sound Horn with Lock — If Equipped Off1st Press 2nd Press
Sound Horn With Remote Start OnOff
1st Press Of Key Fob Unlocks Driver Door All Doors
20_DJD2_OM_EN_USC_t.book Page 502
Page 506 of 553
504MULTIMEDIA
Auto-On Comfort & Remote Start — If
Equipped
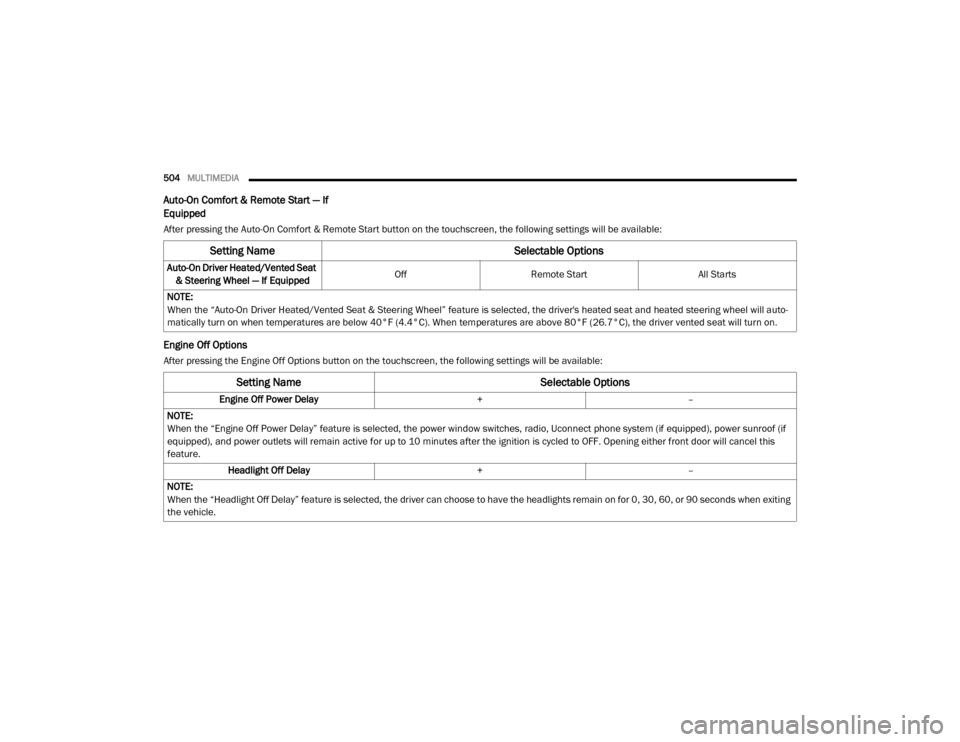
After pressing the Auto-On Comfort & Remote Start button on the touchscreen, the following settings will be available:
Engine Off Options
After pressing the Engine Off Options button on the touchscreen, the following settings will be available:
Setting Name Selectable Options
Auto-On Driver Heated/Vented Seat
& Steering Wheel — If Equipped Off
Remote Start All Starts
NOTE:
When the “Auto-On Driver Heated/Vented Seat & Steering Wheel” feature is selected, the driver's heated seat and heated steering wheel will auto -
matically turn on when temperatures are below 40°F (4.4°C). When temperatures are above 80°F (26.7°C), the driver vented seat will turn on.
Setting Name Selectable Options
Engine Off Power Delay+–
NOTE:
When the “Engine Off Power Delay” feature is selected, the power window switches, radio, Uconnect phone system (if equipped), power sunroof (if
equipped), and power outlets will remain active for up to 10 minutes after the ignition is cycled to OFF. Opening either front door will cancel this
feature. Headlight Off Delay +–
NOTE:
When the “Headlight Off Delay” feature is selected, the driver can choose to have the headlights remain on for 0, 30, 60, or 90 seconds when exiting
the vehicle.
20_DJD2_OM_EN_USC_t.book Page 504
Page 508 of 553
506MULTIMEDIA
Trailer Brake
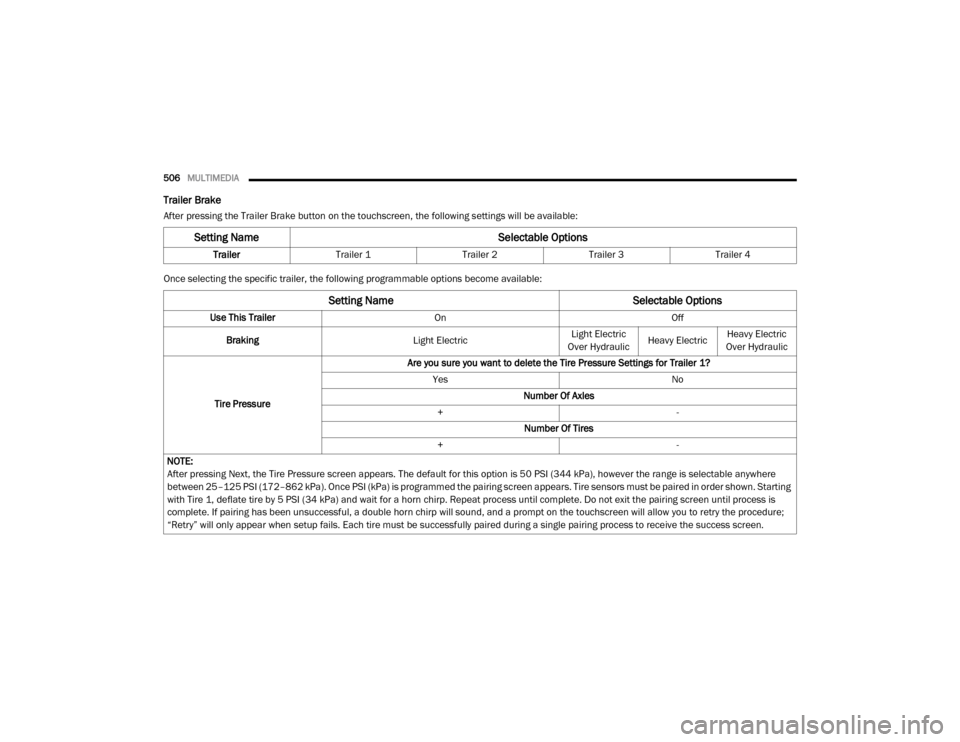
After pressing the Trailer Brake button on the touchscreen, the following settings will be available:
Once selecting the specific trailer, the following programmable options become available:
Setting Name Selectable Options
TrailerTrailer 1 Trailer 2Trailer 3Trailer 4
Setting Name Selectable Options
Use This TrailerOn Off
Braking Light ElectricLight Electric
Over Hydraulic Heavy ElectricHeavy Electric
Over Hydraulic
Tire Pressure Are you sure you want to delete the Tire Pressure Settings for Trailer 1?
Yes No
Number Of Axles
+ -
Number Of Tires
+ -
NOTE:
After pressing Next, the Tire Pressure screen appears. The default for this option is 50 PSI (344 kPa), however the range is selectable anywhere
between 25–125 PSI (172–862 kPa). Once PSI (kPa) is programmed the pairing screen appears. Tire sensors must be paired in order shown. Starting
with Tire 1, deflate tire by 5 PSI (34 kPa) and wait for a horn chirp. Repeat process until complete. Do not exit the pairing screen until process is
complete. If pairing has been unsuccessful, a double horn chirp will sound, and a prompt on the touchscreen will allow you to retry the procedure;
“Retry” will only appear when setup fails. Each tire must be successfully paired during a single pairing process to receive the success screen.
20_DJD2_OM_EN_USC_t.book Page 506
Page 515 of 553
MULTIMEDIA513
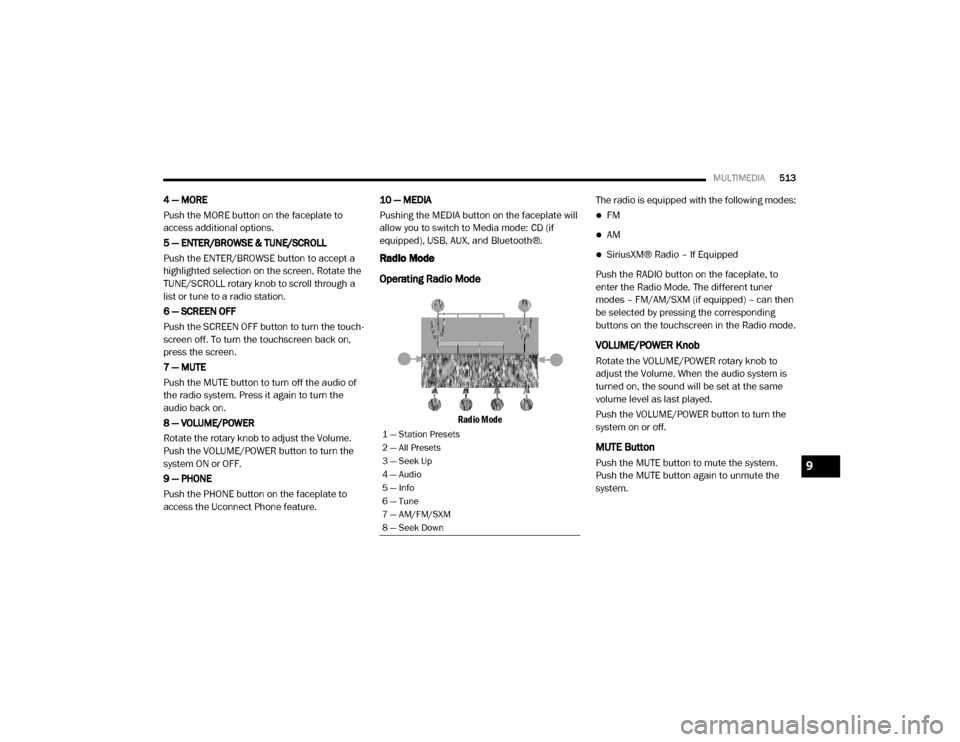
4 — MORE
Push the MORE button on the faceplate to
access additional options.
5 — ENTER/BROWSE & TUNE/SCROLL
Push the ENTER/BROWSE button to accept a
highlighted selection on the screen. Rotate the
TUNE/SCROLL rotary knob to scroll through a
list or tune to a radio station.
6 — SCREEN OFF
Push the SCREEN OFF button to turn the touch -
screen off. To turn the touchscreen back on,
press the screen.
7 — MUTE
Push the MUTE button to turn off the audio of
the radio system. Press it again to turn the
audio back on.
8 — VOLUME/POWER
Rotate the rotary knob to adjust the Volume.
Push the VOLUME/POWER button to turn the
system ON or OFF.
9 — PHONE
Push the PHONE button on the faceplate to
access the Uconnect Phone feature. 10 — MEDIA
Pushing the MEDIA button on the faceplate will
allow you to switch to Media mode: CD (if
equipped), USB, AUX, and Bluetooth®.
Radio Mode
Operating Radio Mode
Radio Mode
The radio is equipped with the following modes:
FM
AM
SiriusXM® Radio – If Equipped
Push the RADIO button on the faceplate, to
enter the Radio Mode. The different tuner
modes – FM/AM/SXM (if equipped) – can then
be selected by pressing the corresponding
buttons on the touchscreen in the Radio mode.
VOLUME/POWER Knob
Rotate the VOLUME/POWER rotary knob to
adjust the Volume. When the audio system is
turned on, the sound will be set at the same
volume level as last played.
Push the VOLUME/POWER button to turn the
system on or off.
MUTE Button
Push the MUTE button to mute the system.
Push the MUTE button again to unmute the
system.
1 — Station Presets
2 — All Presets
3 — Seek Up
4 — Audio
5 — Info
6 — Tune
7 — AM/FM/SXM
8 — Seek Down
9
20_DJD2_OM_EN_USC_t.book Page 513
Page 523 of 553
MULTIMEDIA521
Storing Names/Numbers in The Mobile Phone
Before pairing your mobile phone, you must
make sure you have stored the names you want
to contact in the phonebook on your mobile
phone, so you can call them using the vehicle's
hands-free system.
If your phonebook does not contain any names,
enter new names for the most frequently used
numbers.
For further details, consult your mobile phone
owner's handbook.
NOTE:
The names in the phonebook which do not
contain phone numbers or where both fields
(name and surname) are empty will not be
displayed.
Connection
The system connects automatically to the
paired mobile phone with the highest priority.
To choose a specific mobile phone or Blue-
tooth® audio device, proceed as follows:
1. Access the Settings menu.
2. Select the Phone/Bluetooth® button. 3. Select the Paired Phones or Paired Audio
list using the corresponding button on the
display.
4. Select the specific device (mobile phone or Bluetooth® device).
5. Press the Connect button.
6. During the connection stage, a screen is displayed showing the progress of the oper -
ation.
7. The device connected is highlighted in the list.
Disconnection
To disconnect a specific mobile phone or Blue -
tooth® audio device, proceed as follows:
1. Access the Settings menu.
2. Select the Phone/Bluetooth® button.
3. Select the Paired Phones or Paired Audio list using the corresponding button on the
display.
4. Select the specific device (mobile phone or Bluetooth® device).
5. Press the Disconnect button.Deletion Of A Mobile Phone Or A Bluetooth®
Audio Device
To delete a mobile phone or Bluetooth® audio
device from a list, proceed as follows:
1. Access the Settings menu.
2. Select the Phone/Bluetooth® button.
3. Select the Paired Phones or Paired Audio list using the corresponding button on the
display.
4. Select the device (mobile phone or Blue -
tooth® device).
5. Press the Delete Device button.
6. A confirmation screen will appear on the display:
Press the Yes button to delete the device.
Press the No button to cancel the opera -
tion.
9
20_DJD2_OM_EN_USC_t.book Page 521
Page 533 of 553
MULTIMEDIA531
Push the VR button on the steering wheel.
After the beep, say one of the following
commands and follow the prompts to switch
your media source or choose an artist.
“Change source to Bluetooth®”
“Change source to AUX”
“Change source to USB”
“Play artist Beethoven”; “ Play album
Greatest Hits”; “ Play song Moonlight
Sonata”; “ Play genre Classical”
TIP:
Press the Browse button on the touchscreen to
see all of the music on your USB device. Your
Voice Command must match exactly how the
artist, album, song and genre information is
displayed.
Phone
Making and answering hands-free phone calls
is easy with Uconnect. When the Phonebook
button is illuminated on your touchscreen, your
system is ready. Check UconnectPhone.com for
mobile phone compatibility and pairing instruc -
tions. Push the Phone button . After the beep, say
one of the following commands:
“
Call John Smith”
“Dial 123-456-7890 and follow the system
prompts”
“ Redial (call previous outgoing phone
number)”
“ Call back (call previous incoming phone
number)”
TIP:
When providing a Voice Command, push the
Phone button and say “ Call,” then
pronounce the name exactly as it appears in
your phone book. When a contact has multiple
phone numbers, you can say “ Call John Smith
work .”
Voice Text Reply — If Equipped
Uconnect announces incoming text messages.
Push the VR button on the steering wheel or
Phone button (if enabled) and say “ Listen.”
(Must have compatible mobile phone paired to
Uconnect system.)
1. Once an incoming text message is read to
you, push the VR button
on the steering
wheel or Phone button (if enabled). After
the beep, say: “ Reply
.”
2. Listen to the Uconnect prompts. After the beep, repeat one of the predefined
messages and follow the system prompts.
PRE-DEFINED VOICE TEXT REPLY RESPONSES
Yes. Stuck in
traffic. See you later.
No. Start without
me. I’ll be late.
Okay. Where are
you? I will be 5
25, 30, 45,
60> minutes late.
Call me.
Are you there
yet?
I’ll call you later. I need
directions. See you in 5
minutes.
I’m on my
way. Can’t talk
right now.
I’m lost. Thanks.
9
20_DJD2_OM_EN_USC_t.book Page 531
Page 535 of 553
MULTIMEDIA533
Automatic reply messages can be:
“I am driving right now, I will get back to you
shortly”.
Create a custom auto reply message up to
160 characters.
While in Do Not Disturb, Conference Call can be
selected so you can still place a second call
without being interrupted by incoming calls.
NOTE:
Only the beginning of your custom message
will be seen on the touchscreen.
Reply with text message is not compatible
with iPhones®.
Auto reply with text message is only available
on phones that support Bluetooth® MAP.
Android Auto™ — If Equipped
NOTE:
Feature availability depends on your carrier and
mobile phone manufacturer. Some Android
Auto™ features may or may not be available in
every region and/or language. Android Auto™ allows you to use your voice to
interact with Android’s™ best-in-class speech
technology through your vehicle’s voice recogni
-
tion system, and use your smartphone’s data
plan to project your Android™-powered smart -
phone and a number of its apps onto your Ucon -
nect touchscreen. Connect your Android™ 5.0
(Lollipop) or higher to one of the media USB
ports, using the factory-provided USB cable, and
press the new Android Auto™ icon that replaces
your “Phone” icon on the main menu bar to
begin Android Auto™. Push and hold the VR
button on the steering wheel, or press and hold
the “Microphone” icon within Android Auto™, to
activate Android’s™ VR, which recognizes
natural voice commands, to use a list of your
smartphone’s features:
Maps
Music
Phone
Text Messages
Additional Apps
Refer to your Uconnect Owner’s Manual Supple -
ment for further information. NOTE:
Requires compatible smartphone running
Android™ 5.0 (Lollipop) or higher and download
app on Google Play. Android™, Android Auto™,
and Google Play are trademarks of Google Inc.
Apple CarPlay® — If Equipped
NOTE:
Feature availability depends on your carrier and
mobile phone manufacturer. Some Apple
CarPlay® features may or may not be available
in every region and/or language.
Apple CarPlay® allows you to use your voice to
interact with Siri through your vehicle’s voice
recognition system, and use your smartphone
to project your iPhone® and many apps onto
your Uconnect touchscreen (smartphone’s data
plan will be used for certain apps). Connect your
iPhone® 5 or higher to one of the media USB
ports, using the Apple® factory-provided Light
-
ning cable, and press the new Apple CarPlay®
icon that replaces your Phone icon on the main
menu bar to begin Apple CarPlay®. Push and
hold the VR button on the steering wheel, or
9
20_DJD2_OM_EN_USC_t.book Page 533
Page 539 of 553
CUSTOMER ASSISTANCE537
FCA US LLC Customer Center
P.O. Box 21–8004
Auburn Hills, MI 48321–8004
Phone: (866) 726-4636
FCA Canada Inc. Customer Center
P.O. Box 1621
Windsor, Ontario N9A 4H6
Phone: (800) 465-2001 English / (800)
387-9983 French
In Mexico Contact
Av. Prolongacion Paseo de la Reforma, 1240
Sante Fe C.P. 05109
Mexico, D. F.
In Mexico City: 800-505-1300
Outside Mexico City: +(52) 55 50817568
Puerto Rico And US Virgin Islands
FCA Caribbean LLC
P.O. Box 191857
San Juan 00919-1857
Phone: (866) 726-4636
Fax: (787) 782-3345
Customer Assistance For The Hearing Or
Speech Impaired (TDD/TTY)
To assist customers who have hearing difficul -
ties, the manufacturer has installed special
TDD (Telecommunication Devices for the Deaf)
equipment at its customer center. Any hearing
or speech impaired customer, who has access
to a TDD or a conventional teletypewriter (TTY)
in the United States, can communicate with the
manufacturer by dialing 1-800-380-CHRY.
Canadian residents with hearing difficulties that
require assistance can use the special needs
relay service offered by Bell Canada. For TTY
teletypewriter users, dial 711 and for Voice
callers, dial 1-800-855-0511 to connect with a
Bell Relay Service operator.
Service Contract
You may have purchased a service contract for
a vehicle to help protect you from the high cost
of unexpected repairs after the manufacturer's
New Vehicle Limited Warranty expires. The
Mopar Vehicle Protection plans are the ONLY
vehicle extended protection plans authorized,
endorsed and backed by FCA US LLC to provide
additional protection beyond your vehicle’s
warranty. If you purchased a Mopar Vehicle
Protection Plan, you will receive Plan Provisions and an Owner Identification Card in the mail
within three weeks of the vehicle delivery date.
If you have any questions about the service
contract, call the manufacturer's Service
Contract National Customer Hotline at
1-800-521-9922 (Canadian residents, call
(800) 465-2001 English / (800) 387-9983
French).
FCA US LLC is not responsible for any service
contract you may have purchased from another
manufacturer. If you require service after the
FCA US LLC New Vehicle Limited Warranty
expires, please refer to the contract documents,
and contact the person listed in those docu
-
ments.
We appreciate that you have made a major
investment when you purchased the vehicle. An
authorized dealer has also made a major invest -
ment in facilities, tools, and training to assure
that you are absolutely delighted with the
ownership experience. You will be pleased with
their sincere efforts to resolve any warranty
issues or related concerns.
10
20_DJD2_OM_EN_USC_t.book Page 537