ignition Ram 3500 2016 Owner's Manual
[x] Cancel search | Manufacturer: RAM, Model Year: 2016, Model line: 3500, Model: Ram 3500 2016Pages: 919, PDF Size: 6.67 MB
Page 797 of 919
SELECT button to turn off the message. If the problem
continues, the message will appear the next time the
vehicle is started.
A loose, improperly installed, or damaged fuel filler cap
may also turn on the Malfunction Indicator Light (MIL).
EMISSIONS INSPECTION AND MAINTENANCE
PROGRAMS
In some localities, it may be a legal requirement to pass
an inspection of your vehicle’s emissions control system.
Failure to pass could prevent vehicle registration.For states that require an Inspection and Mainte-
nance (I/M), this check verifies the “Malfunction
Indicator Light (MIL)” is functioning and is not
on when the engine is running, and that the OBD II
system is ready for testing.
Normally, the OBD II system will be ready. The OBD II
system may notbe ready if your vehicle was recently serviced, recently had a dead battery or a battery replace-
ment. If the OBD II system should be determined not
ready for the I/M test, your vehicle may fail the test.
Your vehicle has a simple ignition actuated test, which
you can use prior to going to the test station. To check if
your vehicle’s OBD II system is ready, you must do the
following:
1. Cycle the ignition switch to the ON position, but do
not crank or start the engine.
NOTE: If you crank or start the engine, you will have to
start this test over.
2. As soon as you cycle the ignition switch to the ON position, you will see the “Malfunction Indicator Light
(MIL)” symbol come on as part of a normal bulb
check.
7
MAINTAINING YOUR VEHICLE 795
Page 798 of 919
3. Approximately 15 seconds later, one of two things willhappen:
• The MIL will flash for about 10 seconds and then
return to being fully illuminated until you turn OFF
the ignition or start the engine. This means that your
vehicle’s OBD II system is not readyand you should
not proceed to the I/M station.
• The MIL will not flash at all and will remain fully
illuminated until you place the ignition in the off
position or start the engine. This means that your
vehicle’s OBD II system is readyand you can proceed
to the I/M station.
If your OBD II system is not ready,you should see your
authorized dealer or repair facility. If your vehicle was
recently serviced or had a battery failure or replacement,
you may need to do nothing more than drive your
vehicle as you normally would in order for your OBD II system to update. A recheck with the above test routine
may then indicate that the system is
now ready.
Regardless of whether your vehicle’s OBD II system is
ready or not, if the MIL is illuminated during normal
vehicle operation you should have your vehicle serviced
before going to the I/M station. The I/M station can fail
your vehicle because the MIL is on with the engine
running.
REPLACEMENT PARTS
Use of genuine MOPAR parts for normal/scheduled
maintenance and repairs is highly recommended to en-
sure the designed performance. Damage or failures
caused by the use of non-MOPAR parts for maintenance
and repairs will not be covered by the New Vehicle
Limited Warranty.
796 MAINTAINING YOUR VEHICLE
Page 808 of 919
Engine Air Cleaner Filter Installation
NOTE:Inspect and clean the housing if dirt or debris is
present before replacing the air filter element.
1. Install the air cleaner filter element into the housing assembly with the air cleaner filter inspection surface
facing downward.
2. Install the air cleaner cover onto the housing assembly locating tabs.
3. Latch the spring clips and lock the air cleaner cover to the housing assembly.
Accessory Drive Belt Inspection
WARNING!
•Do not attempt to inspect an accessory drive belt
with vehicle running.
(Continued)
WARNING! (Continued)
•When working near the radiator cooling fan, dis-
connect the fan motor lead. The fan is temperature
controlled and can start at any time regardless of
ignition switch position. You could be injured by
the moving fan blades.
• You can be badly injured working on or around a
motor vehicle. Only do service work for which you
have the knowledge and the proper equipment. If
you have any doubt about your ability to perform a
service job, take your vehicle to a competent me-
chanic.
When inspecting accessory drive belts, small cracks that
run across ribbed surface of belt from rib to rib, are
considered normal. These are not a reason to replace belt.
However, cracks running along a rib (not across) are not
806 MAINTAINING YOUR VEHICLE
Page 820 of 919
To minimize the possibility of catalytic converter damage:
•Do not shut off the engine or interrupt the ignition,
when the transmission is in gear and the vehicle is in
motion.
• Do not try to start the engine by pushing or towing the
vehicle.
• Do not idle the engine with any spark plug wires
disconnected or removed, such as when diagnostic
testing, or for prolonged periods during very rough
idle or malfunctioning operating conditions.
Cooling System
WARNING!
You or others can be badly burned by hot engine
coolant (antifreeze) or steam from your radiator. If
(Continued)
WARNING! (Continued)
you see or hear steam coming from under the hood,
do not open the hood until the radiator has had time
to cool. Never try to open a cooling system pressure
cap when the radiator is hot.
Engine Coolant Checks
Check the engine coolant (antifreeze) protection every 12
months (before the onset of freezing weather, where
applicable). If the engine coolant (antifreeze) is dirty or
rusty in appearance, the system should be drained,
flushed and refilled with fresh coolant. Check the front of
the A/C condenser (if equipped) or radiator for any
accumulation of bugs, leaves, etc. If dirty, clean by gently
spraying water from a garden hose vertically down the
face of the A/C condenser (if equipped) or the back of the
radiator core.
818 MAINTAINING YOUR VEHICLE
Page 843 of 919
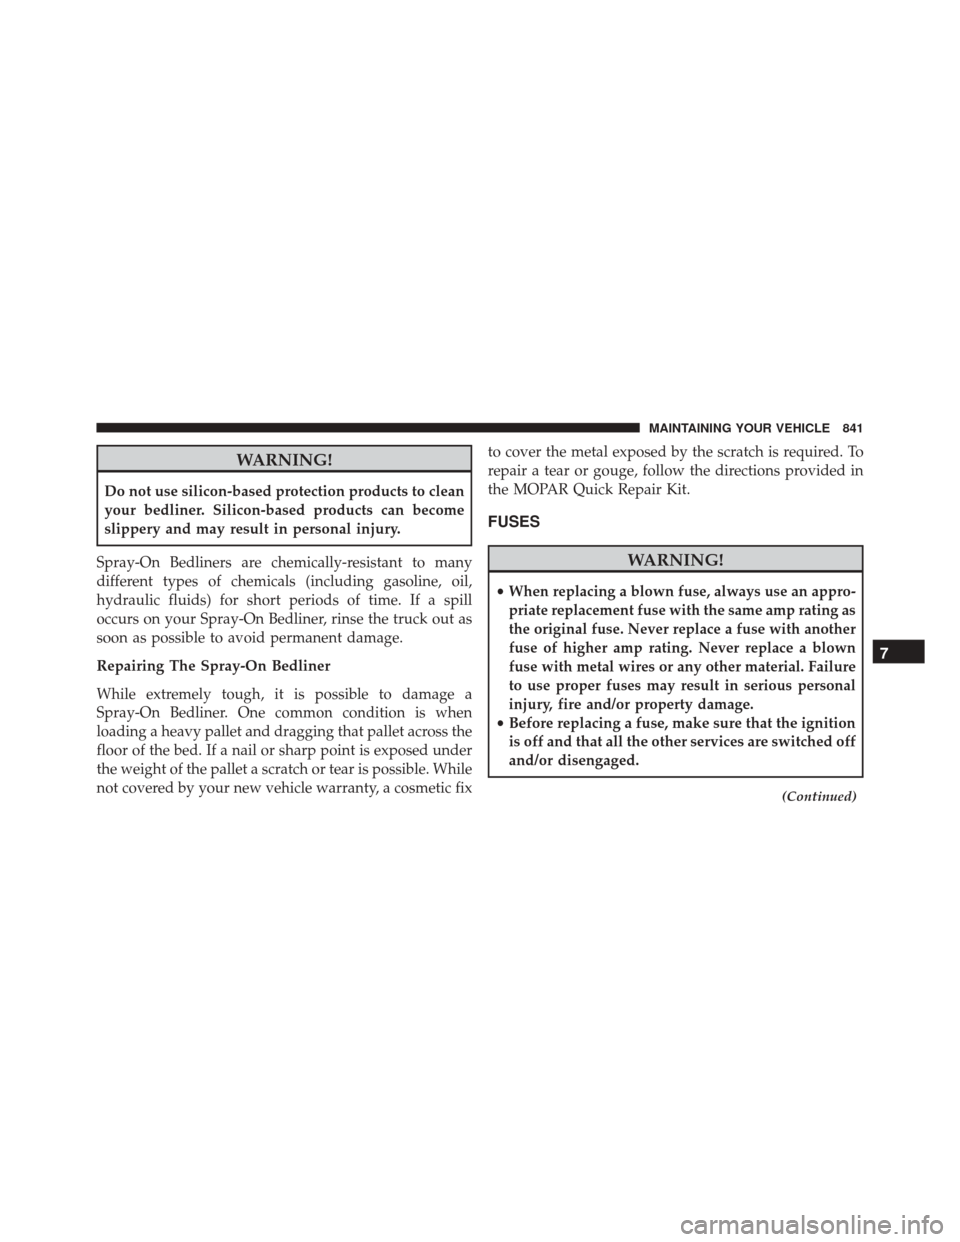
WARNING!
Do not use silicon-based protection products to clean
your bedliner. Silicon-based products can become
slippery and may result in personal injury.
Spray-On Bedliners are chemically-resistant to many
different types of chemicals (including gasoline, oil,
hydraulic fluids) for short periods of time. If a spill
occurs on your Spray-On Bedliner, rinse the truck out as
soon as possible to avoid permanent damage.
Repairing The Spray-On Bedliner
While extremely tough, it is possible to damage a
Spray-On Bedliner. One common condition is when
loading a heavy pallet and dragging that pallet across the
floor of the bed. If a nail or sharp point is exposed under
the weight of the pallet a scratch or tear is possible. While
not covered by your new vehicle warranty, a cosmetic fix to cover the metal exposed by the scratch is required. To
repair a tear or gouge, follow the directions provided in
the MOPAR Quick Repair Kit.
FUSES
WARNING!
•When replacing a blown fuse, always use an appro-
priate replacement fuse with the same amp rating as
the original fuse. Never replace a fuse with another
fuse of higher amp rating. Never replace a blown
fuse with metal wires or any other material. Failure
to use proper fuses may result in serious personal
injury, fire and/or property damage.
• Before replacing a fuse, make sure that the ignition
is off and that all the other services are switched off
and/or disengaged.
(Continued)
7
MAINTAINING YOUR VEHICLE 841
Page 849 of 919
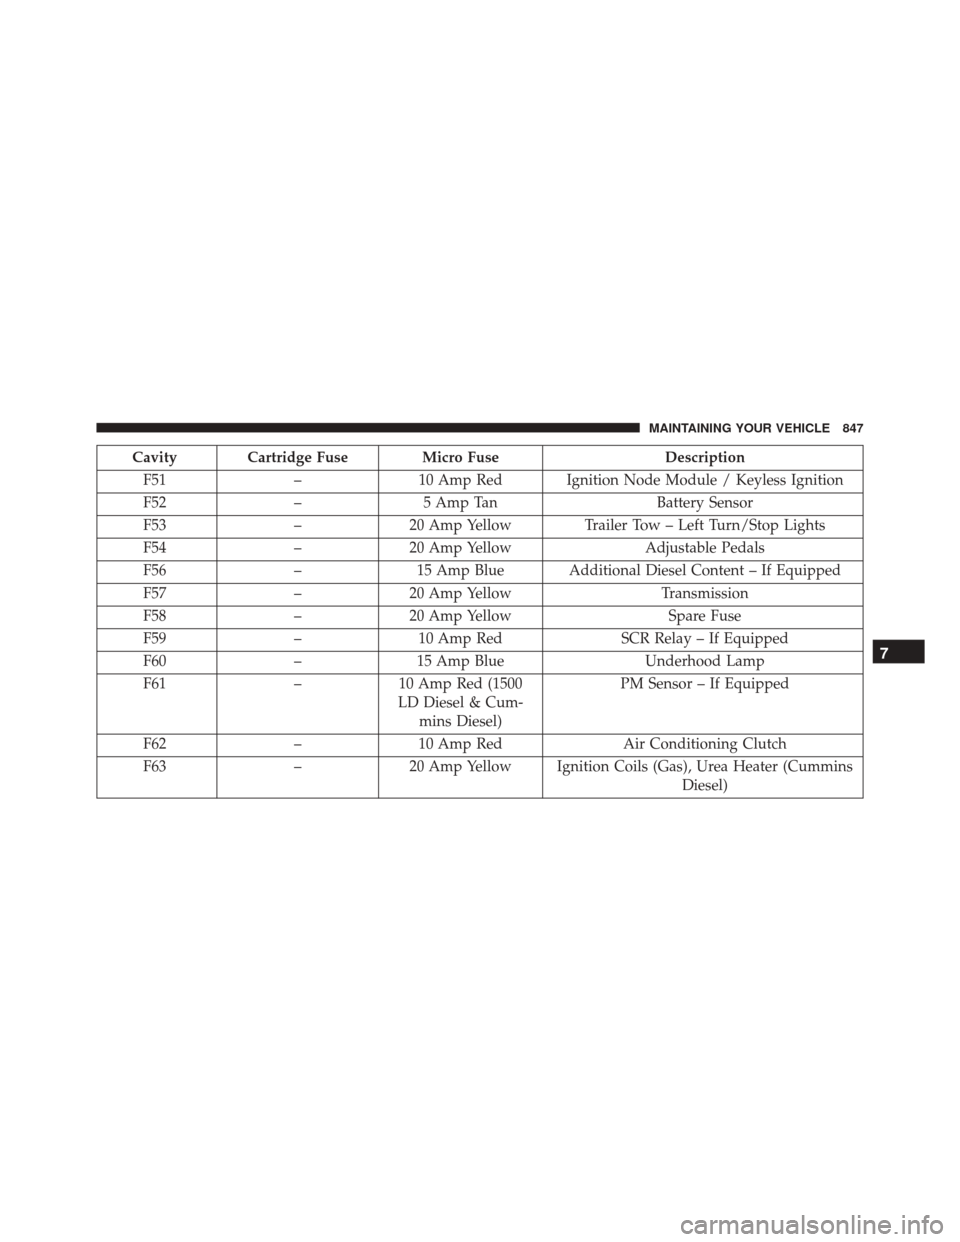
Cavity Cartridge Fuse Micro FuseDescription
F51 –10 Amp Red Ignition Node Module / Keyless Ignition
F52 –5 Amp Tan Battery Sensor
F53 –20 Amp Yellow Trailer Tow – Left Turn/Stop Lights
F54 –20 Amp Yellow Adjustable Pedals
F56 –15 Amp Blue Additional Diesel Content – If Equipped
F57 –20 Amp Yellow Transmission
F58 –20 Amp Yellow Spare Fuse
F59 –10 Amp Red SCR Relay – If Equipped
F60 –15 Amp Blue Underhood Lamp
F61 –10 Amp Red (1500
LD Diesel & Cum- mins Diesel) PM Sensor – If Equipped
F62 –10 Amp Red Air Conditioning Clutch
F63 –20 Amp Yellow Ignition Coils (Gas), Urea Heater (Cummins
Diesel)
7
MAINTAINING YOUR VEHICLE 847
Page 906 of 919
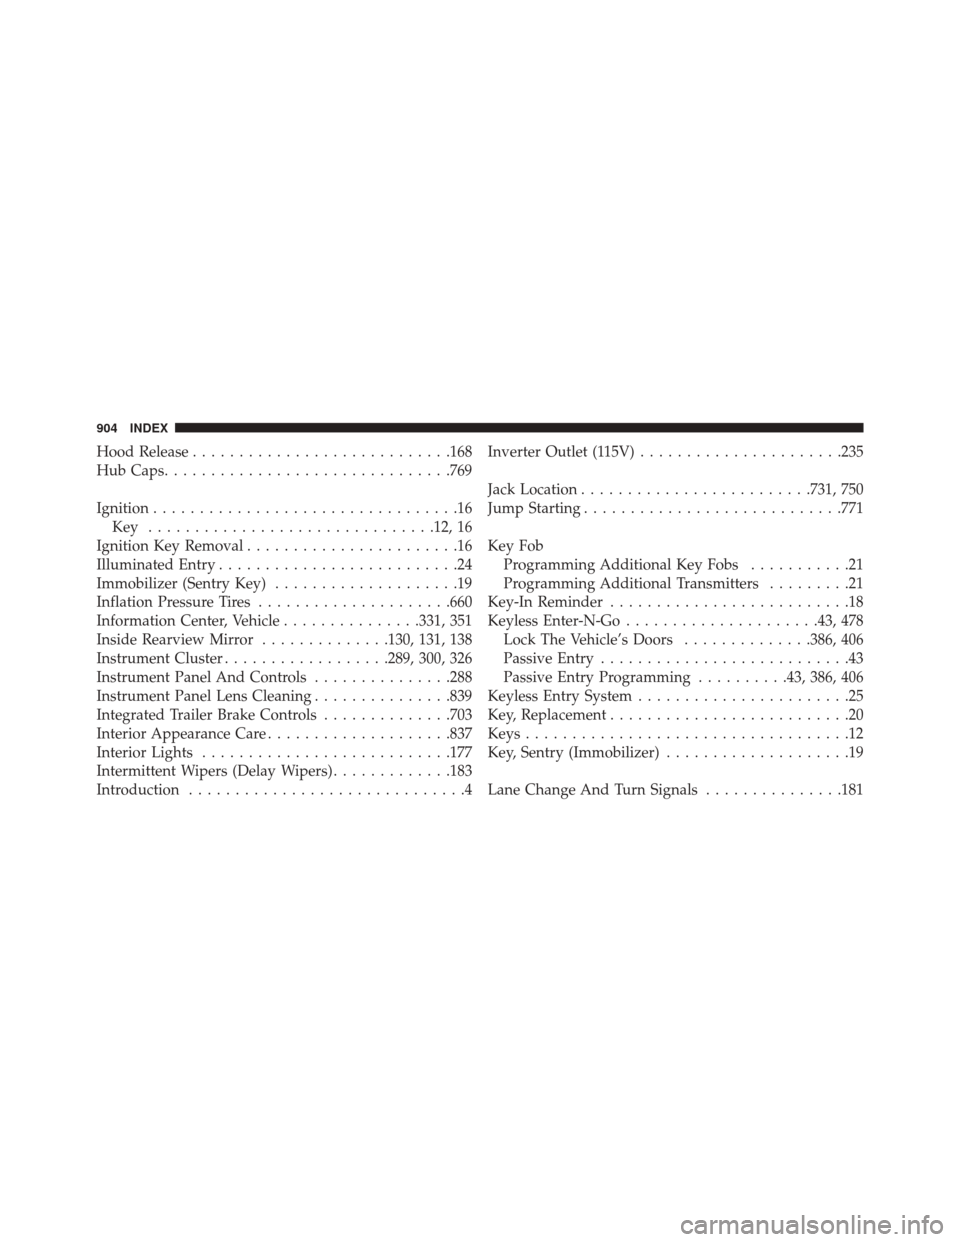
Hood Release........................... .168
Hub Caps .............................. .769
Ignition .................................16
Key .............................. .12, 16
Ignition Key Removal .......................16
Illuminated Entry ..........................24
Immobilizer (Sentry Key) ....................19
Inflation Pressure Tires .....................660
Information Center, Vehicle ...............331, 351
Inside Rearview Mirror ..............130, 131, 138
Instrument Cluster ..................289, 300, 326
Instrument Panel And Controls ...............288
Instrument Panel Lens Cleaning ...............839
Integrated Trailer Brake Controls ..............703
Interior Appearance Care ....................837
Interior Lights .......................... .177
Intermittent Wipers (Delay Wipers) .............183
Introduction ..............................4 Inverter Outlet (115V)
..................... .235
Jack Location ........................ .731, 750
Jump Starting ........................... .771
Key Fob Programming Additional Key Fobs ...........21
Programming Additional Transmitters .........21
Key-In Reminder ..........................18
Keyless Enter-N-Go .....................43, 478
Lock The Vehicle’s Doors ..............386, 406
Passive Entry ...........................43
Passive Entry Programming ..........43, 386, 406
Keyless Entry System .......................25
Key, Replacement ..........................20
Keys ...................................12
Key, Sentry (Immobilizer) ....................19
Lane Change And Turn Signals ...............181
904 INDEX