display Ram 3500 2016 Workshop Manual
[x] Cancel search | Manufacturer: RAM, Model Year: 2016, Model line: 3500, Model: Ram 3500 2016Pages: 919, PDF Size: 6.67 MB
Page 297 of 919
WARNING!
A hot engine cooling system is dangerous. You or
others could be badly burned by steam or boiling
coolant. You may want to call an authorized dealer
for service if your vehicle overheats. If you decide to
look under the hood yourself, see “Maintaining Your
Vehicle”. Follow the warnings under the Cooling
System Pressure Cap paragraph.
WARNING AND INDICATOR LIGHTS
IMPORTANT:The warning / indicator lights switch on
in the instrument panel together with a dedicated mes-
sage and/or acoustic signal when applicable. These
indications are indicative and precautionary and as such
must not be considered as exhaustive and/or alternative
to the information contained in the Owner ’s Manual,
which you are advised to read carefully in all cases.
Always refer to the information in this chapter in the
event of a failure indication.
All active telltales will display first if applicable. The
system check menu may appear different based upon
equipment options and current vehicle status. Some
telltales are optional and may not appear.
4
UNDERSTANDING YOUR INSTRUMENT PANEL 295
Page 308 of 919

Door Open Warning Light
Red TelltaleLight What It Means
Door Open Warning Light
This indicator will illuminate when a door is open and not fully closed.
NOTE:
If the vehicle is moving there will also be a single chime.
NOTE: Door Open Warning Light will differ depending
on the equipped instrument cluster display
306 UNDERSTANDING YOUR INSTRUMENT PANEL
Page 313 of 919
Tire Pressure Monitoring Indicator Light
Yellow TelltaleLight What It Means
Tire Pressure Monitoring Indicator Light
The warning light switches on and a message is displayed to indicate that the tire pressure
is lower than the recommended value and/or that slow pressure loss is occurring. In these
cases, optimal tire duration and fuel consumption may not be guaranteed.
Should one or more tires be in the condition mentioned above, the display will show the
indications corresponding to each tire in sequence.
IMPORTANT: Do not continue driving with one or more
flat tires as handling may be compromised. Stop the
vehicle, avoiding sharp braking and steering. Repair
immediately using the dedicated tire repair kit and
contact your authorized dealership as soon as possible.
Each tire, including the spare (if provided), should be
checked monthly when cold and inflated to the inflation
pressure recommended by the vehicle manufacturer on the vehicle placard or tire inflation pressure label. If your
vehicle has tires of a different size than the size indicated
on the vehicle placard or tire inflation pressure label, you
should determine the proper tire inflation pressure for
those tires.
As an added safety feature, your vehicle has been
equipped with a Tire Pressure Monitoring System
(TPMS) that illuminates a low tire pressure telltale when
4
UNDERSTANDING YOUR INSTRUMENT PANEL 311
Page 333 of 919
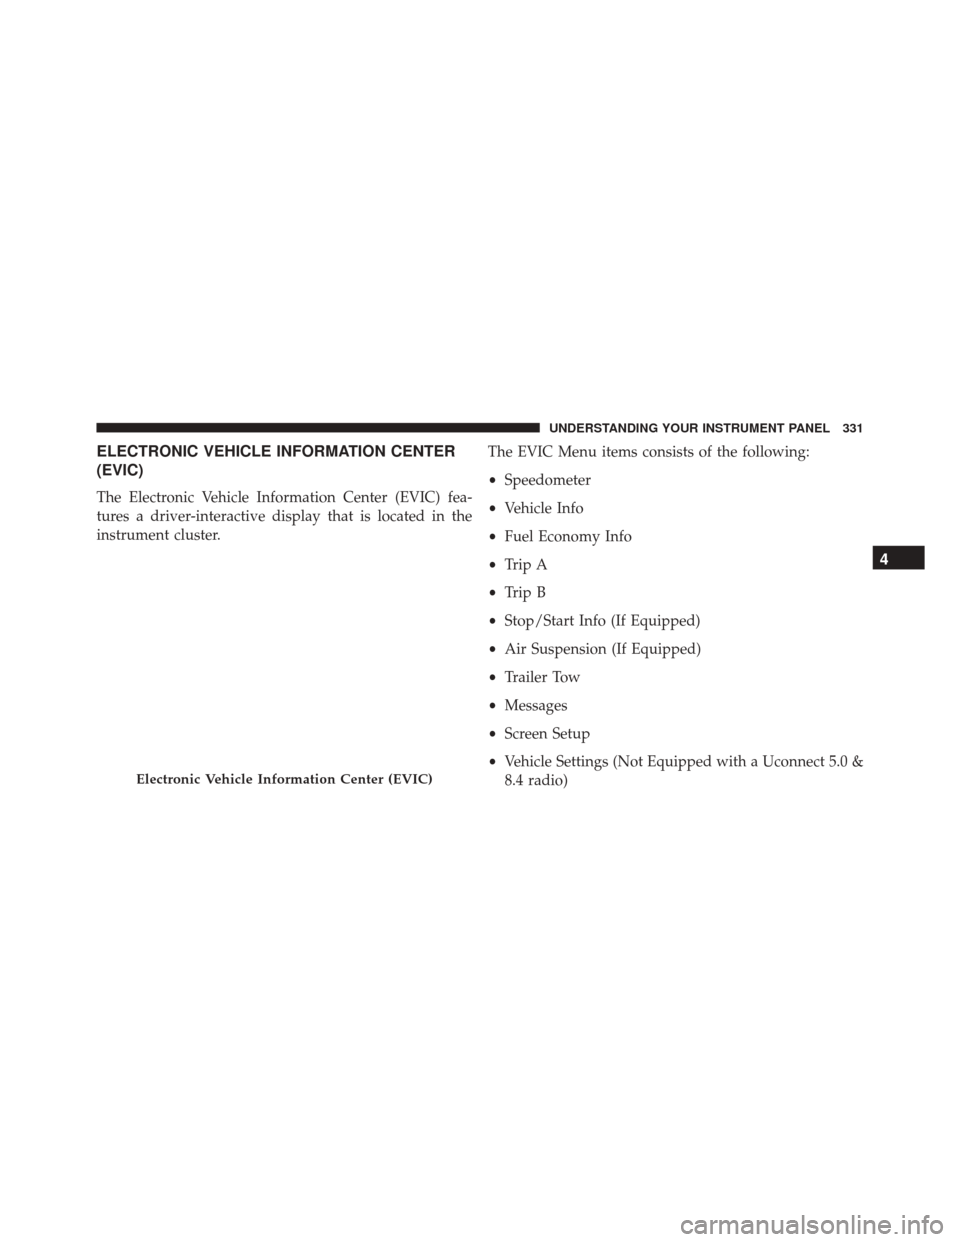
ELECTRONIC VEHICLE INFORMATION CENTER
(EVIC)
The Electronic Vehicle Information Center (EVIC) fea-
tures a driver-interactive display that is located in the
instrument cluster.The EVIC Menu items consists of the following:
•
Speedometer
• Vehicle Info
• Fuel Economy Info
• Trip A
• Trip B
• Stop/Start Info (If Equipped)
• Air Suspension (If Equipped)
• Trailer Tow
• Messages
• Screen Setup
• Vehicle Settings (Not Equipped with a Uconnect 5.0 &
8.4 radio)
Electronic Vehicle Information Center (EVIC)
4
UNDERSTANDING YOUR INSTRUMENT PANEL 331
Page 335 of 919

•RIGHT Arrow Button
Push and release the RIGHTarrow button to
access/select the information screens or sub-
menu screens of a main menu item. Push and
hold the RIGHT arrow button for two seconds
to reset displayed/selected features that can be reset.
• LEFT Arrow Button
Push and release the LEFTarrow button to
return to the main menu, to exit the main menu
push and release the UP or DOWN arrow to
highlight Turn Menu Off, then push and re-
lease the RIGHTarrow.Electronic Vehicle Information Center (EVIC)
Displays — 3.5” Display
4
UNDERSTANDING YOUR INSTRUMENT PANEL 333
Page 336 of 919
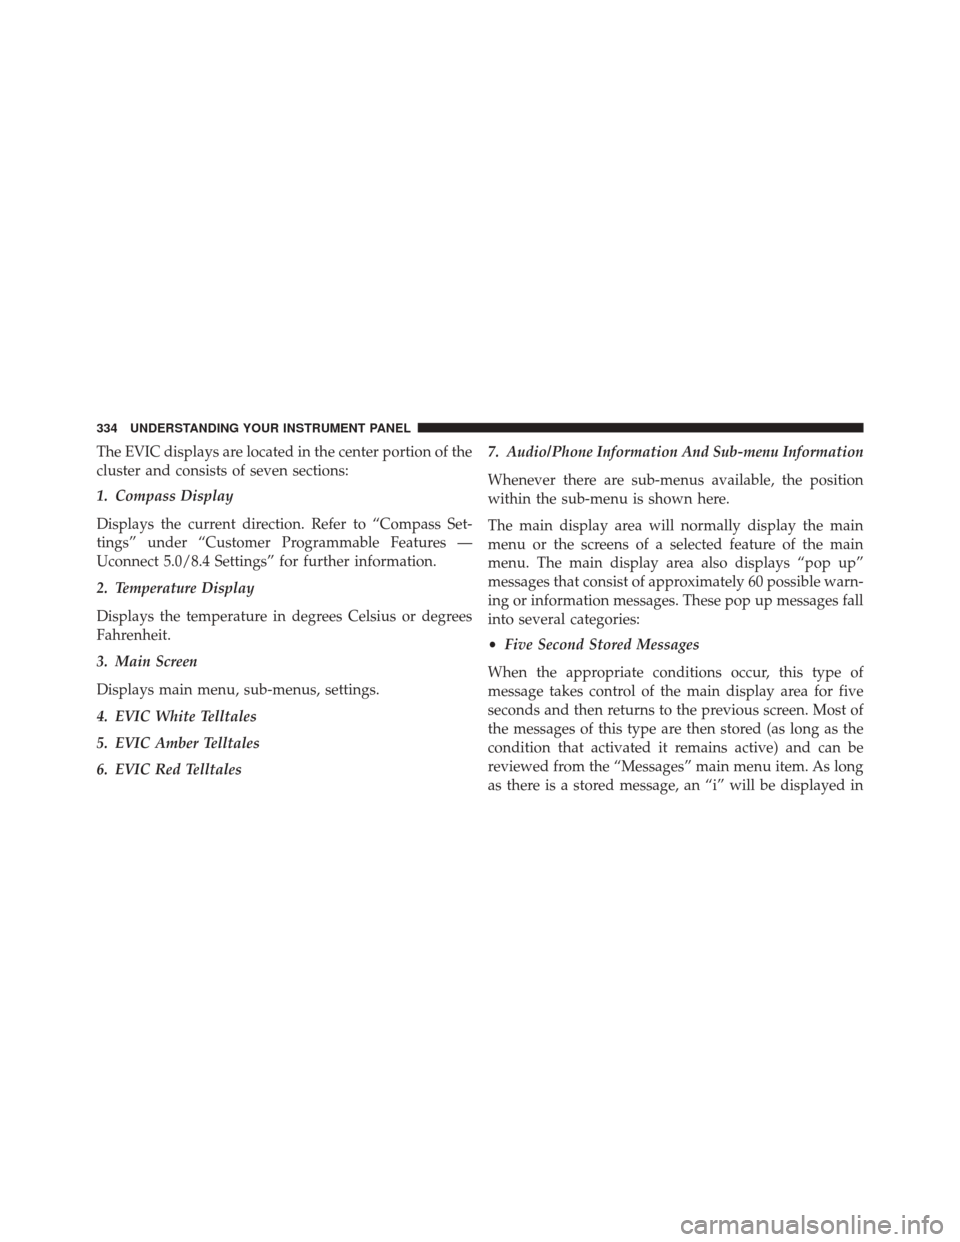
The EVIC displays are located in the center portion of the
cluster and consists of seven sections:
1. Compass Display
Displays the current direction. Refer to “Compass Set-
tings” under “Customer Programmable Features —
Uconnect 5.0/8.4 Settings” for further information.
2. Temperature Display
Displays the temperature in degrees Celsius or degrees
Fahrenheit.
3. Main Screen
Displays main menu, sub-menus, settings.
4. EVIC White Telltales
5. EVIC Amber Telltales
6. EVIC Red Telltales7. Audio/Phone Information And Sub-menu Information
Whenever there are sub-menus available, the position
within the sub-menu is shown here.
The main display area will normally display the main
menu or the screens of a selected feature of the main
menu. The main display area also displays “pop up”
messages that consist of approximately 60 possible warn-
ing or information messages. These pop up messages fall
into several categories:
•
Five Second Stored Messages
When the appropriate conditions occur, this type of
message takes control of the main display area for five
seconds and then returns to the previous screen. Most of
the messages of this type are then stored (as long as the
condition that activated it remains active) and can be
reviewed from the “Messages” main menu item. As long
as there is a stored message, an “i” will be displayed in
334 UNDERSTANDING YOUR INSTRUMENT PANEL
Page 337 of 919
the EVIC’s compass/outside temp line. Examples of this
message type are “Right Front Turn Signal Lamp Out”
and “Low Tire Pressure.”
•Unstored Messages
This message type is displayed indefinitely or until the
condition that activated the message is cleared. Examples
of this message type are “Turn Signal On” (if a turn signal
is left on) and “Lights On” (if driver leaves the vehicle).
• Unstored Messages Until RUN
These messages deal primarily with the Remote Start
feature. This message type is displayed until the ignition
is in the RUN state. Examples of this message type are
“Remote Start Aborted - Door Ajar” and “Press Brake
Pedal and Push Button to Start.”
• Five Second Unstored Messages
When the appropriate conditions occur, this type of
message takes control of the main display area for five seconds and then returns to the previous screen. An
example of this message type is “Automatic High Beams
On.”
Oil Life Reset
Your vehicle is equipped with an engine oil change
indicator system. The “Oil Change Required” message
will display in the EVIC after a single chime has sounded,
to indicate the next scheduled oil change interval. The
engine oil change indicator system is duty cycle based,
which means the engine oil change interval may fluctu-
ate, dependent upon your personal driving style.
NOTE:
Use the steering wheel EVIC controls for the
following procedure(s).
Vehicles Equipped With Passive Entry
1. Without depressing the brake pedal, push the EN- GINE START/STOP button and place the ignition to
the ON/RUN position (do not start the engine).4
UNDERSTANDING YOUR INSTRUMENT PANEL 335
Page 339 of 919
EVIC Selectable Menu Items
Push and release theUPorDOWNarrow but-
tons until the desired Selectable Menu item is high-
lighted in the EVIC.
Speedometer Menu Item
Push and release the UPorDOWNarrow button
until the speedometer menu item is highlighted in the
EVIC. Push and release the RIGHT
arrow button
to cycle the display between MPH and km/h.
Vehicle Info Menu Item
Push and release the UPorDOWNarrow button
until the Vehicle Info menu item is highlighted in the
EVIC. Push and release the RIGHT
arrow button
to enter the submenus items of Vehicle Info. follow the
directional prompts to access or reset any of the
following Vehicle Info submenu items:
• Tire Pressure
• Coolant Temp
• Transmission Temp (Automatic only)
• Oil Temp
• Oil Pressure
• Oil Life
• Battery Voltage
• Gauge Summary
• Engine Hours
Fuel Economy Menu Item
Push and release the UPorDOWNarrow button
until the Fuel Economy menu item is highlighted.
Push and Hold the RIGHT
arrow button to reset
Average Fuel Economy. 4
UNDERSTANDING YOUR INSTRUMENT PANEL 337
Page 340 of 919
•Current Fuel Economy Gauge
• Average Fuel Economy value
• Range to Empty
Trip Menu Item
Trip A
Push and release the UP
orDOWNarrow button
until the Trip A menu item is highlighted in the EVIC.
The Trip A information will display the following:
• Distance
• Average MPG
• Elapsed Time
Push and hold RIGHT
arrow button to reset all
information.
Trip B
Push and release UP
orDOWNarrow button
until the Trip B menu item is highlighted in the EVIC.
The Trip B information will display the following:
• Distance
• Average MPG
• Elapsed Time
Push and hold the RIGHT
arrow button to reset all
the information.
Stop/Start Menu Item – If Equipped
Push and release the UPorDOWNarrow button
until the Stop/Start menu item is highlighted in the
EVIC. Push and release the RIGHT
arrow button
to display the Stop/Start status.
338 UNDERSTANDING YOUR INSTRUMENT PANEL
Page 341 of 919
Air Suspension Menu Item — If Equipped
Push and release theUPorDOWNarrow button
until the Air Suspension menu item is highlighted in
the EVIC. Push and release the RIGHT
arrow
button to display the Air Suspension status.
Trailer Tow Menu Item
Push and release the UPorDOWNarrow button
until the Trailer Tow menu item is highlighted. Push
and release the RIGHT
arrow button and the next
screen will display the following trailer trip
information:
• Trip (trailer specific) Distance: Push and hold the
RIGHT
arrow button to reset the distance.
• Trailer Brake
• Output
• Type
• Gain
EVIC Messages (Stored)
Number of messages stored will be indicated on the
highlighted Messages Menu bar.
When no message(s) have been stored, the right arrow
will not be present in the highlighted Messages bar.
Message(s) remain stored until condition has been
cleared by your authorized service provider.
Sample of stored EVIC Messages
• Front Seat Belts Unbuckled
• Driver Seat Belt Unbuckled
• Passenger Seat Belt Unbuckled
• Service Air Bag System
• Traction Control Off
• Washer Fluid Low
4
UNDERSTANDING YOUR INSTRUMENT PANEL 339