Ram 3500 2017 Owner's Manual
Manufacturer: RAM, Model Year: 2017, Model line: 3500, Model: Ram 3500 2017Pages: 734, PDF Size: 7.3 MB
Page 321 of 734
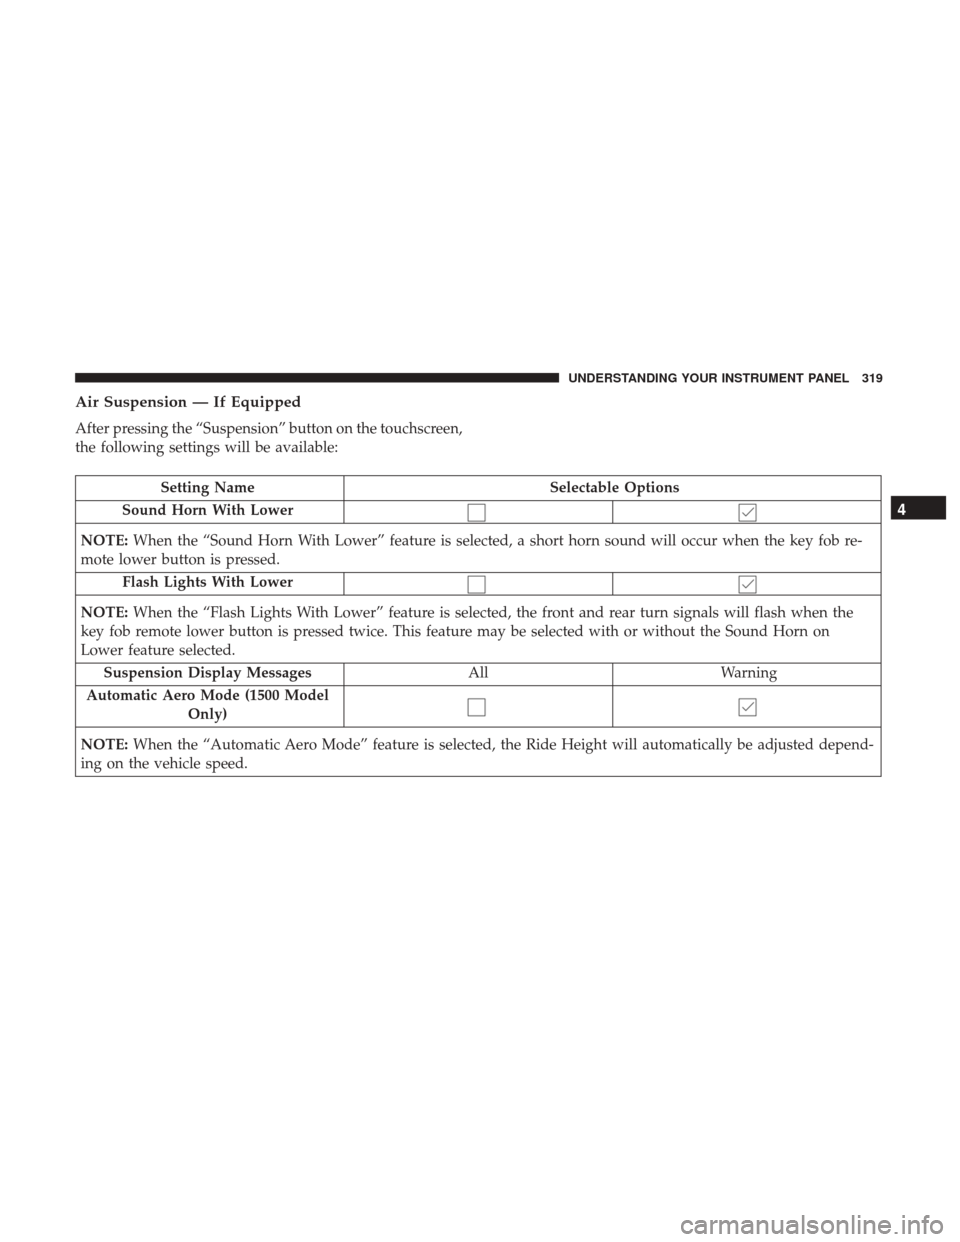
Air Suspension — If Equipped
After pressing the “Suspension” button on the touchscreen,
the following settings will be available:
Setting NameSelectable Options
Sound Horn With Lower
NOTE: When the “Sound Horn With Lower” feature is selected, a short horn sound will occur when the key fob re-
mote lower button is pressed.
Flash Lights With Lower
NOTE: When the “Flash Lights With Lower” feature is selected, the front and rear turn signals will flash when the
key fob remote lower button is pressed twice. This feature may be selected with or without the Sound Horn on
Lower feature selected.
Suspension Display Messages AllWarning
Automatic Aero Mode (1500 Model Only)
NOTE: When the “Automatic Aero Mode” feature is selected, the Ride Height will automatically be adjusted depend-
ing on the vehicle speed.
4
UNDERSTANDING YOUR INSTRUMENT PANEL 319
Page 322 of 734
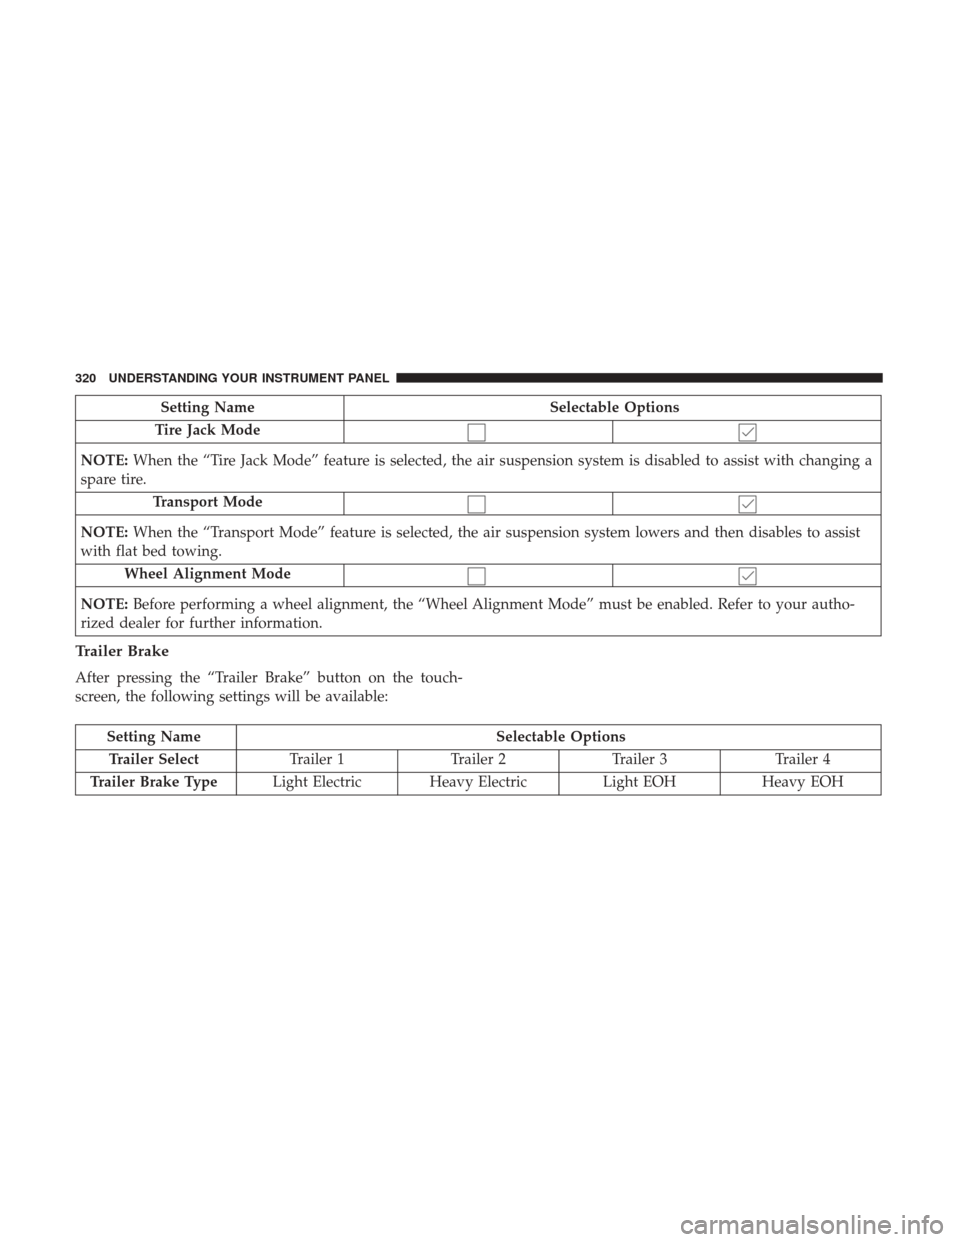
Setting NameSelectable Options
Tire Jack Mode
NOTE: When the “Tire Jack Mode” feature is selected, the air suspension system is disabled to assist with changing a
spare tire.
Transport Mode
NOTE: When the “Transport Mode” feature is selected, the air suspension system lowers and then disables to assist
with flat bed towing.
Wheel Alignment Mode
NOTE: Before performing a wheel alignment, the “Wheel Alignment Mode” must be enabled. Refer to your autho-
rized dealer for further information.
Trailer Brake
After pressing the “Trailer Brake” button on the touch-
screen, the following settings will be available:
Setting Name Selectable Options
Trailer Select Trailer 1Trailer 2Trailer 3 Trailer 4
Trailer Brake Type Light Electric Heavy Electric Light EOHHeavy EOH
320 UNDERSTANDING YOUR INSTRUMENT PANEL
Page 323 of 734
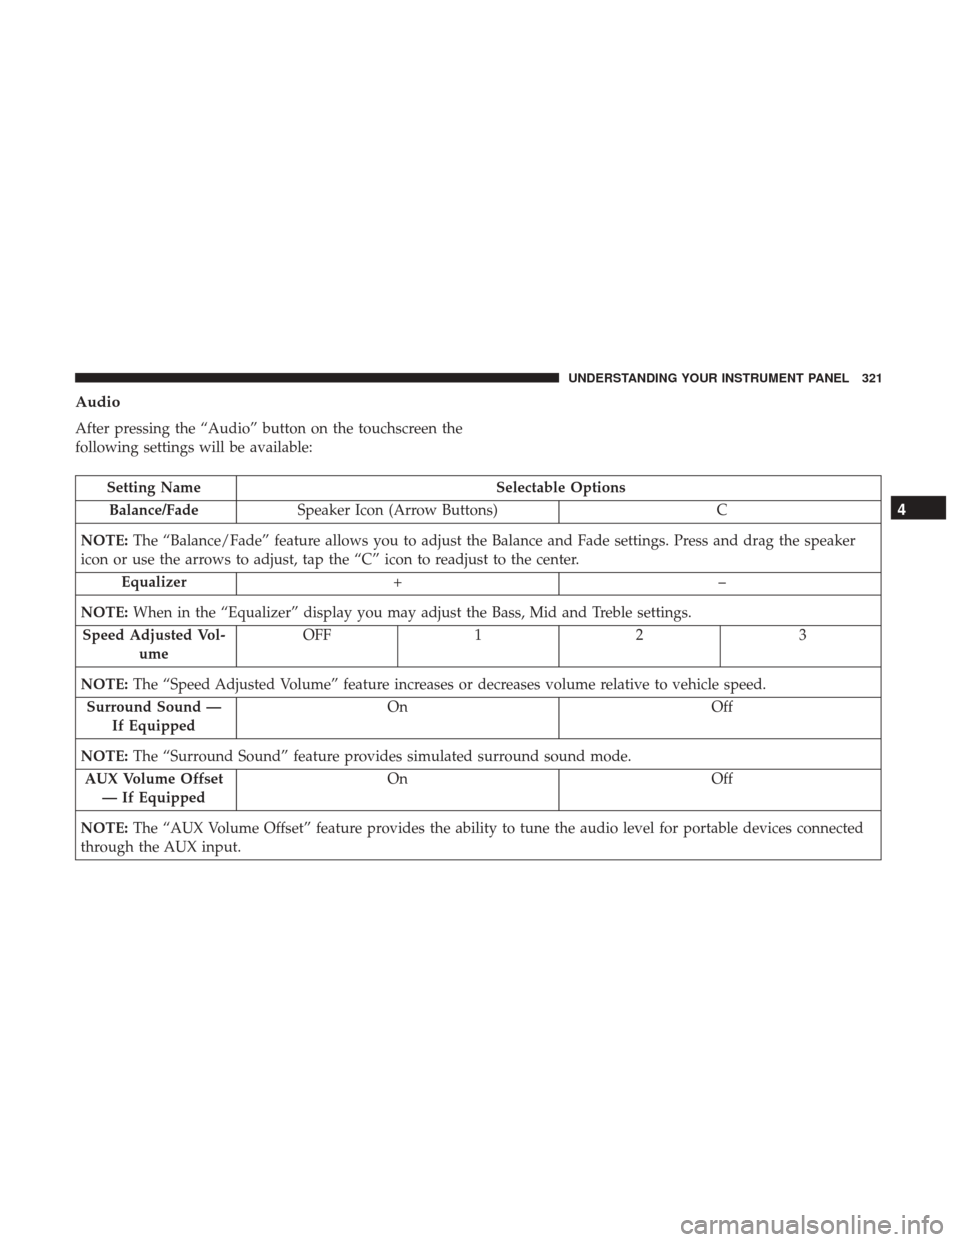
Audio
After pressing the “Audio” button on the touchscreen the
following settings will be available:
Setting NameSelectable Options
Balance/Fade Speaker Icon (Arrow Buttons) C
NOTE: The “Balance/Fade” feature allows you to adjust the Balance and Fade settings. Press and drag the speaker
icon or use the arrows to adjust, tap the “C” icon to readjust to the center.
Equalizer +–
NOTE: When in the “Equalizer” display you may adjust the Bass, Mid and Treble settings.
Speed Adjusted Vol- ume OFF
12 3
NOTE: The “Speed Adjusted Volume” feature increases or decreases volume relative to vehicle speed.
Surround Sound — If Equipped On
Off
NOTE: The “Surround Sound” feature provides simulated surround sound mode.
AUX Volume Offset — If Equipped On
Off
NOTE: The “AUX Volume Offset” feature provides the ability to tune the audio level for portable devices connected
through the AUX input.
4
UNDERSTANDING YOUR INSTRUMENT PANEL 321
Page 324 of 734
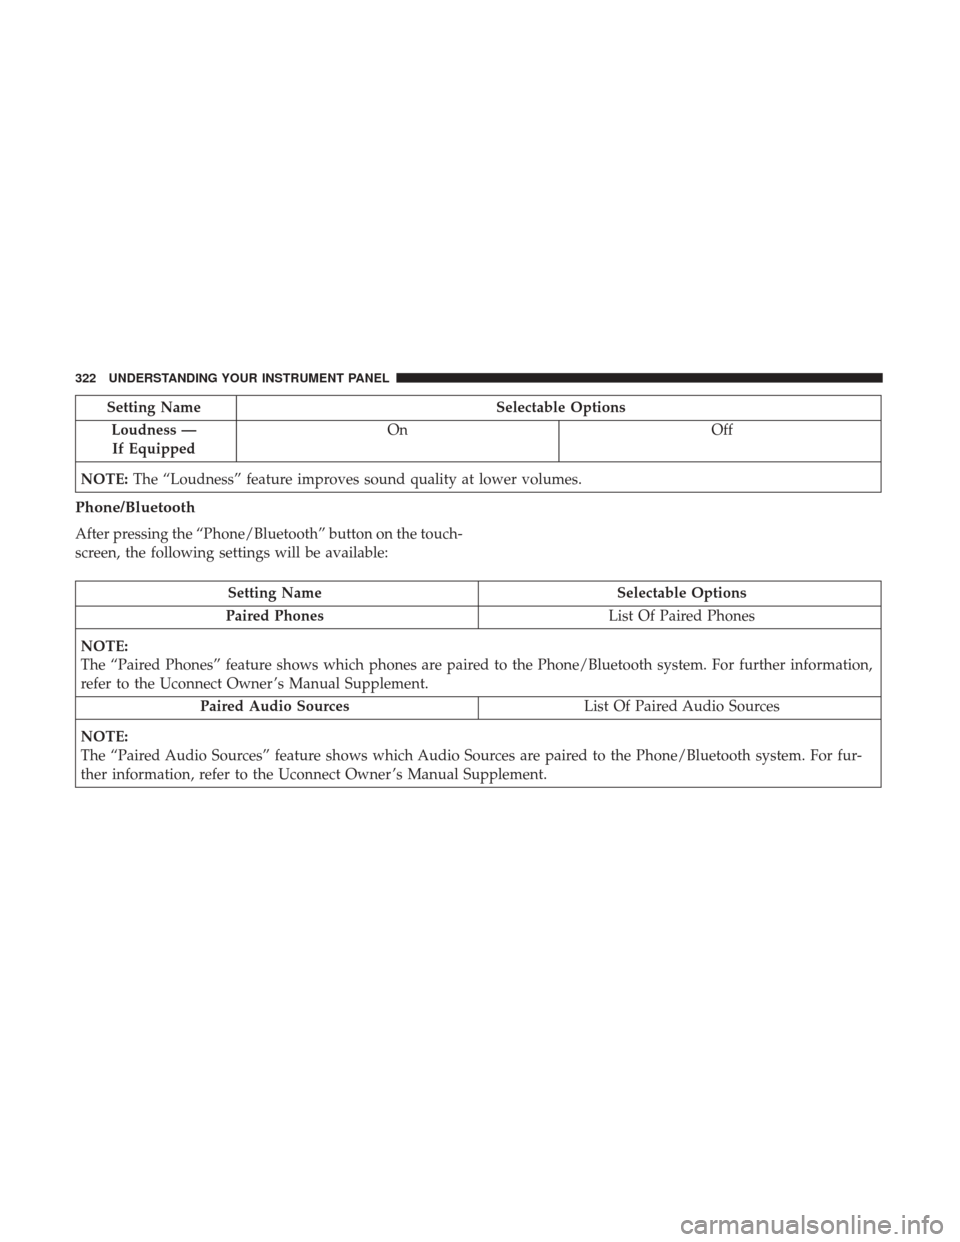
Setting NameSelectable Options
Loudness — If Equipped On
Off
NOTE: The “Loudness” feature improves sound quality at lower volumes.
Phone/Bluetooth
After pressing the “Phone/Bluetooth” button on the touch-
screen, the following settings will be available:
Setting Name Selectable Options
Paired Phones List Of Paired Phones
NOTE:
The “Paired Phones” feature shows which phones are paired to the Phone/Bluetooth system. For further information,
refer to the Uconnect Owner ’s Manual Supplement. Paired Audio Sources List Of Paired Audio Sources
NOTE:
The “Paired Audio Sources” feature shows which Audio Sources are paired to the Phone/Bluetooth system. For fur-
ther information, refer to the Uconnect Owner ’s Manual Supplement.
322 UNDERSTANDING YOUR INSTRUMENT PANEL
Page 325 of 734
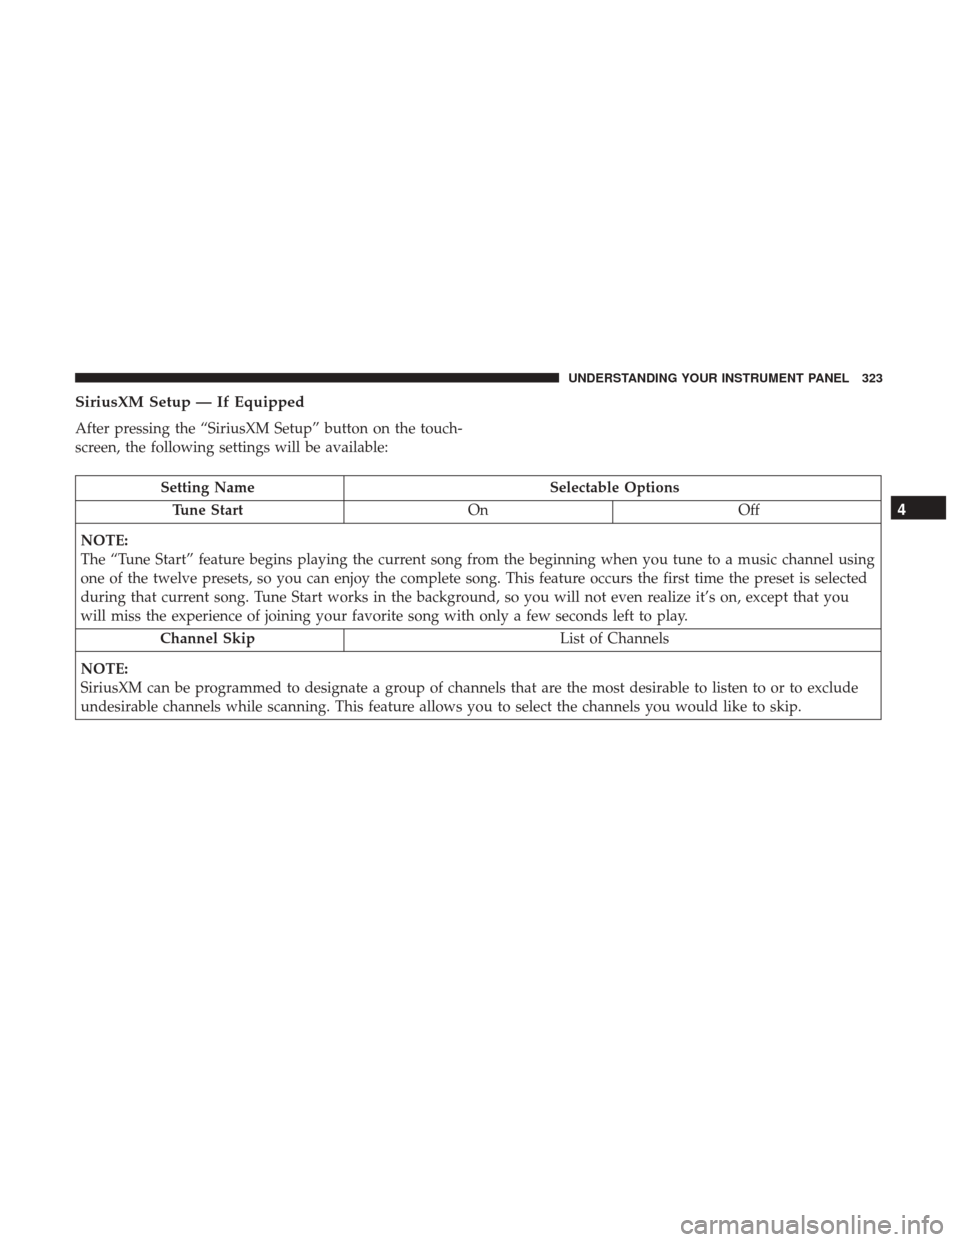
SiriusXM Setup — If Equipped
After pressing the “SiriusXM Setup” button on the touch-
screen, the following settings will be available:
Setting NameSelectable Options
Tune Start OnOff
NOTE:
The “Tune Start” feature begins playing the current song from the beginning when you tune to a music channel using
one of the twelve presets, so you can enjoy the complete song. This feature occurs the first time the preset is selected
during that current song. Tune Start works in the background, so you will not even realize it’s on, except that you
will miss the experience of joining your favorite song with only a few seconds left to play. Channel Skip List of Channels
NOTE:
SiriusXM can be programmed to designate a group of channels that are the most desirable to listen to or to exclude
undesirable channels while scanning. This feature allows you to select the channels you would like to skip.
4
UNDERSTANDING YOUR INSTRUMENT PANEL 323
Page 326 of 734
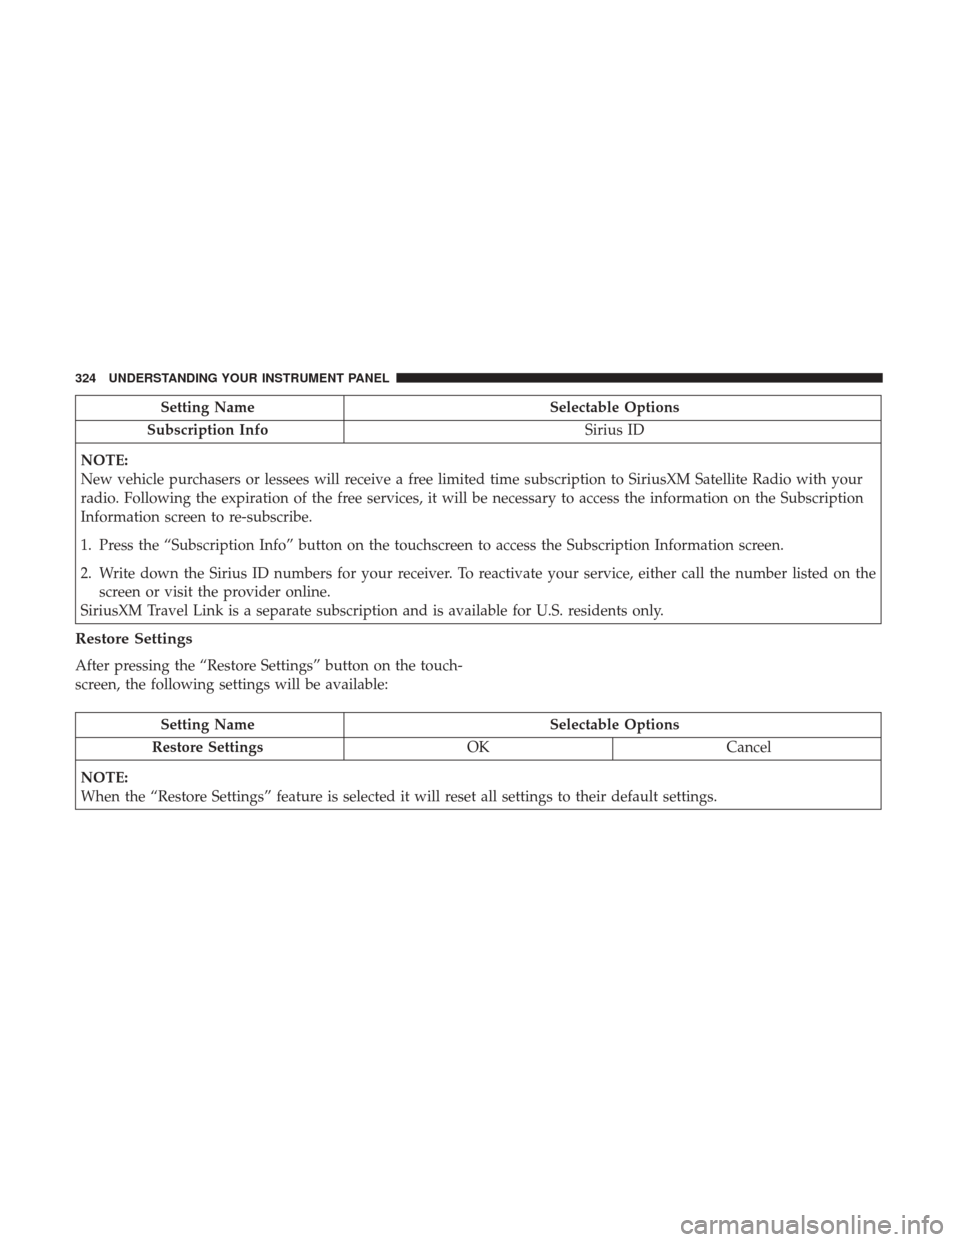
Setting NameSelectable Options
Subscription Info Sirius ID
NOTE:
New vehicle purchasers or lessees will receive a free limited time subscription to SiriusXM Satellite Radio with your
radio. Following the expiration of the free services, it will be necessary to access the information on the Subscription
Information screen to re-subscribe.
1. Press the “Subscription Info” button on the touchscreen to access the Subscription Information screen.
2. Write down the Sirius ID numbers for your receiver. To reactivate your service, either call the number listed on the screen or visit the provider online.
SiriusXM Travel Link is a separate subscription and is available for U.S. residents only.
Restore Settings
After pressing the “Restore Settings” button on the touch-
screen, the following settings will be available:
Setting Name Selectable Options
Restore Settings OKCancel
NOTE:
When the “Restore Settings” feature is selected it will reset all settings to their default settings.
324 UNDERSTANDING YOUR INSTRUMENT PANEL
Page 327 of 734
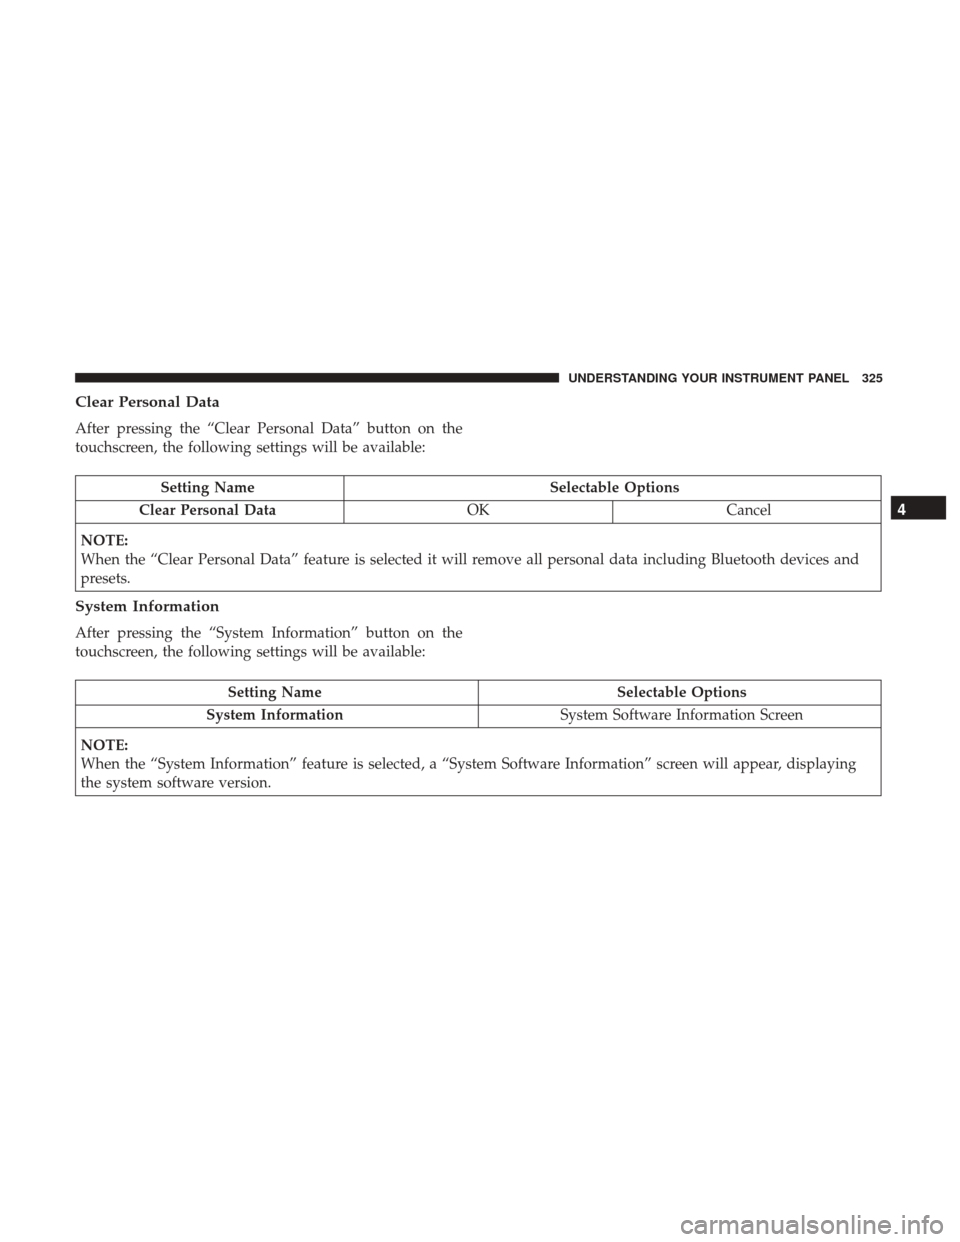
Clear Personal Data
After pressing the “Clear Personal Data” button on the
touchscreen, the following settings will be available:
Setting NameSelectable Options
Clear Personal Data OKCancel
NOTE:
When the “Clear Personal Data” feature is selected it will remove all personal data including Bluetooth devices and
presets.
System Information
After pressing the “System Information” button on the
touchscreen, the following settings will be available:
Setting Name Selectable Options
System Information System Software Information Screen
NOTE:
When the “System Information” feature is selected, a “System Software Information” screen will appear, displaying
the system software version.
4
UNDERSTANDING YOUR INSTRUMENT PANEL 325
Page 328 of 734
UCONNECT RADIOS
For detailed information about your Radio 3.0, Uconnect
3.0, Uconnect 5.0, or Uconnect 8.4/8.4 NAV radio, refer to
your Uconnect Owner ’s Manual Supplement.
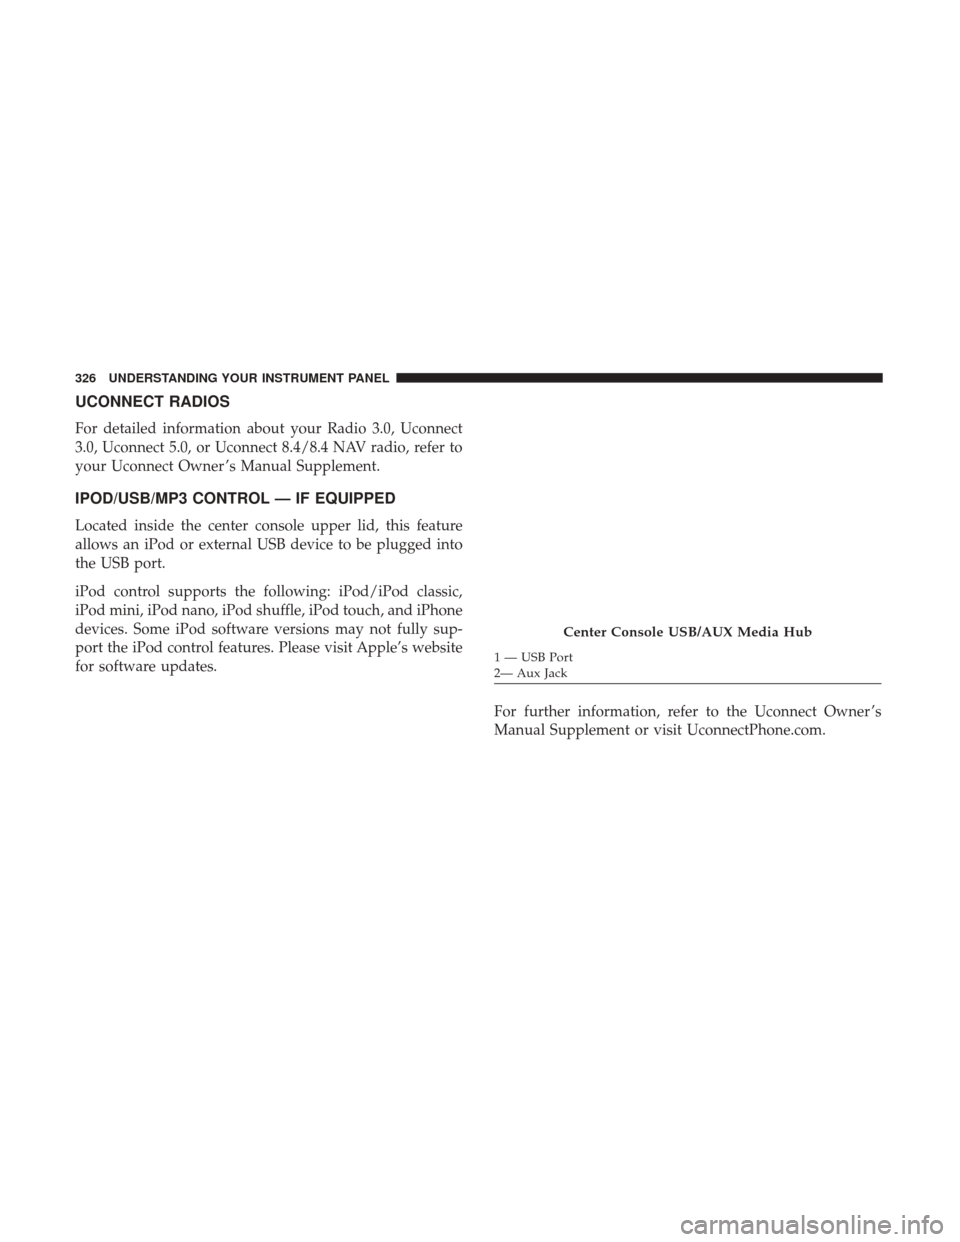
IPOD/USB/MP3 CONTROL — IF EQUIPPED
Located inside the center console upper lid, this feature
allows an iPod or external USB device to be plugged into
the USB port.
iPod control supports the following: iPod/iPod classic,
iPod mini, iPod nano, iPod shuffle, iPod touch, and iPhone
devices. Some iPod software versions may not fully sup-
port the iPod control features. Please visit Apple’s website
for software updates.For further information, refer to the Uconnect Owner ’s
Manual Supplement or visit UconnectPhone.com.
Center Console USB/AUX Media Hub
1 — USB Port
2— Aux Jack
326 UNDERSTANDING YOUR INSTRUMENT PANEL
Page 329 of 734
STEERING WHEEL AUDIO CONTROLS —
IF EQUIPPED
The remote sound system controls are located on the back
surface of the steering wheel. Reach behind the wheel to
access the switches.
The right hand control is a rocker type switch with a
push-button in the center. Pushing the top of the switch
will increase the volume, and pushing the bottom of the
switch will decrease the volume.The button located in the center of the right hand control
will switch modes to Radio, CD or other valid audio
sources.
The left hand control is a rocker type switch with a
push-button in the center. The function of the left hand
control is different depending on which mode you are in.
The following describes the left hand control operation in
each mode.
Radio Operation
Pushing the top of the switch will SEEK up for the next
listenable station and pushing the bottom of the switch will
SEEK down for the next listenable station.
The button located in the center of the left hand control will
tune to the next pre-set station that you have programmed
in the radio pre-set buttons.
CD Player — If Equipped
Pushing the top of the switch once will go to the next track
on the CD. Pushing the bottom of the switch once will go
to the beginning of the current track or to the beginning of
the previous track if it is within eight seconds after the
current track begins to play.
Remote Sound System Controls (Rearview Of Steering
Wheel)
4
UNDERSTANDING YOUR INSTRUMENT PANEL 327
Page 330 of 734
If you push the switch up or down twice, it plays the
second track. If you push the switch up or down three
times, it will play the third, etc.
CD/DVD DISC MAINTENANCE
To keep a CD/DVD in good condition, take the following
precautions:
1. Handle the disc by its edge; avoid touching the surface.
2. If the disc is stained, clean the surface with a soft cloth,wiping from center to edge.
3. Do not apply paper or tape to the disc; avoid scratching the disc.
4. Do not use solvents such as benzene, thinner, cleaners, or anti-static sprays.
5. Store the disc in its case after playing.
6. Do not expose the disc to direct sunlight.
7. Do not store the disc where temperatures may become too high. NOTE:
If you experience difficulty in playing a particular
disc, it may be damaged (e.g., scratched, reflective coating
removed, a hair, moisture or dew on the disc) oversized, or
have protection encoding. Try a known good disc before
considering disc player service.RADIO OPERATION AND MOBILE DEVICES
Under certain conditions, an “on” mobile device in your
vehicle can cause erratic or noisy performance from your
radio. This condition may be lessened or eliminated by
relocating the mobile device antenna. This condition is not
harmful to the radio. If your radio performance does not
satisfactorily “clear” by the repositioning of the antenna, it
is recommended that the radio volume be turned down or
off during mobile device operation when not using
Uconnect (if equipped).
Regulatory And Safety Information
USA/CANADA
Exposure to Radio Frequency Radiation
The radiated output power of the internal wireless radio is
far below the FCC radio frequency exposure limits. Nev-
ertheless, the wireless radio will be used in such a manner
that the radio is 20 cm or further from the human body.
328 UNDERSTANDING YOUR INSTRUMENT PANEL