battery Ram 3500 2018 Owner's Manual
[x] Cancel search | Manufacturer: RAM, Model Year: 2018, Model line: 3500, Model: Ram 3500 2018Pages: 372, PDF Size: 7.1 MB
Page 221 of 372
NOTE:
The positive battery post may be covered with
a protective cap if equipped. Lift up on the
cap to gain access to the positive battery
post. Do not jump off fuses. Only jump di-
rectly off positive post which has a positive
(+)symbol on or around the post.
WARNING!
β’ Take care to avoid the radiator cooling
fan whenever the hood is raised. It can
start anytime the ignition switch is ON.
You can be injured by moving fan blades.
β’ Remove any metal jewelry such as rings,
watch bands and bracelets that could
make an inadvertent electrical contact.
You could be seriously injured.
β’ Batteries contain sulfuric acid that can
burn your skin or eyes and generate
hydrogen gas which is flammable and
explosive. Keep open flames or sparks
away from the battery.
1. Apply the parking brake, shift the auto- matic transmission into PARK and turn
the ignition to LOCK. 2. Turn off the heater, radio, and all unnec-
essary electrical accessories.
3. If using another vehicle to jump start the battery, park the vehicle within the jumper
cables reach, apply the parking brake and
make sure the ignition is OFF.
WARNING!
Do not allow vehicles to touch each other
as this could establish a ground connec-
tion and personal injury could result.
Jump Starting Procedure
WARNING!
Failure to follow this jump starting proce-
dure could result in personal injury or
property damage due to battery explosion.
CAUTION!
Failure to follow these procedures could
result in damage to the charging system of
the booster vehicle or the discharged ve-
hicle.
Connecting The Jumper Cables
1. Connect the positive (+)end of the jumper
cable to the positive (+)post of the dis-
charged vehicle.
NOTE:
Do not jump off fuses. Only jump directly off
positive post.
2. Connect the opposite end of the positive (+) jumper cable to the positive (+)post of
the booster battery.
3. Connect the negative (-)end of the jumper
cable to the negative (-)post of the
booster battery.
4. Connect the opposite end of the negative (-)jumper cable to a good engine ground
(exposed metal part of the discharged
vehicleβs engine) away from the battery
and the fuel injection system.
WARNING!
Do not connect the jumper cable to the
negative (-) post of the discharged battery.
The resulting electrical spark could cause
the battery to explode and could result in
219
Page 222 of 372
WARNING!
personal injury. Only use the specific
ground point, do not use any other exposed
metal parts.
5. Start the engine in the vehicle that has the booster battery, let the engine idle a
few minutes, and then start the engine in
the vehicle with the discharged battery.
CAUTION!
Do not connect jumper cable to any of the
fuses on the positive battery terminal. The
resulting electrical current will blow the
fuse.
6. Once the engine is started, remove the jumper cables in the reverse sequence:
Disconnecting The Jumper Cables
1. Disconnect the negative (-)end of the
jumper cable from the engine ground of
the vehicle with the discharged battery. 2. Disconnect the opposite end of the nega-
tive (-)jumper cable from the negative (-)
post of the booster battery.
3. Disconnect the positive (+)end of the
jumper cable from the positive (+)post of
the booster battery.
4. Disconnect the opposite end of the posi- tive (+)jumper cable from the positive (+)
post of the vehicle with the discharged
battery.
If frequent jump starting is required to start
your vehicle you should have the battery and
charging system inspected at an authorized
dealer.
CAUTION!
Accessories plugged into the vehicle
power outlets draw power from the vehi-
cleβs battery, even when not in use (i.e.,
cellular devices, etc.). Eventually, if
plugged in long enough without engine
operation, the vehicleβs battery will dis-
charge sufficiently to degrade battery life
and/or prevent the engine from starting.
IF YOUR ENGINE OVERHEATS
In any of the following situations, you can
reduce the potential for overheating by taking
the appropriate action.
β’ On the highways β slow down.
β’ In city traffic β while stopped, place the transmission in NEUTRAL, but do not in-
crease the engine idle speed while prevent-
ing vehicle motion with the brakes.
NOTE:
There are steps that you can take to slow
down an impending overheat condition:
β’ If your air conditioner (A/C) is on, turn it off. The A/C system adds heat to the engine
cooling system and turning the A/C off can
help remove this heat.
β’ You can also turn the temperature control to maximum heat, the mode control to floor
and the blower control to high. This allows
the heater core to act as a supplement to
the radiator and aids in removing heat from
the engine cooling system.
IN CASE OF EMERGENCY
220
Page 224 of 372

Center Console Gear Selector β
If Equipped
1. Turn the engine OFF.
2. Firmly apply the parking brake.
3. Using a small screwdriver or similar tool,remove the gear selector override access
cover (located to the right of the gear
selector).
4. Press and maintain firm pressure on the brake pedal.
5. Insert the screwdriver or similar tool into the access hole, and push and hold the
override release lever down. 6. Move the gear selector to the NEUTRALposition.
7. The vehicle may then be started in NEUTRAL.
8. Reinstall the gear selector override access cover.
MANUAL PARK RELEASE β 8 SPEED
TRANSMISSION
WARNING!
Always secure your vehicle by fully apply-
ing the parking brake before activating the
Manual Park Release. In addition, you
should be seated in the driverβs seat with
your foot firmly on the brake pedal when
activating the Manual Park Release. Acti-
vating the Manual Park Release will allow
your vehicle to roll away if it is not secured
by the parking brake, or by proper connec-
tion to a tow vehicle. Activating the
Manual Park Release on an unsecured
vehicle could lead to serious injury or
death for those in or around the vehicle.
In order to push or tow the vehicle in cases
where the transmission will not shift out of
PARK (such as a dead battery), a Manual
Park Release is available.
Gear Selector Override Access Cover
IN CASE OF EMERGENCY
222
Page 233 of 372
Maintenance Plan β Gasoline
Engine
Required Maintenance
Refer to the Maintenance Plan on the follow-
ing pages for required maintenance.
At Every Oil Change Interval As Indicated By OilChange Indicator System:
β’ Change oil and filter.
β’ Rotate the tires. Rotate at the first sign of
irregular wear, even if it occurs before the oil
indicator system turns on.
β’ Inspect battery and clean and tighten ter- minals as required.
β’ Inspect automatic transmission fluid if equipped with dipstick.
β’ Inspect brake pads, shoes, rotors, drums, hoses and park brake.
β’ Inspect engine cooling system protection and hoses.
β’ Inspect exhaust system.
β’ Inspect engine air cleaner if using in dusty or off-road conditions.
β’ Lube the front drive shaft fitting (2500/ 3500 (4x4) models only).
231
Page 237 of 372

Maintenance Plan β Diesel Fuel
Up To B5 Biodiesel (1500 Diesel)
Required Maintenance
Refer to the Maintenance Schedules on the
following pages for required maintenance.
At Every Oil Change Interval As Indicated By OilChange Indicator System:
β’ Change oil and filter.
β’
Completely fill the Diesel Exhaust Fluid tank.
β’ Drain water from fuel filter assembly.
β’ Rotate the tires. Rotate at the first sign of
irregular wear, even if it occurs before the oil
indicator system turns on.
β’ Inspect battery and clean and tighten ter- minals as required.
β’ Inspect brake pads, shoes, rotors, drums, hoses and park brake.
β’ Inspect engine cooling system protection and hoses.
β’ Inspect exhaust system.
β’ Inspect engine air cleaner if using in dusty or off-road conditions.
At Every Second Oil Change Interval As Indi-cated By Oil Change Indicator System:
β’ Change fuel filter.
235
Page 245 of 372
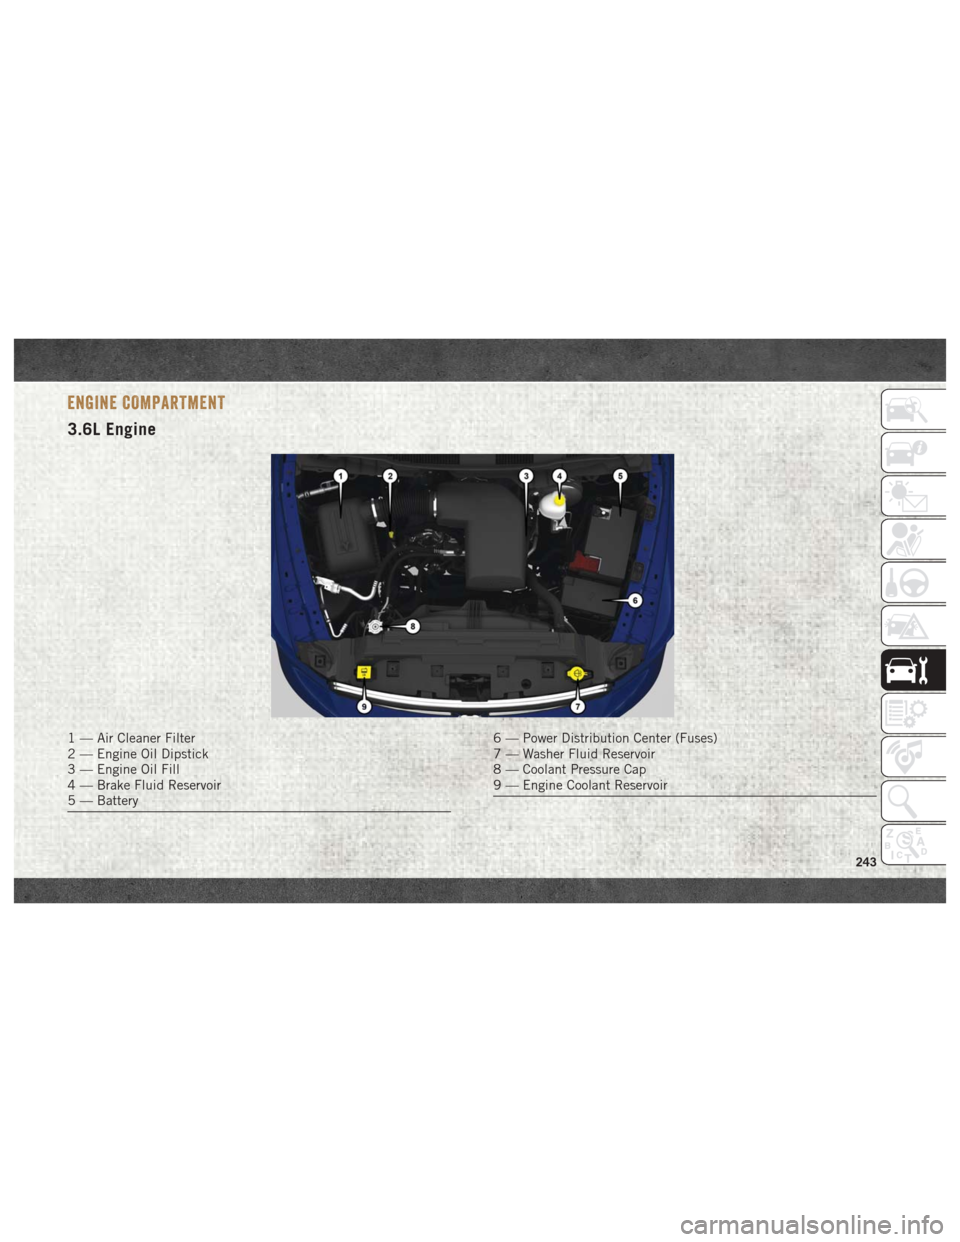
ENGINE COMPARTMENT
3.6L Engine
1 β Air Cleaner Filter
2 β Engine Oil Dipstick
3 β Engine Oil Fill
4 β Brake Fluid Reservoir
5 β Battery6 β Power Distribution Center (Fuses)
7 β Washer Fluid Reservoir
8 β Coolant Pressure Cap
9 β Engine Coolant Reservoir
243
Page 246 of 372
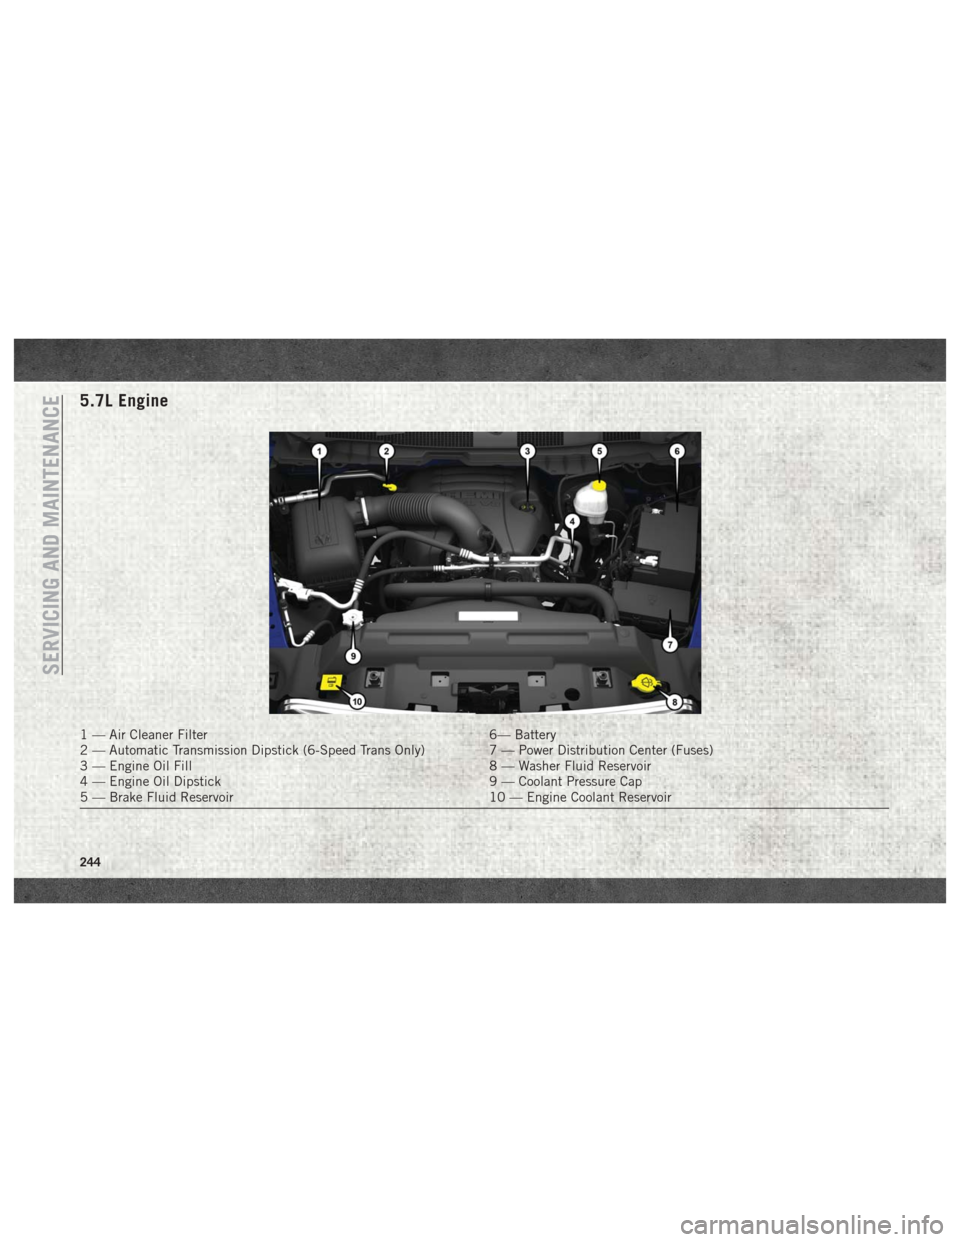
5.7L Engine
1 β Air Cleaner Filter6β Battery
2 β Automatic Transmission Dipstick (6-Speed Trans Only) 7 β Power Distribution Center (Fuses)
3 β Engine Oil Fill 8 β Washer Fluid Reservoir
4 β Engine Oil Dipstick 9 β Coolant Pressure Cap
5 β Brake Fluid Reservoir 10 β Engine Coolant Reservoir
SERVICING AND MAINTENANCE
244
Page 247 of 372
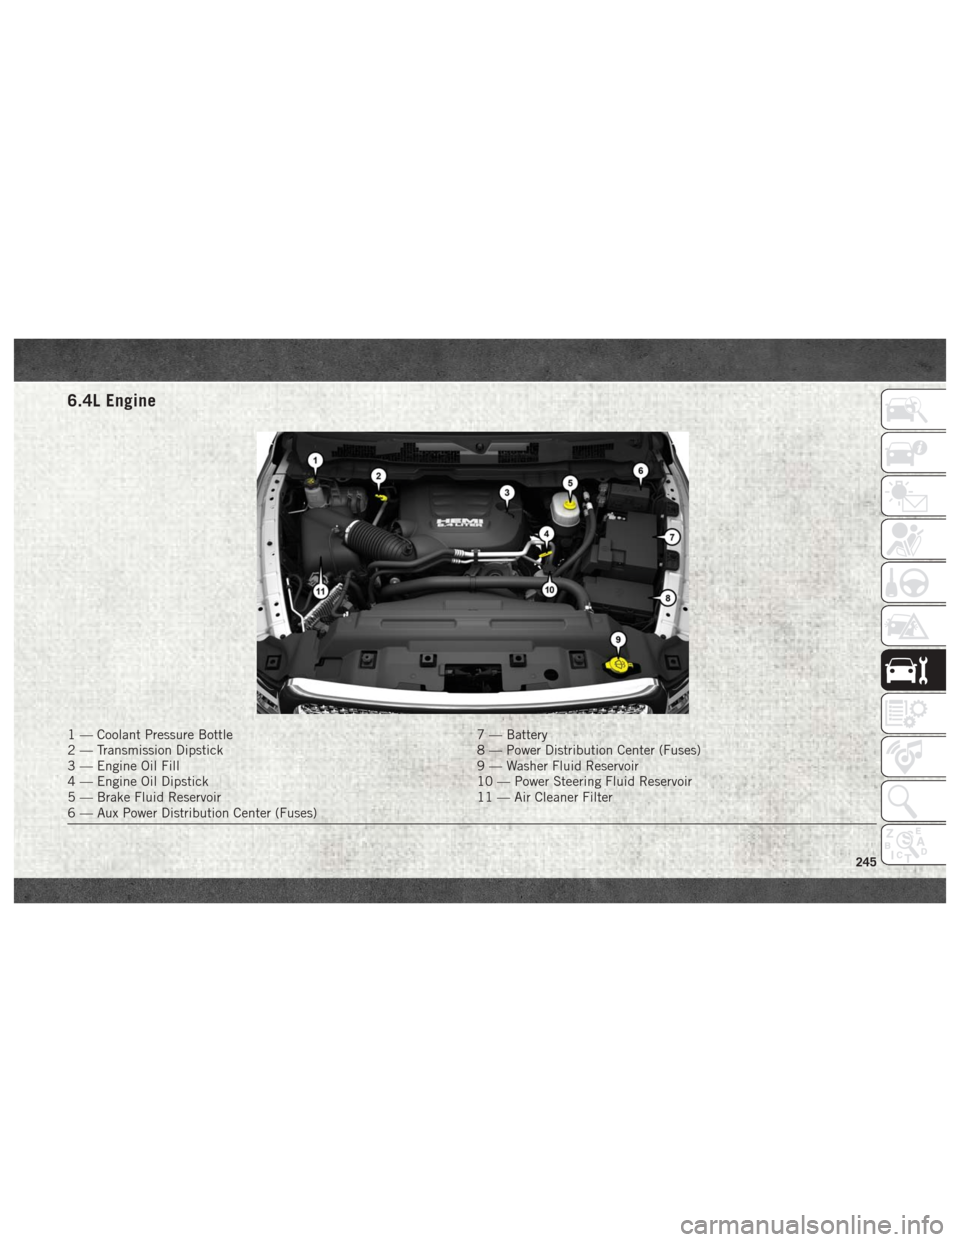
6.4L Engine
1 β Coolant Pressure Bottle7 β Battery
2 β Transmission Dipstick 8 β Power Distribution Center (Fuses)
3 β Engine Oil Fill 9 β Washer Fluid Reservoir
4 β Engine Oil Dipstick 10 β Power Steering Fluid Reservoir
5 β Brake Fluid Reservoir 11 β Air Cleaner Filter
6 β Aux Power Distribution Center (Fuses)
245
Page 248 of 372
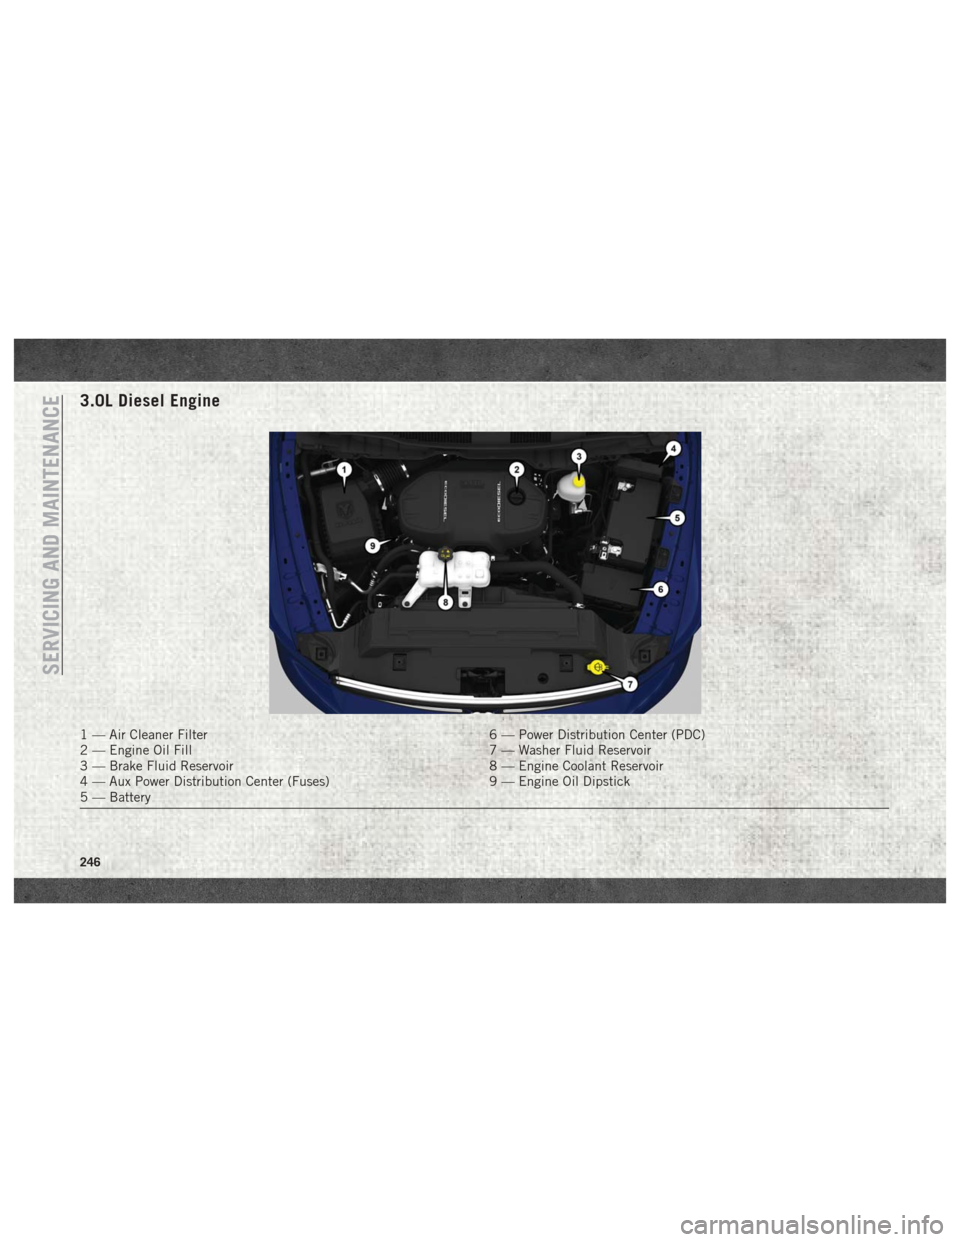
3.0L Diesel Engine
1 β Air Cleaner Filter6 β Power Distribution Center (PDC)
2 β Engine Oil Fill 7 β Washer Fluid Reservoir
3 β Brake Fluid Reservoir 8 β Engine Coolant Reservoir
4 β Aux Power Distribution Center (Fuses) 9 β Engine Oil Dipstick
5 β Battery
SERVICING AND MAINTENANCE
246
Page 249 of 372
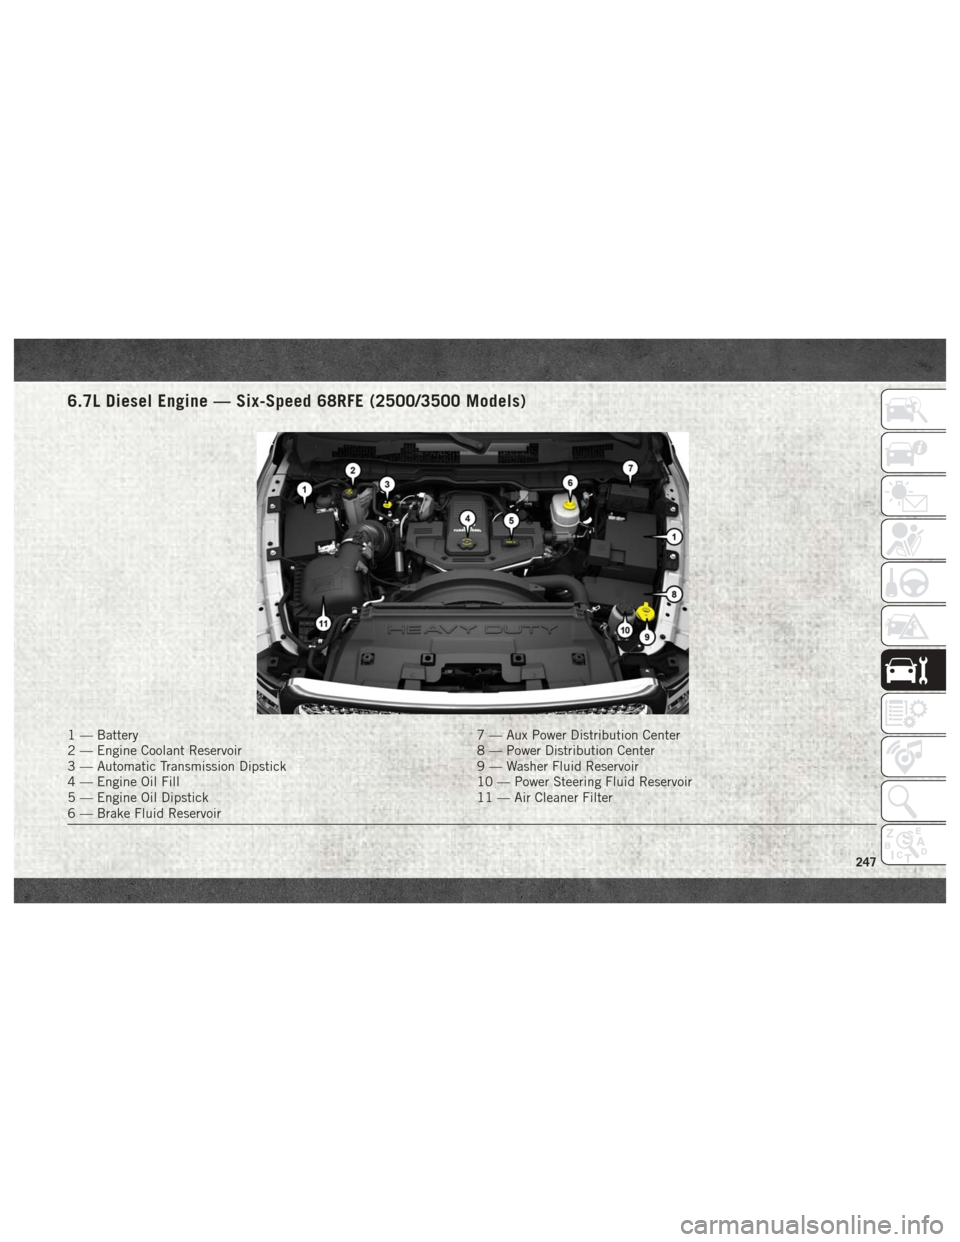
6.7L Diesel Engine β Six-Speed 68RFE (2500/3500 Models)
1 β Battery7 β Aux Power Distribution Center
2 β Engine Coolant Reservoir 8 β Power Distribution Center
3 β Automatic Transmission Dipstick 9 β Washer Fluid Reservoir
4 β Engine Oil Fill 10 β Power Steering Fluid Reservoir
5 β Engine Oil Dipstick 11 β Air Cleaner Filter
6 β Brake Fluid Reservoir
247