Anc Ram 3500 2019 Owner's Manual
[x] Cancel search | Manufacturer: RAM, Model Year: 2019, Model line: 3500, Model: Ram 3500 2019Pages: 696, PDF Size: 13.89 MB
Page 576 of 696

574 TECHNICAL SPECIFICATIONS
Chassis
ComponentFluid, Lubricant, or Genuine Part
Automatic Transmission – Eight-Speed Automatic (For
Diesel Engine see Diesel Supplement) Use only Mopar ZF 8&9 Speed ATF Automatic Transmission
Fluid, or equivalent. Failure to use the correct fluid may
affect the function or performance of your transmission.
Transfer Case We recommend you use Mopar Transfer Case Lubricant for
Borg Warner 44-44 and 44-45.
Front and Rear Axle We recommend you use SAE 75W-85 HD Ram GL-5
Synthetic Axle Lubricant in 9.25 Front & 11.5 Rear Axles. Use
Mopar Synthetic Gear Lubricant SAE 75W-140 (MS-8985) in
12.0 Rear axles. Limited slip additive is required for limited
slip axles.
Brake Master Cylinder We recommend you use Mopar DOT 3.
Power Steering Reservoir We recommend you use Mopar Power Steering Fluid +4 or
Mopar ATF+4 Automatic Transmission Fluid.
Page 578 of 696

576 MULTIMEDIA
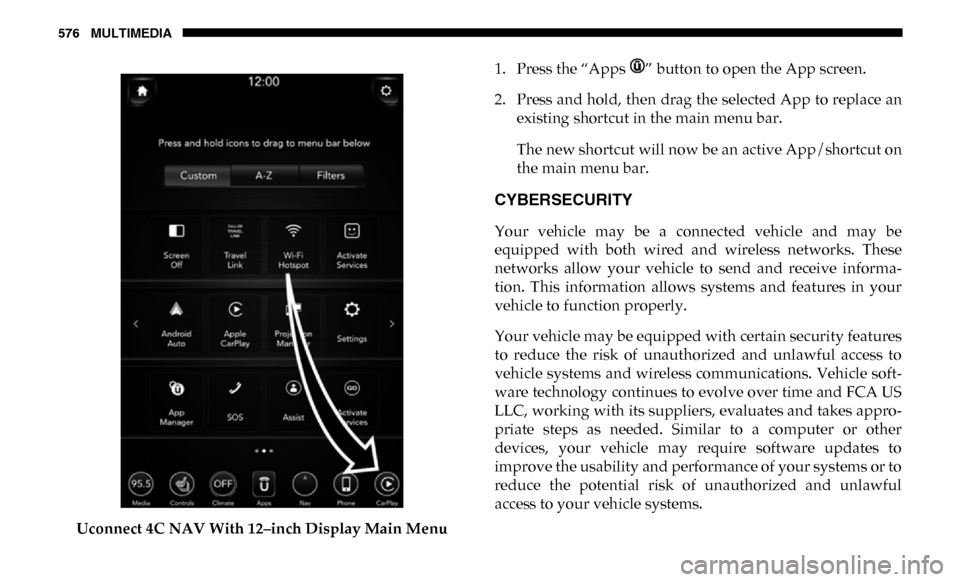
Uconnect 4C NAV With 12–inch Display Main Menu1. Press the “Apps ” button to open the App screen.
2. Press and hold, then drag the selected App to replace an
existing shortcut in the main menu bar.
The new shortcut will now be an active App/shortcut on
the main menu bar.
CYBERSECURITY
Your vehicle may be a connected vehicle and may be
equipped with both wired and wireless networks. These
networks allow your vehicle to send and receive informa -
tion. This information allows systems and features in your
vehicle to function properly.
Your vehicle may be equipped with certain security features
to reduce the risk of unauthorized and unlawful access to
vehicle systems and wireless communications. Vehicle soft -
ware technology continues to evolve over time and FCA US
LLC, working with its suppliers, evaluates and takes appro -
priate steps as needed. Similar to a computer or other
devices, your vehicle may require software updates to
improve the usability and performance of your systems or to
reduce the potential risk of unauthorized and unlawful
access to your vehicle systems.
Page 580 of 696

578 MULTIMEDIA
UCONNECT SETTINGS
The Uconnect system uses a combination of buttons on the
touchscreen and buttons on the faceplate located on the
center of the instrument panel that allows you to access and
change the customer programmable features. Many features
can vary by vehicle.
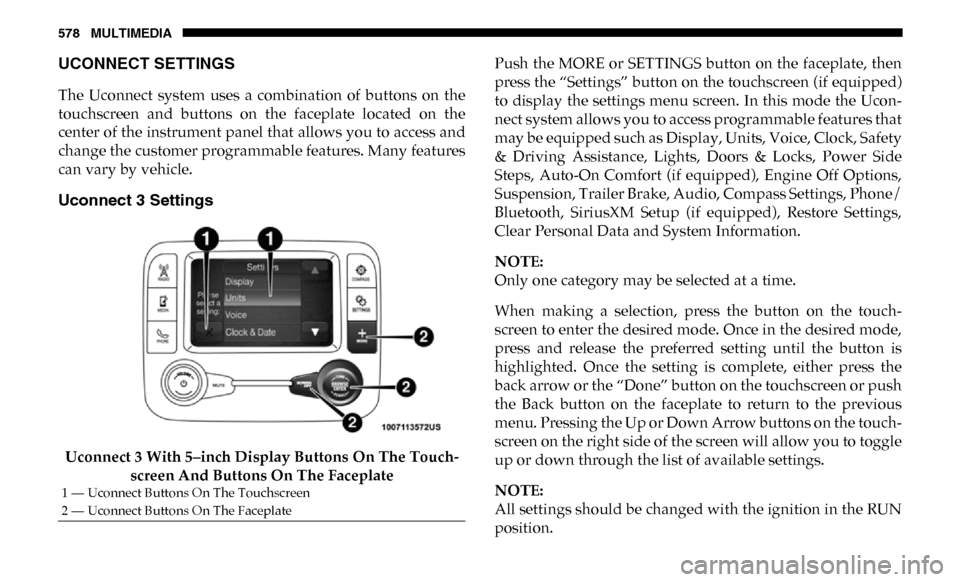
Uconnect 3 Settings
Uconnect 3 With 5–inch Display Buttons On The Touch-
screen And Buttons On The Faceplate Push the MORE or SETTINGS button on the faceplate, then
press the “Settings” button on the touchscreen (if equipped)
to display the settings menu screen. In this mode the Ucon
-
nect system allows you to access programmable features that
may be equipped such as Display, Units, Voice, Clock, Safety
& Driving Assistance, Lights, Doors & Locks, Power Side
Steps, Auto-On Comfort (if equipped), Engine Off Options,
Suspension, Trailer Brake, Audio, Compass Settings, Phone/
Bluetooth, SiriusXM Setup (if equipped), Restore Settings,
Clear Personal Data and System Information.
NOTE:
Only one category may be selected at a time.
When making a selection, press the button on the touch -
screen to enter the desired mode. Once in the desired mode,
press and release the preferred setting until the button is
highlighted. Once the setting is complete, either press the
back arrow or the “Done” button on the touchscreen or push
the Back button on the faceplate to return to the previous
menu. Pressing the Up or Down Arrow buttons on the touch -
screen on the right side of the screen will allow you to toggle
up or down through the list of available settings.
NOTE:
All settings should be changed with the ignition in the RUN
position.
1 — Uconnect Buttons On The Touchscreen
2 — Uconnect Buttons On The Faceplate
Page 581 of 696

MULTIMEDIA 579
Display
After pressing the “Display” button on the touchscreen, the following settings will be available.
Units — If Equipped
After pressing “Units” on the touchscreen, the following will be available:Setting Name
Selectable Options
Display Mode AutoManual
Set Language English, Français, Español
Touchscreen Beep OnOff
Fuel Saver Display OnOff
NOTE:
The “Fuel Saver Display” feature will allow you to enable fuel saver mode and will be displayed in the instrument cluster
display.
Setting Name Selectable Options
Units USMetric Custom
Speed MPH km/h
Distance mi km
Fuel Consumption MPG (UG)MPG (UK) L/100 km km/L
Pressure psikPa bar
9
Page 583 of 696

MULTIMEDIA 581
Safety/Assistance
After pressing the “Safety/Assistance” button on the touchscreen, the following settings will be available:Setting Name Selectable Options
Forward Collision Warning
— If Equipped Off
Warning Only Warning & Braking
Forward Collision Warning
Sensitivity — If Equipped Near
Med Far
Front ParkSense Chime
Volume Low
MedHigh
Rear ParkSense Chime
Volume — If Equipped Low
MedHigh
Tilt Side Mirrors In Reverse
— If Equipped On
Off
NOTE:
When the “Tilt Side Mirrors In Reverse” feature is selected, the exterior side-view mirrors tilt downward when the ignition
is in the RUN position and the transmission gear selector is in the REVERSE position. The mirrors move back to their
previous position when the transmission is shifted out of REVERSE.
Surround View Camera — If
Equipped On
Off
NOTE:
The “Surround View Camera” feature displays a complete 360 degree view of the vehicle's exterior environment while
backing up.
9
Page 584 of 696

582 MULTIMEDIA
Surround View Camera
Delay — If EquippedOn
Off
NOTE:
The “Surround View Camera Delay” setting determines whether or not the screen will display the 360 degree view image
with guidelines for up to ten seconds after the vehicle is shifted out of REVERSE. This delay will be canceled if the vehicle’s
speed exceeds 8 mph (13 km/h), the transmission is shifted into PARK, or the ignition is switched to the OFF position.
Surround View Camera
Guidelines — If Equipped On
Off
NOTE:
The “Surround View Rear Back Up Camera Active Guidelines” feature allows you to see active guidelines over the Surround
View camera display whenever the gear selector is put into REVERSE or the Surround View button on the touchscreen is
pressed. The image will be displayed on the radio touchscreen display.
ParkView Backup Camera
Active Guidelines On
Off
NOTE:
Your vehicle may be equipped with the ParkView Rear Back Up Camera Active Guidelines that allows you to see active
guidelines over the ParkView Back up camera display whenever the gear selector is put into REVERSE. The image will be
displayed on the radio touchscreen display along with a caution note to “check entire surroundings” across the top of the
screen. After five seconds, this note disappears.
ParkView Backup Camera
Delay On
Off
Setting Name
Selectable Options
Page 587 of 696

MULTIMEDIA 585
Doors & Locks
After pressing the “Doors & Locks” button on the touchscreen, the following settings will be available:NOTE:
When the “Flash Lights With Lock” feature is selected, the exterior lights flash when the doors are locked or unlocked with
the key fob. This feature may be selected with or without the sound horn on lock feature selected.
Steering Directed Lights
OnOff
NOTE:
When the “Steering Directed Lights” feature is selected, the headlights turn with the direction of the steering wheel.
Rear Cargo Guidance Lights — If
Equipped On
Off
NOTE:
When the “Rear Cargo Guidance Lights” feature is selected, the lights in the cargo and bed of the truck will come on either
when the headlight switch is pressed, or the button on the back bed of the truck is pressed. Setting Name
Selectable Options
Setting NameSelectable Options
Auto Door Locks — If
Equipped On
Off
NOTE:
When the “Auto Door Locks” feature is selected, all doors lock automatically when the vehicle reaches a speed of 15 mph
(24 km/h).
Auto Unlock On Exit On Off
9
Page 588 of 696

586 MULTIMEDIA
NOTE:
When the “Auto Unlock On Exit” feature is selected, all doors unlock when the vehicle is stopped, the transmission is in the
PARK or NEUTRAL position and the driver's door is opened.
Sound Horn With LockOff1st Press 2nd Press
Remote Door Unlock All Driver
NOTE:
The “Remote Door Unlock” feature allows you to program your remote door locks to open “All doors” or only the “Driver
door” with the first push of the key fob or grabbing the Passive Entry door handle.
Sound Horn With Remote
Start On
Off
NOTE:
When the “Sound Horn With Remote Start” feature is selected, the horn sounds when the remote start is activated.
Memory Linked To Fob — If
Equipped On
Off
NOTE:
• The “Memory Linked To Fob” feature provides automatic driver seat positioning to enhance driver mobility when entering and exiting the vehicle.
• The seat returns to the memorized seat location if “Memory Linked To Fob” is set to (On) when the key fob is used to unlock the door.
Passive Entry — If Equipped On Off
Setting Name
Selectable Options
Page 592 of 696

590 MULTIMEDIA
Trailer Brake
After pressing the “Trailer Brake” button on the touchscreen, the following settings will be available:
Audio
After pressing the “Audio” button on the touchscreen, the following settings will be available:Setting Name
Selectable Options
Trailer Select Trailer 1Trailer 2Trailer 3 Trailer 4
Trailer Brake Type Light Electric Heavy Electric Light EOHHeavy EOH
Trailer Name List of Trailer Names Available
NOTE:
You can select and personalize your trailer name depending on the type of trailer you are hauling. Select the trailer name
from the following list: trailer, boat, car, cargo, dump, equipment, flatbed, gooseneck, horse, livestock, motorcycle, snow
mobile, travel, utility, and 5th wheel.
Setting Name Selectable Options
Balance/Fade FrontBack LeftRight
NOTE:
The “Balance/Fade” feature allows you to adjust the Balance and Fade settings. Press and drag the speaker icon or use the
arrows to adjust, tap the “C” icon to readjust to the center.
Equalizer + –
NOTE:
When in the “Equalizer” display you may adjust the Bass, Mid and Treble settings.
Page 594 of 696

592 MULTIMEDIA
Compass Settings — If Equipped
After pressing the “Compass Settings” button on the touchscreen, the following settings will be available:Setting Name Selectable Options
Variance 1 2 3 4 5 6 7 8 9 10 11 12 13 14 15
NOTE:
• Compass Variance is the difference between Magnetic North and Geographic North. To compensate for the differences the variance should be set for the zone where the vehicle is driven, per the zone map. Once properly set, the compass will auto -
matically compensate for the differences, and provide the most accurate compass heading.
• Keep magnetic materials away from the top of the instrument panel, such as iPod's, Mobile Phones, Laptops and Radar Detectors. This is where the compass module is located, and it can cause interference with the compass sensor, and it may
give false readings.
Perform Compass Calibration On
Off
NOTE:
Press the “Calibration” button on the touchscreen to change this setting. This compass is self-calibrating, which eliminates
the need to manually reset the compass. When the vehicle is new, the compass may appear erratic until it is calibrated. You
may also calibrate the compass by pressing the “ON” button on the touchscreen and completing one or more 360-degree
turns (in an area free from large metal or metallic objects). The compass will now function normally.