traction control Ram 3500 2020 Owner's Guide
[x] Cancel search | Manufacturer: RAM, Model Year: 2020, Model line: 3500, Model: Ram 3500 2020Pages: 568
Page 297 of 568
STARTING AND OPERATING295
has been set a message “CRUISE CONTROL SET
TO MPH (km/h)” will appear indicating what
speed was set. This light will turn on when the
system is turned on via the on/off control. It
turns green when the cruise control is set.
To Vary The Speed Setting
To Increase Speed
When the Normal (Fixed Speed) Cruise Control
is set, you can increase speed by pushing the
RES (+) button.
The driver's preferred units can be selected
through the instrument panel settings. Refer to
“Instrument Cluster Display” in “Getting To
Know Your Instrument Panel” for more
information. The speed increment shown is
dependent on the speed of U.S. (mph) or Metric
(km/h) units:
U.S. Speed (mph)
Pushing the RES (+) button once will result in a
1 mph increase in set speed. Each subse -
quent tap of the button results in an increase
of 1 mph.
If the button is continually pushed, the set
speed will continue to increase in 5 mph incre -
ments until the button is released. The
increase in set speed is reflected in the instru -
ment cluster display.
Metric Speed (km/h)
Pushing the RES (+) button once will result in
a 1 km/h increase in set speed. Each subse -
quent tap of the button results in an increase
of 1 km/h.
If the button is continually pushed, the set
speed will continue to increase in 10 km/h
increments until the button is released. The
increase in set speed is reflected in the
instrument cluster display.
To Decrease Speed
When the Normal (Fixed Speed) Cruise Control
is set, you can decrease speed by pushing the
SET (-) button.
The driver's preferred units can be selected
through the instrument panel settings. Refer to
“Instrument Cluster Display” in “Getting To
Know Your Instrument Panel” for more
information. The speed decrement shown is
dependent on the speed of U.S. (mph) or Metric
(km/h) units:
U.S. Speed (mph)
Pushing the SET (-) button once will result in
a 1 mph decrease in set speed. Each subse -
quent tap of the button results in a decrease
of 1 mph.
If the button is continually pushed, the set
speed will continue to decrease in 5 mph
decrements until the button is released. The
decrease in set speed is reflected in the
instrument cluster display.
Metric Speed (km/h)
Pushing the SET (-) button once will result in
a 1 km/h decrease in set speed. Each subse -
quent tap of the button results in a decrease
of 1 km/h.
If the button is continually pushed, the set
speed will continue to decrease in 10 km/h
decrements until the button is released. The
decrease in set speed is reflected in the
instrument cluster display.
To Cancel
The following conditions will cancel the Normal
(Fixed Speed) Cruise Control without clearing
the memory:
The brake pedal is applied.
The CANCEL button is pushed.
The Electronic Stability Control/Traction
Control System (ESC/TCS) activates.
5
20_DJD2_OM_EN_USC_t.book Page 295
Page 311 of 568
STARTING AND OPERATING309
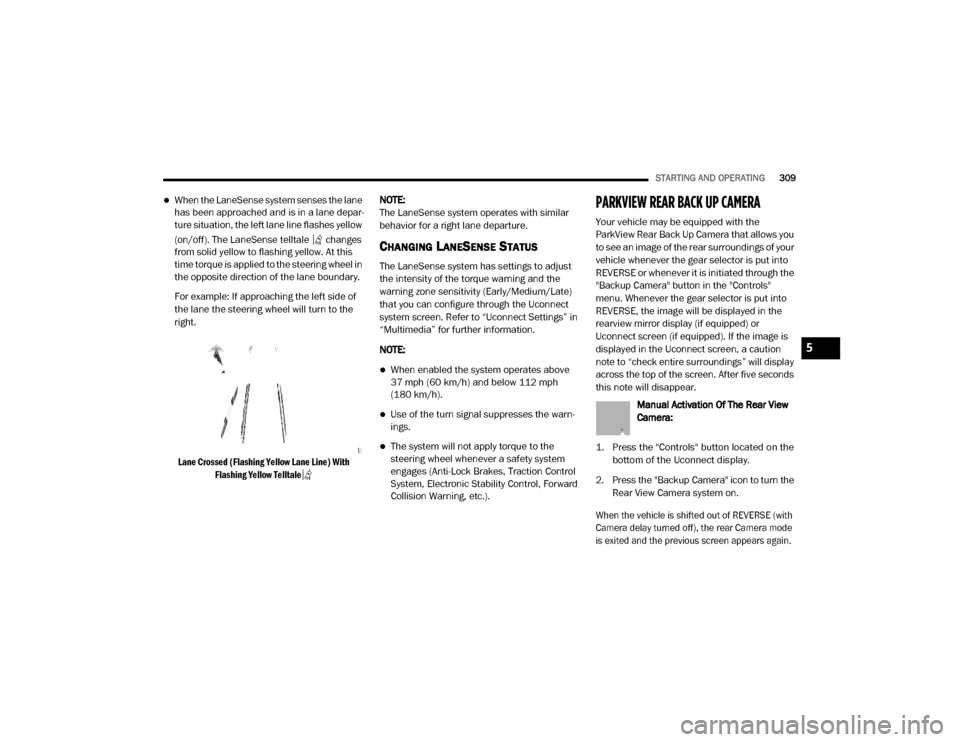
When the LaneSense system senses the lane
has been approached and is in a lane depar -
ture situation, the left lane line flashes yellow
(on/off). The LaneSense telltale changes
from solid yellow to flashing yellow. At this
time torque is applied to the steering wheel in
the opposite direction of the lane boundary.
For example: If approaching the left side of
the lane the steering wheel will turn to the
right.
Lane Crossed (Flashing Yellow Lane Line) With Flashing Yellow Telltale
NOTE:
The LaneSense system operates with similar
behavior for a right lane departure.
CHANGING LANESENSE STATUS
The LaneSense system has settings to adjust
the intensity of the torque warning and the
warning zone sensitivity (Early/Medium/Late)
that you can configure through the Uconnect
system screen. Refer to “Uconnect Settings” in
“Multimedia” for further information.
NOTE:
When enabled the system operates above
37 mph (60 km/h) and below 112 mph
(180 km/h).
Use of the turn signal suppresses the warn -
ings.
The system will not apply torque to the
steering wheel whenever a safety system
engages (Anti-Lock Brakes, Traction Control
System, Electronic Stability Control, Forward
Collision Warning, etc.).
PARKVIEW REAR BACK UP CAMERA
Your vehicle may be equipped with the
ParkView Rear Back Up Camera that allows you
to see an image of the rear surroundings of your
vehicle whenever the gear selector is put into
REVERSE or whenever it is initiated through the
"Backup Camera" button in the "Controls"
menu. Whenever the gear selector is put into
REVERSE, the image will be displayed in the
rearview mirror display (if equipped) or
Uconnect screen (if equipped). If the image is
displayed in the Uconnect screen, a caution
note to “check entire surroundings” will display
across the top of the screen. After five seconds
this note will disappear.
Manual Activation Of The Rear View
Camera:
1. Press the "Controls" button located on the bottom of the Uconnect display.
2. Press the "Backup Camera" icon to turn the Rear View Camera system on.
When the vehicle is shifted out of REVERSE (with
Camera delay turned off), the rear Camera mode
is exited and the previous screen appears again.
5
20_DJD2_OM_EN_USC_t.book Page 309
Page 345 of 568
STARTING AND OPERATING343
(Continued)
11. Shift the transmission into gear, release the brake pedal, and check that the vehicle
operates normally.
NOTE:
With electronic shift transfer case:
Steps 3 and 4 are requirements that must be
met before pushing the button to shift out of
N (Neutral), and must continue to be met
until the shift has been completed. If any of
these requirements are not met before
pushing the button or are no longer met
during the shift, the N (Neutral) indicator light
will flash continuously until all requirements
are met or until the button is released.
The ignition must be in the ON/RUN mode for
a shift to take place and for the position indi -
cator lights to be operable. If the ignition is
not in the ON/RUN mode, the shift will not
take place and no position indicator lights will
be on or flashing.
A flashing N (Neutral) position indicator light
indicates that shift requirements have not
been met.
DRIVING TIPS
DRIVING ON SLIPPERY SURFACES
Acceleration
Rapid acceleration on snow covered, wet, or
other slippery surfaces may cause the driving
wheels to pull erratically to the right or left. This
phenomenon occurs when there is a difference
in the surface traction under the rear (driving)
wheels.
DRIVING THROUGH WATER
Driving through water more than a few inches/
centimeters deep will require extra caution to
ensure safety and prevent damage to your
vehicle.
Flowing/Rising Water
Shallow Standing Water
Although your vehicle is capable of driving
through shallow standing water, consider the
following Cautions and Warnings before doing so.
WARNING!
Rapid acceleration on slippery surfaces is
dangerous. Unequal traction can cause
sudden pulling of the rear wheels. You could
lose control of the vehicle and possibly have a
collision. Accelerate slowly and carefully
whenever there is likely to be poor traction
(ice, snow, wet, mud, loose sand, etc.).
WARNING!
Do not drive on or across a road or path
where water is flowing and/or rising (as in
storm run-off). Flowing water can wear away
the road or path's surface and cause your
vehicle to sink into deeper water.
Furthermore, flowing and/or rising water can
carry your vehicle away swiftly. Failure to
follow this warning may result in injuries that
are serious or fatal to you, your passengers,
and others around you.
WARNING!
Driving through standing water limits your
vehicle’s traction capabilities. Do not
exceed 5 mph (8 km/h) when driving
through standing water.
5
20_DJD2_OM_EN_USC_t.book Page 343
Page 442 of 568
440SERVICING AND MAINTENANCE
TIRE TYPES
All Season Tires — If Equipped
All Season tires provide traction for all seasons
(Spring, Summer, Autumn, and Winter). Traction
levels may vary between different all season
tires. All season tires can be identified by the
M+S, M&S, M/S or MS designation on the tire sidewall. Use all season tires only in sets of four;
failure to do so may adversely affect the safety
and handling of your vehicle.
Summer Or Three Season Tires — If
Equipped
Summer tires provide traction in both wet and dry
conditions, and are not intended to be driven in
snow or on ice. If your vehicle is equipped with
Summer tires, be aware these tires are not
designed for Winter or cold driving conditions.
Install Winter tires on your vehicle when ambient
temperatures are less than 40°F (5°C) or if
roads are covered with ice or snow. For more
information, contact an authorized dealer.
Summer tires do not contain the all season
designation or mountain/snowflake symbol on
the tire sidewall. Use Summer tires only in sets
of four; failure to do so may adversely affect the
safety and handling of your vehicle.
Snow Tires
Some areas of the country require the use of
snow tires during the Winter. Snow tires can be
identified by a “mountain/snowflake” symbol
on the tire sidewall.
If you need snow tires, select tires
equivalent in size and type to the
original equipment tires. Use snow
tires only in sets of four; failure to do
so may adversely affect the safety and handling
of your vehicle.
Snow tires generally have lower speed ratings
than what was originally equipped with your
vehicle and should not be operated at
sustained speeds over 75 mph (120 km/h). For
speeds above 75 mph (120 km/h) refer to
original equipment or an authorized tire dealer
for recommended safe operating speeds,
loading and cold tire inflation pressures.
While studded tires improve performance on
ice, skid and traction capability on wet or dry
surfaces may be poorer than that of
non-studded tires. Some states prohibit
studded tires; therefore, local laws should be
checked before using these tire types.Never use a tire with a smaller load index or
capacity, other than what was originally
equipped on your vehicle. Using a tire with
a smaller load index could result in tire
overloading and failure. You could lose
control and have a collision.
Failure to equip your vehicle with tires
having adequate speed capability can
result in sudden tire failure and loss of
vehicle control.
CAUTION!
Replacing original tires with tires of a
different size may result in false speedometer
and odometer readings.
WARNING! (Continued)
WARNING!
Do not use Summer tires in snow/ice
conditions. You could lose vehicle control,
resulting in severe injury or death. Driving too
fast for conditions also creates the possibility
of loss of vehicle control.
20_DJD2_OM_EN_USC_t.book Page 440
Page 445 of 568
SERVICING AND MAINTENANCE443
Your wheels are susceptible to deterioration
caused by salt, sodium chloride, magnesium
chloride, calcium chloride, etc., and other road
chemicals used to melt ice or control dust on
dirt roads. Use a soft cloth or sponge and mild
soap to wipe away promptly. Do not use harsh
chemicals or a stiff brush. They can damage the
wheel’s protective coating that helps keep them
from corroding and tarnishing.
When cleaning extremely dirty wheels including
excessive brake dust, care must be taken in the
selection of tire and wheel cleaning chemicals
and equipment to prevent damage to the
wheels. Mopar Wheel Treatment or Mopar Chrome Cleaner or their equivalent is
recommended or select a non-abrasive,
non-acidic cleaner for aluminum or chrome
wheels.
NOTE:
If you intend parking or storing your vehicle for
an extended period after cleaning the wheels
with wheel cleaner, drive your vehicle and apply
the brakes to remove the water droplets from
the brake components. This activity will remove
the red rust on the brake rotors and prevent
vehicle vibration when braking.
Dark Vapor Chrome, Black Satin Chrome, or
Low Gloss Clear Coat Wheels
TIRE CHAINS AND TRACTION DEVICES
Use of traction devices require sufficient
tire-to-body clearance. Due to limited clearance,
the following traction devices are
recommended. Follow these recommendations
to guard against damage.
Traction device must be of proper size for the
tire, as recommended by the traction device
manufacturer.
No other tire sizes are recommended for use
with a tire chain or traction device.
CAUTION!
Avoid products or automatic car washes that
use acidic solutions or strong alkaline
additives or harsh brushes. Many aftermarket
wheel cleaners and automatic car washes
may damage the wheel's protective finish.
Such damage is not covered by the New
Vehicle Limited Warranty. Only car wash soap,
Mopar Wheel Cleaner or equivalent is
recommended.
CAUTION!
Do not use scouring pads, steel wool, a bristle
brush, metal polishes or oven cleaner. These
products may damage the wheel's protective
finish. Such damage is not covered by the
New Vehicle Limited Warranty. Only car wash
soap, Mopar Wheel Cleaner or equivalent is
recommended.
CAUTION!
If your vehicle is equipped with these
specialty wheels, DO NOT USE wheel
cleaners, abrasives, or polishing compounds.
They will permanently damage this finish and
such damage is not covered by the New
Vehicle Limited Warranty. HAND WASH ONLY
USING MILD SOAP AND WATER WITH A SOFT
CLOTH. Used on a regular basis; this is all that
is required to maintain this finish.
7
20_DJD2_OM_EN_USC_t.book Page 443
Page 446 of 568
444SERVICING AND MAINTENANCE
(Continued)
2500 Models
Install on rear tires only.
For LT245/70R17E, LT275/70R18E and
LT285/60R20E tires, use of a U-class snow
chain is recommended.
2500 Power Wagon Models
Install on rear tires only.
For a LT285/70R17D tire, use of a U-class
snow chain is recommended.
3500 (Single Rear Wheel) Models
Install on rear tires only.
For LT275/70R18E and LT285/60R20E
tires, use of a U-class snow chain is recom -
mended.
3500 (Dual Rear Wheel) Models
Install on front/rear tires.
For a LT235/80R17E tire, use of a U-class
snow chain is recommended.
TIRE ROTATION RECOMMENDATIONS
Tires on the front and rear axles of vehicles
operate at different loads and perform different
steering, driving, and braking functions. For
these reasons, they wear at unequal rates.
These effects can be reduced by timely rotation
of tires. The benefits of rotation are especially
worthwhile with aggressive tread designs such
as those on all season type tires. Rotation will
WARNING!
Using tires of different size and type (M+S,
Snow) between front and rear axles can
cause unpredictable handling. You could lose
control and have a collision.
CAUTION!
To avoid damage to your vehicle or tires,
observe the following precautions:
Because of restricted traction device clear -
ance between tires and other suspension
components, it is important that only trac-
tion devices in good condition are used.
Broken devices can cause serious damage.
Stop the vehicle immediately if noise
occurs that could indicate device breakage.
Remove the damaged parts of the device
before further use.
Install device as tightly as possible and
then retighten after driving about ½ mile
(0.8 km). Autosock traction devices do not
require retightening.
Do not exceed 30 mph (48 km/h).
Drive cautiously and avoid severe turns and
large bumps, especially with a loaded
vehicle.
Do not drive for a prolonged period on dry
pavement.
Observe the traction device manufacturer’s
instructions on the method of installation,
operating speed, and conditions for use.
Always use the suggested operating speed
of the device manufacturer if it is less than
30 mph (48 km/h).
Do not use traction devices on a compact
spare tire.
CAUTION! (Continued)
20_DJD2_OM_EN_USC_t.book Page 444
Page 448 of 568
446SERVICING AND MAINTENANCE
DEPARTMENT OF TRANSPORTATION
UNIFORM TIRE QUALITY GRADES
The following tire grading categories
were established by the National
Highway Traffic Safety Administration.
The specific grade rating assigned by the
tire's manufacturer in each category is
shown on the sidewall of the tires on
your vehicle.
All passenger vehicle tires must conform
to Federal safety requirements in
addition to these grades.
TREADWEAR
The Treadwear grade is a comparative
rating, based on the wear rate of the tire
when tested under controlled conditions
on a specified government test course.
For example, a tire graded 150 would
wear one and one-half times as well on
the government course as a tire graded
100. The relative performance of tires
depends upon the actual conditions of
their use, however, and may depart
significantly from the norm due to
variations in driving habits, service
practices, and differences in road
characteristics and climate.
TRACTION GRADES
The Traction grades, from highest to
lowest, are AA, A, B, and C. These grades
represent the tire's ability to stop on wet
pavement, as measured under
controlled conditions on specified
government test surfaces of asphalt and
concrete. A tire marked C may have poor
traction performance.
TEMPERATURE GRADES
The Temperature grades are A (the
highest), B, and C, representing the tire's
resistance to the generation of heat and
its ability to dissipate heat, when tested
under controlled conditions on a
specified indoor laboratory test wheel.
Sustained high temperature can cause
the material of the tire to degenerate
and reduce tire life, and excessive
temperature can lead to sudden tire
failure. The grade C corresponds to a
level of performance, which all
passenger vehicle tires must meet
under the Federal Motor Vehicle Safety
Standard No. 109. Grades B and A
When replacing a flat, the spare tire may
have to be remounted on the rim, or
installed at a different location, to maintain
the correct placement of the tire on the
wheel relative to the tire/wheel position on
the truck. For example, if the spare is used
to replace an outer rear tire it will have to be
remounted on the rim so that the wheel is
dished inward. That way the tread design of
asymmetrical tires and the white writing of
the OWL tires will maintain proper position.
CAUTION! (Continued)WARNING!
The traction grade assigned to this tire is
based on straight-ahead braking traction
tests, and does not include acceleration,
cornering, hydroplaning, or peak traction
characteristics.
20_DJD2_OM_EN_USC_t.book Page 446
Page 558 of 568

556 J
Jack Location
................................................. 365Jump Starting................................................ 375
K
Key Fob Panic Alarm
................................................. 15Programming Additional Key Fobs....... 16, 24Key Fob Battery Service (Remote
Keyless Entry).................................................. 15
Key Fob Programming (Remote Keyless Entry).. 16
Keyless Enter-N-Go........................28, 214, 218Lock The Vehicle’s Doors....... 476, 494, 514Passive Entry............................................... 28Passive Entry Programming............. 494, 514Keys................................................................. 14Replacement............................................... 24
L
Lane Change And Turn Signals........................ 51Lane Change Assist......................................... 52LaneSense.................................................... 306Latches.......................................................... 212Hood........................................................... 74Lead Free Gasoline........................................ 454Leaks, Fluid................................................... 212Life Of Tires................................................... 439Light Bulbs........................................... 212, 351
Lights............................................................ 212Air Bag.................................... 130, 182, 210Automatic High Beam.................................. 49Brake Assist Warning............................... 148Brake Warning.......................................... 131Bulb Replacement.................................... 351Cab Top Clearance................................... 357Cargo........................................................... 52Center Mounted Stop............................... 356Courtesy/Reading....................................... 53Cruise....................................................... 141Daytime Running......................................... 49
Electronic Stability Program(ESP) Indicator... 132
Exterior...............................................48, 212Fog........................................................... 355Four Wheel Drive Indicator....................... 255Hazard Warning Flasher........................... 346Headlights............................................ 48, 50High Beam................................................... 49Hill Descent Control Indicator................... 149Illuminated Entry......................................... 54Interior......................................................... 53Lights On Reminder..................................... 51Low Fuel................................................... 135Malfunction Indicator (Check Engine)....... 133Park.......................................................... 140Passing........................................................ 50Seat Belt Reminder.................................. 130Security Alarm.......................................... 132Service..................................................... 351
Side Marker.............................................. 357Traction Control........................................ 148Transfer Case........................................... 255Turn Signals............51, 141, 212, 353, 355Warning Instrument Cluster Descriptions................................ 132, 141Limited-Slip Differential....................... 270, 424Load Shed Battery Saver Mode..................... 129Load Shed Battery Saver On......................... 129Load Shed Electrical Load Reduction........... 129Load Shed Intelligent Battery Sensor............ 129Loading Vehicle............................................. 324Tires.......................................................... 433LocksAutomatic Door............................................30Child Protection...........................................30Power Door..................................................27Low Tire Pressure System............................. 163Lubrication, Body.......................................... 414Lug Nuts/Bolts.............................................. 452
M
Maintenance....................................................73Maintenance Free Battery............................ 400Maintenance Plan......................................... 391Maintenance Schedule............... 385, 389, 391Malfunction Indicator Light
(Check Engine)..................................... 133, 143
20_DJD2_OM_EN_USC_t.book Page 556
Page 562 of 568

560 Inflation Pressure
...................................... 436Life Of Tires............................................... 439Load Capacity.................................. 433, 434
Pressure Monitoring System (TPMS)... 136, 163
Quality Grading.......................................... 446Radial........................................................ 437Replacement............................................. 439Rotation.................................................... 444Safety.............................................. 429, 435Sizes.......................................................... 430Snow Tires................................................. 440Spare Tires...................................... 441, 442Spinning.................................................... 438Trailer Towing............................................ 331Tread Wear Indicators............................... 438Wheel Nut Torque..................................... 452To Open Hood.................................................. 74Tongue Weight/Trailer Weight....................... 330Tonneau Cover.................................... 100, 448Tonneau Cover Cleaning................................ 448Torque Converter Clutch................................ 245
Towing................................................. 325, 381Disabled Vehicle....................................... 381Guide........................................................ 330Recreational............................................. 339Weight...................................................... 330Towing Behind A Motorhome........................ 339Traction......................................................... 343Traction Control............................................ 153Trailer Sway Control (TSC)............................. 153Trailer Towing............................................... 325Cooling System Tips................................. 336Hitches..................................................... 329Minimum Requirements........................... 330Mirrors......................................................... 46Tips........................................................... 335Trailer And Tongue Weight........................ 330Wiring....................................................... 334Trailer Towing Guide..................................... 330Trailer Weight................................................ 330Transfer Case............................................... 425Electronically Shifted....................... 246, 250Fluid................................................ 463, 466
Transmission................................................. 235Automatic............................... 235, 239, 422Fluid................................................. 463, 466Maintenance............................................ 422Shifting..................................................... 233Transporting Pets.......................................... 209Tread Wear Indicators................................... 438Turn Signals......................... 51, 141, 353, 355
U
UconnectUconnect Settings
.......................... 476, 478,494, 497, 514, 516Uconnect PhoneCall Continuation...................................... 537Uconnect SettingsCustomer Programmable Features... 28, 476, 478, 494, 497, 514, 516Passive Entry Programming............... 28, 476, 494, 514Uconnect Voice Command............................ 541Uniform Tire Quality Grades.......................... 446
20_DJD2_OM_EN_USC_t.book Page 560