fuse Ram 4500 Chassis Cab 2017 User Guide
[x] Cancel search | Manufacturer: RAM, Model Year: 2017, Model line: 4500 Chassis Cab, Model: Ram 4500 Chassis Cab 2017Pages: 534, PDF Size: 4.74 MB
Page 491 of 534
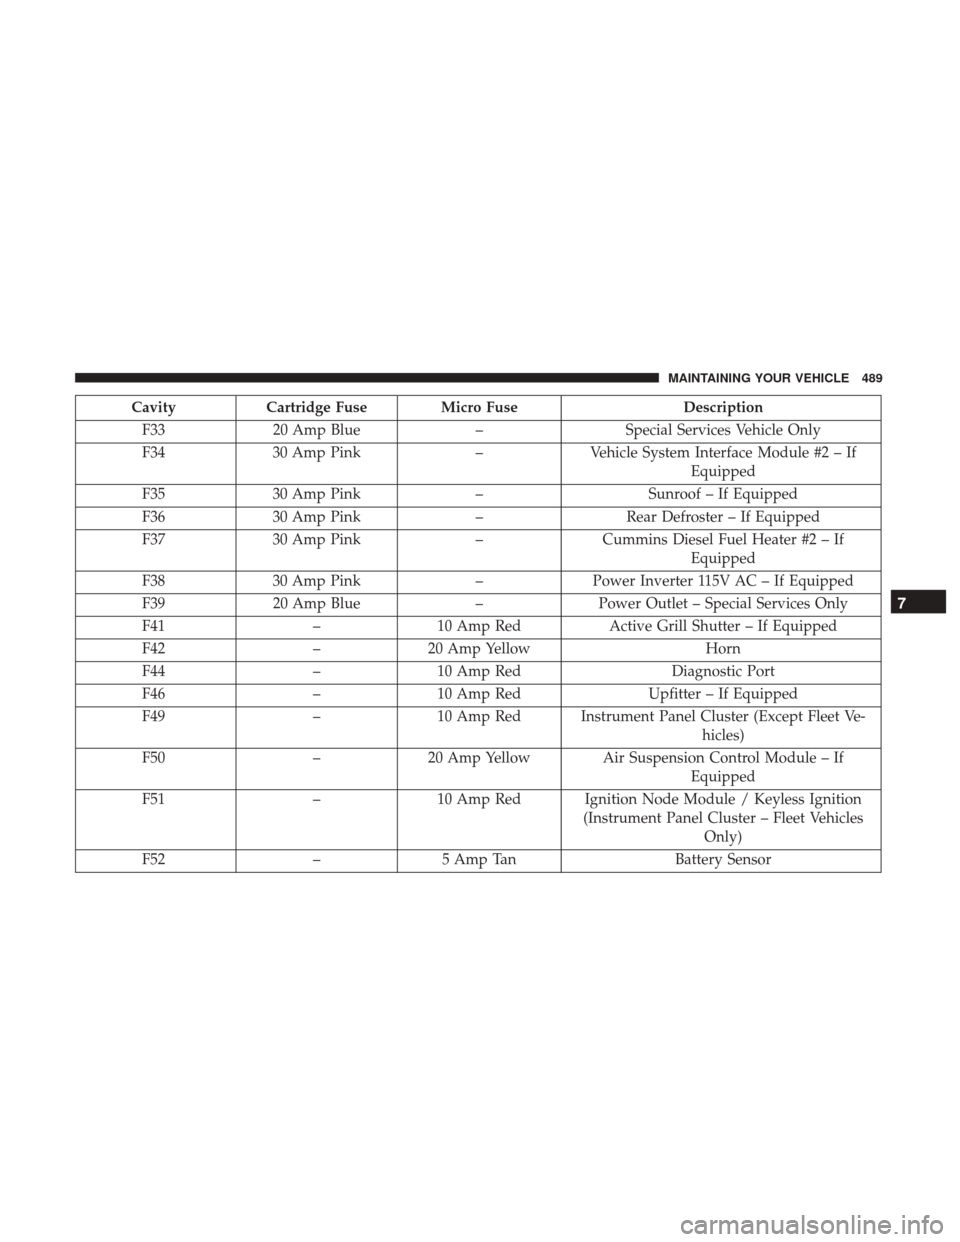
CavityCartridge Fuse Micro Fuse Description
F33 20 Amp Blue –Special Services Vehicle Only
F34 30 Amp Pink –Vehicle System Interface Module #2 – If
Equipped
F35 30 Amp Pink –Sunroof – If Equipped
F36 30 Amp Pink –Rear Defroster – If Equipped
F37 30 Amp Pink –Cummins Diesel Fuel Heater #2 – If
Equipped
F38 30 Amp Pink –Power Inverter 115V AC – If Equipped
F39 20 Amp Blue –Power Outlet – Special Services Only
F41 –10 Amp Red Active Grill Shutter – If Equipped
F42 –20 Amp Yellow Horn
F44 –10 Amp Red Diagnostic Port
F46 –10 Amp Red Upfitter – If Equipped
F49 –10 Amp Red Instrument Panel Cluster (Except Fleet Ve-
hicles)
F50 –20 Amp Yellow Air Suspension Control Module – If
Equipped
F51 –10 Amp Red Ignition Node Module / Keyless Ignition
(Instrument Panel Cluster – Fleet VehiclesOnly)
F52 –5 Amp Tan Battery Sensor
7
MAINTAINING YOUR VEHICLE 489
Page 492 of 534
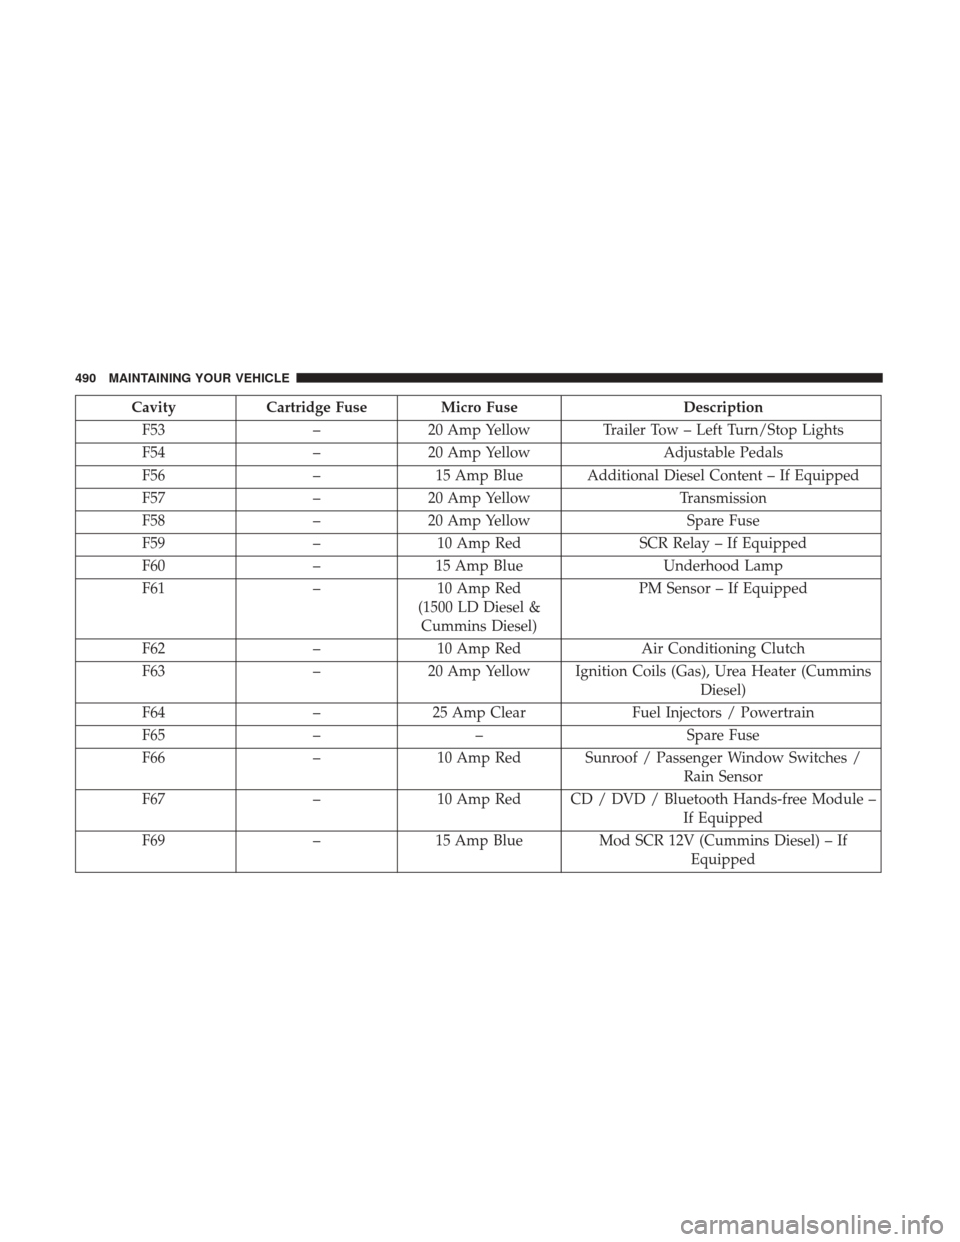
CavityCartridge Fuse Micro Fuse Description
F53 –20 Amp Yellow Trailer Tow – Left Turn/Stop Lights
F54 –20 Amp Yellow Adjustable Pedals
F56 –15 Amp Blue Additional Diesel Content – If Equipped
F57 –20 Amp Yellow Transmission
F58 –20 Amp Yellow Spare Fuse
F59 –10 Amp Red SCR Relay – If Equipped
F60 –15 Amp Blue Underhood Lamp
F61 –10 Amp Red
(1500 LD Diesel & Cummins Diesel) PM Sensor – If Equipped
F62 –10 Amp Red Air Conditioning Clutch
F63 –20 Amp Yellow Ignition Coils (Gas), Urea Heater (Cummins
Diesel)
F64 –25 Amp Clear Fuel Injectors / Powertrain
F65 –– Spare Fuse
F66 –10 Amp Red Sunroof / Passenger Window Switches /
Rain Sensor
F67 –10 Amp Red CD / DVD / Bluetooth Hands-free Module –
If Equipped
F69 –15 Amp Blue Mod SCR 12V (Cummins Diesel) – If
Equipped
490 MAINTAINING YOUR VEHICLE
Page 493 of 534
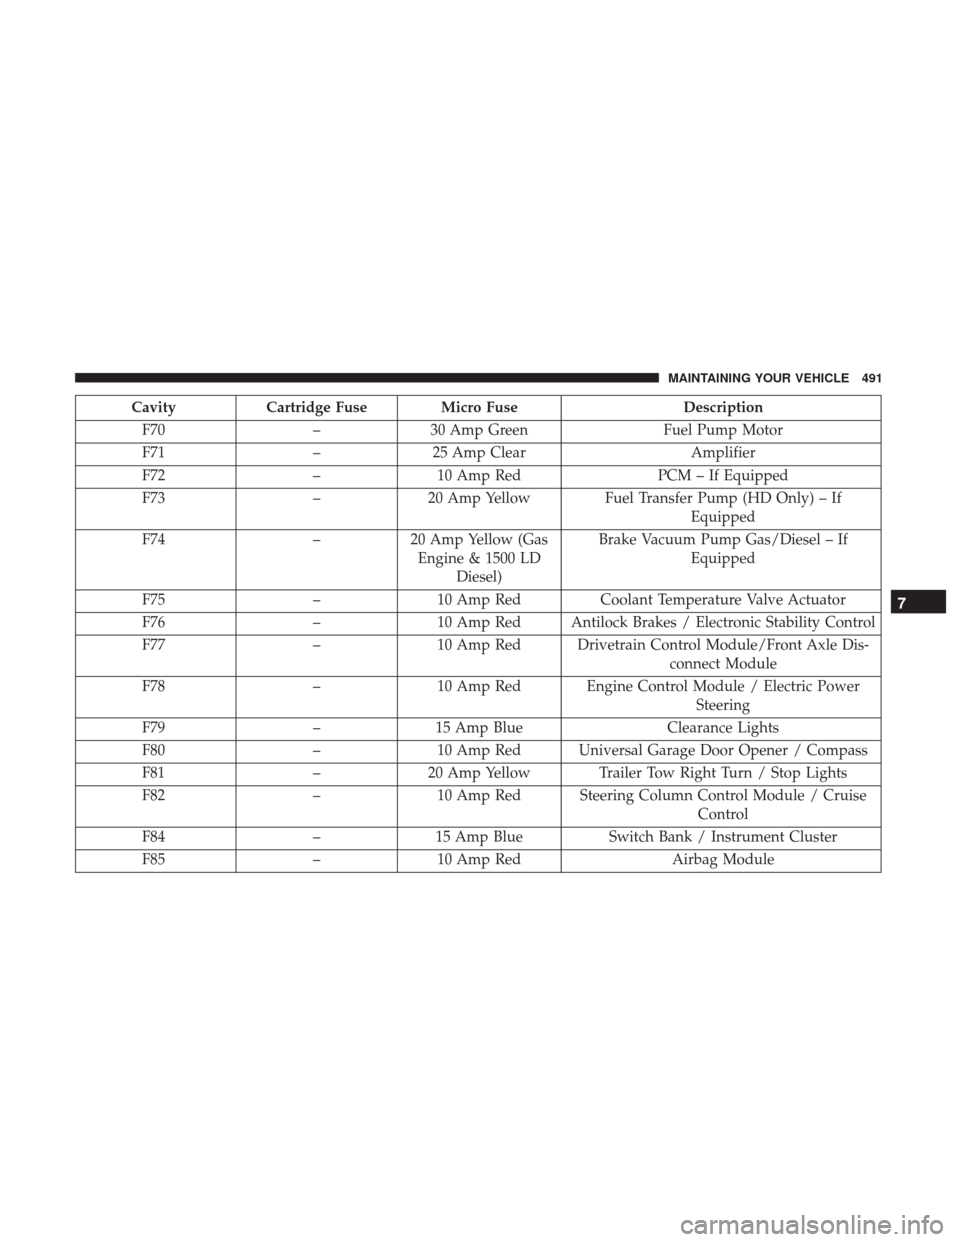
CavityCartridge Fuse Micro Fuse Description
F70 –30 Amp Green Fuel Pump Motor
F71 –25 Amp Clear Amplifier
F72 –10 Amp Red PCM – If Equipped
F73 –20 Amp Yellow Fuel Transfer Pump (HD Only) – If
Equipped
F74 –20 Amp Yellow (Gas
Engine & 1500 LD Diesel) Brake Vacuum Pump Gas/Diesel – If
Equipped
F75 –10 Amp Red Coolant Temperature Valve Actuator
F76 –10 Amp Red Antilock Brakes / Electronic Stability Control
F77 –10 Amp Red Drivetrain Control Module/Front Axle Dis-
connect Module
F78 –10 Amp Red Engine Control Module / Electric Power
Steering
F79 –15 Amp Blue Clearance Lights
F80 –10 Amp Red Universal Garage Door Opener / Compass
F81 –20 Amp Yellow Trailer Tow Right Turn / Stop Lights
F82 –10 Amp Red Steering Column Control Module / Cruise
Control
F84 –15 Amp Blue Switch Bank / Instrument Cluster
F85 –10 Amp Red Airbag Module
7
MAINTAINING YOUR VEHICLE 491
Page 494 of 534
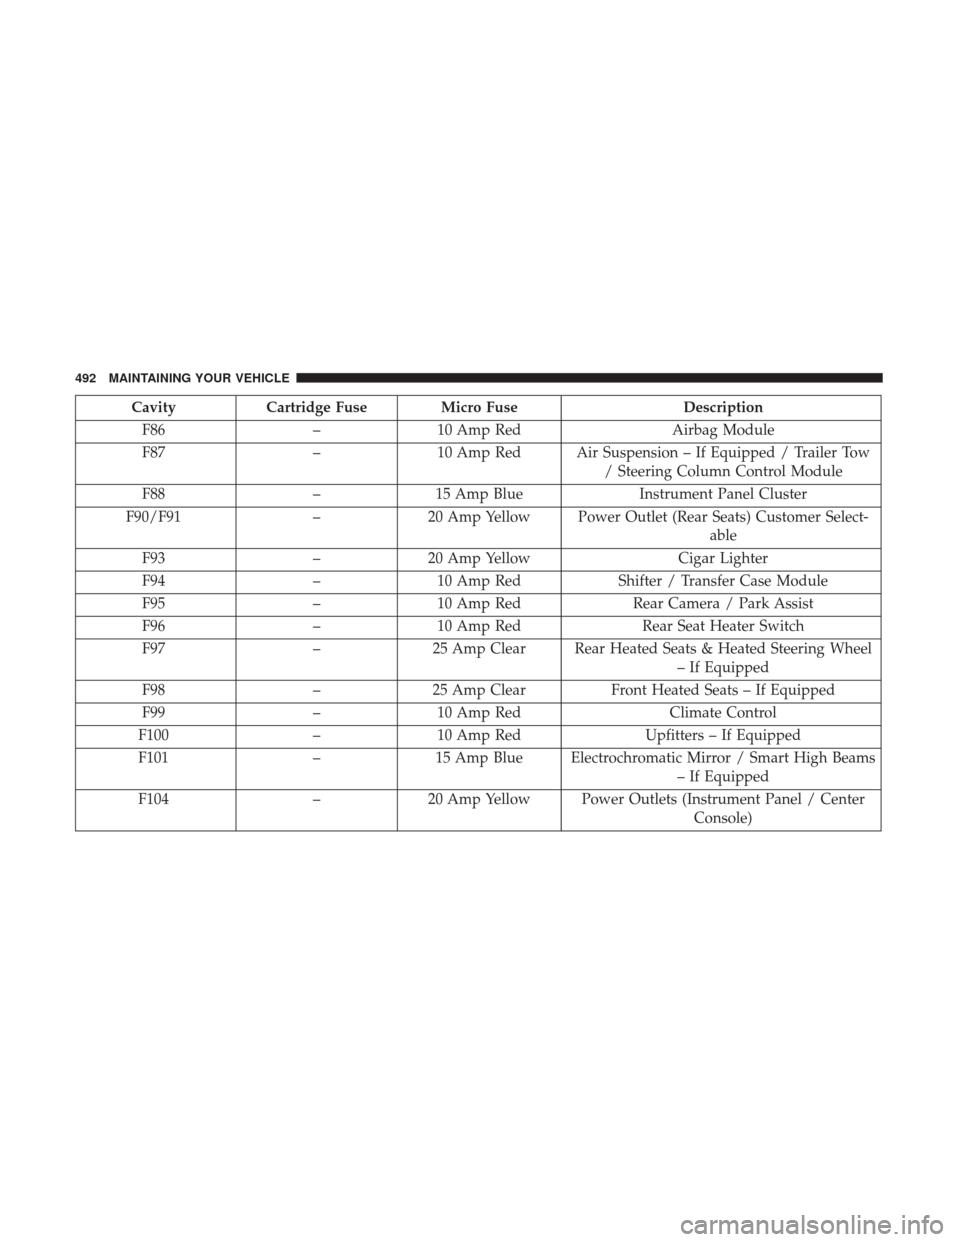
CavityCartridge Fuse Micro Fuse Description
F86 –10 Amp Red Airbag Module
F87 –10 Amp Red Air Suspension – If Equipped / Trailer Tow
/ Steering Column Control Module
F88 –15 Amp Blue Instrument Panel Cluster
F90/F91 –20 Amp Yellow Power Outlet (Rear Seats) Customer Select-
able
F93 –20 Amp Yellow Cigar Lighter
F94 –10 Amp Red Shifter / Transfer Case Module
F95 –10 Amp Red Rear Camera / Park Assist
F96 –10 Amp Red Rear Seat Heater Switch
F97 –25 Amp Clear Rear Heated Seats & Heated Steering Wheel
– If Equipped
F98 –25 Amp Clear Front Heated Seats – If Equipped
F99 –10 Amp Red Climate Control
F100 –10 Amp Red Upfitters – If Equipped
F101 –15 Amp Blue Electrochromatic Mirror / Smart High Beams
– If Equipped
F104 –20 Amp Yellow Power Outlets (Instrument Panel / Center
Console)
492 MAINTAINING YOUR VEHICLE
Page 495 of 534

CAUTION!
•When installing the power distribution center cover,
it is important to ensure the cover is properly posi-
tioned and fully latched. Failure to do so may allow
water to get into the power distribution center and
possibly result in an electrical system failure.
• When replacing a blown fuse, it is important to use
only a fuse having the correct amperage rating. The
use of a fuse with a rating other than indicated may
result in a dangerous electrical system overload. If a
properly rated fuse continues to blow, it indicates a
problem in the circuit that must be corrected.
VEHICLE STORAGE
If you are storing your vehicle for more than 21 days, we
recommend that you take the following steps to minimize
the drain on your vehicle’s battery:
• Disconnect the negative cable from battery.
• Any time you store your vehicle or keep it out of service
(i.e., vacation) for two weeks or more, run the air
conditioning system at idle for about five minutes in the
fresh air and high blower setting. This will ensure
adequate system lubrication to minimize the possibility
of compressor damage when the system is started again.
REPLACEMENT BULBS
LIGHT BULBS — Interior
Bulb Number
Overhead Console Lamps TS 212-2
Dome Lamp 7679
For lighted switches, see your authorized dealer for replacement instructions.
7
MAINTAINING YOUR VEHICLE 493
Page 522 of 534
Exhaust Gas Caution.....................95, 399
Exhaust System ........................ .95, 469
Exterior Lighting .......................... .130
Exterior Lights .............................98
Filters Air Cleaner ............................ .454
Air Conditioning .....................292, 459
Engine Fuel ........................... .500
Engine Oil ......................... .454, 500
Engine Oil Disposal ...................... .453
Flashers Turn Signal ...................... .98, 137, 220
Flat Tire Stowage .......................... .435
Flooded Engine Starting ..................... .323
Fluid, Brake ............................. .502
Fluid Capacities ........................... .499
Fluid Leaks ...............................98
Fluid Level Checks Automatic Transmission ....................479
Brake ................................ .476
Power Steering ......................... .350
Fluids, Lubricants And Genuine Parts ............500
Fog Lights ........................ .133, 216, 496
Fold Flat Load Floor ....................... .187Four-Way Hazard Flasher
.....................426
Four Wheel Drive ......................... .338
Freeing A Stuck Vehicle ..................... .439
Front Axle (Differential) ..................... .477
Fuel ................................... .396
Adding .............................. .400
Additives ............................. .398
Clean Air ............................. .396
Ethanol .............................. .397
Filler Cap (Gas Cap) ..................... .400
Filter ................................ .500
Gasoline .............................. .396
Light ................................ .214
Materials
Added ........................ .398
Methanol ............................. .397
Octane Rating .......................... .396
Requirements .......................... .396
Tank Capacity .......................... .499
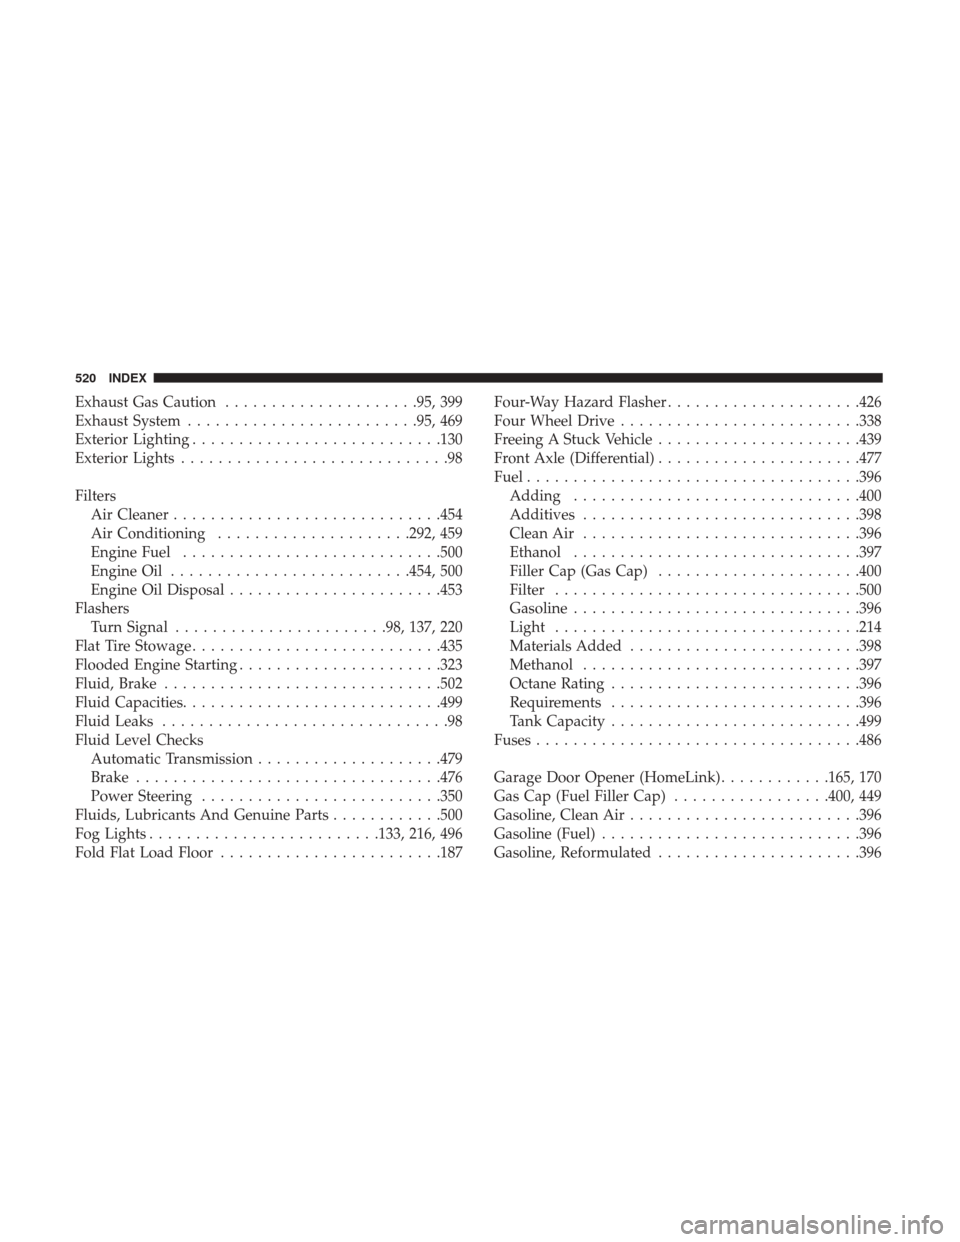
Fuses .................................. .486
Garage Door Opener (HomeLink) ............165, 170
Gas Cap (Fuel Filler Cap) .................400, 449
Gasoline, Clean Air ........................ .396
Gasoline (Fuel) ........................... .396
Gasoline, Reformulated ..................... .396
520 INDEX
Page 526 of 534
Multi-Function Control Lever..................137
Navigation System (Uconnect GPS) ..............161
New Vehicle Break-In Period .................93, 94
Occupant Restraints .........................40
Octane Rating, Gasoline (Fuel) .................396
Oil, Engine ........................... .452, 500
Capacity .............................. .499
Change Interval ........................ .452
Dipstick .............................. .452
Disposal .............................. .453
Filter ............................. .454, 500
Filter Disposal .......................... .453
Identification Logo ...................... .453
Pressure Warning Light ....................205
Recommendation ........................ .452
Synthetic ............................. .453
Viscosity .............................. .453
Oil Filter, Change ......................... .454
Oil Pressure Light ......................... .205
Onboard Diagnostic System ...................448
Operating Precautions ...................... .448
Operator Manual (Owner’s Manual) ...............4
Outside Rearview Mirrors ....................110 Overdrive
............................... .333
Overdrive OFF Switch ...................... .333
Overhead Console ......................... .164
Overheating, Engine ....................... .426
Owner’s Manual (Operator Manual) ...........4,514
Paint Care ............................... .481
Panic Alarm ...............................24
Parking Brake ............................ .350
ParkSense System, Rear ...................148, 155
Passing Light ............................ .138
Passive Entry ..............................34
Pedals, Adjustable ......................... .142
Personalized Menu Bar ..................... .294
Personal
Settings .......................... .230
Pets .....................................93
Placard, Tire And Loading Information ........371, 372
Power Distribution Center (Fuses) ..................486
Door Locks ..............................32
Mirrors ................................111
Outlet (Auxiliary Electrical Outlet) .........172, 177
Seats .................................115
Sliding Rear Window ..................... .187
Steering ........................... .349, 350
524 INDEX
Page 533 of 534

INSTALLATION OF RADIO TRANSMITTING
EQUIPMENT
Special design considerations are incorporated into this
vehicle’s electronic system to provide immunity to radio
frequency signals. Mobile two-way radios and telephone
equipment must be installed properly by trained person-
nel. The following must be observed during installation.
The positive power connection should be made directly
to the battery and fused as close to the battery as possible.
The negative power connection should be made to body
sheet metal adjacent to the negative battery connection.
This connection should not be fused.
Antennas for two-way radios should be mounted on the
roof or the rear area of the vehicle. Care should be used
in mounting antennas with magnet bases. Magnets may
affect the accuracy or operation of the compass on
vehicles so equipped.The antenna cable should be as short as practical and
routed away from the vehicle wiring when possible. Use
only fully shielded coaxial cable.
Carefully match the antenna and cable to the radio to
ensure a low Standing Wave Ratio (SWR).
Mobile radio equipment with output power greater than
normal may require special precautions.
All installations should be checked for possible interfer-
ence between the communications equipment and the
vehicle’s electronic systems.