pedal Ram 4500 Chassis Cab 2019 User Guide
[x] Cancel search | Manufacturer: RAM, Model Year: 2019, Model line: 4500 Chassis Cab, Model: Ram 4500 Chassis Cab 2019Pages: 607, PDF Size: 10.72 MB
Page 58 of 607

56 GETTING TO KNOW YOUR VEHICLE
NOTE:
• Always adjust the pedals to a position that allows fullpedal travel.
• Further small adjustments may be necessary to find the best possible seat/pedal position.
• For vehicles equipped with Driver Memory Seat, you can use your remote keyless entry key fob or the memory
switch on the driver’s door trim panel to return the adjust -
able pedals to pre-programmed positions. Refer to “Driver
Memory Seat” in “Getting To Know Your Vehicle” for
further information.MIRRORS
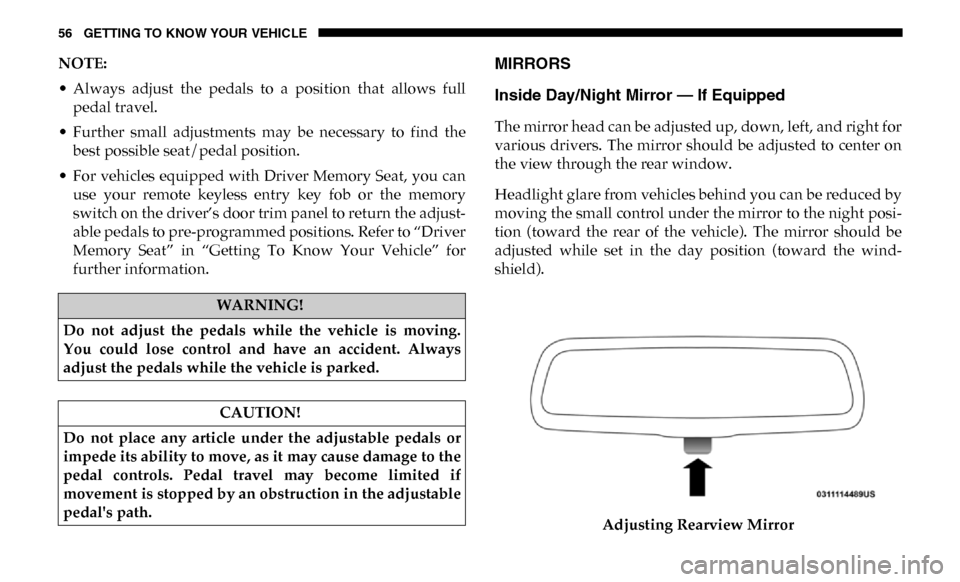
Inside Day/Night Mirror — If Equipped
The mirror head can be adjusted up, down, left, and right for
various drivers. The mirror should be adjusted to center on
the view through the rear window.
Headlight glare from vehicles behind you can be reduced by
moving the small control under the mirror to the night posi -
tion (toward the rear of the vehicle). The mirror should be
adjusted while set in the day position (toward the wind -
shield).
Adjusting Rearview Mirror
WARNING!
Do not adjust the pedals while the vehicle is moving.
You could lose control and have an accident. Always
adjust the pedals while the vehicle is parked.
CAUTION!
Do not place any article under the adjustable pedals or
impede its ability to move, as it may cause damage to the
pedal controls. Pedal travel may become limited if
movement is stopped by an obstruction in the adjustable
pedal's path.
Page 133 of 607

GETTING TO KNOW YOUR INSTRUMENT PANEL 131
Oil Life Reset Procedure
1. Without pushing the brake pedal, push the ENGINESTART/STOP button and place the ignition to the ON/
RUN position (do not start the engine).
2. Push and release the down arrow button to scroll down -
ward through the main menu to “Vehicle Info.”
3. Push and release the right arrow button to access the
”Vehicle Info” screen, then scroll up or down to select
“Oil Life.”
4. Push and hold the right arrow button to select “Reset”.
5. Push and release the down arrow button to select “Yes,”
then push and release the right arrow button to reset the
Oil Life to 100%.
6. Push and release the up arrow button to exit the instru -
ment cluster display screen.
Secondary Method Of Resetting Engine Oil Life
1. Without pressing the brake pedal, push the ENGINE START/STOP button and place the ignition to the ON/
RUN position (do not start the engine). 2. Fully press the accelerator pedal, slowly, three times
within ten seconds.
3. Without pushing the brake pedal, push the ENGINE START/STOP button once to return the ignition to the
OFF/LOCK position.
NOTE:
If the indicator message illuminates when you start the
vehicle, the oil change indicator system did not reset. If
necessary, repeat this procedure.
Display Menu Items
Push and release the up or down arrow button until the
desired selectable menu icon is highlighted in the instrument
cluster display.
Speedometer
Push and release the up or down arrow button until the
speedometer menu item is highlighted in the instrument
cluster display. Push and release the right arrow button to
cycle the display between mph and km/h.
3
Page 149 of 607

GETTING TO KNOW YOUR INSTRUMENT PANEL 147
ABS pump will run when applying the brake, and a brake
pedal pulsation may be felt during each stop.
The dual brake system provides a reserve braking capacity in
the event of a failure to a portion of the hydraulic system. A
leak in either half of the dual brake system is indicated by the
Brake Warning Light, which will turn on when the brake
fluid level in the master cylinder has dropped below a spec-
ified level.
The light will remain on until the cause is corrected.
NOTE:
The light may flash momentarily during sharp cornering
maneuvers, which change fluid level conditions. The vehicle
should have service performed, and the brake fluid level
checked.
If brake failure is indicated, immediate repair is necessary. Vehicles equipped with the Anti-Lock Brake System (ABS)
are also equipped with Electronic Brake Force Distribution
(EBD). In the event of an EBD failure, the Brake Warning
Light will turn on along with the ABS Light. Immediate
repair to the ABS system is required.
Operation of the Brake Warning Light can be checked by
turning the ignition switch from the OFF position to the ON/
RUN position. The light should illuminate for approximately
two seconds. The light should then turn off unless the
parking brake is applied or a brake fault is detected. If the
light does not illuminate, have the light inspected by an
authorized dealer.
The light also will turn on when the parking brake is applied
with the ignition switch in the ON/RUN position.
NOTE:
This light shows only that the parking brake is applied. It
does not show the degree of brake application.
— Hood Open Warning Light
This warning light will illuminate when the hood is ajar/
open and not fully closed.
NOTE:
If the vehicle is moving, there will also be a single chime.
WARNING!
Driving a vehicle with the red brake light on is
dangerous. Part of the brake system may have failed. It
will take longer to stop the vehicle. You could have a
collision. Have the vehicle checked immediately.
3
Page 151 of 607

GETTING TO KNOW YOUR INSTRUMENT PANEL 149
— Electronic Throttle Control (ETC) Warning Light
This warning light will illuminate to indicate a problem with
the Electronic Throttle Control (ETC) system. If a problem is
detected while the vehicle is running, the light will either
stay on or flash depending on the nature of the problem.
Cycle the ignition when the vehicle is safely and completely
stopped and the transmission is placed in the PARK position.
The light should turn off. If the light remains on with the
vehicle running, your vehicle will usually be drivable;
however, see an authorized dealer for service as soon as
possible.
NOTE:
This light may turn on if the accelerator and brake pedals are
pressed at the same time.
If the light continues to flash when the vehicle is running,
immediate service is required and you may experience
reduced performance, an elevated/rough idle, or engine
stall and your vehicle may require towing. The light will
come on when the ignition is placed in the ON/RUN or
ACC/ON/RUN position and remain on briefly as a bulb
check. If the light does not come on during starting, have the
system checked by an authorized dealer. — Trailer Brake Disconnected Warning Light
This warning light will illuminate when the Trailer Brake has
been disconnected.
— Transmission Temperature Warning Light — If
Equipped
This warning light will illuminate to warn of a high transmis -
sion fluid temperature. This may occur with strenuous usage
such as trailer towing. If this light turns on, stop the vehicle
and run the engine at idle or slightly faster, with the trans -
mission in PARK or NEUTRAL, until the light turns off.
Once the light turns off, you may continue to drive normally.
WARNING!
If you continue operating the vehicle when the
Transmission Temperature Warning Light is illuminated
you could cause the fluid to boil over, come in contact
with hot engine or exhaust components and cause a fire.
CAUTION!
Continuous driving with the Transmission Temperature
Warning Light illuminated will eventually cause severe
transmission damage or transmission failure.
3
Page 163 of 607

161
(Continued)
SAFETY
SAFETY FEATURES
Anti-Lock Brake System (ABS)
The Anti-Lock Brake System (ABS) provides increased
vehicle stability and brake performance under most braking
conditions. The system automatically prevents wheel lock,
and enhances vehicle control during braking.
The ABS performs a self-check cycle to ensure that the ABS
is working properly each time the vehicle is started and
driven. During this self-check, you may hear a slight clicking
sound as well as some related motor noises.
ABS is activated during braking when the system detects one
or more wheels begin to lock. Road conditions such as ice,
snow, gravel, bumps, railroad tracks, loose debris, or panic
stops may increase the likelihood of ABS activation(s).You also may experience the following when ABS activates:
• The ABS motor noise (it may continue to run for a short
time after the stop).
• The clicking sound of solenoid valves.
• Brake pedal pulsations.
• A slight drop of the brake pedal at the end of the stop.
These are all normal characteristics of ABS.
WARNING!
• The ABS contains sophisticated electronic equipment that may be susceptible to interference caused by
improperly installed or high output radio transmitting
equipment. This interference can cause possible loss of
anti-lock braking capability. Installation of such equip -
ment should be performed by qualified professionals.
• Pumping of the Anti-Lock Brakes will diminish their effectiveness and may lead to a collision. Pumping
makes the stopping distance longer. Just press firmly
on your brake pedal when you need to slow down or
stop.
4
Page 165 of 607

SAFETY 163
Electronic Brake Force Distribution (EBD)
This function manages the distribution of the braking torque
between the front and rear axles by limiting braking pressure
to the rear axle. This is done to prevent overslip of the rear
wheels to avoid vehicle instability, and to prevent the rear
axle from entering ABS before the front axle.
Brake System Warning Light
The red “Brake System Warning Light” will turn on when
the ignition is turned to the ON/RUN mode and may stay on
for as long as four seconds.
If the “Brake System Warning Light” remains on or comes on
while driving, it indicates that the brake system is not func-
tioning properly and that immediate service is required. If
the “Brake System Warning Light” does not come on when
the ignition is turned to the ON/RUN mode, have the light
repaired as soon as possible. Brake Assist System (BAS)
The BAS is designed to optimize the vehicle’s braking capa
-
bility during emergency braking maneuvers. The system
detects an emergency braking situation by sensing the rate
and amount of brake application and then applies optimum
pressure to the brakes. This can help reduce braking
distances. The BAS complements the anti-lock brake system
(ABS). Applying the brakes very quickly results in the best
BAS assistance. To receive the benefit of the system, you
must apply continuous braking pressure during the stop -
ping sequence, (do not “pump” the brakes). Do not reduce
brake pedal pressure unless braking is no longer desired.
Once the brake pedal is released, the BAS is deactivated.
WARNING!
The Brake Assist System (BAS) cannot prevent the
natural laws of physics from acting on the vehicle, nor
can it increase the traction afforded by prevailing road
conditions. BAS cannot prevent collisions, including
those resulting from excessive speed in turns, driving on
very slippery surfaces, or hydroplaning. The capabilities
of a BAS-equipped vehicle must never be exploited in a
reckless or dangerous manner, which could jeopardize
the user's safety or the safety of others.
4
Page 167 of 607

SAFETY 165
Towing With HSA
HSA will also provide assistance to mitigate roll back while
towing a trailer.Disabling And Enabling HSA
This feature can be turned on or turned off. To change the
current setting, proceed as follows:
• If disabling HSA using your instrument cluster display,
refer to “Instrument Cluster Display” in “Getting To Know
Your Instrument Panel” for further information.
• If disabling HSA using Uconnect Settings, refer to “Ucon -
nect Settings” in “Multimedia” for further information.
For vehicles not equipped with an instrument cluster
display, perform the following steps:
1. Center the steering wheel (front wheels pointing straight forward).
2. Shift the transmission into PARK.
3. Apply the parking brake.
4. Start the engine.
5. Rotate the steering wheel slightly more than one-half turn to the left.
WARNING!
• If you use a trailer brake controller with your trailer, the trailer brakes may be activated and deactivated with
the brake switch. If so, there may not be enough brake
pressure to hold both the vehicle and the trailer on a
hill when the brake pedal is released. In order to avoid
rolling down an incline while resuming acceleration,
manually activate the trailer brake or apply more
vehicle brake pressure prior to releasing the brake
pedal.
• HSA is not a parking brake. Always apply the parking brake fully when exiting your vehicle. Also, be certain
to place the transmission in PARK.
• Failure to follow these warnings can result in a colli -
sion or serious personal injury.
4
Page 216 of 607

214 SAFETY
for a short period of time, typically 30 seconds or less. The
EDR in this vehicle is designed to record such data as:
• How various systems in your vehicle were operating;
• Whether or not the driver and passenger safety belts werebuckled/fastened;
• How far (if at all) the driver was depressing the accelerator and/or brake pedal; and,
• How fast the vehicle was traveling.
These data can help provide a better understanding of the
circumstances in which crashes and injuries occur.
NOTE:
EDR data are recorded by your vehicle only if a non-trivial
crash situation occurs; no data are recorded by the EDR
under normal driving conditions and no personal data (e.g.,
name, gender, age, and crash location) are recorded.
However, other parties, such as law enforcement, could
combine the EDR data with the type of personally identi -
fying data routinely acquired during a crash investigation.
To read data recorded by an EDR, special equipment is
required, and access to the vehicle or the EDR is needed. In
addition to the vehicle manufacturer, other parties, such as
law enforcement, that have the special equipment, can read
the information if they have access to the vehicle or the EDR.Child Restraints
Everyone in your vehicle needs to be buckled up at all times,
including babies and children. Every state in the United
States, and every Canadian province, requires that small
children ride in proper restraint systems. This is the law, and
you can be prosecuted for ignoring it.
Children 12 years or younger should ride properly buckled
up in a rear seat, if available. According to crash statistics,
children are safer when properly restrained in the rear seats
rather than in the front.
There are different sizes and types of restraints for children
from newborn size to the child almost large enough for an
adult safety belt. Always check the child seat Owner’s
Manual to make sure you have the correct seat for your child.
WARNING!
In a collision, an unrestrained child can become a
projectile inside the vehicle. The force required to hold
even an infant on your lap could become so great that
you could not hold the child, no matter how strong you
are. The child and others could be badly injured or
killed. Any child riding in your vehicle should be in a
proper restraint for the child’s size.
Page 244 of 607

242 SAFETY
(Continued)
(Continued)
Floor Mat Safety Information
Always use floor mats designed to fit your vehicle. Only use
a floor mat that does not interfere with the operation of the
accelerator, brake or clutch pedals. Only use a floor mat that
is securely attached using the floor mat fasteners so it cannot
slip out of position and interfere with the accelerator, brake
or clutch pedals or impair safe operation of your vehicle in
other ways.
WARNING!
An improperly attached, damaged, folded, or stacked
floor mat, or damaged floor mat fasteners may cause
your floor mat to interfere with the accelerator, brake, or
clutch pedals and cause a loss of vehicle control. To
prevent SERIOUS INJURY or DEATH:
• ALWAYS securely attach your floor mat using the floor mat fasteners. DO NOT install your floor mat
upside down or turn your floor mat over. Lightly pull to
confirm mat is secured using the floor mat fasteners on
a regular basis.
• ALWAYS REMOVE THE EXISTING FLOOR MAT
FROM THE VEHICLE before installing any other
floor mat. NEVER install or stack an additional floor
mat on top of an existing floor mat.
• ONLY install floor mats designed to fit your vehicle. NEVER install a floor mat that cannot be properly
attached and secured to your vehicle. If a floor mat
needs to be replaced, only use a FCA approved floor
mat for the specific make, model, and year of your
vehicle.
• ONLY use the driver’s side floor mat on the driver’s side floor area. To check for interference, with the
vehicle properly parked with the engine off, fully
depress the accelerator, the brake, and the clutch pedal
(if present) to check for interference. If your floor mat
interferes with the operation of any pedal, or is not
secure to the floor, remove the floor mat from the
vehicle and place the floor mat in your trunk.
• ONLY use the passenger’s side floor mat on the passenger’s side floor area.
WARNING! (Continued)
Page 245 of 607

SAFETY 243
Periodic Safety Checks You Should Make Outside
The Vehicle
Tires
Examine tires for excessive tread wear and uneven wear
patterns. Check for stones, nails, glass, or other objects
lodged in the tread or sidewall. Inspect the tread for cuts and
cracks. Inspect sidewalls for cuts, cracks, and bulges. Check
the wheel bolts for tightness. Check the tires (including
spare) for proper cold inflation pressure.
Lights
Have someone observe the operation of brake lights and
exterior lights while you work the controls. Check turn
signal and high beam indicator lights on the instrument
panel.
Door Latches
Check for proper closing, latching, and locking.
Fluid Leaks
Check area under the vehicle after overnight parking for
fuel, coolant, oil, or other fluid leaks. Also, if gasoline fumes
are detected or if fuel, or brake fluid leaks are suspected. The
cause should be located and corrected immediately.
• ALWAYS make sure objects cannot fall or slide into the
driver’s side floor area when the vehicle is moving.
Objects can become trapped under accelerator, brake,
or clutch pedals and could cause a loss of vehicle
control.
• NEVER place any objects under the floor mat (e.g., towels, keys, etc.). These objects could change the posi -
tion of the floor mat and may cause interference with
the accelerator, brake, or clutch pedals.
• If the vehicle carpet has been removed and re-installed, always properly attach carpet to the floor and check the
floor mat fasteners are secure to the vehicle carpet.
Fully depress each pedal to check for interference with
the accelerator, brake, or clutch pedals then re-install
the floor mats.
• It is recommended to only use mild soap and water to clean your floor mats. After cleaning, always check
your floor mat has been properly installed and is
secured to your vehicle using the floor mat fasteners by
lightly pulling mat.
WARNING! (Continued)
4