tow Ram 4500 Chassis Cab 2020 Workshop Manual
[x] Cancel search | Manufacturer: RAM, Model Year: 2020, Model line: 4500 Chassis Cab, Model: Ram 4500 Chassis Cab 2020Pages: 516, PDF Size: 29.24 MB
Page 228 of 516
226STARTING AND OPERATING
Manually Shifted Transfer Case — If
Equipped
The transfer case provides four mode positions:
Two-Wheel Drive High Range (2H)
Four-Wheel Drive Lock High Range (4H)
N (Neutral)
Four-Wheel Drive Low Range (4L)
For additional information on the appropriate
use of each transfer case mode position, see
the information below:
2H
Two-Wheel Drive High Range — This range is for
normal street and highway driving on dry, hard
surfaced roads.
4H
Four-Wheel Drive Lock High Range — This range
locks the front and rear driveshafts together
forcing the front and rear wheels to rotate at the
same speed. Additional traction for loose, slip -
pery road surfaces only. N (Neutral)
N (Neutral) — This range disengages both the
front and rear driveshafts from the powertrain.
To be used for flat towing behind another
vehicle. Refer to “Recreational Towing” in
“Starting And Operating” for further informa
-
tion.
4L
Four-Wheel Drive Low Range — This range locks
the front and rear driveshafts together forcing
the front and rear wheels to rotate at the same
speed. Additional traction and maximum pulling
power for loose, slippery road surfaces only. Do
not exceed 25 mph (40 km/h).
This transfer case is intended to be driven in the
2H position for normal street and highway
conditions such as dry, hard surfaced roads.
When additional traction is required, the 4H and
4L positions can be used to lock the front and
rear driveshafts together and force the front
and rear wheels to rotate at the same speed.
This is accomplished by simply moving the gear
selector to the desired positions once the
appropriate speed and gear requirements are
met, refer to “Shifting Procedure – Manually
Shifted Transfer Case” in this section for further
information. The 4H and 4L positions are intended for loose,
slippery road surfaces only. Driving in the 4H
and 4L positions on dry, hard surfaced roads
may cause increased tire wear and damage to
the driveline components.
The “Transfer Case Position Indicator Light” in
the instrument cluster will alert the driver that
the vehicle is in four-wheel drive and that the
front and rear driveshafts are locked together.
This light will illuminate when the transfer case
is shifted into either the 4H or 4L position. There
is no light for the 2H or Neutral positions on
some models.
When operating your vehicle in 4L, the engine
speed is approximately three times that of the
2H or 4H positions at a given road speed. Take
care not to overspeed the engine and do not
exceed 25 mph (40 km/h).
Proper operation of four-wheel drive vehicles
depends on tires of equal size, type and circum
-
ference on each wheel. Any difference will
adversely affect shifting and can cause damage
to the drivetrain.
NOTE:
Do not attempt to make a shift while only the
front or rear wheels are spinning, as this can
cause damage to driveline components.
2020_RAM_CHASSIS_CAB_OM_USA=GUID-6C67832B-7839-4CCF-BEFC-CDF988F949EA=1=en=.book Page 226
Page 229 of 516

STARTING AND OPERATING227
Because four-wheel drive provides improved
traction, there is a tendency to exceed safe
turning and stopping speeds. Do not go faster
than road conditions permit.
NOTE:
Delayed shifts out of four-wheel drive may be
experienced due to uneven tire wear, low or
uneven tire pressures, excessive vehicle
loading, or cold temperatures.
Two-Wheel Drive High Range (2H)
Two-Wheel Drive High Range — This range is for
normal street and highway driving on dry hard
surfaced roads.
Four-Wheel Drive High Range (4H)
Four-Wheel Drive High Range — This range locks
the front and rear driveshafts together forcing
the front and rear wheels to rotate at the same
speed. Additional traction for loose, slippery
road surfaces only.
N (Neutral)
Neutral — This range disengages the front and
rear driveshafts from the powertrain. To be
used for flat towing behind another vehicle.
Refer to “Recreational Towing” in “Starting And
Operating” for further information.
Four-Wheel Drive Low Range (4L)
Four-Wheel Drive Low Range — This range locks
the front and rear driveshafts together forcing
the front and rear wheels to rotate at the same
speed. Additional traction and maximum pulling
power for loose, slippery road surfaces only. Do
not exceed 25 mph (40 km/h).
Shifting Procedure — Manually Shifted
Transfer Case
2H To 4H
Shifting between 2H and 4H can be made with
the vehicle stopped or in motion. If the vehicle
is in motion, shifts can be made up to 55 mph
(88 km/h). With the vehicle in motion, the
transfer case will engage/disengage faster if
you momentarily release the accelerator pedal
after completing the shift. Apply a constant
force when shifting the transfer case lever.
2H Or 4H To 4L
NOTE:
When shifting into or out of 4L some gear noise
may be heard. This noise is normal and is not
detrimental to the vehicle or occupants.
With the vehicle rolling at 2 to 3 mph
(3 to 5 km/h), shift the transmission into
NEUTRAL. While the vehicle is coasting at
2 to 3 mph (3 to 5 km/h), shift the transfer case
lever firmly to the desired position. Do not
pause in transfer case Neutral.
WARNING!
You or others could be injured or killed if you
leave the vehicle unattended with the transfer
case in the NEUTRAL position without first
fully engaging the parking brake. The transfer
case NEUTRAL position disengages both the
front and rear drive shafts from the
powertrain and will allow the vehicle to roll,
even if the transmission is in PARK. The
parking brake should always be applied when
the driver is not in the vehicle.
CAUTION!
Do not use 4L (Low) range when operating
the vehicle on dry pavement. Driveline
hardware damage can result.
5
2020_RAM_CHASSIS_CAB_OM_USA=GUID-6C67832B-7839-4CCF-BEFC-CDF988F949EA=1=en=.book Page 227
Page 235 of 516
STARTING AND OPERATING233
(Continued)
Adaptive Cruise Control (ACC) Operation
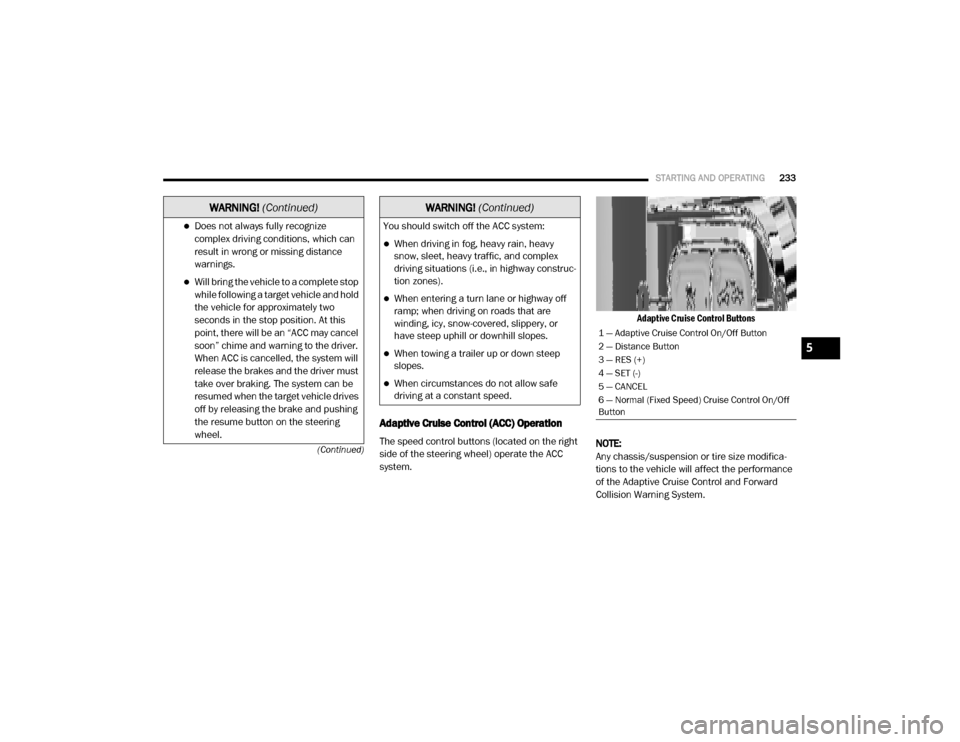
The speed control buttons (located on the right
side of the steering wheel) operate the ACC
system.
Adaptive Cruise Control Buttons
NOTE:
Any chassis/suspension or tire size modifica -
tions to the vehicle will affect the performance
of the Adaptive Cruise Control and Forward
Collision Warning System.
Does not always fully recognize complex driving conditions, which can
result in wrong or missing distance
warnings.
Will bring the vehicle to a complete stop while following a target vehicle and hold
the vehicle for approximately two
seconds in the stop position. At this
point, there will be an “ACC may cancel
soon” chime and warning to the driver.
When ACC is cancelled, the system will
release the brakes and the driver must
take over braking. The system can be
resumed when the target vehicle drives
off by releasing the brake and pushing
the resume button on the steering
wheel.
WARNING! (Continued)
You should switch off the ACC system:
When driving in fog, heavy rain, heavy
snow, sleet, heavy traffic, and complex
driving situations (i.e., in highway construc -
tion zones).
When entering a turn lane or highway off
ramp; when driving on roads that are
winding, icy, snow-covered, slippery, or
have steep uphill or downhill slopes.
When towing a trailer up or down steep
slopes.
When circumstances do not allow safe
driving at a constant speed.
WARNING! (Continued)
1 — Adaptive Cruise Control On/Off Button
2 — Distance Button
3 — RES (+)
4 — SET (-)
5 — CANCEL
6 — Normal (Fixed Speed) Cruise Control On/Off
Button
5
2020_RAM_CHASSIS_CAB_OM_USA=GUID-6C67832B-7839-4CCF-BEFC-CDF988F949EA=1=en=.book Page 233
Page 244 of 516
242STARTING AND OPERATING
Towing A Trailer
ACC while towing a trailer is recommended only
with an Integrated Trailer Brake Controller.
Aftermarket trailer brake controllers will not
activate the trailer brakes when ACC is braking.
Offset Driving
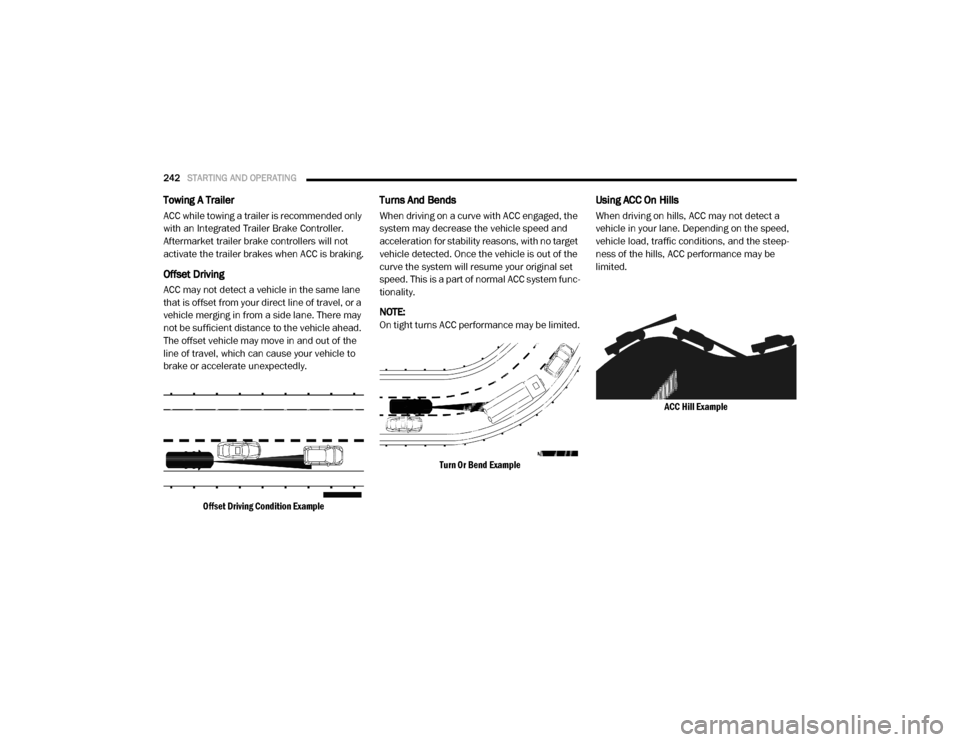
ACC may not detect a vehicle in the same lane
that is offset from your direct line of travel, or a
vehicle merging in from a side lane. There may
not be sufficient distance to the vehicle ahead.
The offset vehicle may move in and out of the
line of travel, which can cause your vehicle to
brake or accelerate unexpectedly.
Offset Driving Condition Example
Turns And Bends
When driving on a curve with ACC engaged, the
system may decrease the vehicle speed and
acceleration for stability reasons, with no target
vehicle detected. Once the vehicle is out of the
curve the system will resume your original set
speed. This is a part of normal ACC system func -
tionality.
NOTE:
On tight turns ACC performance may be limited.
Turn Or Bend Example
Using ACC On Hills
When driving on hills, ACC may not detect a
vehicle in your lane. Depending on the speed,
vehicle load, traffic conditions, and the steep -
ness of the hills, ACC performance may be
limited.
ACC Hill Example
2020_RAM_CHASSIS_CAB_OM_USA=GUID-6C67832B-7839-4CCF-BEFC-CDF988F949EA=1=en=.book Page 242
Page 252 of 516
250STARTING AND OPERATING
When you move the gear selector into
REVERSE with ParkSense turned off, the
instrument cluster display will show "Off" on
the vehicle graphic arcs for as long as the
vehicle is in REVERSE.
ParkSense, when on, will reduce the volume
of the radio when it is sounding a tone.
Clean the ParkSense sensors regularly,
taking care not to scratch or damage them.
The sensors must not be covered with ice,
snow, slush, mud, dirt or debris. Failure to do
so can result in the system not working prop -
erly. The ParkSense system might not detect
an obstacle behind the fascia/bumper, or it
could provide a false indication that an
obstacle is behind the fascia/bumper.
Ensure the ParkSense system is off if objects
such as bicycle carriers, trailer hitches, etc.,
are placed on the fascia/bumper while
driving the vehicle. Failure to do so can result
in the system misinterpreting a close
obstacle as a sensor problem, causing the
“Wipe Sensors” message or providing false
alerts.
PARKSENSE FRONT AND REAR PARK ASSIST
The ParkSense Front and Rear Park Assist
system provides visual and audible indications
of the distance between the rear, and/or front
fascia/bumper, and a detected obstacle when
backing up or moving forward (e.g. during a
parking maneuver).
Refer to “ParkSense System Usage Precau -
tions” in this section for limitations of this
system and recommendations.
WARNING!
Drivers must be careful when backing up
even when using ParkSense. Always check
carefully behind your vehicle, look behind
you, and be sure to check for pedestrians,
animals, other vehicles, obstructions, and
blind spots before backing up. You are
responsible for safety and must continue to
pay attention to your surroundings. Failure
to do so can result in serious injury or
death.
Before using ParkSense, it is strongly
recommended that the ball mount and
hitch ball assembly is disconnected from
the vehicle when the vehicle is not used for
towing. Failure to do so can result in injury
or damage to vehicles or obstacles
because the hitch ball will be much closer
to the obstacle than the rear fascia when
the loudspeaker sounds the continuous
tone. Also, the sensors could detect the ball
mount and hitch ball assembly, depending
on its size and shape, giving a false indica -
tion that an obstacle is behind the vehicle.
CAUTION!
ParkSense is only a parking aid and it is
unable to recognize every obstacle,
including small obstacles. Parking curbs
might be temporarily detected or not
detected at all. Obstacles located above or
below the sensors will not be detected
when they are in close proximity.
The vehicle must be driven slowly when
using ParkSense in order to be able to stop
in time when an obstacle is detected. It is
recommended that the driver looks over
his/her shoulder when using ParkSense.
2020_RAM_CHASSIS_CAB_OM_USA=GUID-6C67832B-7839-4CCF-BEFC-CDF988F949EA=1=en=.book Page 250
Page 257 of 516
STARTING AND OPERATING255
When you move the gear selector to the
REVERSE position and Front or Rear Park -
Sense is turned off, the instrument cluster
display will show "Off" on the vehicle graphic
arcs. This vehicle graphic will be displayed for
as long as the vehicle is in REVERSE.
ParkSense, when on, will reduce the volume
of the radio when it is sounding a tone.
Clean the ParkSense sensors regularly,
taking care not to scratch or damage them.
The sensors must not be covered with ice,
snow, slush, mud, dirt or debris. Failure to do
so can result in the system not working prop -
erly. The ParkSense system might not detect
an obstacle behind or in front of the fascia/
bumper, or it could provide a false indication
that an obstacle is behind or in front of the
fascia/bumper.
Ensure the ParkSense system is off if objects
such as bicycle carriers, trailer hitches, etc.,
are placed on the fascia/bumper while
driving the vehicle. Failure to do so can result
in the system misinterpreting a close
obstacle as a sensor problem, causing the
“Wipe Front/Rear Sensors” message or
providing false alerts.
WARNING!
Drivers must be careful when backing up
even when using ParkSense. Always check
carefully behind your vehicle, look behind
you, and be sure to check for pedestrians,
animals, other vehicles, obstructions, and
blind spots before backing up. You are
responsible for safety and must continue to
pay attention to your surroundings. Failure
to do so can result in serious injury or
death.
Before using ParkSense, it is strongly
recommended that the ball mount and
hitch ball assembly is disconnected from
the vehicle when the vehicle is not used for
towing. Failure to do so can result in injury
or damage to vehicles or obstacles
because the hitch ball will be much closer
to the obstacle than the rear fascia when
the loudspeaker sounds the continuous
tone. Also, the sensors could detect the ball
mount and hitch ball assembly, depending
on its size and shape, giving a false indica -
tion that an obstacle is behind the vehicle.
CAUTION!
ParkSense is only a parking aid and it is
unable to recognize every obstacle,
including small obstacles. Parking curbs
might be temporarily detected or not
detected at all. Obstacles located above or
below the sensors will not be detected
when they are in close proximity.
The vehicle must be driven slowly when
using ParkSense in order to be able to stop
in time when an obstacle is detected. It is
recommended that the driver looks over
his/her shoulder when using ParkSense.
5
2020_RAM_CHASSIS_CAB_OM_USA=GUID-6C67832B-7839-4CCF-BEFC-CDF988F949EA=1=en=.book Page 255
Page 265 of 516

STARTING AND OPERATING263
Rear Cross Path View
Pressing the Rear Cross Path soft
key will give the driver a wider
angle view of the rear came ra
syste m. The Top view will be
dis abled when this is selec te d.
Front View
The Front view will show you what is
immediately in front of the vehicle
and is always paired with the Top view
of the vehicle.
Front Cross Path View Pressing the Fro nt Cro ss Path soft
key will give the driver a wider
angle view of the front cam era
syste m. The Top view will be
dis abled when this is selec te d.
Rear View Camera
Pressing the Backup Camera soft key
will provide a full screen rear view with
Zoom View. NOTE:
If the Backup Camera view was selected
through the Surround View screen, exiting out of
the Rear View Camera screen will return to the
Surround View screen. If the Backup Camera
was manually activated through the Controls
menu of the Uconnect display, exiting out of the
display screen will return to the Controls menu.
Cargo Camera
Pressing the Cargo Camera soft key
will provide a full screen view of the
cargo area.
NOTE:
If the Cargo Camera view was selected through
the Surround View screen, exiting out of the
Cargo Camera screen will return to the
Surround View screen. If the Cargo Camera was
manually activated through the Controls menu
of the Uconnect display, exiting out of the
display screen will return to the Controls menu.
Trailer Reverse Guidance Pressing the Trailer Reverse Guid -
ance soft key will provide a full screen
view of the cargo area and trailer. Pressing the Left & Right Tow Mirror
Split Screen View button within the
Trailer Reverse Guidance screen will
display a split screen to allow the
driver to see both sides of the trailer at the
same time. This view allows the driver to pan
left/right to better frame the trailer in the image.
NOTE:
Trailer Reverse Guidance can only be selected
through the Surround View screen; exiting out of
the Trailer Reverse Guidance screen will return
to the Surround View screen.
Zoom View
When the Rear View Camera image is
being displayed, and the vehicle
speed is below 8 mph (13 km/h)
while in any gear selector position,
Zoom View is available. By pressing the “magni -
fying glass” icon in the upper left of the display
screen, the image will zoom in to four times the
standard view. Pressing the icon a second time
will return the view to the standard Backup
Camera display.
5
2020_RAM_CHASSIS_CAB_OM_USA=GUID-6C67832B-7839-4CCF-BEFC-CDF988F949EA=1=en=.book Page 263
Page 275 of 516
STARTING AND OPERATING273
VEHICLE LOADING
Gross Vehicle Weight Rating (GVWR)
The GVWR is the total permissible weight of your
vehicle including driver, passengers, vehicle,
options and cargo. The label also specifies
maximum capacities of front and rear axle
systems (GAWR). Total load must be limited so
GVWR and front and rear GAWR are not
exceeded.
Payload
The payload of a vehicle is defined as the allow -
able load weight a truck can carry, including the
weight of the driver, all passengers, options and
cargo.
Gross Axle Weight Rating (GAWR)
The GAWR is the maximum permissible load on
the front and rear axles. The load must be
distributed in the cargo area so that the GAWR
of each axle is not exceeded.
Each axle GAWR is determined by the compo -
nents in the system with the lowest load
carrying capacity (axle, springs, tires or wheels).
Heavier axles or suspension components some -times specified by purchasers for increased
durability does not necessarily increase the
vehicle's GVWR.
Tire Size
The tire size on the Vehicle Certification Label
represents the actual tire size on your vehicle.
Replacement tires must be equal to the load
capacity of this tire size.
Rim Size
This is the rim size that is appropriate for the tire
size listed.
Inflation Pressure
This is the cold tire inflation pressure for your
vehicle for all loading conditions up to full
GAWR.
Curb Weight
The curb weight of a vehicle is defined as the
total weight of the vehicle with all fluids,
including vehicle fuel, at full capacity condi
-
tions, and with no occupants or cargo loaded
into the vehicle. The front and rear curb weight
values are determined by weighing your vehicle
on a commercial scale before any occupants or
cargo are added.
Loading
The actual total weight and the weight of the
front and rear of your vehicle at the ground can
best be determined by weighing it when it is
loaded and ready for operation.
The entire vehicle should first be weighed on a
commercial scale to ensure that the GVWR has
not been exceeded. The weight on the front and
rear of the vehicle should then be determined
separately to be sure that the load is properly
distributed over the front and rear axles.
Weighing the vehicle may show that the GAWR
of either the front or rear axle has been
exceeded but the total load is within the speci -
fied GVWR. If so, weight must be shifted from
front to rear or rear to front as appropriate until
the specified weight limitations are met. Store
the heavier items down low and be sure that the
weight is distributed equally. Stow all loose
items securely before driving.
Improper weight distributions can have an
adverse effect on the way your vehicle steers
and handles and the way the brakes operate.
5
2020_RAM_CHASSIS_CAB_OM_USA=GUID-6C67832B-7839-4CCF-BEFC-CDF988F949EA=1=en=.book Page 273
Page 276 of 516
274STARTING AND OPERATING
TRAILER TOWING
In this section you will find safety tips and infor -
mation on limits to the type of towing you can
reasonably do with your vehicle. Before towing a
trailer, carefully review this information to tow
your load as efficiently and safely as possible.
To maintain the New Vehicle Limited Warranty
coverage, follow the requirements and recom -
mendations in this manual concerning vehicles
used for trailer towing.
Common Towing Definitions
The following trailer towing related definitions
will assist you in understanding the following
information:
Gross Vehicle Weight Rating (GVWR)
The GVWR is the total allowable weight of your
vehicle. This includes driver, passengers, cargo
and tongue weight. The total load must be
limited so that you do not exceed the GVWR.
Refer to “Vehicle Loading/Vehicle Certification
Label” in “Starting And Operating” for further
information.
Gross Trailer Weight (GTW)
The GTW is the weight of the trailer plus the
weight of all cargo, consumables and equip -
ment (permanent or temporary) loaded in or on
the trailer in its "loaded and ready for operation"
condition.
The recommended way to measure GTW is to
put your fully loaded trailer on a vehicle scale.
The entire weight of the trailer must be
supported by the scale.
Gross Combination Weight Rating (GCWR)
The GCWR is the total allowable weight of your
vehicle and trailer when weighed in combina -
tion.
Gross Axle Weight Rating (GAWR)
The GAWR is the maximum capacity of the front
and rear axles. Distribute the load over the front
and rear axles evenly. Make sure that you do
not exceed either front or rear GAWR. Refer to
“Vehicle Loading/Vehicle Certification Label” in
“Starting And Operating” for further informa -
tion.
Tongue Weight (TW)
The tongue weight is the downward force
exerted on the hitch ball by the trailer. You must
consider this as part of the load on your vehicle.
CAUTION!
Do not load your vehicle any heavier than the
GVWR or the maximum front and rear GAWR.
If you do, parts on your vehicle can break, or
it can change the way your vehicle handles.
This could cause you to lose control. Also
overloading can shorten the life of your
vehicle.
WARNING!
If the gross trailer weight is 5,000 lbs
(2,267 kg) or more, it is recommended to use
a weight-distributing hitch to ensure stable
handling of your vehicle. If you use a standard
weight-carrying hitch, you could lose control
of your vehicle and cause a collision.
WARNING!
It is important that you do not exceed the
maximum front or rear GAWR. A dangerous
driving condition can result if either rating is
exceeded. You could lose control of the
vehicle and have a collision.
2020_RAM_CHASSIS_CAB_OM_USA=GUID-6C67832B-7839-4CCF-BEFC-CDF988F949EA=1=en=.book Page 274
Page 277 of 516
STARTING AND OPERATING275
Trailer Frontal Area
The frontal area is the maximum height multi -
plied by the maximum width of the front of a
trailer.
Trailer Sway Control (TSC)
The TSC can be a mechanical telescoping link
that can be installed between the hitch receiver
and the trailer tongue that typically provides
adjustable friction associated with the tele -
scoping motion to dampen any unwanted trailer
swaying motions while traveling.
If equipped, the electronic TSC recognizes a
swaying trailer and automatically applies indi -
vidual wheel brakes and/or reduces engine
power to attempt to eliminate the trailer sway.
Weight-Carrying Hitch
A weight-carrying hitch supports the trailer
tongue weight, just as if it were luggage located
at a hitch ball or some other connecting point of
the vehicle. These kinds of hitches are the most
popular on the market today and they are
commonly used to tow small and medium sized
trailers.
Weight-Distributing Hitch
A weight-distributing system works by applying
leverage through spring (load) bars. They are
typically used for heavier loads to distribute
trailer tongue weight to the tow vehicle's front
axle and the trailer axle(s). When used in accor -
dance with the manufacturer's directions, it
provides for a more level ride, offering more
consistent steering and brake control, thereby
enhancing towing safety. The addition of a fric -
tion/hydraulic sway control also dampens sway
caused by traffic and crosswinds and contrib -
utes positively to tow vehicle and trailer
stability. Trailer Sway Control (TSC) and a weight
distributing (load equalizing) hitch are recom -
mended for heavier Tongue Weights (TW) and
may be required depending on vehicle and
trailer configuration/loading to comply with
GAWR requirements.
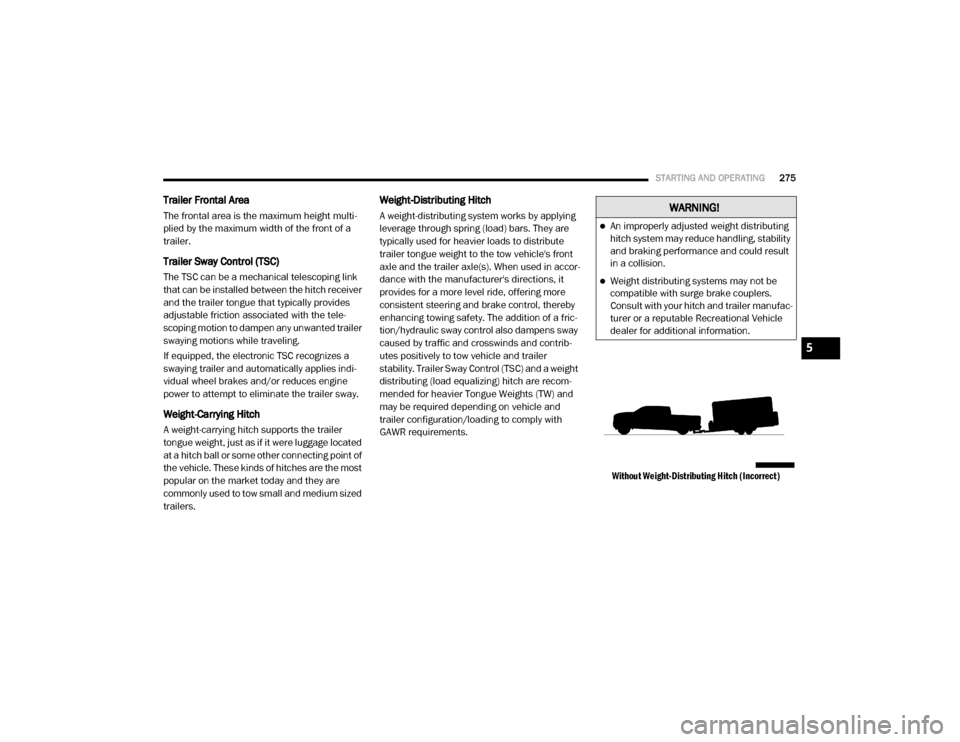
Without Weight-Distributing Hitch (Incorrect)
WARNING!
An improperly adjusted weight distributing
hitch system may reduce handling, stability
and braking performance and could result
in a collision.
Weight distributing systems may not be
compatible with surge brake couplers.
Consult with your hitch and trailer manufac-
turer or a reputable Recreational Vehicle
dealer for additional information.
5
2020_RAM_CHASSIS_CAB_OM_USA=GUID-6C67832B-7839-4CCF-BEFC-CDF988F949EA=1=en=.book Page 275