display RAM CHASSIS CAB 2009 Owner's Guide
[x] Cancel search | Manufacturer: RAM, Model Year: 2009, Model line: CHASSIS CAB, Model: RAM CHASSIS CAB 2009Pages: 429, PDF Size: 3.51 MB
Page 192 of 429
Press the rotary TUNE control a fourth time and BAL will
display. Turn the TUNE control to the right or left to
adjust the sound level from the right or left side speakers.
Press the rotary TUNE control a fifth time and FADE will
display. Turn the TUNE control to the left or right to
adjust the sound level between the front and rear speak-
ers.
Press the tune control again or wait five seconds to exit
setting tone, balance, and fade.
RND/SET Button (Radio Mode) To Set The
Pushbutton Memory
When you are receiving a station that you wish to
commit to pushbutton memory, press the SET button.
The symbol SET 1 will now show in the display window.
Select the button (1-6) you wish to lock onto this station
and press and release that button. If a button is notselected within five seconds after pressing the SET but-
ton, the station will continue to play but will not be
stored into pushbutton memory.
You may add a second station to each pushbutton by
repeating the above procedure with this exception: Press
the SET button twice and SET 2 will show in the display
window. Each button can be set for SET 1 and SET 2 in
both AM and FM. This allows a total of 12 AM, 12 FM,
and 12 Satellite (if equipped) stations to be stored into
pushbutton memory. The stations stored in SET 2
memory can be selected by pressing the pushbutton
twice.
Every time a preset button is used, a corresponding
button number will display.
Preset Buttons1-6(Radio Mode)
These buttons tune the Radio to the stations that you
commit to pushbutton memory, 12 AM, 12 FM, and 12
Satellite (if equipped) stations.
190 UNDERSTANDING YOUR INSTRUMENT PANEL
Page 193 of 429
Operating Instructions - CD Mode
NOTE:The ignition switch must be in the ON or ACC
position to operate the radio.
Inserting The Compact Disc (Single CD Player)
Gently insert one CD into the CD player with the CD
label facing up. The CD will automatically be pulled into
the CD Player and the CD icon will illuminate on the
radio display.
If the volume control is ON, the unit will switch to CD
mode and begin to play. The display will show the track
number and play time in minutes and seconds. Play will
begin at the start of track one.
NOTE:
•On some vehicles, you may insert or eject a disc with
the radio or ignition switch OFF.
•If you insert a disc with the ignition ON and the radio
OFF, the CD will automatically be pulled into the CD
player.
•This radio does not play discs with MP3 tracks.
SEEK Button (CD Mode)
Press the right side of the SEEK button for the next track
on the CD. Press the left side of the button to return to the
beginning of the current track, or return to the beginning
of the previous track if the CD is within the first
10 seconds of the current selection.
MUTE Button (CD Mode)
Press the MUTE button to cancel the sound from the
speakers. \6MUTE\6will display. Press the MUTE button a
second time and the sound from the speakers will return.
Rotating the volume control or turning the ignition
OFF/ON will also return the sound from the speakers.
UNDERSTANDING YOUR INSTRUMENT PANEL 191
4
Page 194 of 429
SCAN Button (CD Mode)
Press this button to play the first 10 seconds of each track.
To stop the scan function, press the button a second time.
EJECT Button (CD Mode)
Press this button and the disc will unload and
move to the entrance for easy removal. The
unit will switch to the last selected mode.
If you do not remove the disc within 15 seconds, it will be
reloaded. The radio mode will continue to appear.
TIME Button (CD Mode)
Press this button to change the display from elapsed CD
playing time to time of day. The time of day will display
for five seconds.
RW/FF (CD Mode)
Press and hold the FF (Fast Forward) and the CD player
will begin to fast forward until FF is released. The RW
(Rewind) button works in a similar manner. Press and hold the FF button to fast forward through the
tracks. Release the FF button to stop the fast forward
feature. If the RW button is pressed, the current track will
reverse to the beginning of the track and begin playing.
RND/SET Button (Random Play Button) (CD
Mode)
Press this button while the CD is playing to activate
Random play. This feature plays the selections on the
compact disc in random order to provide an interesting
change of pace.
Press the SEEK button to move to the next randomly
selected track.
Press the RND button a second time to stop Random
play.
Operating Instructions - Auxiliary Mode
The auxiliary (AUX) jack is an audio input jack, which
allows the user to plug in a portable device such as an
192 UNDERSTANDING YOUR INSTRUMENT PANEL
Page 195 of 429
MP3 player, cassette player, or microphone and utilize
the vehicle’s audio system to amplify the source and play
through the vehicle speakers.
The auxiliary mode becomes active when an electrical
device is plugged into the AUX jack using a standard
3.5 mm stereo audio cable and the user presses and
releases the MODE button until AUX appears on the
display.
NOTE:The radio will return to the last stored mode if
the ignition switch is turned from the OFF/LOCK posi-
tion to the ACC position, the radio is turned on, and the
radio was previously in the AUX mode.
SEEK Button (Auxiliary Mode)
No function.
MUTE Button (Auxiliary Mode)
Press the MUTE button to cancel the sound from the
speakers. \6MUTE\6will display. Press the MUTE button a second time and the sound from the speakers will return.
Rotating the volume control or turning the ignition
OFF/ON will also return the sound from the speakers.
SCAN Button (Auxiliary Mode)
No function.
EJECT Button (Auxiliary Mode)
No function.
PSCAN Button (Auxiliary Mode)
No function.
TIME Button (Auxiliary Mode)
Press this button to change the display from elapsed
playing time to time of day. The time of day will display
for five seconds.
UNDERSTANDING YOUR INSTRUMENT PANEL 193
4
Page 198 of 429
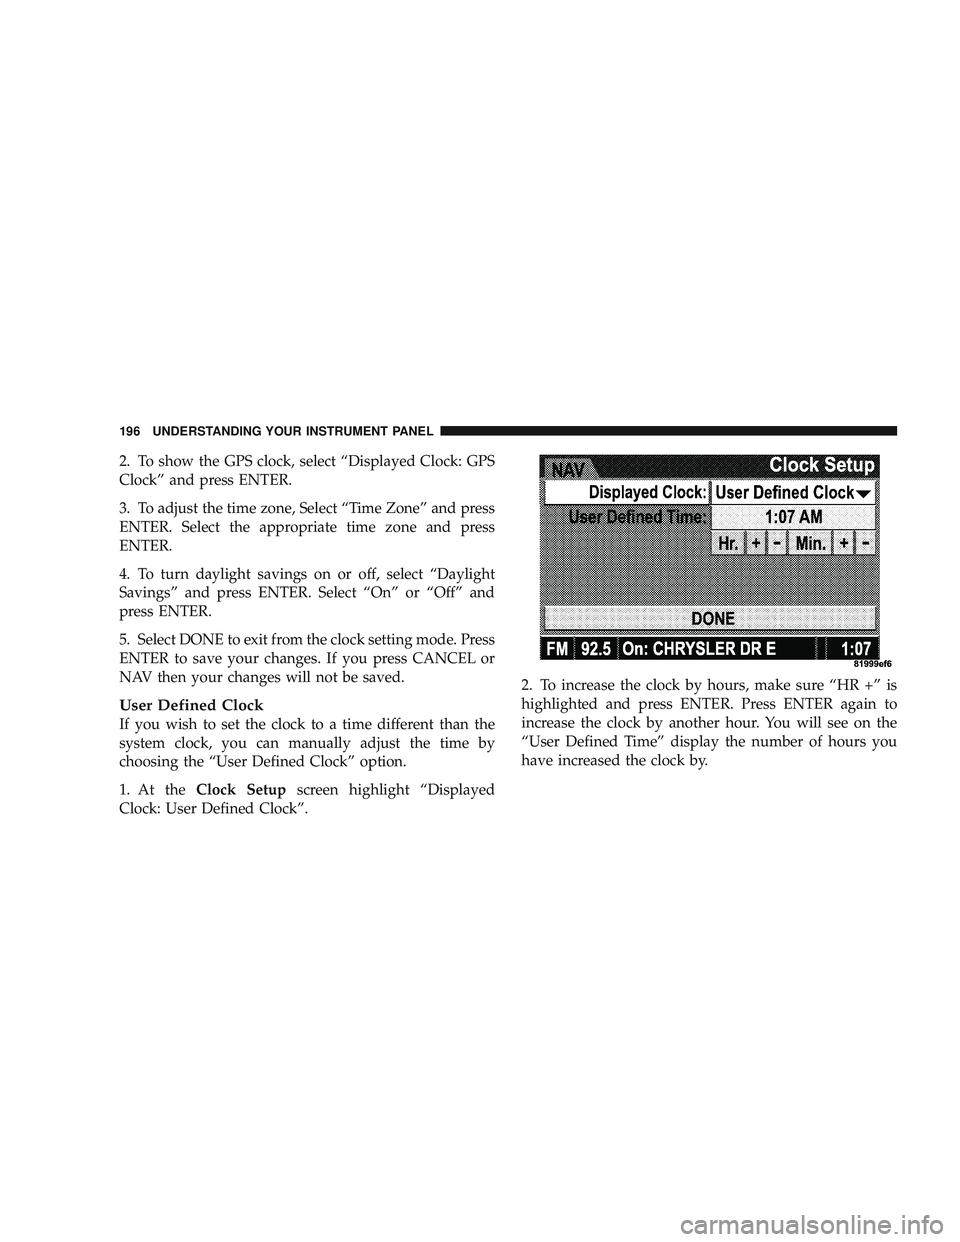
2. To show the GPS clock, select “Displayed Clock: GPS
Clock” and press ENTER.
3. To adjust the time zone, Select “Time Zone” and press
ENTER. Select the appropriate time zone and press
ENTER.
4. To turn daylight savings on or off, select “Daylight
Savings” and press ENTER. Select “On” or “Off” and
press ENTER.
5. Select DONE to exit from the clock setting mode. Press
ENTER to save your changes. If you press CANCEL or
NAV then your changes will not be saved.
User Defined Clock
If you wish to set the clock to a time different than the
system clock, you can manually adjust the time by
choosing the “User Defined Clock” option.
1. At theClock Setup screen highlight “Displayed
Clock: User Defined Clock”. 2. To increase the clock by hours, make sure “HR +” is
highlighted and press ENTER. Press ENTER again to
increase the clock by another hour. You will see on the
“User Defined Time” display the number of hours you
have increased the clock by.
196 UNDERSTANDING YOUR INSTRUMENT PANEL
Page 200 of 429
number 888-539-7474, or visit the Sirius web site at
www.sirius.com, or at www.siriuscanada.ca for Cana-
dian residents.
Electronic Serial Number/Sirius Identification
Number (ESN/SID)
Please have the following information available when
calling:
1. The Electronic Serial Number/Sirius Identification
Number (ESN/SID).
2. Your Vehicle Identification Number.
To access the ESN/SID, refer to the following procedure.
ESN/SID Access with REF Radios
With the ignition switch in the ACC position and the
radio OFF, press the CD Eject and TIME buttons simul-
taneously for three seconds. The first four digits of the
12-digit ESN/SID number will display. Press the SEEK
UP button to display the next four digits. Continue topress the SEEK UP button until all 12 ESN/SID digits
display. The SEEK DOWN will page down until the first
four digits display. The radio will exit the ESN/SID mode
when any other button is pushed, the ignition is turned
OFF, or five minutes have passed since any button was
pushed.
ESN/SID Access with RAQ and RAK Radios
With the ignition switch in the ACC position and the
radio OFF, press the CD Eject and TIME buttons simul-
taneously for three seconds. All twelve ESN/SID num-
bers will display. The radio will exit the ESN/SID mode
when any other button is pushed, the ignition is turned
OFF, or five minutes have passed since any button was
pushed.
ESN/SID Access with REC Navigation Radios
Please refer to your Navigation User’s Manual.
198 UNDERSTANDING YOUR INSTRUMENT PANEL
Page 201 of 429
With the ignition in the ACC position and the radio off,
press the CD Eject and SET buttons simultaneously until
the 12 digits of the ESN/SID appear on the screen.
Selecting Satellite Mode in REF, RAQ, And RAK
Radios
Selecting Satellite Mode — REF Radio
Press the MODE button repeatedly until the word\6SAT\6
appears in the display.
A CD may remain in the radio while in the Satellite radio
mode.
Selecting Satellite Mode — RAQ and RAK Radio
Press the MODE button repeatedly until the word \6SAT\6
appears in the display.
These radios will also display the current station name
and program type. For more information, such as song
title and artist, press the MSG or INFO button. A CD or tape may remain in the radio while in the
Satellite radio mode.
Selecting A Channel
Press and release the SEEK or TUNE knob to search for
the next channel. Press the top of the button to search up
and the bottom of the button to search down. Holding the
TUNE button causes the radio to bypass channels until
the button is released.
Press and release the SCAN button (if equipped) to
automatically change channels every seven seconds. The
radio will pause on each channel for seven seconds
before moving on to the next channel. The word
\6SCAN\6
will appear in the display between each channel change.
Press the SCAN button a second time to stop the search.
NOTE: Channels that may contain objectionable content
can be blocked. Contact Sirius Customer Care at 888-539-
7474 to discuss options for channel blocking or unblock-
ing. Please have your ESN/SID information available.
UNDERSTANDING YOUR INSTRUMENT PANEL 199
4
Page 203 of 429
Reception Quality
Satellite reception may be interrupted due to one of the
following reasons:
•The vehicle is parked in an underground parking
structure or under a physical obstacle.
•Dense tree coverage may interrupt reception.
•Driving under wide bridges or along tall buildings can
cause intermittent reception.
•Placing objects over or too close to the antenna can
cause signal blockage.
VIDEO ENTERTAINMENT SYSTEM™ (SALES
CODE XRV) — IF EQUIPPED
The optional Video Entertainment System (VES)™ con-
sists of a DVD player and LCD (liquid crystal display)
screen, a battery-powered remote control, and two head-
sets. The system is located in the headliner behind thefront row seat. Refer to your VES™ User’s Manual for
detailed operating instructions.
REMOTE SOUND SYSTEM CONTROLS — IF
EQUIPPED
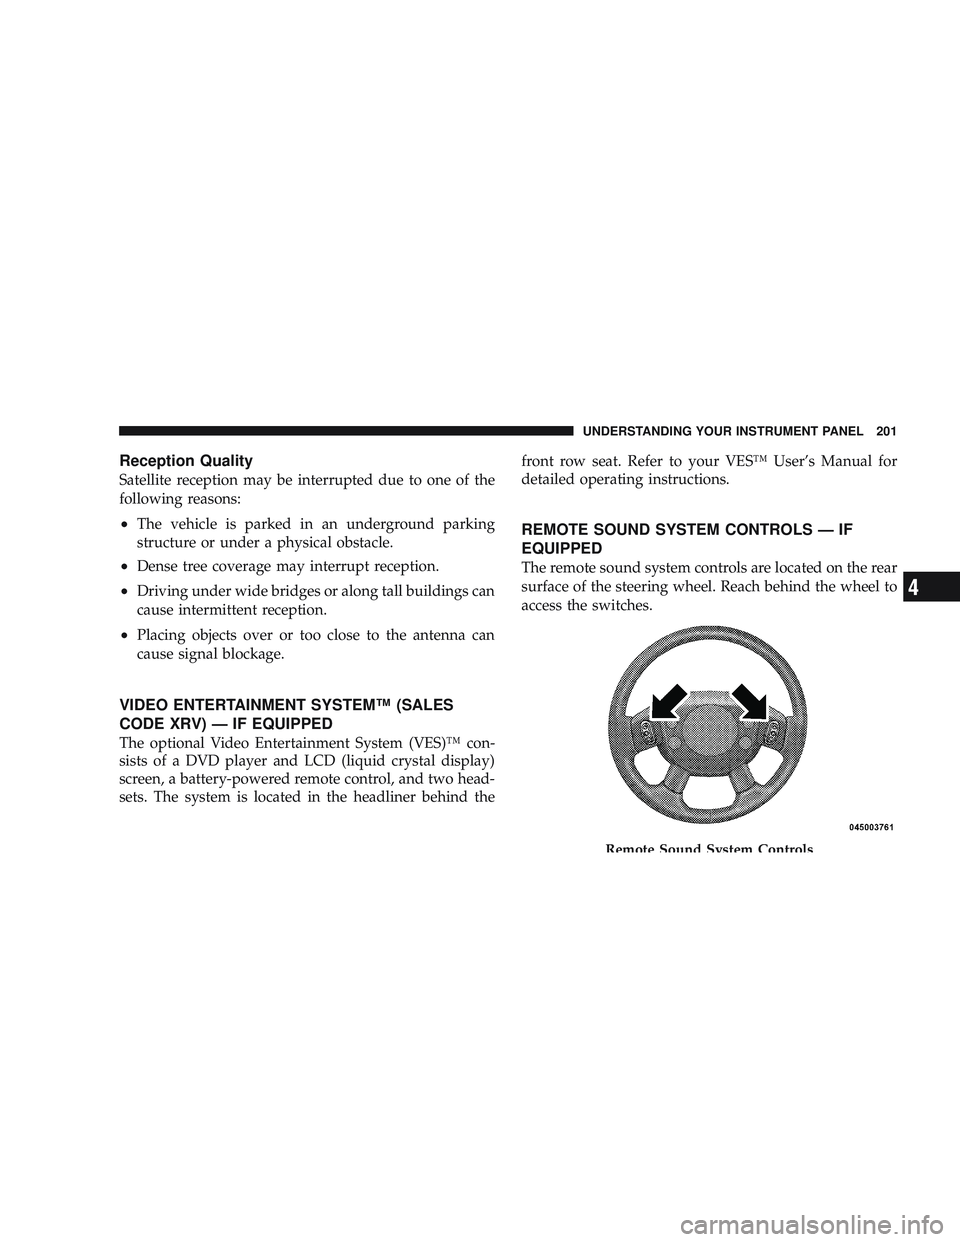
The remote sound system controls are located on the rear
surface of the steering wheel. Reach behind the wheel to
access the switches.
Remote Sound System Controls
UNDERSTANDING YOUR INSTRUMENT PANEL 201
4
Page 226 of 429
AUTOMATIC TRANSMISSION
CAUTION!
Damage to the transmission may occur if the follow-
ing precautions are not observed:
•Shift into PARK only after the vehicle has come to
a complete stop.
•Shift into or out of REVERSE only after the
vehicle has come to a complete stop and the engine
is at idle speed.
•Do not shift from REVERSE, PARK, or NEUTRAL
into any forward gear when the engine is above
idle speed.
•Before shifting into any gear, make sure your foot
is firmly on the brake pedal.
WARNING!
It is dangerous to move the shift lever out of PARK or
NEUTRAL if the engine speed is higher than idle
speed. If your foot is not firmly on the brake pedal,
the vehicle could accelerate quickly forward or in
reverse. You could lose control of the vehicle and hit
someone or something. Only shift into gear when the
engine is idling normally and when your right foot is
firmly on the brake pedal.
Automatic Transmission with Overdrive
The gear shift lever display located in the instrument
panel cluster indicates the transmission gear range (the
selector is illuminated for night driving). The shift lever is
mounted on the right side of the steering column. You
must depress the brake pedal to pull the shift lever out of
PARK position (Brake Interlock System). To drive, move
the shift lever from PARK or NEUTRAL to the desired
224 STARTING AND OPERATING
Page 288 of 429
WARNING!
•Never have any smoking materials lit in or near
the vehicle when the gas cap is removed or the
tank filled.
•Never add fuel to the vehicle when the engine is
running. This is in violation of most state and
federal fire regulations and will cause the MIL to
turn on.
NOTE: Tighten the gas cap 1/4 turn until you hear one
click. This is an indication that the cap is properly
tightened.
If the gas cap is not tightened properly, the Malfunction
Indicator Light will come on, Be sure the gas cap is
tightened every time the vehicle is refueled.
WARNING!
A fire may result if gasoline is pumped into a
portable container that is inside of a vehicle. You
could be burned. Always place gas containers on the
ground while filling.
Loose Fuel Filler Cap (Gas Cap) Message
If the vehicle’s diagnostic system determines that the fuel
filler cap in loose, improperly installed or damaged, a
GASCAP message will be displayed in the instrument
cluster. Tighten the gas cap until a “clicking” sound is
heard. This is an indication that the gas cap is properly
tightened. Press the odometer reset button to turn the
message off. If the problem persists, the message will
appear the next time the vehicle is started. This might
indicate a damaged cap. If the problem is detected twice
in a row, the system will turn on the MIL. Resolving the
problem will turn the MIL off.
286 STARTING AND OPERATING