buttons RAM CHASSIS CAB 2009 Owners Manual
[x] Cancel search | Manufacturer: RAM, Model Year: 2009, Model line: CHASSIS CAB, Model: RAM CHASSIS CAB 2009Pages: 429, PDF Size: 3.51 MB
Page 24 of 429
To Unlock the Doors
Press and release the UNLOCK button on the RKE
transmitter once to unlock only the driver’s door or twice
to unlock all the doors. When the UNLOCK button is
pressed, the illuminated entry will initiate, the parking
lights will flash on twice and, if installed, the cargo lamp
will turn on for 30 seconds.
The system can be programmed to unlock all the doors or
the driver’s door only upon the first UNLOCK button
press by using the following procedure:
1. Perform this operation while standing outside the
vehicle.
2. Press and hold the LOCK button on your RKE trans-
mitter.3. Continue to hold the LOCK button at least four
seconds, but no longer than 10 seconds, then press and
hold the UNLOCK button while still holding the LOCK
button.
4. Release both buttons at the same time.
5. This will allow you to unlock all doors on the first
press of the UNLOCK button.
6. To reactivate this feature, repeat the above steps.
To Lock the Doors
Press and release the LOCK button on the RKE transmit-
ter to lock all doors. If the ignition is OFF, when the doors
are locked, the parking lights will flash on once and the
horn will chirp once.
22 THINGS TO KNOW BEFORE STARTING YOUR VEHICLE
Page 25 of 429
The Horn Chirp feature is activated when shipped from
the assembly plant. If desired, this feature can be disabled
by using the following procedure:
1. Perform this operation while standing outside the
vehicle.
2. Press and hold the LOCK button on a programmed
(i.e., functional) RKE transmitter.
3. Continue to hold the LOCK button, wait at least four
seconds, but no longer than 10 seconds, then press and
hold the PANIC button. Release both buttons at the same
time.
4. To reactivate this feature, repeat the above steps.
This vehicle is shipped from the assembly plant with the
park lamp flash feature activated. If desired, this feature
can be disabled by using the following procedure:1. Perform this operation while standing outside the
vehicle.
2. Press and hold the UNLOCK button on a programmed
(i.e., functional) RKE transmitter.
3. Continue to hold the UNLOCK button, wait at least
four seconds, but no longer than 10 seconds, then press
and hold the LOCK button. Release both buttons at the
same time.
4. To reactivate this feature, repeat the above steps.
Using the Panic Alarm
To activate the Panic Mode while the ignition is OFF,
press and release the PANIC button on the RKE trans-
mitter once. When the Panic Mode is activated, the
interior lights will illuminate, the headlights and parking
lights will flash, and the horn will sound.
THINGS TO KNOW BEFORE STARTING YOUR VEHICLE 23
2
Page 27 of 429
RKE Transmitter Battery Service
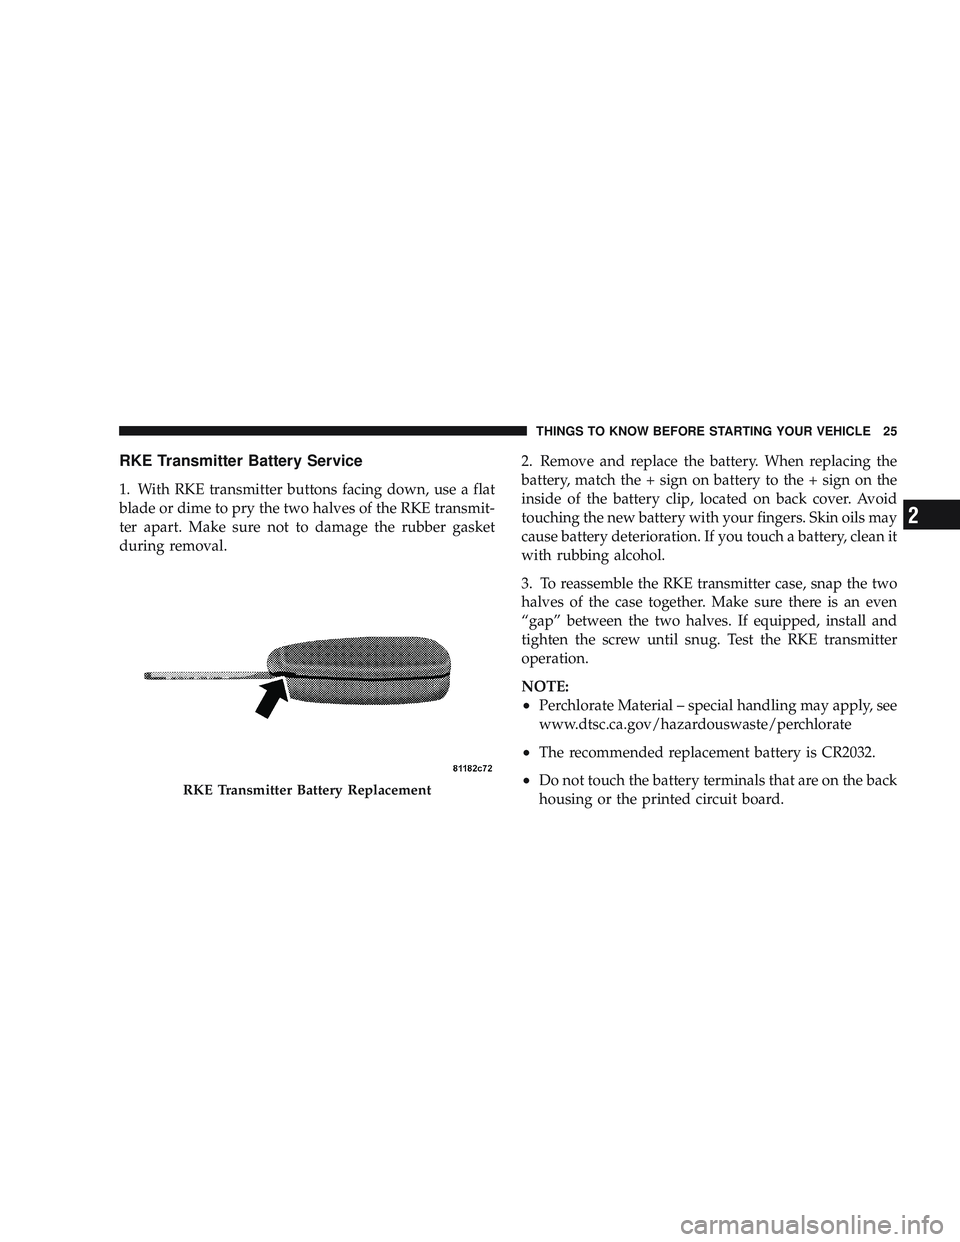
1. With RKE transmitter buttons facing down, use a flat
blade or dime to pry the two halves of the RKE transmit-
ter apart. Make sure not to damage the rubber gasket
during removal.2. Remove and replace the battery. When replacing the
battery, match the + sign on battery to the + sign on the
inside of the battery clip, located on back cover. Avoid
touching the new battery with your fingers. Skin oils may
cause battery deterioration. If you touch a battery, clean it
with rubbing alcohol.
3. To reassemble the RKE transmitter case, snap the two
halves of the case together. Make sure there is an even
“gap” between the two halves. If equipped, install and
tighten the screw until snug. Test the RKE transmitter
operation.
NOTE:
•Perchlorate Material – special handling may apply, see
www.dtsc.ca.gov/hazardouswaste/perchlorate
•The recommended replacement battery is CR2032.
•Do not touch the battery terminals that are on the back
housing or the printed circuit board.RKE Transmitter Battery Replacement
THINGS TO KNOW BEFORE STARTING YOUR VEHICLE 25
2
Page 89 of 429
The UConnect\3system is driven through your
Bluetooth\3 “Hands-Free Profile” cellular phone.
UConnect\3 features Bluetooth\3 technology - the global
standard that enables different electronic devices to con-
nect to each other without wires or a docking station, so
UConnect\3 works no matter where you stow your cellu-
lar phone (be it your purse, pocket, or briefcase), as long
as your phone is turned on and has been paired to the
vehicle’s UConnect\3 system. The UConnect\3 system
allows up to seven cellular phones to be linked to the
system. Only one linked (or paired) cellular phone can be
used with the system at a time. The system is available in
English, Spanish, or French languages.
Phone Button The rearview mirror contains the microphone
for the system (depending on the type of
mirror and radio equipped), and either the radio or the mirror has the two control buttons (PHONE
Button and VOICE RECOGNITION button) that will
enable you to access the system.
Voice Recognition Button
Actual button location may vary with the ra-
dio. The individual buttons are described in the
“Operation” section.
The UConnect\3 system can be used with any Hands-Free
Profile certified Bluetooth\3 cellular phone. See the
UConnect\3 website for supported phones. If your cellu-
lar phone supports a different profile (e.g., Headset
Profile) you may not be able to use any UConnect \3
features. Refer to your cellular service provider or the
phone manufacturer for details.
UNDERSTANDING THE FEATURES OF YOUR VEHICLE 87
3
Page 135 of 429
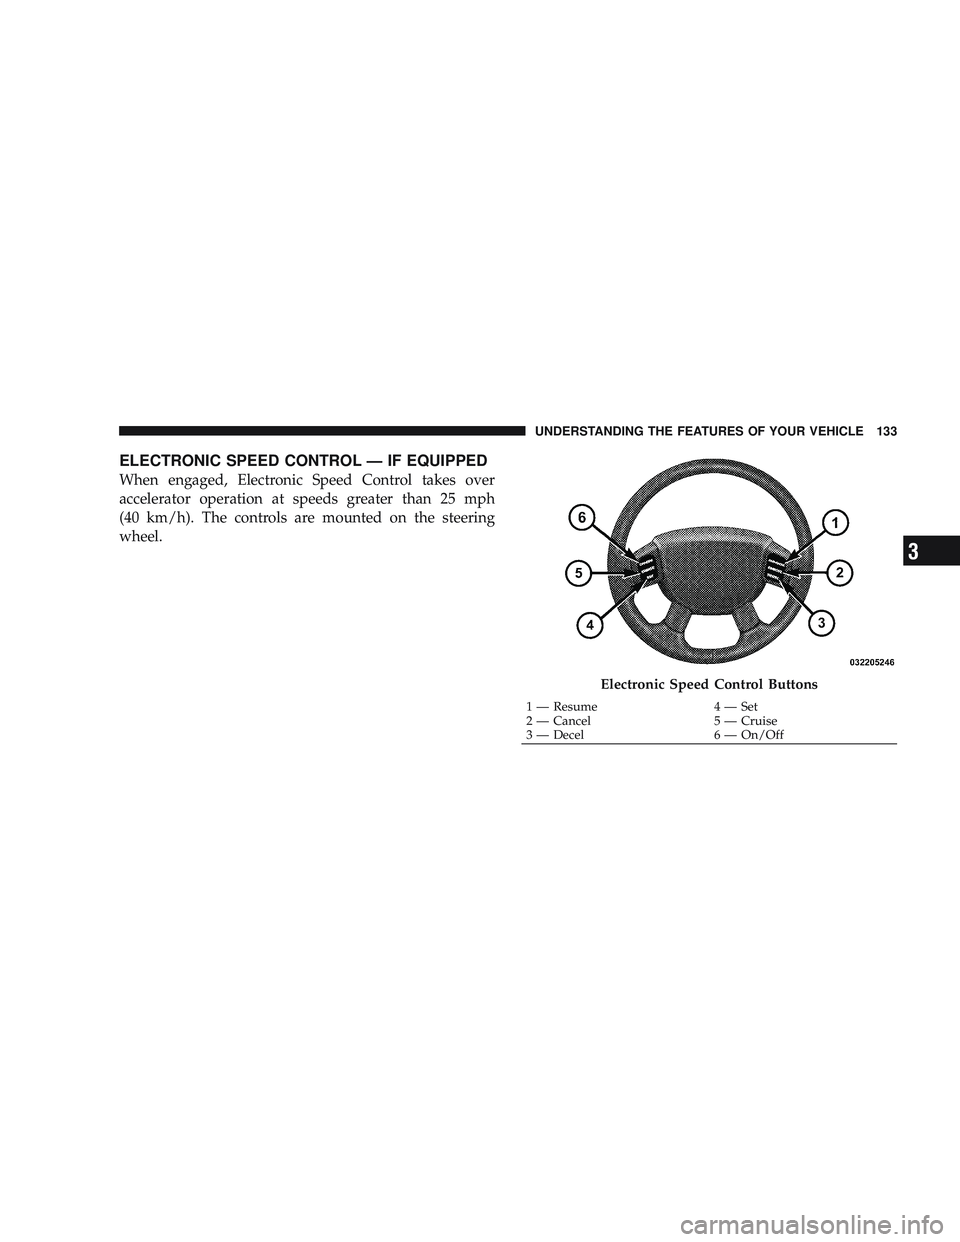
ELECTRONIC SPEED CONTROL — IF EQUIPPED
When engaged, Electronic Speed Control takes over
accelerator operation at speeds greater than 25 mph
(40 km/h). The controls are mounted on the steering
wheel.
Electronic Speed Control Buttons
1 — Resume4 — Set
2 — Cancel 5 — Cruise
3 — Decel 6 — On/Off
UNDERSTANDING THE FEATURES OF YOUR VEHICLE 133
3
Page 136 of 429
NOTE:The Electronic Speed Control system has been
designed to shut down if multiple speed control switch
buttons (i.e., SET and CANCEL) are operated simulta-
neously, in order to ensure proper operation. The system
can be reactivated by pushing the Electronic Speed
Control switch ON/OFF button and reestablishing the
desired vehicle SET speed.
To Activate
Push the ON/OFF button to the ON position. An indi-
cator light in the instrument cluster illuminates when the
system is on.
To Set At A Desired Speed
When the vehicle has reached the desired speed, press
and release the SET button. Release the accelerator and
the vehicle will operate at the selected speed.
To Deactivate
A soft tap on the brake pedal, normal braking, clutch
pressure while slowing the vehicle, or pressing the CAN-
CEL button will deactivate the Electronic Speed Control
without erasing the memory. Pushing the ON/OFF but-
ton to the OFF position or turning off the ignition erases
the memory.
WARNING!
Leaving the Electronic Speed Control on when not in
use is dangerous. You could accidentally set the
system to cause it to go faster than you want. You
could lose control and have an accident. Always
leave the system off when you are not using it.
134 UNDERSTANDING THE FEATURES OF YOUR VEHICLE
Page 180 of 429
By pressing the SEEK button when the PTY icon is
displayed, the radio will be tuned to the next frequency
station with the same selected PTY name. The PTY
function only operates when in the FM mode.
If a preset button is activated while in the PTY (Program
Type) mode, the PTY mode will be exited and the radio
will tune to the preset station.
SET/DIR Button (Radio Mode) — To Set the
Push-Button Memory
When you are receiving a station that you wish to
commit to push-button memory, press the SET/DIR
button. The symbol SET 1 will now show in the display
window. Select the button (1-6) you wish to lock onto this
station and press and release that button. If a button is
not selected within 5 seconds after pressing the SET/DIR
button, the station will continue to play but will not be
stored into push-button memory.You may add a second station to each push-button by
repeating the above procedure with this exception: Press
the SET/DIR button twice and SET 2 will show in the
display window. Each button can be set for SET 1 and
SET 2 in both AM and FM. This allows a total of 12 AM,
12 FM and 12 Satellite (if equipped) stations to be stored
into push-button memory. The stations stored in SET 2
memory can be selected by pressing the push-button
twice.
Every time a preset button is used a corresponding
button number will be displayed.
Buttons1-6(Radio Mode)
These buttons tune the Radio to the stations that you
commit to push-button memory {12 AM, 12 FM, and 12
Satellite (if equipped) stations}.
178 UNDERSTANDING YOUR INSTRUMENT PANEL
Page 184 of 429
RND/PTY Button (Random Play Button) (CD
MODE for CD Audio Play)
Press this button while the CD is playing to activate
Random Play. This feature plays the selections on the
compact disc in random order to provide an interesting
change of pace.
Press the SEEK button to move to the next randomly
selected track.
Press and hold the FF button to fast forward through the
tracks. Release the FF button to stop the fast forward
feature.
Press the RND button a second time to stop Random
Play.
Buttons1-6(CDMODEforCDAudio Play)
Selects disc positions 1 - 6 for Play/Load/Eject.
Notes On Playing MP3 Files
The radio can play MP3 files, however, acceptable MP3 file
recording media and formats are limited. When writing
MP3 files, pay attention to the following restrictions.
Supported Media (Disc Types)
The MP3 file recording media supported by the radio are
CD-ROM, CD-R and CD-RW.
Supported Medium Formats (File Systems)
The medium formats supported by the radio are ISO 9660
Level 1 and Level 2 and includes the Joliet extension.
When reading discs recorded using formats other than
ISO 9660 Level 1 and Level 2, the radio may fail to read
files properly and may be unable to play the file nor-
mally. UDF and Apple HFS formats are not supported.
The radio uses the following limits for file systems:
•Maximum number of directory levels: 15
•Maximum number of files: 255
182 UNDERSTANDING YOUR INSTRUMENT PANEL
Page 188 of 429
Press and hold the MSG or INFO button while in the
message display priority mode or elapsed time display
priority mode will display the song title for each file.
RW/FF (CD Mode for MP3 Play)
Press the FF side of the button to move forward through
the MP3 selection.
TUNE Control (CD Mode for MP3 Play)
Pressing the TUNE Control allows the adjustment of
Tone, Balance, and Fade.
AM/FM Button (CD Mode for MP3 Play)
Switches back to Radio mode.
RND/ PTY Button (CD Mode for MP3 Play)
Pressing this button plays files randomly.
SET/DIR Button (CD Mode for MP3 Play)
Press the SET/DIR Button to display folders, when
playing an MP3 discs that have a file/folder structure.Turn the TUNE control to display available folders or
move through available folders. Press the TUNE control
to select a folder.
Buttons1-6(CDModeforMP3Play)
Selects disc positions 1 - 6 for Play/Load/Eject.
Operating Instructions - Hands Free Phone (If
Equipped)
Refer to Hands Free Phone in Section 3 of the Owner’s
Manual.
Operating Instructions - Satellite Radio Mode (If
Equipped)
Refer to the Satellite Radio section of the Owner’s
Manual.
Operating Instructions - Video Entertainment
System (VES)™ (If Equipped)
Refer to separate Video Entertainment System (VES)™
Guide.
186 UNDERSTANDING YOUR INSTRUMENT PANEL
Page 192 of 429
Press the rotary TUNE control a fourth time and BAL will
display. Turn the TUNE control to the right or left to
adjust the sound level from the right or left side speakers.
Press the rotary TUNE control a fifth time and FADE will
display. Turn the TUNE control to the left or right to
adjust the sound level between the front and rear speak-
ers.
Press the tune control again or wait five seconds to exit
setting tone, balance, and fade.
RND/SET Button (Radio Mode) To Set The
Pushbutton Memory
When you are receiving a station that you wish to
commit to pushbutton memory, press the SET button.
The symbol SET 1 will now show in the display window.
Select the button (1-6) you wish to lock onto this station
and press and release that button. If a button is notselected within five seconds after pressing the SET but-
ton, the station will continue to play but will not be
stored into pushbutton memory.
You may add a second station to each pushbutton by
repeating the above procedure with this exception: Press
the SET button twice and SET 2 will show in the display
window. Each button can be set for SET 1 and SET 2 in
both AM and FM. This allows a total of 12 AM, 12 FM,
and 12 Satellite (if equipped) stations to be stored into
pushbutton memory. The stations stored in SET 2
memory can be selected by pressing the pushbutton
twice.
Every time a preset button is used, a corresponding
button number will display.
Preset Buttons1-6(Radio Mode)
These buttons tune the Radio to the stations that you
commit to pushbutton memory, 12 AM, 12 FM, and 12
Satellite (if equipped) stations.
190 UNDERSTANDING YOUR INSTRUMENT PANEL