warning RAM CHASSIS CAB 2017 Owners Manual
[x] Cancel search | Manufacturer: RAM, Model Year: 2017, Model line: CHASSIS CAB, Model: RAM CHASSIS CAB 2017Pages: 536, PDF Size: 5.67 MB
Page 207 of 536

WARNING!A malfunctioning catalytic converter, as referenced
above, can reach higher temperatures than in normal
operating conditions. This can cause a fire if you drive
slowly or park over flammable substances such as dry
plants, wood, cardboard, etc. This could result in death
or serious injury to the driver, occupants or others. CAUTION!Prolonged driving with the Malfunction Indicator
Light (MIL) on could cause damage to the engine
control system. It also could affect fuel economy and
driveability. If the MIL is flashing, severe catalytic
converter damage and power loss will soon occur.
Immediate service is required. 4UNDERSTANDING YOUR INSTRUMENT PANEL 205
Page 210 of 536

Tire Pressure Monitoring Indicator Light
Yellow Telltale
Light What It Means
Tire Pressure Monitoring Indicator Light
The warning light switches on and a message is displayed to indicate that the tire pressure is
lower than the recommended value and/or that slow pressure loss is occurring. In these cases,
optimal tire duration and fuel consumption may not be guaranteed.
Should one or more tires be in the condition mentioned above, the display will show the indica-
tions corresponding to each tire in sequence.
CAUTION!Do not continue driving with one or more flat tires as
handling may be compromised. Stop the vehicle,
avoiding sharp braking and steering. Repair immedi-
ately using the dedicated tire repair kit and contact
your authorized dealership as soon as possible.
Each tire, including the spare (if provided), should be
checked monthly when cold and inflated to the inflation
pressure recommended by the vehicle manufacturer on the
vehicle placard or tire inflation pressure label. If your
vehicle has tires of a different size than the size indicated on the vehicle placard or tire inflation pressure label, you
should determine the proper tire inflation pressure for
those tires.
As an added safety feature, your vehicle has been
equipped with a Tire Pressure Monitoring System (TPMS)
that illuminates a low tire pressure telltale when one or
more of your tires is significantly under-inflated. Accord-
ingly, when the low tire pressure telltale illuminates, you
should stop and check your tires as soon as possible and
inflate them to the proper pressure. Driving on a signifi-
cantly under-inflated tire causes the tire to overheat and
can lead to tire failure. Under-inflation also reduces fuel
efficiency and tire tread life, and may affect the vehicle’s
handling and stopping ability.208 UNDERSTANDING YOUR INSTRUMENT PANEL
Page 211 of 536

Please note that the TPMS is not a substitute for proper tire
maintenance, and it is the driver ’s responsibility to main-
tain correct tire pressure, even if under-inflation has not
reached the level to trigger illumination of the TPMS low
tire pressure telltale.
Your vehicle has also been equipped with a TPMS malfunc-
tion indicator to indicate when the system is not operating
properly. The TPMS malfunction indicator is combined
with the low tire pressure telltale. When the system detects
a malfunction, the telltale will flash for approximately one
minute and then remain continuously illuminated. This
sequence will continue upon subsequent vehicle start-ups
as long as the malfunction exists. When the malfunction
indicator is illuminated, the system may not be able to
detect or signal low tire pressure as intended. TPMS
malfunctions may occur for a variety of reasons, including
the installation of replacement or alternate tires or wheels
on the vehicle that prevent the TPMS from functioning
properly. Always check the TPMS malfunction telltale after
replacing one or more tires or wheels on your vehicle, to
ensure that the replacement or alternate tires and wheels
allow the TPMS to continue to function properly. CAUTION!The TPMS has been optimized for the original equip-
ment tires and wheels. TPMS pressures and warning
have been established for the tire size equipped on
your vehicle. Undesirable system operation or sensor
damage may result when using replacement equip-
ment that is not of the same size, type, and/or style.
Aftermarket wheels can cause sensor damage. Using
aftermarket tire sealants may cause the Tire Pressure
Monitoring System (TPMS) sensor to become inoper-
able. After using an aftermarket tire sealant it is
recommended that you take your vehicle to an autho-
rized dealership to have your sensor function checked. 4UNDERSTANDING YOUR INSTRUMENT PANEL 209
Page 212 of 536
Low Fuel Indicator Light
Yellow Telltale
Light What It Means
Low Fuel Indicator Light
When the fuel level reaches approximately 3.0 gal (11.0 L) this light will turn on, and remain on
until fuel is added.
Anti-Lock Brake (ABS) Indicator Light
Yellow Telltale
Light What It Means
Anti-Lock Brake (ABS) Indicator Light
After the ignition is turned on, the Anti-Lock Brake System (ABS) light illuminates to indicate
function check at vehicle startup. If the light remains on after startup or comes on and stays on at
road speeds, it may indicate that the ABS has detected a malfunction or has become inoperative.
The system reverts to standard non-anti-lock brakes.
If both the Brake Warning Light and the ABS Warning Light are on, see an authorized dealer im-
mediately. Refer to “Anti-Lock Brake System” in “Starting And Operating” for further informa-
tion.210 UNDERSTANDING YOUR INSTRUMENT PANEL
Page 213 of 536
Transmission Temperature Indicator Light
Yellow Telltale
Light What It Means
Transmission Temperature Indicator Light
This light indicates that the transmission fluid temperature is running hot. This may occur with
severe usage, such as trailer towing. If this light turns on, safely pull over and stop the vehicle.
Then, shift the transmission into NEUTRAL and run the engine at idle or faster until the light
turns off.
WARNING!If you continue operating the vehicle when the Trans-
mission Temperature Warning Light is illuminated you
could cause the fluid to boil over, come in contact with
hot engine or exhaust components and cause a fire. CAUTION!Continuous driving with the Transmission Tempera-
ture Warning Light illuminated will eventually cause
severe transmission damage or transmission failure. 4UNDERSTANDING YOUR INSTRUMENT PANEL 211
Page 220 of 536
Cruise Control SET Indicator Light — If Equipped
White Telltale
Light What It Means
Cruise Control SET Indicator Light
This light will turn on when the speed control is set. Refer to “Speed Control” in “Understanding
The Features Of Your Vehicle” for further information.
INSTRUMENT CLUSTER DISPLAY
Your vehicle may be equipped with an instrument cluster
display, which offers useful information to the driver. With
the ignition in the STOP/OFF position, opening/closing of
a door will activate the display for viewing, and display
the total miles (kilometers) in the odometer. Your instru-
ment cluster display is designed to display important
information about your vehicle’s systems and features.
Using a driver interactive display located on the instru-
ment panel, your instrument cluster display can show you
how systems are working and give you warnings when
they aren’t. The steering wheel mounted controls allow
you to scroll through and enter the main menus and
submenus. You can access the specific information you
want and make selections and adjustments. Instrument Cluster Display Controls
The instrument cluster display features a driver-interactive
display that is located in the instrument cluster.
Base Instrument Cluster Display218 UNDERSTANDING YOUR INSTRUMENT PANEL
Page 224 of 536
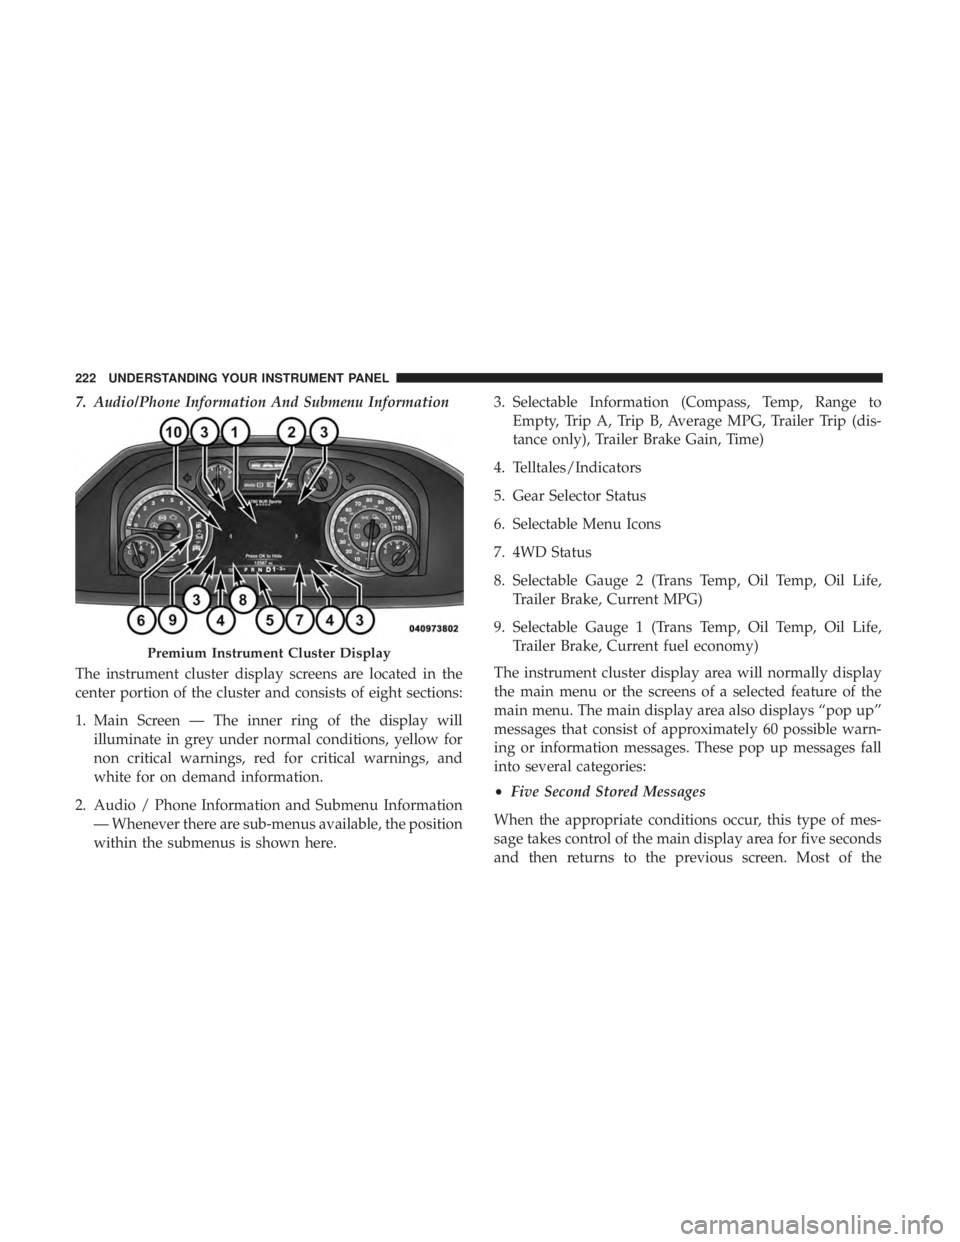
7. Audio/Phone Information And Submenu Information
The instrument cluster display screens are located in the
center portion of the cluster and consists of eight sections:
1. Main Screen — The inner ring of the display will
illuminate in grey under normal conditions, yellow for
non critical warnings, red for critical warnings, and
white for on demand information.
2. Audio / Phone Information and Submenu Information
— Whenever there are sub-menus available, the position
within the submenus is shown here. 3. Selectable Information (Compass, Temp, Range to
Empty, Trip A, Trip B, Average MPG, Trailer Trip (dis-
tance only), Trailer Brake Gain, Time)
4. Telltales/Indicators
5. Gear Selector Status
6. Selectable Menu Icons
7. 4WD Status
8. Selectable Gauge 2 (Trans Temp, Oil Temp, Oil Life,
Trailer Brake, Current MPG)
9. Selectable Gauge 1 (Trans Temp, Oil Temp, Oil Life,
Trailer Brake, Current fuel economy)
The instrument cluster display area will normally display
the main menu or the screens of a selected feature of the
main menu. The main display area also displays “pop up”
messages that consist of approximately 60 possible warn-
ing or information messages. These pop up messages fall
into several categories:
• Five Second Stored Messages
When the appropriate conditions occur, this type of mes-
sage takes control of the main display area for five seconds
and then returns to the previous screen. Most of thePremium Instrument Cluster Display222 UNDERSTANDING YOUR INSTRUMENT PANEL
Page 228 of 536
Audio
Push and release the up or down arrow button until the
Audio display icon is highlighted in the instrument cluster
display. Push and release the right arrow button to display
the active source.
Stored Messages
Push and release the up or down arrow button
until the Messages Menu item is highlighted.
This feature shows the number of stored warning
messages. Pushing the right arrow button will
allow you to see what the stored messages are.
When no messages are present, main menu icon will be a
closed envelope.
Screen Setup Menu Item
Push and release the up or down arrow button until the
Screen Setup menu item is highlighted in the instrument
cluster display. Push and release the right arrow button to
enter the Screen Setup submenu. The Screen Setup feature
allows you to change what information is displayed in the
instrument cluster as well as the location that information
is displayed. Vehicle Settings Menu Item
Personal Settings allows the driver to set and recall features
when the transmission is in PARK.
Push and release the up and down button until Settings
displays in the instrument cluster display.
Follow the prompts to display and set any of the following
Vehicle Settings.
NOTE: Your vehicle may be equipped with the following
settings.
• If equipped with a base radio (Non-Touchscreen) Vehicle
Settings will be included in the instrument cluster dis-
play.
• If equipped with a Touchscreen radio, the Vehicle Set-
tings will be included in the radio head unit.226 UNDERSTANDING YOUR INSTRUMENT PANEL
Page 233 of 536
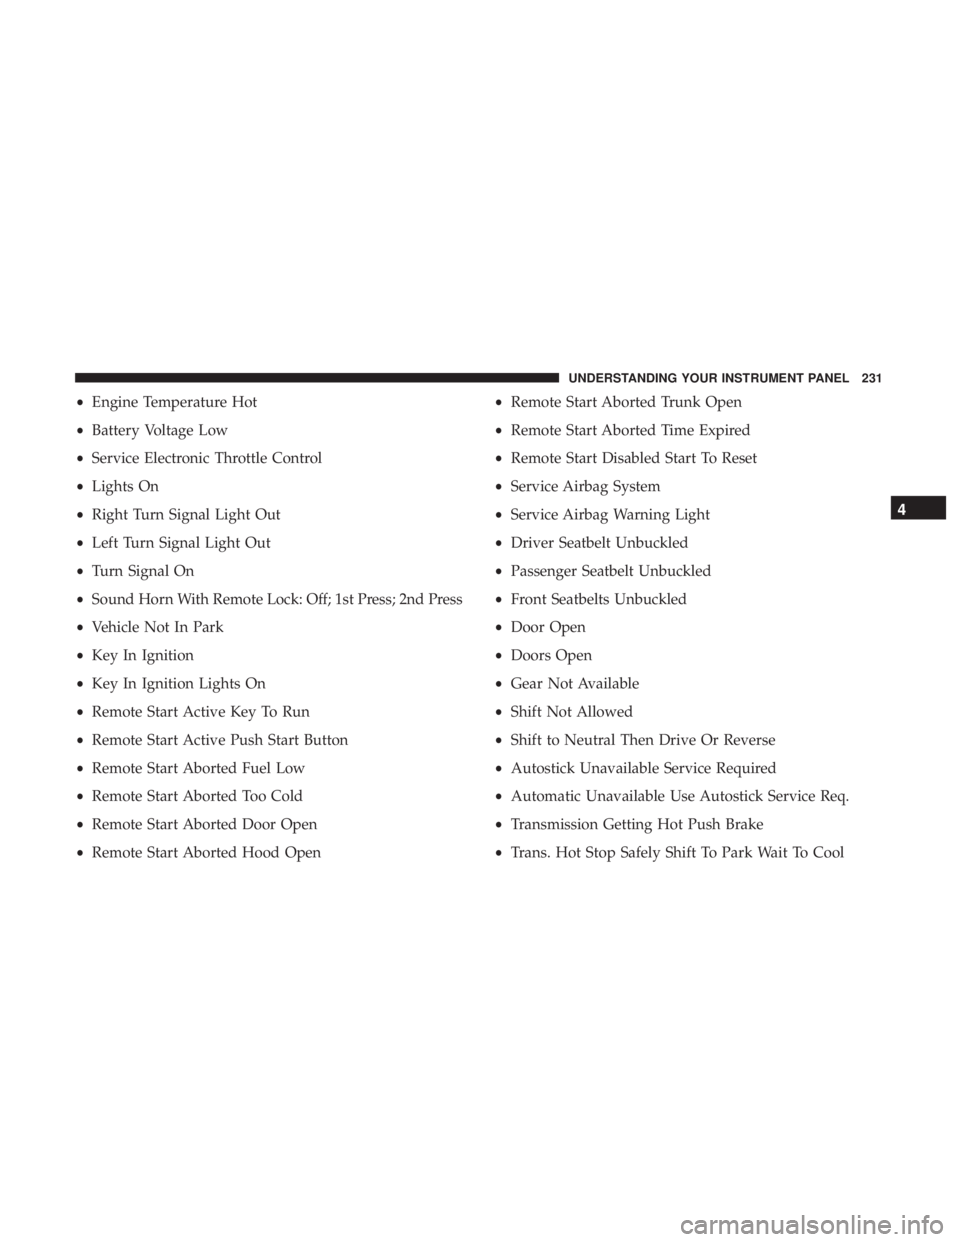
• Engine Temperature Hot
• Battery Voltage Low
• Service Electronic Throttle Control
• Lights On
• Right Turn Signal Light Out
• Left Turn Signal Light Out
• Turn Signal On
• Sound Horn With Remote Lock: Off; 1st Press; 2nd Press
• Vehicle Not In Park
• Key In Ignition
• Key In Ignition Lights On
• Remote Start Active Key To Run
• Remote Start Active Push Start Button
• Remote Start Aborted Fuel Low
• Remote Start Aborted Too Cold
• Remote Start Aborted Door Open
• Remote Start Aborted Hood Open • Remote Start Aborted Trunk Open
• Remote Start Aborted Time Expired
• Remote Start Disabled Start To Reset
• Service Airbag System
• Service Airbag Warning Light
• Driver Seatbelt Unbuckled
• Passenger Seatbelt Unbuckled
• Front Seatbelts Unbuckled
• Door Open
• Doors Open
• Gear Not Available
• Shift Not Allowed
• Shift to Neutral Then Drive Or Reverse
• Autostick Unavailable Service Required
• Automatic Unavailable Use Autostick Service Req.
• Transmission Getting Hot Push Brake
• Trans. Hot Stop Safely Shift To Park Wait To Cool 4UNDERSTANDING YOUR INSTRUMENT PANEL 231
Page 234 of 536
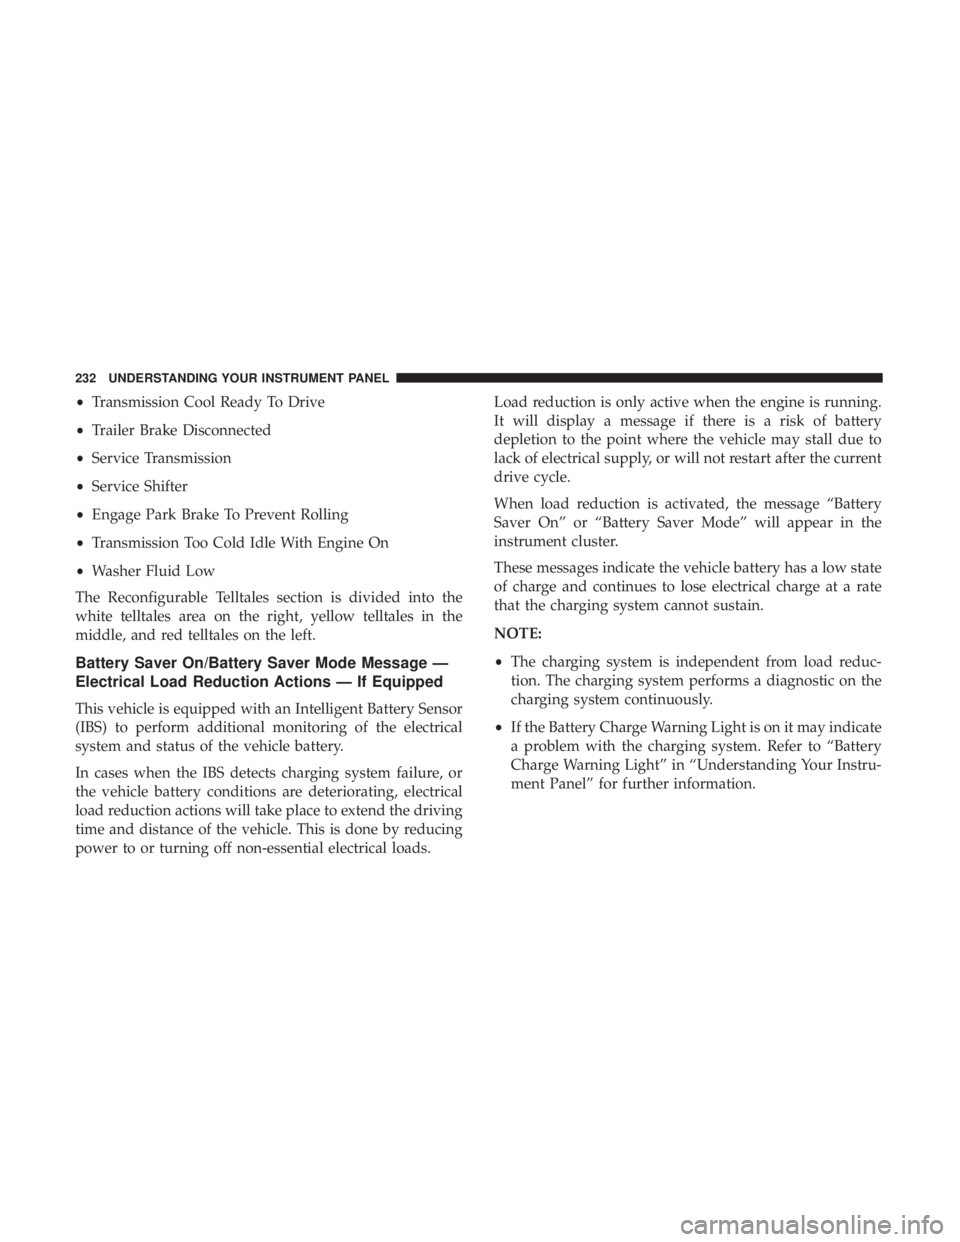
• Transmission Cool Ready To Drive
• Trailer Brake Disconnected
• Service Transmission
• Service Shifter
• Engage Park Brake To Prevent Rolling
• Transmission Too Cold Idle With Engine On
• Washer Fluid Low
The Reconfigurable Telltales section is divided into the
white telltales area on the right, yellow telltales in the
middle, and red telltales on the left.
Battery Saver On/Battery Saver Mode Message —
Electrical Load Reduction Actions — If Equipped
This vehicle is equipped with an Intelligent Battery Sensor
(IBS) to perform additional monitoring of the electrical
system and status of the vehicle battery.
In cases when the IBS detects charging system failure, or
the vehicle battery conditions are deteriorating, electrical
load reduction actions will take place to extend the driving
time and distance of the vehicle. This is done by reducing
power to or turning off non-essential electrical loads. Load reduction is only active when the engine is running.
It will display a message if there is a risk of battery
depletion to the point where the vehicle may stall due to
lack of electrical supply, or will not restart after the current
drive cycle.
When load reduction is activated, the message “Battery
Saver On” or “Battery Saver Mode” will appear in the
instrument cluster.
These messages indicate the vehicle battery has a low state
of charge and continues to lose electrical charge at a rate
that the charging system cannot sustain.
NOTE:
• The charging system is independent from load reduc-
tion. The charging system performs a diagnostic on the
charging system continuously.
• If the Battery Charge Warning Light is on it may indicate
a problem with the charging system. Refer to “Battery
Charge Warning Light” in “Understanding Your Instru-
ment Panel” for further information.232 UNDERSTANDING YOUR INSTRUMENT PANEL