remote start RAM CHASSIS CAB 2017 Owner's Manual
[x] Cancel search | Manufacturer: RAM, Model Year: 2017, Model line: CHASSIS CAB, Model: RAM CHASSIS CAB 2017Pages: 536, PDF Size: 5.67 MB
Page 140 of 536

CAUTION!Do not place any article under the adjustable pedals or
impede its ability to move as it may cause damage to
the pedal controls. Pedal travel may become limited if
movement is stopped by an obstruction in the adjust-
able pedal’s path.
HEATED STEERING WHEEL — IF EQUIPPED
The steering wheel contains a heating element that helps
warm your hands in cold weather. The heated steering
wheel has only one temperature setting. Once the heated
steering wheel has been turned on, it will operate for an
average of 80 minutes before automatically shutting off.
This time may vary based on the temperature of the
surrounding environment or the heated steering wheel
may not turn on when it is already warm.
The heated steering wheel control button is located on the
center of the instrument panel below the climate controls.
If your vehicle is equipped with a touchscreen, the heated
steering wheel control button is located within the climate
or controls screen of the touchscreen. • Press the heated steering wheel button once to turn
the heating element On.
• Press the heated steering wheel button a second time
to turn the heating element Off.
NOTE: The engine must be running for the heated steering
wheel to operate.
Vehicles Equipped With Remote Start
On models that are equipped with remote start, the heated
steering wheel can be programmed to come on during a
remote start.
If your vehicle is equipped with a touchscreen, this feature
can be programmed through the Uconnect system. Refer to
“Uconnect Settings” in “Understanding Your Instrument
Panel” for further information.
If your vehicle is not equipped with a touchscreen, this
feature can be programmed through the instrument cluster
display. Refer to “Instrument Cluster Display” in “Under-
standing Your Instrument Panel” for further information.138 UNDERSTANDING THE FEATURES OF YOUR VEHICLE
Page 225 of 536
messages of this type are then stored (as long as the
condition that activated it remains active) and can be
reviewed from the “Messages” main menu item. As long as
there is a stored message, an “i” will be displayed in the
instrument cluster display’s compass/outside temp line.
Examples of this message type are “Right Front Turn Signal
Lamp Out” and “Low Tire Pressure.”
• Unstored Messages
This message type is displayed indefinitely or until the
condition that activated the message is cleared. Examples
of this message type are “Turn Signal On” (if a turn signal
is left on) and “Lights On” (if driver leaves the vehicle).
• Unstored Messages Until RUN
These messages deal primarily with the Remote Start
feature. This message type is displayed until the ignition is
in the RUN state. Examples of this message type are
“Remote Start Aborted - Door Ajar” and “Press Brake
Pedal and Push Button to Start.”
• Five Second Unstored Messages
When the appropriate conditions occur, this type of mes-
sage takes control of the main display area for five seconds
and then returns to the previous screen. An example of this
message type is “Automatic High Beams On.” Oil Life Reset
Your vehicle is equipped with an engine oil change indi-
cator system. The “Oil Change Required” message will
display in the instrument cluster display after a single
chime has sounded, to indicate the next scheduled oil
change interval. The engine oil change indicator system is
duty cycle based, which means the engine oil change
interval may fluctuate, dependent upon your personal
driving style.
NOTE: Use the steering wheel instrument cluster display
controls for the following procedure(s).
Vehicles Equipped With Passive Entry
1. Without pushing the brake pedal, push the ENGINE
START/STOP button and place the ignition to the
ON/RUN position (do not start the engine).
2. Push and release the down arrow button to scroll
downward through the main menu to “Vehicle Info.”
3. Push and release the right arrow button to access the
”Vehicle Info” screen, then scroll up or down to select
“Oil Life.”
4. Push and hold the right arrow button to select “Reset”. 4UNDERSTANDING YOUR INSTRUMENT PANEL 223
Page 230 of 536
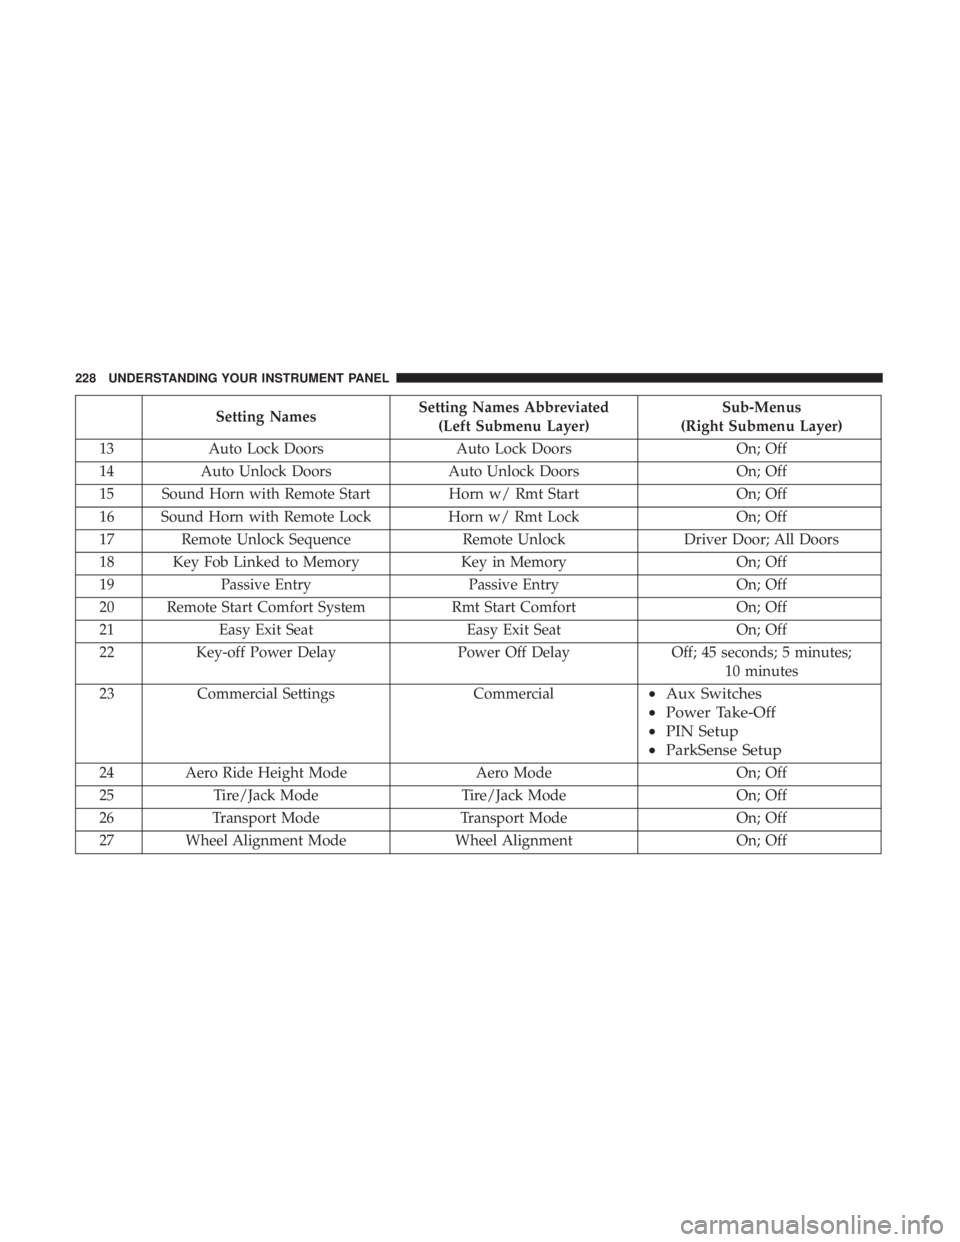
Setting Names Setting Names Abbreviated
(Left Submenu Layer) Sub-Menus
(Right Submenu Layer)
13 Auto Lock Doors Auto Lock Doors On; Off
14 Auto Unlock Doors Auto Unlock Doors On; Off
15 Sound Horn with Remote Start Horn w/ Rmt Start On; Off
16 Sound Horn with Remote Lock Horn w/ Rmt Lock On; Off
17 Remote Unlock Sequence Remote Unlock Driver Door; All Doors
18 Key Fob Linked to Memory Key in Memory On; Off
19 Passive Entry Passive Entry On; Off
20 Remote Start Comfort System Rmt Start Comfort On; Off
21 Easy Exit Seat Easy Exit Seat On; Off
22 Key-off Power Delay Power Off Delay Off; 45 seconds; 5 minutes;
10 minutes
23 Commercial Settings Commercial • Aux Switches
• Power Take-Off
• PIN Setup
• ParkSense Setup
24 Aero Ride Height Mode Aero Mode On; Off
25 Tire/Jack Mode Tire/Jack Mode On; Off
26 Transport Mode Transport Mode On; Off
27 Wheel Alignment Mode Wheel Alignment On; Off228 UNDERSTANDING YOUR INSTRUMENT PANEL
Page 233 of 536
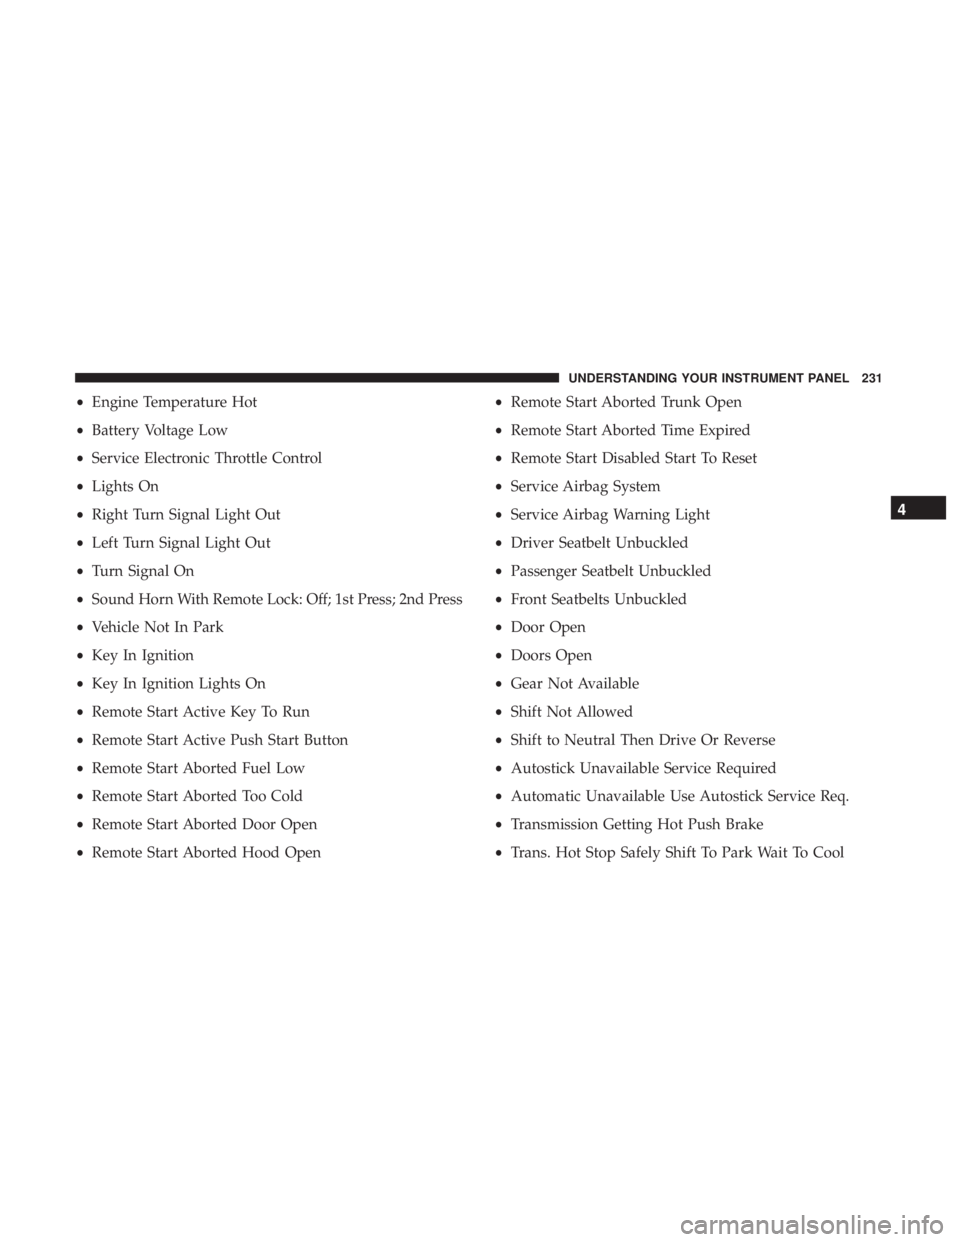
• Engine Temperature Hot
• Battery Voltage Low
• Service Electronic Throttle Control
• Lights On
• Right Turn Signal Light Out
• Left Turn Signal Light Out
• Turn Signal On
• Sound Horn With Remote Lock: Off; 1st Press; 2nd Press
• Vehicle Not In Park
• Key In Ignition
• Key In Ignition Lights On
• Remote Start Active Key To Run
• Remote Start Active Push Start Button
• Remote Start Aborted Fuel Low
• Remote Start Aborted Too Cold
• Remote Start Aborted Door Open
• Remote Start Aborted Hood Open • Remote Start Aborted Trunk Open
• Remote Start Aborted Time Expired
• Remote Start Disabled Start To Reset
• Service Airbag System
• Service Airbag Warning Light
• Driver Seatbelt Unbuckled
• Passenger Seatbelt Unbuckled
• Front Seatbelts Unbuckled
• Door Open
• Doors Open
• Gear Not Available
• Shift Not Allowed
• Shift to Neutral Then Drive Or Reverse
• Autostick Unavailable Service Required
• Automatic Unavailable Use Autostick Service Req.
• Transmission Getting Hot Push Brake
• Trans. Hot Stop Safely Shift To Park Wait To Cool 4UNDERSTANDING YOUR INSTRUMENT PANEL 231
Page 246 of 536

Doors & Locks
After pressing the “Doors & Locks” button on the touch-
screen, the following settings will be available:
Setting Name Selectable Options
Auto Door Locks On Off
NOTE: When the “Auto Door Locks” feature is selected, all doors will lock automatically when the vehicle reaches a
speed of 15 mph (24 km/h).
Auto Unlock On Exit On Off
NOTE: When the “Auto Unlock On Exit” feature is selected, all doors will unlock when the vehicle is stopped, the
transmission is in the PARK or NEUTRAL position and the driver’s door is opened.
Sound Horn With Lock Off 1st Press 2nd Press
Remote Door Unlock All Driver
NOTE: The “Remote Door Unlock” feature will allow you to program your remote door locks to open “All doors” or
only the “Driver door” with the first push of the key fob or grabbing the Passive Entry door handle.
Sound Horn With Remote
Start On Off
NOTE: When the “Sound Horn With Remote Start” feature is selected, the horn will sound when the remote start is
activated. 244 UNDERSTANDING YOUR INSTRUMENT PANEL
Page 266 of 536

Setting Name Selectable Options
Flash Lights With Lock
NOTE: When the “Flash Lights With Lock” feature is selected, the front and rear turn signals will flash when the
doors are locked or unlocked with the key fob. This feature may be selected with or without the “Sound Horn With
Lock” feature selected.
Sound Horn With Lock Off 1st Press 2nd Press
Sound Horn With Remote
Start
1st Press Of Key Fob
Unlocks Driver Door All Doors
NOTE:
• When “1st Press Of Key Fob Unlocks: Driver Door” is selected, only the driver’s door will unlock on the first press
of the key fob unlock button. You must push the key fob unlock button twice to unlock the passenger’s doors.
• When “All Doors” is selected, all of the doors will unlock on the first push of the key fob unlock button.
• If the vehicle is programmed “1st Press Of Key Fob Unlocks: All Doors”, all doors will unlock no matter which
Passive Entry equipped door handle is grasped. If “1st Press Of Key Fob Unlocks: Driver Door” is programmed,
only the driver ’s door will unlock when the driver ’s door is grasped.
• With Passive Entry, if “1st Press Of Key Fob Unlocks: Driver Door” is programmed pushing the handle more than
once will only result in the driver ’s door opening. If “Driver Door” is selected, once the driver ’s door is opened,
the interior door lock/unlock switch can be used to unlock all doors (or use key fob).264 UNDERSTANDING YOUR INSTRUMENT PANEL
Page 268 of 536

Auto Comfort Systems — If Equipped
After pressing the “Auto-On Comfort” button on the
touchscreen, the following settings will be available:
Setting Name Selectable Options
Auto-On Driver Heated/
Ventilated Seat & Steering
Wheel With Vehicle Start
— If Equipped Off Remote Start All Starts
NOTE: When the “Auto-On Driver Heated/Ventilated Seat & Steering Wheel With Vehicle Start” feature is selected
the driver’s heated seat and heated steering wheel will automatically turn on when temperatures are below 40° F
(4.4° C). When temperatures are above 80° F (26.7° C), the driver vented seat will turn on. 266 UNDERSTANDING YOUR INSTRUMENT PANEL
Page 308 of 536
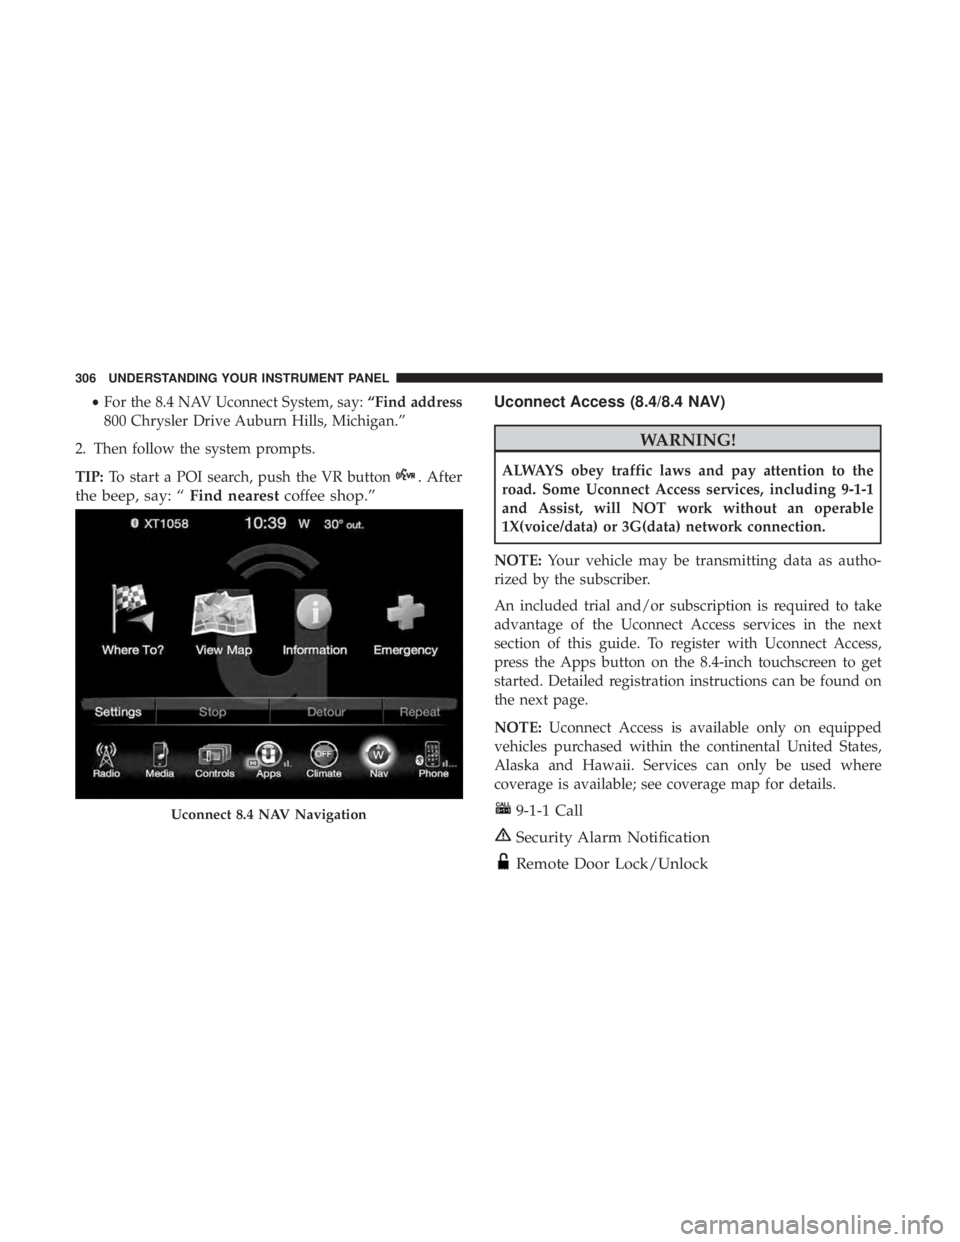
• For the 8.4 NAV Uconnect System, say: “Find address
800 Chrysler Drive Auburn Hills, Michigan.”
2. Then follow the system prompts.
TIP: To start a POI search, push the VR button . After
the beep, say: “ Find nearest coffee shop.” Uconnect Access (8.4/8.4 NAV)
WARNING!ALWAYS obey traffic laws and pay attention to the
road. Some Uconnect Access services, including 9-1-1
and Assist, will NOT work without an operable
1X(voice/data) or 3G(data) network connection.
NOTE: Your vehicle may be transmitting data as autho-
rized by the subscriber.
An included trial and/or subscription is required to take
advantage of the Uconnect Access services in the next
section of this guide. To register with Uconnect Access,
press the Apps button on the 8.4-inch touchscreen to get
started. Detailed registration instructions can be found on
the next page.
NOTE: Uconnect Access is available only on equipped
vehicles purchased within the continental United States,
Alaska and Hawaii. Services can only be used where
coverage is available; see coverage map for details.
9-1-1 Call
Security Alarm Notification
Remote Door Lock/UnlockUconnect 8.4 NAV Navigation306 UNDERSTANDING YOUR INSTRUMENT PANEL
Page 309 of 536
Stolen Vehicle Assistance
Remote Vehicle Start**
Remote Horn and Lights
Vehicle Finder
Send ‘N Go
Yelp Search
Voice Texting
Roadside Assistance Call
3G Wi-Fi Hotspot***
**If vehicle is equipped.
***Extra charges apply.
Vehicle Health Alert
Your vehicle will send you an email alert if it senses a
problem under the hood with one of your vehicles key
systems. For further information go to the Mopar Owner
Connect website moparownerconnect.com.
Register (8.4/8.4 NAV)
To unlock the full potential of Uconnect Access in your
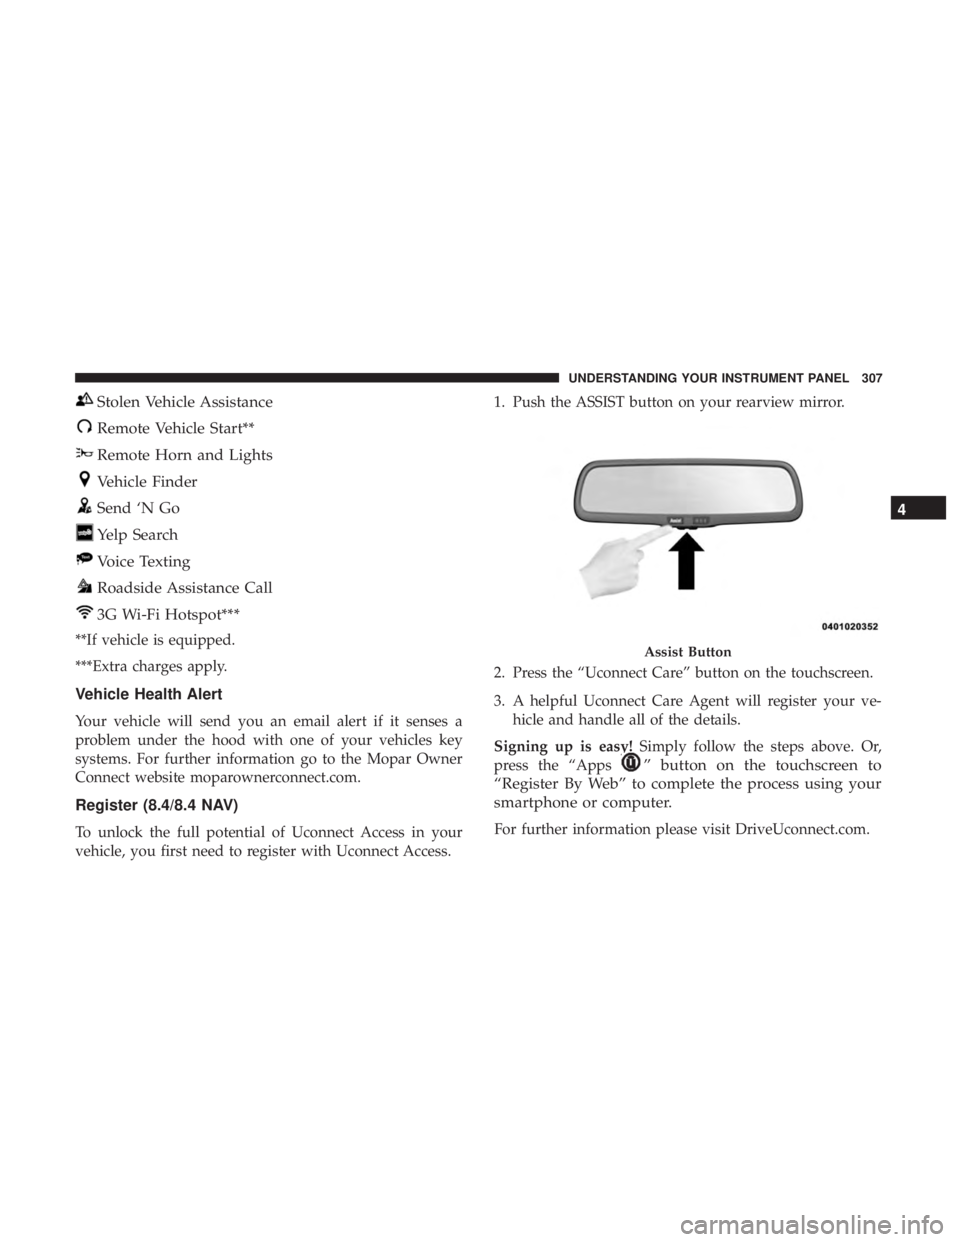
vehicle, you first need to register with Uconnect Access. 1. Push the ASSIST button on your rearview mirror.
2. Press the “Uconnect Care” button on the touchscreen.
3. A helpful Uconnect Care Agent will register your ve-
hicle and handle all of the details.
Signing up is easy! Simply follow the steps above. Or,
press the “Apps
” button on the touchscreen to
“Register By Web” to complete the process using your
smartphone or computer.
For further information please visit DriveUconnect.com. Assist Button 4UNDERSTANDING YOUR INSTRUMENT PANEL 307
Page 310 of 536
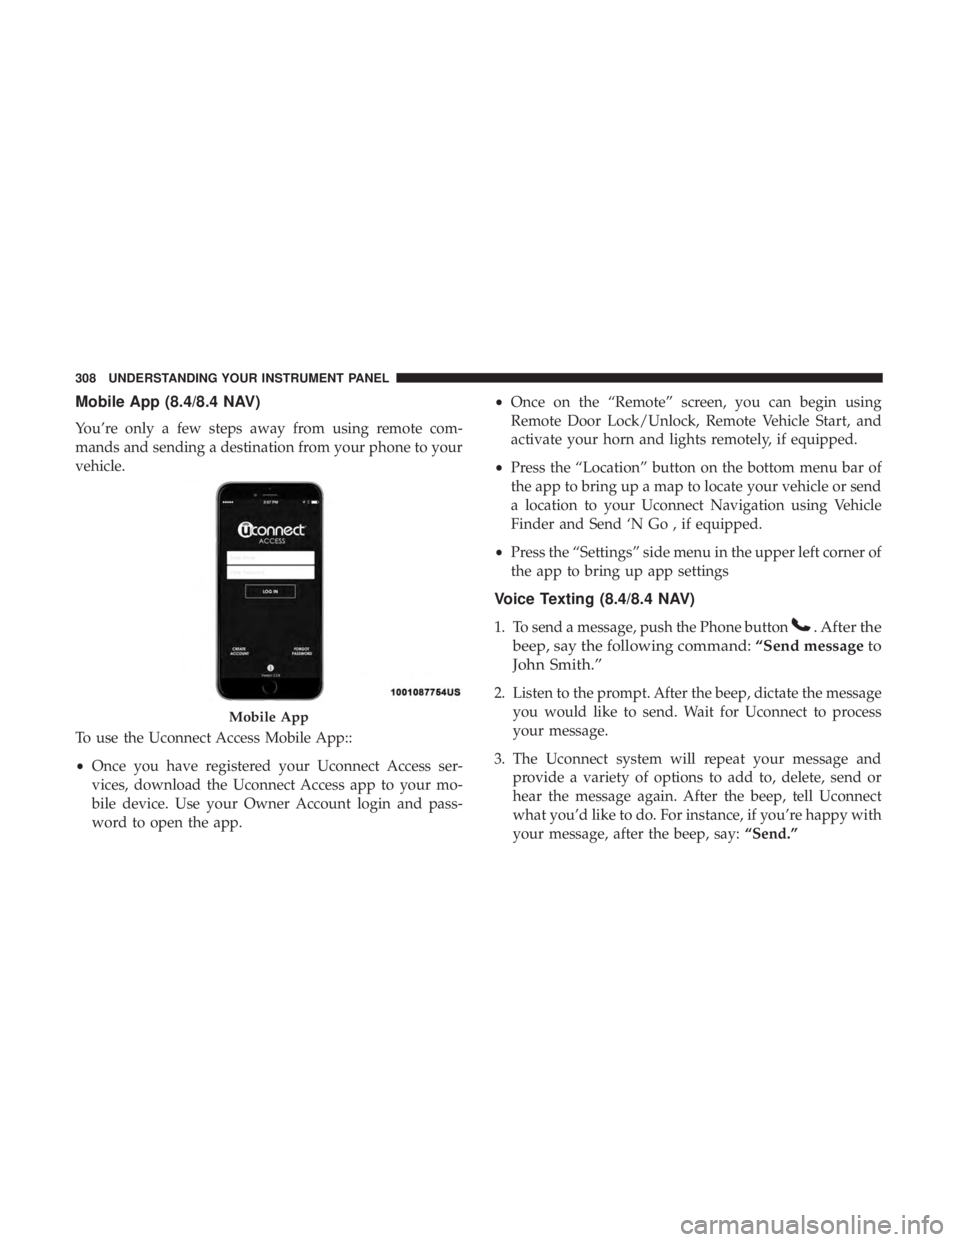
Mobile App (8.4/8.4 NAV)
You’re only a few steps away from using remote com-
mands and sending a destination from your phone to your
vehicle.
To use the Uconnect Access Mobile App::
• Once you have registered your Uconnect Access ser-
vices, download the Uconnect Access app to your mo-
bile device. Use your Owner Account login and pass-
word to open the app. • Once on the “Remote” screen, you can begin using
Remote Door Lock/Unlock, Remote Vehicle Start, and
activate your horn and lights remotely, if equipped.
• Press the “Location” button on the bottom menu bar of
the app to bring up a map to locate your vehicle or send
a location to your Uconnect Navigation using Vehicle
Finder and Send ‘N Go , if equipped.
• Press the “Settings” side menu in the upper left corner of
the app to bring up app settings
Voice Texting (8.4/8.4 NAV)
1. To send a message, push the Phone button . After the
beep, say the following command: “Send message to
John Smith.”
2. Listen to the prompt. After the beep, dictate the message
you would like to send. Wait for Uconnect to process
your message.
3. The Uconnect system will repeat your message and
provide a variety of options to add to, delete, send or
hear the message again. After the beep, tell Uconnect
what you’d like to do. For instance, if you’re happy with
your message, after the beep, say: “Send.”Mobile App308 UNDERSTANDING YOUR INSTRUMENT PANEL