ECO mode RAM CHASSIS CAB 2020 User Guide
[x] Cancel search | Manufacturer: RAM, Model Year: 2020, Model line: CHASSIS CAB, Model: RAM CHASSIS CAB 2020Pages: 516, PDF Size: 16.57 MB
Page 36 of 516
34GETTING TO KNOW YOUR VEHICLE
When you remove the key fob from the igni -
tion, the driver’s seat will move to a position
0.3 inches (7.7 mm) forward of the rear stop if the driver’s seat position is between
0.9 inches and 2.7 inches (22.7 mm and
67.7 mm) forward of the rear stop. The seat
will return to its previously set position when
you place the ignition to the ACC or RUN posi -
tion.
The Easy Entry/Easy Exit feature is disabled
when the driver’s seat position is less than
0.9 inches (22.7 mm) forward of the rear stop. At this position, there is no benefit to
the driver by moving the seat for Easy Exit or
Easy Entry.
Each stored memory setting will have an associ -
ated Easy Entry and Easy Exit position.
NOTE:
The Easy Entry/Exit feature is not enabled when
the vehicle is delivered from the factory. The
Easy Entry/Exit feature is enabled (or later
disabled) through the programmable features
in the Uconnect system. Refer to “Uconnect
Settings” in “Multimedia” for further informa -
tion.
Heated Seats — If Equipped
On some models, the front and rear seats may
be equipped with heaters located in the seat
cushions and seat backs.
Front Heated Seats
The heated seats control buttons are located on
the center instrument panel below the touch -
screen, and are also located within the climate
or controls screen of the touchscreen.
Push the heated seat button once to turn
the HI setting on.
Push the heated seat button a second
time to turn the MED setting on.
Push the heated seat button a third time
to turn the LO setting on.
Push the heated seat button a fourth time
to turn the heating elements off.
NOTE:
The engine must be running for the heated
seats to operate.
The level of heat selected will stay on until
the operator changes it.
Vehicles Equipped With Remote Start
On models that are equipped with remote start,
the driver’s seat can be programmed to come
on during a remote start.
This feature can be programmed through the
Uconnect system. Refer to “Uconnect Settings”
in “Multimedia” for further information.
WARNING!
Persons who are unable to feel pain to the
skin because of advanced age, chronic
illness, diabetes, spinal cord injury, medica -
tion, alcohol use, exhaustion or other phys -
ical condition must exercise care when
using the seat heater. It may cause burns
even at low temperatures, especially if
used for long periods of time.
Do not place anything on the seat or seat -
back that insulates against heat, such as a
blanket or cushion. This may cause the seat
heater to overheat. Sitting in a seat that has
been overheated could cause serious
burns due to the increased surface
temperature of the seat.
2020_RAM_CHASSIS_CAB_OM_USA=GUID-6C67832B-7839-4CCF-BEFC-CDF988F949EA=1=en=.book Page 34
Page 37 of 516
GETTING TO KNOW YOUR VEHICLE35
Rear Heated Seats
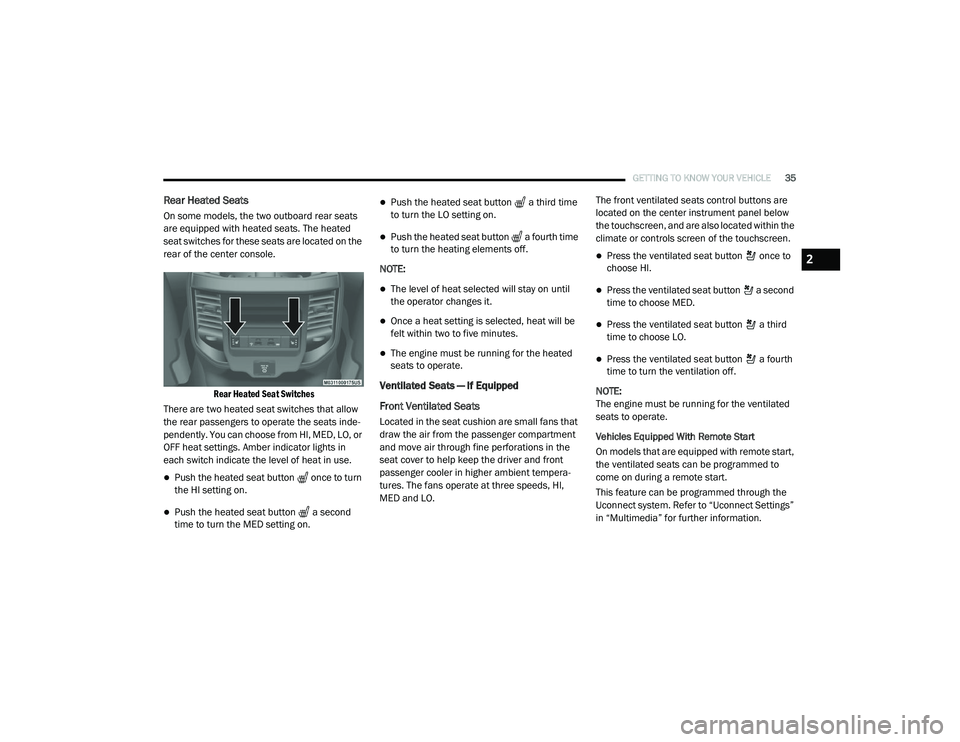
On some models, the two outboard rear seats
are equipped with heated seats. The heated
seat switches for these seats are located on the
rear of the center console.
Rear Heated Seat Switches
There are two heated seat switches that allow
the rear passengers to operate the seats inde -
pendently. You can choose from HI, MED, LO, or
OFF heat settings. Amber indicator lights in
each switch indicate the level of heat in use.
Push the heated seat button once to turn
the HI setting on.
Push the heated seat button a second
time to turn the MED setting on.
Push the heated seat button a third time
to turn the LO setting on.
Push the heated seat button a fourth time
to turn the heating elements off.
NOTE:
The level of heat selected will stay on until
the operator changes it.
Once a heat setting is selected, heat will be
felt within two to five minutes.
The engine must be running for the heated
seats to operate.
Ventilated Seats — If Equipped
Front Ventilated Seats
Located in the seat cushion are small fans that
draw the air from the passenger compartment
and move air through fine perforations in the
seat cover to help keep the driver and front
passenger cooler in higher ambient tempera -
tures. The fans operate at three speeds, HI,
MED and LO. The front ventilated seats control buttons are
located on the center instrument panel below
the touchscreen, and are also located within the
climate or controls screen of the touchscreen.
Press the ventilated seat button once to
choose HI.
Press the ventilated seat button a second
time to choose MED.
Press the ventilated seat button a third
time to choose LO.
Press the ventilated seat button a fourth
time to turn the ventilation off.
NOTE:
The engine must be running for the ventilated
seats to operate.
Vehicles Equipped With Remote Start
On models that are equipped with remote start,
the ventilated seats can be programmed to
come on during a remote start.
This feature can be programmed through the
Uconnect system. Refer to “Uconnect Settings”
in “Multimedia” for further information.
2
2020_RAM_CHASSIS_CAB_OM_USA=GUID-6C67832B-7839-4CCF-BEFC-CDF988F949EA=1=en=.book Page 35
Page 40 of 516

38GETTING TO KNOW YOUR VEHICLE
STEERING WHEEL
Tilt Steering Column
This feature allows you to tilt the steering
column upward or downward. The tilt lever is
located on the steering column, below the multi -
function lever.
Pull the lever toward the steering wheel to
unlock the steering column. With one hand
firmly on the steering wheel, move the steering
column up or down, as desired. Release the
lever to lock the steering column firmly in place.
Tilt Steering Lever
Heated Steering Wheel — If Equipped
The steering wheel contains a heating element
that helps warm your hands in cold weather.
The heated steering wheel has only one
temperature setting. Once the heated steering
wheel has been turned on, it will stay on until
the operator turns it off. The heated steering
wheel may not turn on when it is already warm.
The heated steering wheel control button is
located on the center instrument panel below
the touchscreen, as well as within the climate or
controls screen of the touchscreen.
Press the heated steering wheel button
once to turn the heating element on.
Press the heated steering wheel button a
second time to turn the heating element off. NOTE:
The engine must be running for the heated
steering wheel to operate.
Vehicles Equipped With Remote Start
On models that are equipped with remote start,
the heated steering wheel can be programmed
to come on during a remote start.
This feature can be programmed through the
Uconnect system. Refer to “Uconnect Settings”
in “Multimedia” for further information.
WARNING!
Do not adjust the steering column while
driving. Adjusting the steering column while
driving or driving with the steering column
unlocked, could cause the driver to lose
control of the vehicle. Failure to follow this
warning may result in serious injury or death.
WARNING!
Persons who are unable to feel pain to the
skin because of advanced age, chronic
illness, diabetes, spinal cord injury, medica
-
tion, alcohol use, exhaustion, or other phys -
ical conditions must exercise care when
using the steering wheel heater. It may
cause burns even at low temperatures,
especially if used for long periods.
Do not place anything on the steering wheel
that insulates against heat, such as a
blanket or steering wheel covers of any type
and material. This may cause the steering
wheel heater to overheat.
2020_RAM_CHASSIS_CAB_OM_USA=GUID-6C67832B-7839-4CCF-BEFC-CDF988F949EA=1=en=.book Page 38
Page 47 of 516
GETTING TO KNOW YOUR VEHICLE45
Daytime Running Lights (DRLs)
The headlights on your vehicle will illuminate
when the engine is started and the transmis -
sion is in any gear except PARK. This provides a
constant "lights on" condition until the ignition is
placed in the OFF position. The lights illuminate
at less than half of normal intensity. If the
parking brake is applied, the Daytime Running
Lights (DRLs) will turn off. Also, if a turn signal is
activated, the DRL lamp on the same side of the
vehicle may turn off for the duration of the turn
signal activation. Once the turn signal is no
longer active, the DRL lamp will illuminate.
NOTE:
If allowed by law in the country in which the
vehicle was purchased, the Daytime Running
Lights can be turned on and off using the
Uconnect System, refer to “Uconnect Settings”
in “Multimedia” for further information.
High/Low Beam Switch
Push the multifunction lever toward the instru-
ment panel to switch the headlights to high
beam. Pulling the multifunction lever back
toward the steering wheel will turn the low
beams back on, or shut the high beams off.
Automatic High Beam Headlamp Control —
If Equipped
The Automatic High Beam Headlamp Control
system provides increased forward lighting at
night by automating high beam control through
the use of a digital camera mounted on the
inside rearview mirror or forward facing camera.
This camera detects vehicle specific light and
automatically switches from high beams to low
beams until the approaching vehicle is out of
view.
NOTE:
The Automatic High Beam Headlamp Control
can be turned on or off by selecting “ON”
under “Auto Dim High Beams” within your
Uconnect settings, as well as turning the
headlight switch to the AUTO position. Refer
to “Uconnect Settings” in “Multimedia” for
further information.
Broken, muddy, or obstructed headlights and
taillights of vehicles in the field of view will
cause headlights to remain on longer (closer
to the vehicle). Also, dirt, film, and other
obstructions on the windshield or camera
lens will cause the system to function improp -
erly.
To opt out of the Advanced Auto High Beam
Sensitivity Control (default) and enter
Reduced High Beam Sensitivity Control (not
recommended), on vehicles equipped with
mirror controlled automatic high beams and
without the forward facing camera, toggle the
high beam lever six full on/off cycles within
10 seconds of placing the ignition in the ON
position. The system will return to the default
setting when the ignition is OFF.
If the windshield or Automatic High Beam Head -
lamp Control mirror is replaced, the mirror must
be re-aimed to ensure proper performance. See
a local authorized dealer.
To Activate
1. The Automatic High Beams are enabled through the Uconnect system. Refer to
“Uconnect Settings” in “Multimedia” for
further information.
2. Turn the headlight switch to the AUTO head -
light position.
3. Push the multifunction lever away from you (toward front of vehicle) to engage the high
beam mode.
2
2020_RAM_CHASSIS_CAB_OM_USA=GUID-6C67832B-7839-4CCF-BEFC-CDF988F949EA=1=en=.book Page 45
Page 48 of 516
46GETTING TO KNOW YOUR VEHICLE
NOTE:
The Automatic High Beams will not activate until
the vehicle is at or above 12 mph (20 km/h).
To Deactivate
1. Pull the multifunction lever toward you (or
rearward in vehicle) to manually deactivate
the system (normal operation of low
beams).
2. Push back on the multifunction lever to reactivate the system.
The Automatic High Beams can also be deacti -
vated through the Uconnect system. Refer to
“Uconnect Settings” in “Multimedia” for further
information.
Flash-To-Pass
You can signal another vehicle with your head -
lights by lightly pulling the multifunction lever
toward you. This will cause the high beam head -
lights to turn on, and remain on, until the lever
is released.
Automatic Headlights — If Equipped
This system automatically turns your headlights
on or off based on ambient light levels. To turn
the system on, turn the headlight switch clock-
wise, aligning the indicator with the AUTO on the
headlight switch. When the system is on, the
Headlight Time Delay feature is also on. This
means your headlights will stay on for up to 90
seconds after you place the ignition switch in
the OFF position. To turn the Automatic System
off, turn the headlight switch counterclockwise
to the O (off) position.
NOTE:
The engine must be running before the head -
lights will come on in the Automatic mode.
Parking Lights And Panel Lights
To turn on the parking lights and instrument
panel lights, from the O (off) position, rotate the
headlight switch clockwise to the first detent. To
turn off the parking lights, rotate the headlight
switch back to the O (off) position.
Directional LED Headlamp System — If
Equipped
This is a system consisting of LED (low/high
beam) headlights that incorporate dynamic
cornering with 5-degree inboard/15-degree
outboard swivel. The headlights continuously
and automatically adapt to the driving condi -
tions around bends or when cornering based on
steering wheel angle.
The system directs the headlights to light up the
road in the best way, taking into account the
speed of the vehicle and the bend or corner
angle, as well as the speed of steering.
The adaptive lights are automatically activated
when the vehicle is traveling above approxi -
mately 5 mph (8 km/h).
Headlights On With Wipers (Available With
Automatic Headlights Only)
When this feature is active, the headlights will
turn on approximately 10 seconds after the
wipers are turned on if the headlight switch is
placed in the AUTO position. In addition, the
headlights will turn off when the wipers are
turned off, if they were turned on by this feature.
2020_RAM_CHASSIS_CAB_OM_USA=GUID-6C67832B-7839-4CCF-BEFC-CDF988F949EA=1=en=.book Page 46
Page 50 of 516
48GETTING TO KNOW YOUR VEHICLE
The cargo lights will turn on for approximately
60 seconds when a key fob unlock button is
pushed, as part of the Illuminated Entry feature.
When these lights are activated using the
button on the headlight switch, the trailer
spotter lights will remain illuminated when the
vehicle transmission is in PARK, NEUTRAL, or
REVERSE. The trailer spotter lights will turn off
when the vehicle transmission is placed in
DRIVE.
Battery Saver
To protect the life of your vehicle’s battery, load
shedding is provided for both the interior and
exterior lights.
If the ignition is OFF, the interior lights will auto -
matically turn off when:
Any door is left ajar for 10 minutes.
The Dome Off button is pushed.
The cargo and spotter lights are manually
activated by the headlight switch.
NOTE:
Battery saver mode is canceled if the ignition is
ON. If the headlights remain on while the ignition is
placed in the OFF position, the exterior lights will
automatically turn off after eight minutes. If the
headlights are turned on and left on for eight
minutes while the ignition is OFF, the exterior
lights will automatically turn off.
INTERIOR LIGHTS
Courtesy Lights
The courtesy, dome, and cargo lights are turned
on when any door is opened or the Dome On
button is pushed on the overhead console. Also,
if your vehicle is equipped with Remote Keyless
Entry, and the unlock button is pushed on the
key fob, the courtesy, dome, and cargo lights
will turn on.
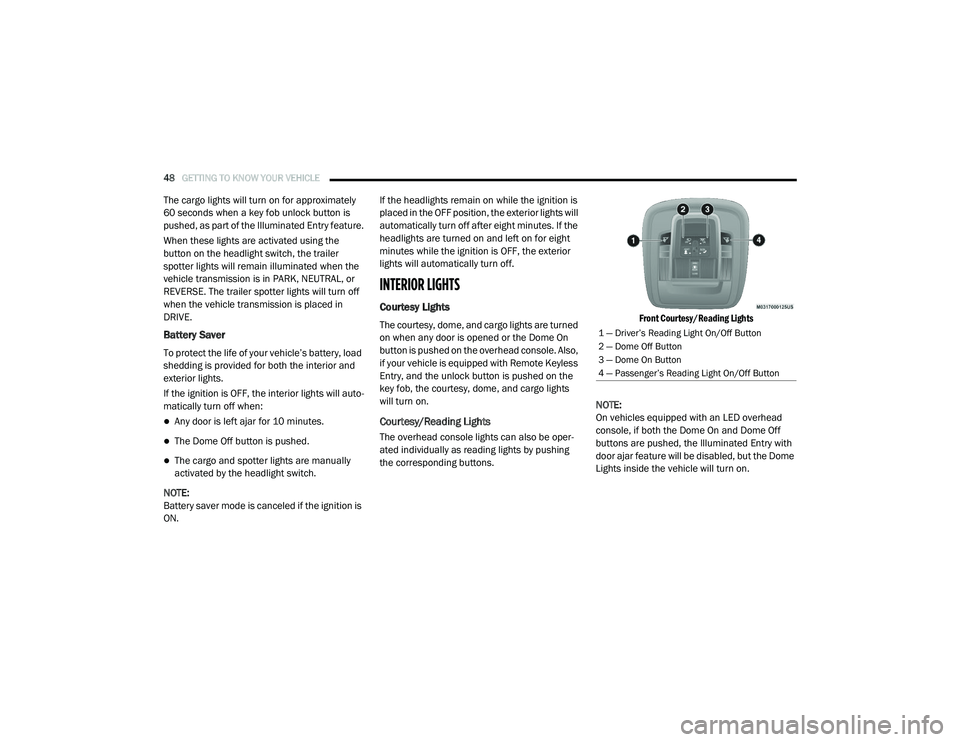
Courtesy/Reading Lights
The overhead console lights can also be oper
-
ated individually as reading lights by pushing
the corresponding buttons.
Front Courtesy/Reading Lights
NOTE:
On vehicles equipped with an LED overhead
console, if both the Dome On and Dome Off
buttons are pushed, the Illuminated Entry with
door ajar feature will be disabled, but the Dome
Lights inside the vehicle will turn on.
1 — Driver’s Reading Light On/Off Button
2 — Dome Off Button
3 — Dome On Button
4 — Passenger’s Reading Light On/Off Button
2020_RAM_CHASSIS_CAB_OM_USA=GUID-6C67832B-7839-4CCF-BEFC-CDF988F949EA=1=en=.book Page 48
Page 54 of 516

52GETTING TO KNOW YOUR VEHICLE
Manual Climate Control Overview
Manual Climate Controls
Icon Description
MAX A/C Setting
Set the Temperature Control Knob to the MAX A/C setting to change the current setting to the coldest output of air. Moving
the temperature control knob away from the MAX A/C setting causes the MAX A/C operation to exit.
A/C Button
Push the A/C button to engage the Air Conditioning (A/C). The A/C indicator illuminates when the A/C is on.
Recirculation Button
Press and release this button on the touchscreen, or push the button on the faceplate, to change the system between
Recirculation mode and outside air mode. The Recirculation indicator and the A/C indicator illuminate when the
Recirculation button is pushed. Recirculation can be used when outside conditions, such as smoke, odors, dust, or
humidity are present. Recirculation can be used in all modes except for Defrost. Recirculation may be unavailable if
conditions exist that could create fogging on the inside of the windshield. The A/C can be deselected manually without
disturbing the mode control selection. Continuous use of the Recirculation mode may make the inside air stuffy and
window fogging may occur. Extended use of this mode is not recommended.
2020_RAM_CHASSIS_CAB_OM_USA=GUID-6C67832B-7839-4CCF-BEFC-CDF988F949EA=1=en=.book Page 52
Page 59 of 516

GETTING TO KNOW YOUR VEHICLE57
Icon Description
MAX A/C
Press and release the MAX A/C button on the touchscreen to change the current setting to the coldest output of air. The
MAX A/C indicator illuminates when MAX A/C is on. Pressing the button again will cause the MAX A/C operation to exit.
NOTE:
The MAX A/C button is only available on the touchscreen.
Faceplate A/C Button
Touchscreen A/C Button A/C Button
Press and release the button on the touchscreen, or push and release the button on the faceplate, to change the current
setting. The A/C indicator illuminates when A/C is on.
Recirculation Button
Press and release this button to change the system between recirculation mode and outside air mode. The Recirculation
indicator illuminates when Recirculation is on. Recirculation can be used when outside conditions such as smoke, odors,
dust, or high humidity are present. Recirculation can be used in all modes. Recirculation may be unavailable (button on the
touchscreen greyed out) if conditions exist that could create fogging on the inside of the windshield. The A/C can be
deselected manually without disturbing the mode control selection. Continuous use of the Recirculation mode may make
the inside air stuffy and window fogging may occur. Extended use of this mode is not recommended.
2
2020_RAM_CHASSIS_CAB_OM_USA=GUID-6C67832B-7839-4CCF-BEFC-CDF988F949EA=1=en=.book Page 57
Page 60 of 516

58GETTING TO KNOW YOUR VEHICLE
Faceplate Auto Button
Touchscreen Auto Button AUTO
Set your desired temperature and press AUTO. AUTO will achieve and maintain your desired temperature by automatically
adjusting the blower speed and air distribution. AUTO mode is highly recommended for efficiency. You can press and
release this button on the touchscreen, or push the button on the faceplate, to turn AUTO on. The AUTO indicator
illuminates when AUTO is on. Toggling this function will cause the system to switch between manual mode and automatic
modes. Refer to “Automatic Operation” within this section for more information.
Front Defrost Button
Press and release the Front Defrost button on the touchscreen, or push and release the button on the faceplate, to change
the current airflow setting to Defrost mode. The Front Defrost indicator illuminates when Front Defrost is on. Air comes from
the windshield and side window demist outlets. When the defrost button is selected, the blower level may increase. Use
Defrost mode with maximum temperature settings for best windshield and side window defrosting and defogging. When
toggling the front defrost mode button, the climate system will return to previous setting.
Rear Defrost Button
Push and release the Rear Defrost button on the touchscreen, or push and release the button on the faceplate, to turn on
the rear window defroster and the heated outside mirrors (if equipped). The indicator illuminates when the rear window
defroster is on. The rear window defroster automatically turns off after 15 minutes.
Icon
Description
2020_RAM_CHASSIS_CAB_OM_USA=GUID-6C67832B-7839-4CCF-BEFC-CDF988F949EA=1=en=.book Page 58
Page 64 of 516

62GETTING TO KNOW YOUR VEHICLE
Climate Control Functions
A/C (Air Conditioning)
The Air Conditioning (A/C) button allows the
operator to manually activate or deactivate the
air conditioning system. When the air condi -
tioning system is turned on, cool dehumidified
air will flow through the outlets into the cabin.
For improved fuel economy, press the A/C
button to turn off the air conditioning and manu -
ally adjust the blower and airflow mode settings.
Also, make sure to select only Panel, Bi-Level, or
Floor modes.
NOTE:
For Manual Climate Controls, if the system is
in Mix, Floor or Defrost Mode, the A/C can be
turned off, but the A/C system shall remain
active to prevent fogging of the windows.
If fog or mist appears on the windshield or
side glass, select Defrost mode, and increase
blower speed if needed.
If your air conditioning performance seems
lower than expected, check the front of the
A/C condenser (located in front of the radi -
ator), for an accumulation of dirt or insects.
Clean with a gentle water spray from the front
of the radiator and through the condenser. MAX A/C
MAX A/C sets the control for maximum cooling
performance.
Press and release to toggle between MAX A/C
and the prior settings. The button illuminates
when MAX A/C is on.
In MAX A/C, the blower level and mode position
can be adjusted to desired user settings.
Pressing other settings will cause the MAX A/C
operation to switch to the selected setting and
MAX A/C to exit.
Recirculation
In cold weather, use of Recirculation mode may
lead to excessive window fogging. The Recircu
-
lation feature may be unavailable (button on
the touchscreen greyed out) if conditions exist
that could create fogging on the inside of the
windshield.
On systems with Manual Climate Controls, if
equipped, the Recirculation mode is not
allowed in Defrost mode to improve window
clearing operation. Recirculation is disabled
automatically if this mode is selected.
Attempting to use Recirculation while in this
mode causes the LED in the control button to
blink and then turns off.
Automatic Temperature Control (ATC)
Automatic Operation
1. Push the AUTO button on the faceplate, or the AUTO button on the touchscreen on the
Automatic Temperature Control (ATC)
Panel.
2. Next, adjust the temperature you would like the system to maintain by adjusting the
driver and passenger temperature control
buttons. Once the desired temperature is
displayed, the system will achieve and auto -
matically maintain that comfort level.
3. When the system is set up for your comfort level, it is not necessary to change the
settings. You will experience the greatest
efficiency by simply allowing the system to
function automatically.
NOTE:
It is not necessary to move the temperature
settings for cold or hot vehicles. The system
automatically adjusts the temperature,
mode, and blower speed to provide comfort
as quickly as possible.
2020_RAM_CHASSIS_CAB_OM_USA=GUID-6C67832B-7839-4CCF-BEFC-CDF988F949EA=1=en=.book Page 62