clock reset RAM CHASSIS CAB 2020 Owners Manual
[x] Cancel search | Manufacturer: RAM, Model Year: 2020, Model line: CHASSIS CAB, Model: RAM CHASSIS CAB 2020Pages: 516, PDF Size: 16.57 MB
Page 431 of 516
MULTIMEDIA429
Restore Default Settings
After pressing the Restore Default Settings button on the touchscreen, the following settings will be available:
Clear Personal Data
After pressing the Clear Personal Data Settings button on the touchscreen, the following settings will be available:
Setting Name Selectable Options
Restore Default SettingsYesCancel
NOTE:
When the “Restore Default Settings” feature is selected it will reset the Display, Clock, Audio, and Radio Settings to their default settings. If “Yes” is
selected a pop-up will appear asking "Are you sure you want to reset your settings to default?” select “Yes” to restore, or “Cancel” to exit.
Setting Name Selectable Options
Clear Personal DataYesCancel
NOTE:
When this feature is selected it will remove all personal data including Bluetooth® devices and presets. If “Yes” is selected a pop-up will appear asking
"Are you sure you want to clear all personal data?” select “Yes” to Clear, or “Cancel” to exit.
9
2020_RAM_CHASSIS_CAB_OM_USA=GUID-6C67832B-7839-4CCF-BEFC-CDF988F949EA=1=en=.book Page 429
Page 432 of 516
430MULTIMEDIA
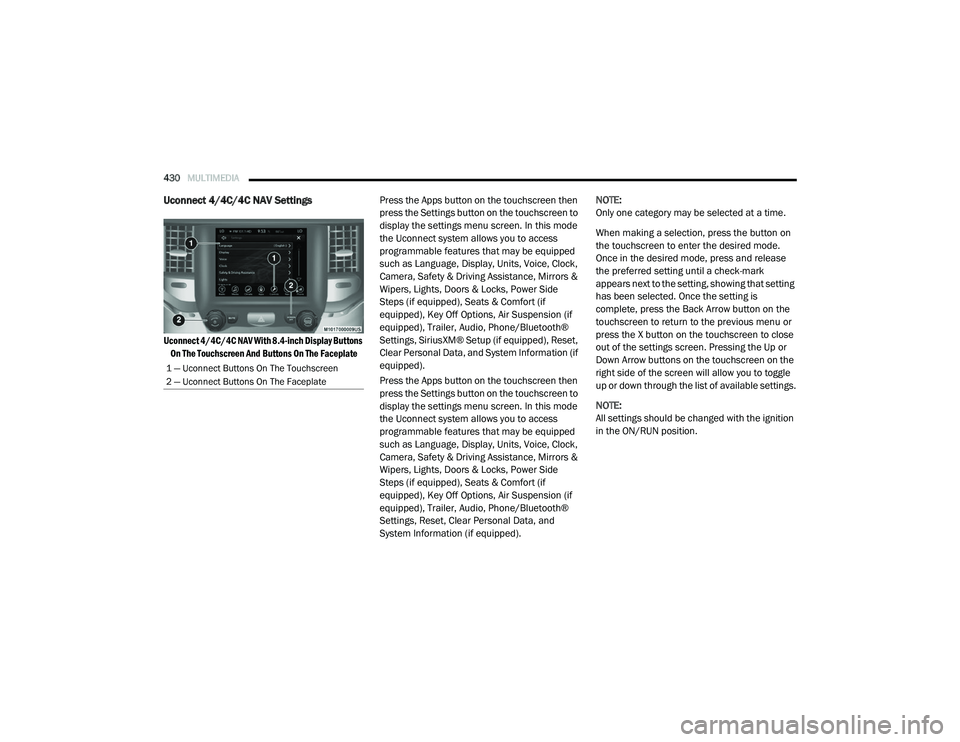
Uconnect 4/4C/4C NAV Settings
Uconnect 4/4C/4C NAV With 8.4-inch Display Buttons
On The Touchscreen And Buttons On The Faceplate
Press the Apps button on the touchscreen then
press the Settings button on the touchscreen to
display the settings menu screen. In this mode
the Uconnect system allows you to access
programmable features that may be equipped
such as Language, Display, Units, Voice, Clock,
Camera, Safety & Driving Assistance, Mirrors &
Wipers, Lights, Doors & Locks, Power Side
Steps (if equipped), Seats & Comfort (if
equipped), Key Off Options, Air Suspension (if
equipped), Trailer, Audio, Phone/Bluetooth®
Settings, SiriusXM® Setup (if equipped), Reset,
Clear Personal Data, and System Information (if
equipped).
Press the Apps button on the touchscreen then
press the Settings button on the touchscreen to
display the settings menu screen. In this mode
the Uconnect system allows you to access
programmable features that may be equipped
such as Language, Display, Units, Voice, Clock,
Camera, Safety & Driving Assistance, Mirrors &
Wipers, Lights, Doors & Locks, Power Side
Steps (if equipped), Seats & Comfort (if
equipped), Key Off Options, Air Suspension (if
equipped), Trailer, Audio, Phone/Bluetooth®
Settings, Reset, Clear Personal Data, and
System Information (if equipped). NOTE:
Only one category may be selected at a time.
When making a selection, press the button on
the touchscreen to enter the desired mode.
Once in the desired mode, press and release
the preferred setting until a check-mark
appears next to the setting, showing that setting
has been selected. Once the setting is
complete, press the Back Arrow button on the
touchscreen to return to the previous menu or
press the X button on the touchscreen to close
out of the settings screen. Pressing the Up or
Down Arrow buttons on the touchscreen on the
right side of the screen will allow you to toggle
up or down through the list of available settings.
NOTE:
All settings should be changed with the ignition
in the ON/RUN position.
1 — Uconnect Buttons On The Touchscreen
2 — Uconnect Buttons On The Faceplate
2020_RAM_CHASSIS_CAB_OM_USA=GUID-6C67832B-7839-4CCF-BEFC-CDF988F949EA=1=en=.book Page 430
Page 449 of 516
MULTIMEDIA447
Reset
After pressing the Reset button on the touchscreen, the following settings will be available:Subscription Information
Sirius ID
NOTE:
New vehicle purchasers or lessees will receive a free limited time subscription to SiriusXM® Satellite Radio with your radio. Following the expiration
of the free services, it will be necessary to access the information on the Subscription Information screen to re-subscribe.
1. Press the Subscription Information button on the touchscreen to access the Subscription Information screen.
2. Write down the Sirius ID numbers for your receiver. To reactivate your service, either call the number listed on the screen or visit the provider online.
SiriusXM® Travel Link is a separate subscription.
Setting Name Selectable Options
Setting NameSelectable Options
Restore Settings to DefaultOKCancel
NOTE:
When the “Restore Settings to Default” feature is selected it resets clock, audio and other features to their default settings. Reset App Drawer OKCancel
Clear Personal Data YesCancel
9
2020_RAM_CHASSIS_CAB_OM_USA=GUID-6C67832B-7839-4CCF-BEFC-CDF988F949EA=1=en=.book Page 447
Page 451 of 516
MULTIMEDIA449
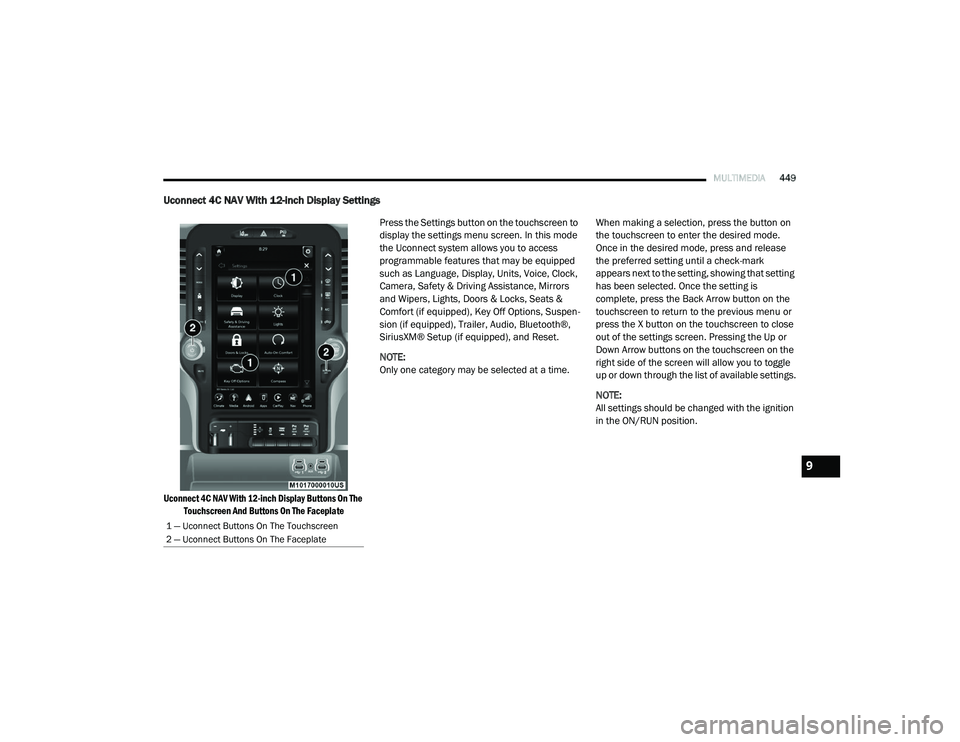
Uconnect 4C NAV With 12-inch Display Settings
Uconnect 4C NAV With 12-inch Display Buttons On The
Touchscreen And Buttons On The Faceplate
Press the Settings button on the touchscreen to
display the settings menu screen. In this mode
the Uconnect system allows you to access
programmable features that may be equipped
such as Language, Display, Units, Voice, Clock,
Camera, Safety & Driving Assistance, Mirrors
and Wipers, Lights, Doors & Locks, Seats &
Comfort (if equipped), Key Off Options, Suspen
-
sion (if equipped), Trailer, Audio, Bluetooth®,
SiriusXM® Setup (if equipped), and Reset.
NOTE:
Only one category may be selected at a time. When making a selection, press the button on
the touchscreen to enter the desired mode.
Once in the desired mode, press and release
the preferred setting until a check-mark
appears next to the setting, showing that setting
has been selected. Once the setting is
complete, press the Back Arrow button on the
touchscreen to return to the previous menu or
press the X button on the touchscreen to close
out of the settings screen. Pressing the Up or
Down Arrow buttons on the touchscreen on the
right side of the screen will allow you to toggle
up or down through the list of available settings.
NOTE:
All settings should be changed with the ignition
in the ON/RUN position.
1 — Uconnect Buttons On The Touchscreen
2 — Uconnect Buttons On The Faceplate
9
2020_RAM_CHASSIS_CAB_OM_USA=GUID-6C67832B-7839-4CCF-BEFC-CDF988F949EA=1=en=.book Page 449
Page 471 of 516
MULTIMEDIA469
10 — MEDIA
Pushing the MEDIA button on the faceplate will
allow you to switch to Media mode: CD (if
equipped), USB, AUX, and Bluetooth®.
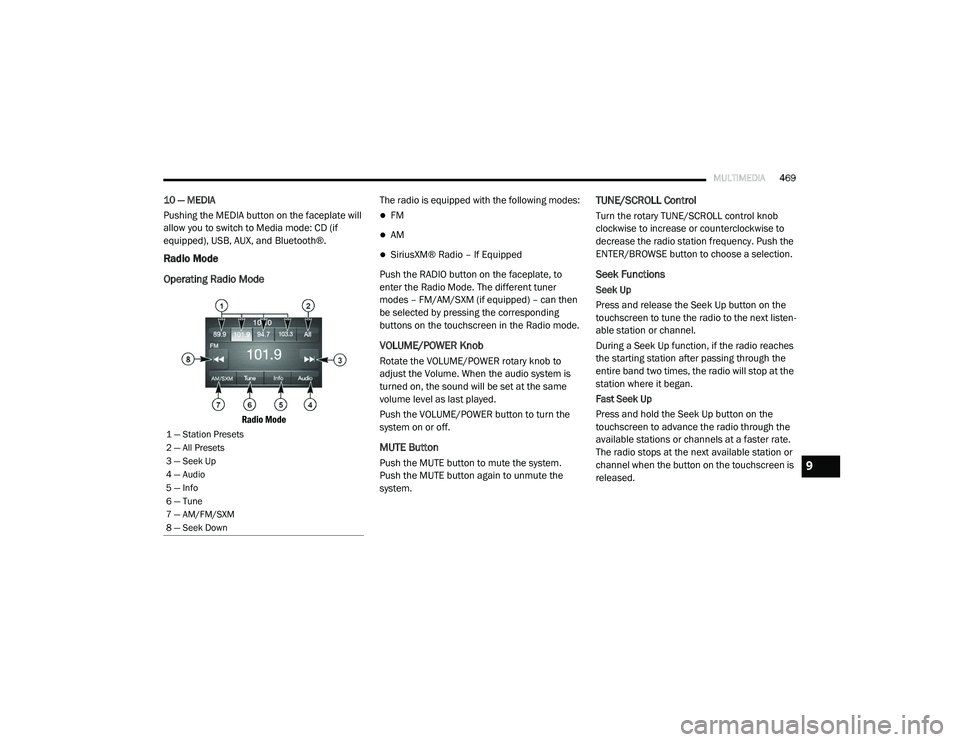
Radio Mode
Operating Radio Mode
Radio Mode
The radio is equipped with the following modes:
FM
AM
SiriusXM® Radio – If Equipped
Push the RADIO button on the faceplate, to
enter the Radio Mode. The different tuner
modes – FM/AM/SXM (if equipped) – can then
be selected by pressing the corresponding
buttons on the touchscreen in the Radio mode.
VOLUME/POWER Knob
Rotate the VOLUME/POWER rotary knob to
adjust the Volume. When the audio system is
turned on, the sound will be set at the same
volume level as last played.
Push the VOLUME/POWER button to turn the
system on or off.
MUTE Button
Push the MUTE button to mute the system.
Push the MUTE button again to unmute the
system.
TUNE/SCROLL Control
Turn the rotary TUNE/SCROLL control knob
clockwise to increase or counterclockwise to
decrease the radio station frequency. Push the
ENTER/BROWSE button to choose a selection.
Seek Functions
Seek Up
Press and release the Seek Up button on the
touchscreen to tune the radio to the next listen -
able station or channel.
During a Seek Up function, if the radio reaches
the starting station after passing through the
entire band two times, the radio will stop at the
station where it began.
Fast Seek Up
Press and hold the Seek Up button on the
touchscreen to advance the radio through the
available stations or channels at a faster rate.
The radio stops at the next available station or
channel when the button on the touchscreen is
released.
1 — Station Presets
2 — All Presets
3 — Seek Up
4 — Audio
5 — Info
6 — Tune
7 — AM/FM/SXM
8 — Seek Down
9
2020_RAM_CHASSIS_CAB_OM_USA=GUID-6C67832B-7839-4CCF-BEFC-CDF988F949EA=1=en=.book Page 469
Page 473 of 516
MULTIMEDIA471
When you are receiving a station that you wish
to commit into memory, press and hold the
desired numbered button on the touchscreen
for more than two seconds or until you hear a
confirmation beep.
The Radio stores up to 12 presets in each of the
Radio modes. Four presets are visible at the top
of the radio screen.
Audio Settings
1. Push the SETTINGS button on the right side
of the radio faceplate. If the settings button
is not present, push the MORE button on
the faceplate, then the Settings button on
the touchscreen.
2. Scroll down and press the Audio button on the touchscreen to open the Audio menu.
3. The Audio Menu shows the following options for you to customize your audio
settings:
Auto Play — Press the Auto Play button on
the touchscreen to select between ON or
OFF. This feature determines if music
automatically starts playing from a device
when it is first connected to the Media
hub’s USB port.
Equalizer — Press the Equalizer button on
the touchscreen to adjust the Bass, Mid
and Treble. Use the + or – buttons on the
touchscreen to adjust the equalizer to
your desired settings. Press the Back
Arrow button on the touchscreen when
done.
Balance/Fade — Press the Balance/Fade
button on the touchscreen to adjust the
sound from the speakers. Use the arrow
button on the touchscreen to adjust the
sound level from the front and rear or
right and left side speakers. Press the
Center C button on the touchscreen to
reset the balance and fade to the factory
setting. Press the Back Arrow button on
the touchscreen when done.
Speed Adjust Volume — Press the Speed
Adjusted Volume button on the touch -
screen to select between OFF, 1, 2 or 3.
This will decrease the radio volume rela -
tive to a decrease in vehicle speed. Press
the Back Arrow button on the touch-
screen when done.
Loudness — Press the Loudness button
on the touchscreen to select the Loud -
ness feature. When this feature is acti -
vated, it improves sound quality at lower
volumes.
Clock Settings
1. Push the SETTINGS button on the face -
plate, or push the MORE button on the
faceplate, and then the SETTINGS button
on the touchscreen.
2. Select the Clock and Date button on the touchscreen.
3. Next, select Set Time to change the time.
4. Select Set Date to change the date.
5. To set the time, select the Seek Up or Seek Down arrows as appropriate. Select “12 hrs
vs 24 hrs”, “AM” or “PM” or select the “Time
Zones” (if equipped).
6. Select the Done button when complete.
9
2020_RAM_CHASSIS_CAB_OM_USA=GUID-6C67832B-7839-4CCF-BEFC-CDF988F949EA=1=en=.book Page 471