ECO mode RAM CHASSIS CAB 2022 Workshop Manual
[x] Cancel search | Manufacturer: RAM, Model Year: 2022, Model line: CHASSIS CAB, Model: RAM CHASSIS CAB 2022Pages: 428, PDF Size: 20.18 MB
Page 224 of 428
222MULTIMEDIA
To insert an Auxiliary device, gently insert the
Auxiliary device cable into the AUX port. If you
insert an Auxiliary device with the ignition and the
radio on, the unit will switch to AUX Mode and
begin to play.
Controlling The Auxiliary Device
The control of the Auxiliary device (e.g., selecting
playlists, play, fast forward, etc.) cannot be
provided by the radio; use the device controls
instead. Adjust the volume with the Volume button,
Volume/Mute rotary knob, or the On/Off rotary
knob, or with the volume of the attached device.
NOTE:The radio unit is acting as the amplifier for audio
output from the Auxiliary device. Therefore, if the
volume control on the Auxiliary device is set too
low, there will be insufficient audio signal for the
radio unit to play the music on the device.
Seek Up /Seek Down
In USB Mode, press the Seek Up button on the
touchscreen for the next selection on the USB
device. Press and release the Seek Down button
on the touchscreen to return to the beginning of
the current selection, or to return to the beginning
of the previous selection if the USB device is within
the first three seconds of the current selection.
In Bluetooth® Mode, press and release the Seek
Up button on the touchscreen for the next
selection on the Bluetooth® device. Press and release the Seek Down button on the touchscreen
to return to the beginning of the current selection,
or return to the beginning of the previous selection
if the Bluetooth® device is within the first second
of the current selection.
Browse
In USB Mode, press the Browse button on the
touchscreen to display the browse window. In USB
Mode, the left side of the browse window displays
a list of ways you can browse through the contents
of the USB device. If supported by the device, you
can browse by Folder, Artist, Playlist, Album, Song,
etc. Press the desired button on the touchscreen
on the left side of the screen. The center of the
browse window shows items and their
sub-functions, which can be scrolled through by
pressing the Up and Down buttons to the right. The
TUNE/SCROLL knob can also be used to scroll.
On the Uconnect 3 With 5-inch Display, select the
Browse button on the touchscreen to scroll
through and select a desired track on the device.
Press the Exit button on the touchscreen if you
wish to cancel the Browse function.
Media Mode
In USB Mode, press the Media button on the
touchscreen to select the desired audio source:
USB.
In Bluetooth® Mode, press the Media button on
the touchscreen to select the desired audio
source: Bluetooth®.
In AUX Mode, press the Media button on the
touchscreen to select the desired audio source:
AUX.
Repeat
In USB Mode, press the Repeat button on the
touchscreen to toggle the repeat functionality. The
Repeat button on the touchscreen is highlighted
when active. The Radio will continue to play the
current track, repeatedly, as long as the repeat is
active. Press the Repeat button again to enter
Repeat All. The radio will continue to play all the
current tracks, repeatedly, as long as the repeat
function is active. To cancel Repeat, press the
Repeat button a third time.
Shuffle
In USB Mode, press the Shuffle button on the
touchscreen to play the selections on the USB
device in random order to provide an interesting
change of pace. Press the Shuffle button on the
touchscreen a second time to turn this feature off.
Audio
Audio settings can be accessed by pressing the
Audio button Ú
page 214.
22_DPF_OM_EN_USC_t.book Page 222
Page 225 of 428
MULTIMEDIA223
Info
In USB Mode, press the Info button on the
touchscreen to display the current track
information. Press the Info or X button on the
touchscreen a second time to cancel this feature.
Tracks
In USB Mode, press the Tracks button on the
touchscreen to display a pop-up with the Song List.
The song currently playing is indicated by an arrow
and lines above and below the song title. When in
the Tracks List screen you can rotate the TUNE/
SCROLL knob to highlight a track (indicated by the
line above and below the track name) and then
push the ENTER/BROWSE knob to start playing
that track.
In Bluetooth® Mode, if the Bluetooth® device
supports this feature, press the Tracks button on
the touchscreen to display a pop-up with the Song
List. The currently playing song is indicated by a red
arrow and lines above and below the song title.
Pressing the Tracks button on the touchscreen
while the pop-up is displayed will close the pop-up.
MEDIA VOICE COMMANDS
Uconnect offers connections via USB, Bluetooth®,
and auxiliary (AUX) ports. Voice operation is only
available for connected USB and AUX devices.
Push the VR button located on the steering
wheel. After the beep, say one of the following
commands and follow the prompts to switch your
media source or choose an artist:
“ Change source to Bluetooth®”
“Change source to AUX”
“Change source to USB”
“Play artist Beethoven”; “ Play album Greatest
Hits”; “ Play song Moonlight Sonata”; “ Play genre
Classical”
Did You Know: Press the Browse button on the
touchscreen to see all of the music on your USB
device. Your Voice Command must match exactly
how the artist, album, song, and genre information
is displayed.
PHONE MODE
Overview
Uconnect Phone is a voice-activated, hands-free,
in-vehicle communications system. It allows you to
dial a phone number with your mobile phone.
The feature supports the following:
Voice Activated Features
Hands-Free dialing via Voice (“Call John Smith
Mobile” or “Dial 248-555-1212”).
Hands-Free text-to-speech listening of your
incoming SMS messages.
Hands-Free Text Message Replying: Forward
one of 18 predefined SMS messages to
incoming calls/text messages.
Redialing last dialed numbers (“Redial”).
Calling Back the last incoming call number
(“Call Back”).
Viewing call logs on screen (“Show Incoming
Calls,” “Show Outgoing Calls,” “Show Missed
Calls,” or “Show Recent Calls”).
Searching Contacts phone number (“Search for
John Smith Mobile”).
5
22_DPF_OM_EN_USC_t.book Page 223
Page 228 of 428
226MULTIMEDIA
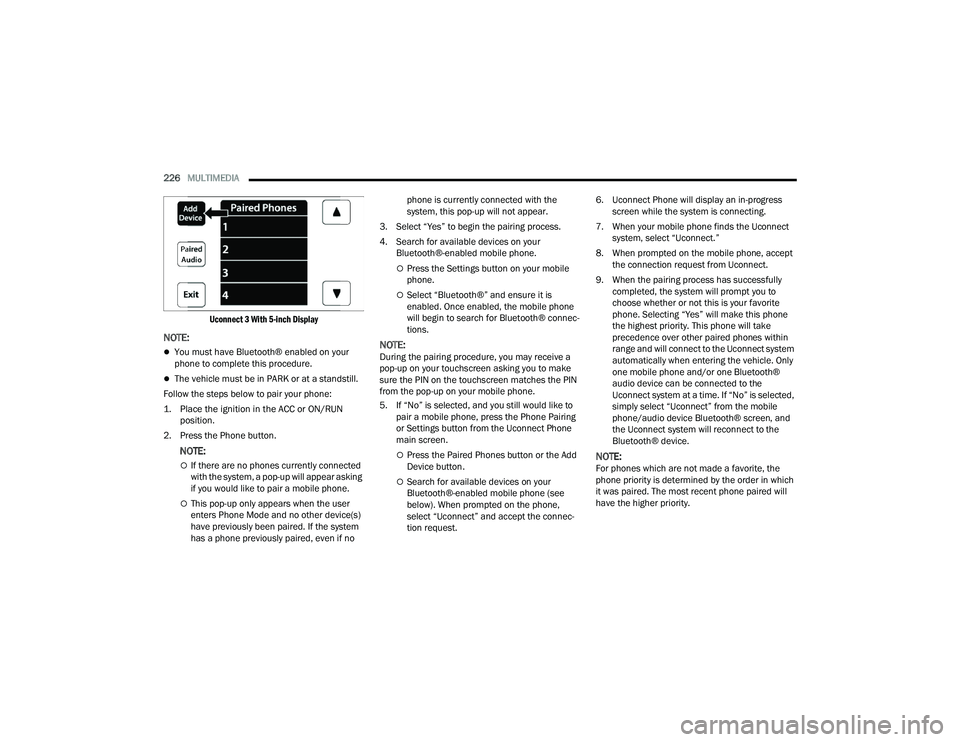
Uconnect 3 With 5-inch Display
NOTE:
You must have Bluetooth® enabled on your
phone to complete this procedure.
The vehicle must be in PARK or at a standstill.
Follow the steps below to pair your phone:
1. Place the ignition in the ACC or ON/RUN position.
2. Press the Phone button.
NOTE:
If there are no phones currently connected
with the system, a pop-up will appear asking
if you would like to pair a mobile phone.
This pop-up only appears when the user
enters Phone Mode and no other device(s)
have previously been paired. If the system
has a phone previously paired, even if no phone is currently connected with the
system, this pop-up will not appear.
3. Select “Yes” to begin the pairing process.
4. Search for available devices on your Bluetooth®-enabled mobile phone.
Press the Settings button on your mobile
phone.
Select “Bluetooth®” and ensure it is
enabled. Once enabled, the mobile phone
will begin to search for Bluetooth® connec -
tions.
NOTE:During the pairing procedure, you may receive a
pop-up on your touchscreen asking you to make
sure the PIN on the touchscreen matches the PIN
from the pop-up on your mobile phone.
5. If “No” is selected, and you still would like to pair a mobile phone, press the Phone Pairing
or Settings button from the Uconnect Phone
main screen.
Press the Paired Phones button or the Add
Device button.
Search for available devices on your
Bluetooth®-enabled mobile phone (see
below). When prompted on the phone,
select “Uconnect” and accept the connec -
tion request. 6. Uconnect Phone will display an in-progress
screen while the system is connecting.
7. When your mobile phone finds the Uconnect system, select “Uconnect.”
8. When prompted on the mobile phone, accept the connection request from Uconnect.
9. When the pairing process has successfully completed, the system will prompt you to
choose whether or not this is your favorite
phone. Selecting “Yes” will make this phone
the highest priority. This phone will take
precedence over other paired phones within
range and will connect to the Uconnect system
automatically when entering the vehicle. Only
one mobile phone and/or one Bluetooth®
audio device can be connected to the
Uconnect system at a time. If “No” is selected,
simply select “Uconnect” from the mobile
phone/audio device Bluetooth® screen, and
the Uconnect system will reconnect to the
Bluetooth® device.
NOTE:For phones which are not made a favorite, the
phone priority is determined by the order in which
it was paired. The most recent phone paired will
have the higher priority.
22_DPF_OM_EN_USC_t.book Page 226
Page 235 of 428
MULTIMEDIA233
Siri® Eyes Free — If Equipped
When used with your Apple® iPhone® connected
to your vehicle via Bluetooth®, Siri lets you use
your voice to send text messages, select media,
place phone calls and much more. Siri uses your
natural language to understand what you mean
and responds back to confirm your requests. The
system is designed to keep your eyes on the road
and your hands on the wheel by letting Siri help you
perform useful tasks.
To enable Siri, push and hold, then release the
Uconnect Voice Recognition (VR) button on the
steering wheel. After you hear a double beep, you
can ask Siri to play podcasts and music, get
directions, read text messages, and many other
useful requests.
BLUETOOTH® COMMUNICATION LINK
Mobile phones may lose connection to the
Uconnect Phone. When this happens, the
connection can generally be re-established by
restarting the mobile phone. Your mobile phone is
recommended to remain in Bluetooth® ON mode.
POWER-UP
After switching the ignition key from OFF to either
the ON/RUN or ACC position, or after a language
change, you must wait at least 15 seconds prior to
using the system Ú page 412.
CONNECTED VEHICLE SERVICES —
IF EQUIPPED
IS MY VEHICLE CONNECTED?
If equipped, vehicles with an ASSIST and an SOS
button are connected vehicles. These buttons will
be located on either the rearview mirror or
overhead console, depending on the vehicle. If
these buttons are present in your vehicle, you have
a connected radio and can take advantage of the
many connected vehicle features.
For further information about the ASSIST and SOS
buttons Úpage 312.
INTRODUCTION TO CONNECTED VEHICLE
S
ERVICES
One of the many benefits of your vehicle’s
Uconnect system is that you can now take
advantage of SiriusXM Guardian™ connected
services. To unlock the full potential of SiriusXM
Guardian™ in your vehicle, you first need to
activate SiriusXM Guardian™ connected services.
NOTE:SiriusXM Guardian™ involves the collection, trans -
mission and use of data from your vehicle
Ú page 252.
SiriusXM Guardian™ Contact Information
SiriusXM Guardian™/Care
US residents visit: https://www.driveucon -
nect.com/sirius-xm-guardian.html or call
1-844-796-4827
Canadian residents visit: https://www.driveuco -
nnect.ca/en/sirius-xm-guardian or call
1-877-324-9091
WARNING!
ALWAYS obey traffic laws and pay attention to
the road. ALWAYS drive safely with your hands on
the steering wheel. You have full responsibility
and assume all risks related to the use of the
features and applications in this vehicle. Only
use the features and applications when it is safe
to do so. Failure to comply may result in an
accident involving serious injury or death.
5
22_DPF_OM_EN_USC_t.book Page 233
Page 250 of 428
248MULTIMEDIA
do not have an active subscription, push the
ASSIST button and press the Activate button on the
touchscreen to activate services.
CONNECTED SERVICES SOS FAQS —
I
F EQUIPPED
1.
What happens if I accidentally push the SOS
Call button on the mirror or overhead console?
You have 10 seconds after pushing the SOS
Call button to cancel the call. To cancel the
call, either push the SOS Call button again, or
press the Cancel button on the in-vehicle
touchscreen.
2. What type of information is sent when I use the
SOS Call button from my vehicle? Certain
vehicle information, such as make and model,
is transmitted along with the last known GPS
location.
3. When could I use the SOS Call button? You can
use the SOS Call button to make a call if you or
someone else needs emergency assistance.
CONNECTED SERVICES REMOTE DOOR
L
OCK/UNLOCK FAQS
1.
How long does it take to unlock or lock the
door?
Depending on various conditions, it can
take up to three minutes or more for the
request to get to your vehicle.
2.
Which is faster, my key fob or the Mobile App?
Your key fob will lock/unlock the door more
quickly, however its range is limited and your
Mobile App comes in handy for these and
other situations.
3. Will my vehicle be safe if I lose my device?
People sometimes lose their mobile devices,
which is why security measures have been
engineered into the Mobile App. Asking for
your username, password and SiriusXM
Guardian™ Security PIN are required for the
activation of Remote services through your
mobile device. It is your responsibility to
protect your passwords and PINs.
4. Why can’t all mobile devices use the Mobile
App? The Mobile App is compatible with most
devices with the Apple® and Android™
operating systems. The capabilities of these
devices allow us to remotely command your
vehicle. Other operating systems may be
supported in the future.
5. Why is the Mobile App running slow? The
Mobile App relies on a mobile network
connection from your device to send
commands to your vehicle which must have an
operable LTE (voice/data) or 3G, 4G (data), or
5G (data) network connection. If either your
device or your vehicle is in an area with below
average coverage, it may take longer to log in
and send commands.
CONNECTED SERVICES ROADSIDE
A
SSISTANCE FAQS
1.
What is the phone number for roadside
assistance call? The phone number is:
US: 1-800-521-2779
Canada: 1-800-363-4869
2. If I am subscribed to SiriusXM Guardian™,
does it cover towing or other expenses
incurred by using roadside assistance? No,
however your new vehicle may include
Roadside Assistance Call services.
CONNECTED SERVICES SEND & GO
FAQ
S — IF EQUIPPED
1.
How long does it take to send the route and
destination to my vehicle?
Depending on
various conditions, it can take up to three
minutes for the request to get through to your
vehicle.
2. Can I cancel a route I sent to my vehicle? Yes,
once you enter your vehicle, and start the
engine, the pop-up message stating that you
have a new route will appear. There is an exit
button on the pop-up that will cancel the route
if selected.
22_DPF_OM_EN_USC_t.book Page 248
Page 262 of 428

260SAFETY
Anti-Lock Brake System (ABS) Warning
Light
The yellow ABS Warning Light will turn on when the
ignition is placed in the ON/RUN mode and may
stay on for as long as four seconds.
If the ABS Warning Light remains on or comes on
while driving, it indicates that the anti-lock portion
of the brake system is not functioning and that
service is required. However, the conventional
brake system will continue to operate normally if
the ABS Warning Light is on.
If the ABS Warning Light is on, the brake system
should be serviced as soon as possible to restore
the benefits of anti-lock brakes. If the ABS Warning
Light does not come on when the ignition is placed
in the ON/RUN mode, have the light repaired as
soon as possible.
ELECTRONIC BRAKE CONTROL (EBC)
S
YSTEM
Your vehicle is equipped with an advanced
Electronic Brake Control (EBC) system. This system
includes Anti-Lock Brake System (ABS), Brake
Assist System (BAS), Electronic Brake Force
Distribution (EBD), Hill Start Assist (HSA),
Electronic Roll Mitigation (ERM), Electronic
Stability Control (ESC), and Traction Control
System (TCS). These systems work together to
enhance both vehicle stability and control in
various driving conditions. Your vehicle may also be equipped with Trailer
Sway Control (TSC) and Hill Descent Control (HDC).
Brake Assist System (BAS)
The BAS is designed to optimize the vehicle’s
braking capability during emergency braking
maneuvers. The system detects an emergency
braking situation by sensing the rate and amount
of brake application and then applies optimum
pressure to the brakes. This can help reduce
braking distances. The BAS complements the
Anti-Lock Brake System (ABS). Applying the brakes
very quickly results in the best BAS assistance. To
receive the benefit of the system, you must apply
continuous braking pressure during the stopping
sequence (do not “pump” the brakes). Do not
reduce brake pedal pressure unless braking is no
longer desired. Once the brake pedal is released,
the BAS is deactivated.
Brake System Warning Light
The red Brake System Warning Light will turn on
when the ignition is placed in the ON/RUN mode
and may stay on for as long as four seconds.
If the Brake System Warning Light remains on or
comes on while driving, it indicates that the brake
system is not functioning properly and that
immediate service is required. If the Brake System
Warning Light does not come on when the ignition
is placed in the ON/RUN mode, have the light
repaired as soon as possible.
Electronic Brake Force Distribution (EBD)
EBD manages the distribution of the braking
torque between the front and rear axles by limiting
braking pressure to the rear axle. This is done to
prevent overslip of the rear wheels to avoid vehicle
instability, and to prevent the rear axle from
entering ABS before the front axle.
Electronic Roll Mitigation (ERM)
ERM anticipates the potential for wheel lift by
monitoring the driver’s steering wheel input and
the speed of the vehicle. When ERM determines
that the rate of change of the steering wheel angle
and vehicle’s speed are sufficient to potentially
cause wheel lift, it then applies the appropriate
brake and may also reduce engine power to lessen
the chance that wheel lift will occur. ERM can only
reduce the chance of wheel lift occurring during
severe or evasive driving maneuvers; it cannot
WARNING!
The Brake Assist System (BAS) cannot prevent the
natural laws of physics from acting on the vehicle,
nor can it increase the traction afforded by pre
-
vailing road conditions. BAS cannot prevent colli -
sions, including those resulting from excessive
speed in turns, driving on very slippery surfaces,
or hydroplaning. The capabilities of a BAS-
equipped vehicle must never be exploited in a
reckless or dangerous manner, which could jeop -
ardize the user's safety or the safety of others.
22_DPF_OM_EN_USC_t.book Page 260
Page 263 of 428

SAFETY261
prevent wheel lift due to other factors, such as
road conditions, leaving the roadway, or striking
objects or other vehicles.
NOTE:ERM is disabled any time the ESC is in “Full Off”
mode (if equipped). For a complete explanation of
the available ESC modes, see Ú page 261.
Electronic Stability Control (ESC)
ESC enhances directional control and stability of
the vehicle under various driving conditions. ESC
corrects for oversteering or understeering of the
vehicle by applying the brake of the appropriate wheel(s) to counteract the above conditions.
Engine power may also be reduced to help the
vehicle maintain the desired path.
Oversteer — when the vehicle is turning more
than appropriate for the steering wheel position.
Understeer — when the vehicle is turning less
than appropriate for the steering wheel position.
ESC uses sensors in the vehicle to determine the
vehicle path intended by the driver and compares
it to the actual path of the vehicle. When the actual
path does not match the intended path, ESC
applies the brake of the appropriate wheel to
assist in counteracting the oversteer or understeer
condition.
The ESC Activation/Malfunction Indicator Light
located in the instrument cluster will start to flash
as soon as the ESC system becomes active. The
ESC Activation/Malfunction Indicator Light also
flashes when the TCS is active. If the ESC
Activation/Malfunction Indicator Light begins to
flash during acceleration, ease up on the
accelerator and apply as little throttle as possible.
Be sure to adapt your speed and driving to the
prevailing road conditions.
WARNING!
Many factors, such as vehicle loading, road
conditions and driving conditions, influence the
chance that wheel lift or rollover may occur. ERM
cannot prevent all wheel lift or rollovers,
especially those that involve leaving the roadway
or striking objects or other vehicles. The
capabilities of an ERM-equipped vehicle must
never be exploited in a reckless or dangerous
manner which could jeopardize the user's safety
or the safety of others.
WARNING!
Electronic Stability Control (ESC) cannot
prevent the natural laws of physics from acting
on the vehicle, nor can it increase the traction
afforded by prevailing road conditions. ESC
cannot prevent accidents, including those
resulting from excessive speed in turns, driving
on very slippery surfaces, or hydroplaning. ESC
also cannot prevent accidents resulting from
loss of vehicle control due to inappropriate
driver input for the conditions. Only a safe,
attentive, and skillful driver can prevent acci -
dents. The capabilities of an ESC equipped
vehicle must never be exploited in a reckless or
dangerous manner which could jeopardize the
user’s safety or the safety of others.
Vehicle modifications, or failure to properly
maintain your vehicle, may change the handling
characteristics of your vehicle, and may nega -
tively affect the performance of the ESC system.
Changes to the steering system, suspension,
braking system, tire type and size or wheel size
may adversely affect ESC performance. Improp -
erly inflated and unevenly worn tires may also
degrade ESC performance. Any vehicle modifi-
cation or poor vehicle maintenance that
reduces the effectiveness of the ESC system
can increase the risk of loss of vehicle control,
vehicle rollover, personal injury and death.
6
22_DPF_OM_EN_USC_t.book Page 261
Page 264 of 428
262SAFETY
ESC Operating Modes
Depending upon model and mode of operation, the
ESC system may have multiple operating modes.
ESC On
This is the normal operating mode for the ESC
system. Whenever the vehicle is started, the ESC
system will be in this mode. This mode should be
used for most driving conditions. Alternate ESC
modes should only be used for specific reasons as
noted in the following paragraphs.
Partial Off
This mode may be useful if the vehicle becomes
stuck. This mode may modify TCS and ESC
thresholds for activation, which allows for more
wheel spin than normally allowed.
To enter the “Partial Off” mode, momentarily push
the ESC OFF button and the ESC OFF Indicator
Light will illuminate. To turn the ESC on again,
momentarily push the ESC OFF button and the ESC
OFF Indicator Light will turn off.
NOTE:For vehicles with multiple partial ESC modes, the
push and release of the button will toggle the ESC
modes. Multiple attempts may be required to
return to "ESC On" mode. Full Off — If Equipped
This mode is intended for off-highway or off-road
use only and should not be used on any public
roadways. In this mode, TCS and ESC features are
turned off. To enter the “Full Off” mode, push and
hold the ESC OFF button for five seconds while the
vehicle is stopped with the engine running. After
five seconds, a chime will sound, the ESC OFF
Indicator Light will illuminate, and the “ESC OFF”
message will display in the instrument cluster. To
turn ESC on again, momentarily push the ESC OFF
button.
NOTE:The system may switch from ESC “Full Off” to
“Partial Off” mode when the vehicle exceeds a
predetermined speed. When the vehicle speed
slows below the predetermined speed the system
will return to ESC “Full Off”.
ESC modes may also be affected by drive modes (if
equipped).WARNING!
When in “Partial Off” mode, the TCS function
-
ality of ESC, except for the limited slip feature
described in the TCS section, has been
disabled and the ESC OFF Indicator Light will
be illuminated. When in “Partial Off” mode,
the engine power reduction feature of TCS is
disabled, and the enhanced vehicle stability
offered by the ESC system is reduced.
Trailer Sway Control (TSC) is disabled when
the ESC system is in the “Partial Off” mode.
WARNING!
In the ESC “Full Off” mode, the engine torque
reduction and stability features are disabled.
Therefore, enhanced vehicle stability offered
by the ESC system is unavailable. In an emer -
gency evasive maneuver, the ESC system will
not engage to assist in maintaining stability.
ESC “Full Off” mode is intended for
off-highway or off-road use only.
The Electronic Stability Control (ESC) cannot
prevent the natural laws of physics from
acting on the vehicle, nor can it increase the
traction afforded by prevailing road condi -
tions. ESC cannot prevent all accidents,
including those resulting from excessive
speed in turns, driving on very slippery
surfaces, or hydroplaning. ESC also cannot
prevent collisions.
22_DPF_OM_EN_USC_t.book Page 262
Page 265 of 428

SAFETY263
ESC Activation/Malfunction Indicator Light
And ESC OFF Indicator Light
The ESC Activation/Malfunction Indicator
Light in the instrument cluster will come
on when the ignition is placed in the ON
mode. It should go out with the engine
running. If the ESC Activation/Malfunction
Indicator Light comes on continuously with the
engine running, a malfunction has been detected
in the ESC system. If this light remains on after
several ignition cycles, and the vehicle has been
driven several miles (kilometers) at speeds greater
than 30 mph (48 km/h), see an authorized dealer
as soon as possible to have the problem
diagnosed and corrected.
The ESC Activation/Malfunction Indicator Light
starts to flash as soon as the tires lose traction and
the ESC system becomes active. The ESC
Activation/Malfunction Indicator Light also flashes
when TCS is active. If the ESC Activation/
Malfunction Indicator Light begins to flash during
acceleration, ease up on the accelerator and apply
as little throttle as possible. Be sure to adapt your
speed and driving to the prevailing road conditions.
The ESC OFF Indicator Light indicates
that the Electronic Stability Control (ESC)
is in a reduced mode.
NOTE:
The ESC Activation/Malfunction Indicator Light
and the ESC OFF Indicator Light come on
momentarily each time the ignition is placed in
the ON position.
Each time the ignition is placed in the ON posi -
tion, the ESC system will be on even if it was
turned off previously.
The ESC system will make buzzing or clicking
sounds when it is active. This is normal; the
sounds will stop when ESC becomes inactive
following the maneuver that caused the ESC
activation.
Hill Descent Control (HDC) — If Equipped
HDC is intended for low speed off-road driving
while in 4WD Low. HDC maintains vehicle speed
while descending hills during various driving
situations. HDC controls vehicle speed by actively
controlling the brakes.
HDC Has Three States:
1. Off (feature is not enabled and will not activate).
2. Enabled (feature is enabled and ready but activation conditions are not met, or driver is
actively overriding with brake or throttle
application).
3. Active (feature is enabled and actively controlling vehicle speed). Enabling HDC
HDC is enabled by pushing the HDC switch, but the
following conditions must also be met to enable
HDC:
The driveline is in 4WD Low.
The vehicle speed is below 5 mph (8 km/h).
The parking brake is released.
The driver door is closed.
Activating HDC
Once HDC is enabled it will activate automatically
if driven down a grade of sufficient magnitude. The
set speed for HDC is selectable by the driver, and
can be adjusted by using the gear shift +/-. The
following summarizes the HDC set speeds:
HDC Target Set Speeds
P = No set speed. HDC may be enabled but will
not activate.
R = 0.6 mph (1 km/h)
N = 1.2 mph (2 km/h)
D = 0.6 mph (1 km/h)
1st = 0.6 mph (1 km/h)
2nd = 1.2 mph (2 km/h)
3rd = 1.8 mph (3 km/h)
4th = 2.5 mph (4 km/h)
5th = 3.1 mph (5 km/h)
6
22_DPF_OM_EN_USC_t.book Page 263
Page 268 of 428

266SAFETY
Trailer Sway Control (TSC)
TSC uses sensors in the vehicle to recognize an
excessively swaying trailer and will take the
appropriate actions to attempt to stop the sway.
NOTE:TSC cannot stop all trailers from swaying. Always
use caution when towing a trailer and follow the
trailer tongue weight recommendations
Úpage 173.
When TSC is functioning, the ESC Activation/
Malfunction Indicator Light will flash, the engine
power may be reduced and you may feel the
brakes being applied to individual wheels to
attempt to stop the trailer from swaying. TSC is
disabled when the ESC system is in the “Partial
Off” or “Full Off” modes.
AUXILIARY DRIVING SYSTEMS
FORWARD COLLISION WARNING (FCW)
W
ITH MITIGATION — IF EQUIPPED
FCW with Mitigation provides the driver with
audible warnings, visual warnings (within the
instrument cluster display), and may apply a brake
jerk to warn the driver when it detects a potential
frontal collision. The warnings and limited braking
are intended to provide the driver with enough time
to react, avoid or mitigate the potential collision.
NOTE:FCW monitors the information from the forward
looking sensors as well as the Electronic Brake
Controller (EBC), to calculate the probability of a
forward collision. When the system determines
that a forward collision is probable, the driver will
be provided with audible and visual warnings as
well as a possible brake jerk warning.
If the driver does not take action based upon these
progressive warnings, then the system will provide
a limited level of active braking to help slow the
vehicle and mitigate the potential forward collision.
If the driver reacts to the warnings by braking and
the system determines that the driver intends to
avoid the collision by braking but has not applied
sufficient brake force, the system will compensate
and provide additional brake force as required. If an FCW with Mitigation event begins at a speed
below 32 mph (52 km/h), the system may provide
the maximum braking possible to mitigate the
potential forward collision. If the Forward Collision
Warning with Mitigation event stops the vehicle
completely, the system will hold the vehicle at
standstill for two seconds and then release the
brakes.
FCW Message
When the system determines a collision with the
vehicle in front of you is no longer probable, the
warning message will be deactivated Úpage 412.
WARNING!
If TSC activates while driving, slow the vehicle
down, stop at the nearest safe location, and
adjust the trailer load to eliminate trailer sway.
22_DPF_OM_EN_USC_t.book Page 266