warning light RAM CHASSIS CAB 2023 User Guide
[x] Cancel search | Manufacturer: RAM, Model Year: 2023, Model line: CHASSIS CAB, Model: RAM CHASSIS CAB 2023Pages: 444, PDF Size: 20.51 MB
Page 43 of 444
GETTING TO KNOW YOUR VEHICLE41
The following indications may be displayed on the
Digital Rearview Mirror:
Digital Mode This indication will appear when the
Rearview camera is utilizing the cameras
on the vehicle.
Tow Mode Graphic - If Equipped This indication will appear when the
Rearview camera is utilizing the auxiliary
camera attached to the trailer.
View Switching In Progress This indication will appear when camera
view switching is in progress.
Camera Signal Lost - Single View This indication will appear when the
Rearview Camera has lost its signal.
Camera Signal Lost - Multiview This indication will appear when the
camera effected has lost its signal in
either Split Screen or Tri-View. Communication Lost
This indication will appear when the
Digital Rearview Camera has lost
communication with the vehicle.
If a camera signal is lost, switch to Automatic
Dimming Mirror mode.
For more information on trailer camera options,
see Ú page 173.
ILLUMINATED VANITY MIRROR —
I
F EQUIPPED
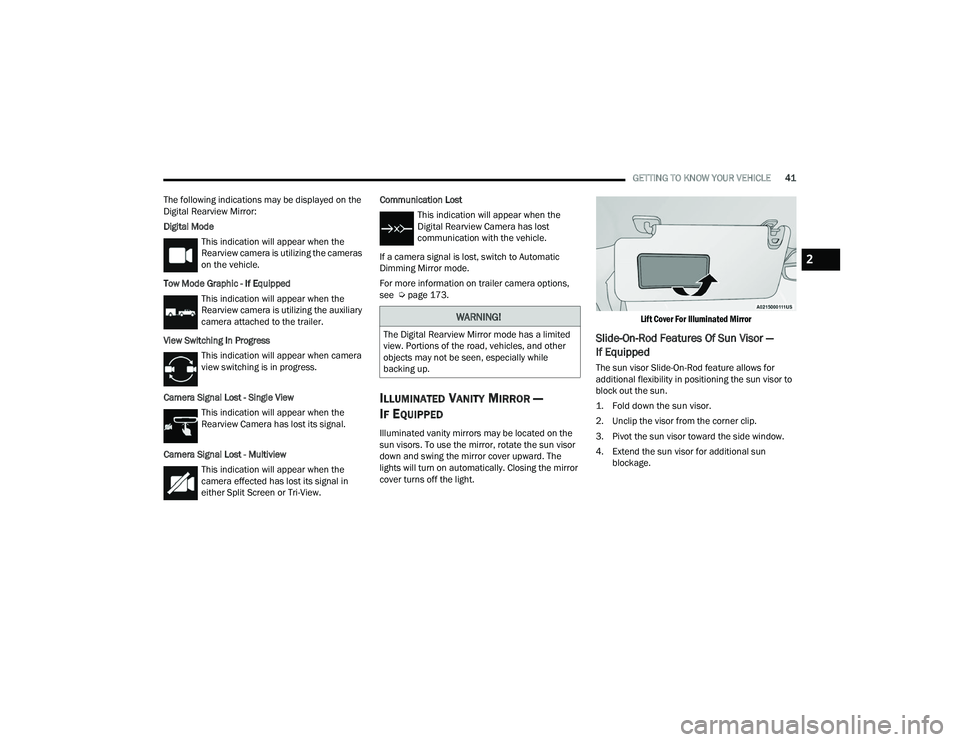
Illuminated vanity mirrors may be located on the
sun visors. To use the mirror, rotate the sun visor
down and swing the mirror cover upward. The
lights will turn on automatically. Closing the mirror
cover turns off the light.
Lift Cover For Illuminated Mirror
Slide-On-Rod Features Of Sun Visor —
If Equipped
The sun visor Slide-On-Rod feature allows for
additional flexibility in positioning the sun visor to
block out the sun.
1. Fold down the sun visor.
2. Unclip the visor from the corner clip.
3. Pivot the sun visor toward the side window.
4. Extend the sun visor for additional sun
blockage.
WARNING!
The Digital Rearview Mirror mode has a limited
view. Portions of the road, vehicles, and other
objects may not be seen, especially while
backing up.
2
23_DPF_OM_EN_USC_t.book Page 41
Page 45 of 444
GETTING TO KNOW YOUR VEHICLE43
Manual Telescoping Mirrors
To extend the Manual Telescoping Mirrors pull the
mirror outward to desired position. To return to
normal position, push the mirror inward all the way.
Manual Telescoping Mirror (Extended Position)
NOTE:Return the trailer towing mirrors to normal driving
position or fold the mirrors prior to entering an
automated car wash.
Outside Mirrors Folding Feature
All outside mirrors are designed to be able to be
manually folded both forward and rearward to
prevent damage.
Folding Mirror
Outside Mirrors With Turn Signal And
Approach Lighting — If Equipped
Driver and passenger outside mirrors with turn
signal lighting contain LEDs, which are located at
the back of the mirror.
The LEDs are turn signal indicators, which flash
with the corresponding turn signal lights in the
front and rear of the vehicle. Turning on the Hazard
Warning flashers will also activate these LEDs.
OUTSIDE AUTOMATIC DIMMING MIRROR —
I
F EQUIPPED
The exterior mirrors will automatically adjust for
glare from vehicles behind you. This feature is
controlled by the inside automatic dimming mirror.
The mirrors will automatically adjust for headlight
glare when the inside mirror adjusts.
POWER MIRRORS — IF EQUIPPED
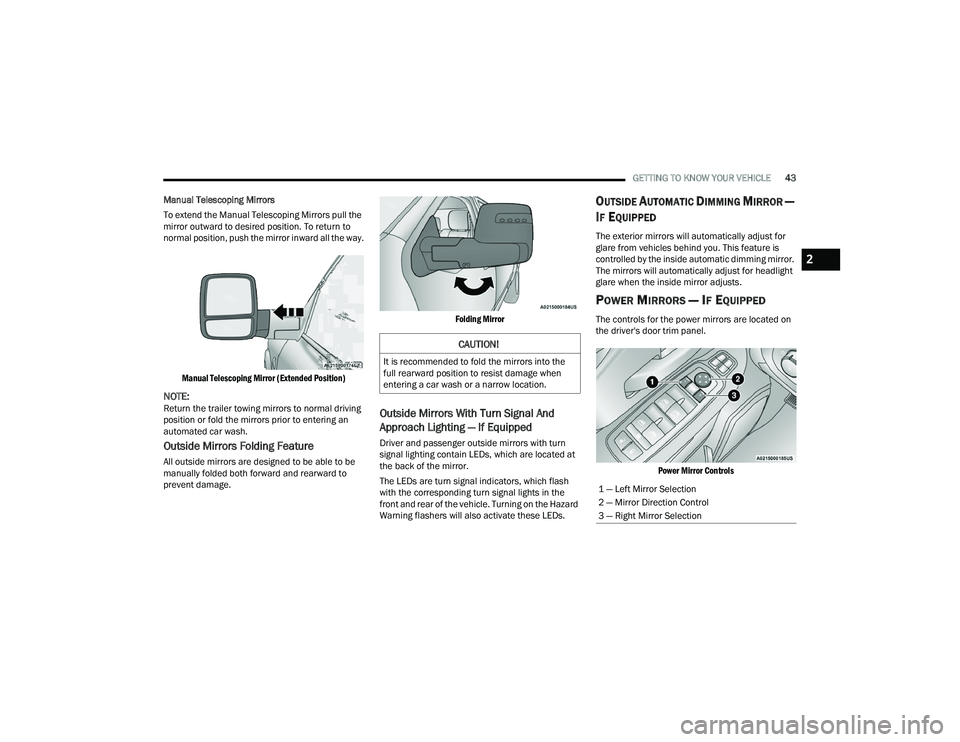
The controls for the power mirrors are located on
the driver's door trim panel.
Power Mirror Controls
CAUTION!
It is recommended to fold the mirrors into the
full rearward position to resist damage when
entering a car wash or a narrow location.
1 — Left Mirror Selection
2 — Mirror Direction Control
3 — Right Mirror Selection
2
23_DPF_OM_EN_USC_t.book Page 43
Page 50 of 444
48GETTING TO KNOW YOUR VEHICLE
not be immediately visible when looking at the
device. The name and color of the button may vary
slightly by manufacturer.
NOTE:The “LEARN” or “TRAIN” button is not the button
you normally use to operate the device.
Non-rolling Code Devices
Most devices manufactured before 1995 will not
have a rolling code. These devices will also not
have a “LEARN” or “TRAIN” button.
PROGRAMMING HOMELINK® TO A
G
ARAGE DOOR OPENER
To program any of the HomeLink® buttons to
activate your garage door opener motor, proceed
as follows:
NOTE:All HomeLink® buttons are programmed using this
procedure. You do not need to erase all channels
when programming additional buttons.
1. Place the ignition switch into the ON/RUN
position.
2. Place the garage door opener transmitter 1 to 3 inches (3 to 8 cm) away from the
HomeLink® button you wish to program, while
keeping the HomeLink® indicator light in view.
3. Push and hold the HomeLink® button you want to program while you push and hold the garage door opener transmitter button you are
trying to replicate.
4. Continue to hold both buttons and observe the HomeLink® indicator light. The HomeLink®
indicator light will flash slowly and then rapidly.
Once this happens, release both buttons.
NOTE:Make sure the garage door opener motor is
plugged in before moving on to the rolling code/
non-rolling code final steps.
Rolling Code Garage Door Opener Final Steps
NOTE:You have 30 seconds in which to initiate rolling
code final step 2, after completing rolling code
final step 1.
1. At the garage door opener motor (in the garage), locate the “LEARN” or “TRAIN”
button. This can usually be found where the
hanging antenna wire is attached to the
garage door opener motor. Firmly push and
release the “LEARN” or “TRAIN” button.
2. Return to the vehicle and push the programmed HomeLink® button three times
(holding the button for two seconds each
time). If the garage door opener motor
operates, programming is complete.
3. Push the programmed HomeLink® button to confirm that the garage door opener motor operates. If the garage door opener motor
does not operate, repeat the final steps for the
rolling code procedure.
Non-Rolling Code Garage Door Opener Final Steps
1. Push and hold the programmed HomeLink® button and observe the HomeLink® indicator
light. If the HomeLink® indicator light stays
on constantly, programming is complete.
2. Push the programmed HomeLink® button to confirm that the garage door opener motor
operates. If the garage door opener motor
does not operate, repeat the steps from the
beginning.
WARNING!
Your motorized door or gate will open and
close while you are programming the universal
transmitter. Do not program the transmitter if
people or pets are in the path of the door or
gate.
Do not run your vehicle in a closed garage or
confined area while programming the trans -
mitter. Exhaust gas from your vehicle contains
Carbon Monoxide (CO) which is odorless and
colorless. Carbon Monoxide is poisonous
when inhaled and can cause you and others to
be severely injured or killed.
23_DPF_OM_EN_USC_t.book Page 48
Page 52 of 444
50GETTING TO KNOW YOUR VEHICLE
NOTE:
If the indicator light stays on constantly,
programming is complete and the garage
door/device should activate when the
HomeLink® button is pushed.
To program the two remaining HomeLink®
buttons, repeat each step for each
remaining button. DO NOT erase the chan -
nels.
If you unplugged the garage door opener/device
for programming, plug it back in at this time.
Reprogramming A Single HomeLink® Button
(Canadian/Gate Operator)
To reprogram a channel that has been previously
trained, follow these steps:
1. Place the ignition in the ON/RUN position.
2. Press and hold the desired HomeLink® button until the indicator light begins to flash after 20
seconds. Do not release the button.
3. Without releasing the button, proceed with “Canadian/Gate Operator Programming” Step
2 and follow all remaining steps.
SECURITY
It is advised to erase all channels before you sell or
turn in your vehicle.
To do this, push and hold the two outside buttons
for 20 seconds until the indicator flashes. Note
that all channels will be erased. Individual
channels cannot be erased.
The HomeLink® Universal Transceiver is disabled
when the Vehicle Security system is active.
TROUBLESHOOTING TIPS
If you are having trouble programming
HomeLink®, here are some of the most common
solutions:
Replace the battery in the garage door opener
hand-held transmitter.
Push the LEARN button on the garage door
opener to complete the training for a rolling
code.
Did you unplug the device for programming and
remember to plug it back in?
If you have any problems, or require assistance,
please call toll-free 1-800-355-3515 or on the
Internet at
HomeLink.com for information or
assistance.
WARNING!
Vehicle exhaust contains carbon monoxide, a
dangerous gas. Do not run your vehicle in the
garage while programming the transmitter.
Exhaust gas can cause serious injury or death.
Your motorized door or gate will open and
close while you are programming the universal
transmitter. Do not program the transmitter if
people, pets or other objects are in the path of
the door or gate. Only use this transmitter with
a garage door opener that has a “stop and
reverse” feature as required by Federal safety
standards. This includes most garage door
opener models manufactured after 1982. Do
not use a garage door opener without these
safety features.
23_DPF_OM_EN_USC_t.book Page 50
Page 54 of 444
52GETTING TO KNOW YOUR VEHICLE
DAYTIME RUNNING LIGHTS (DRLS)
The Daytime Running Lights (DRLs) come on
whenever the engine is running, and the low
beams are not on. The lights will remain on until
the ignition is placed in the OFF or ACC position, or
the parking brake is engaged.
NOTE:
For vehicles sold in Canada, the Daytime
Running Lights will automatically deactivate
when the front fog lights are turned on.
If allowed by law in the country in which the
vehicle was purchased, the Daytime Running
Lights can be turned on and off using the
Uconnect system Úpage 199.
On some vehicles, the Daytime Running Lights
may deactivate, or reduce intensity, on one side
of the vehicle (when a turn signal is activated on
that side), or on both sides of the vehicle (when
the hazard warning lights are activated).
HIGH/LOW BEAM SWITCH
Push the multifunction lever toward the instrument
panel to switch the headlights to high beam.
Pulling the multifunction lever back toward the
steering wheel will turn the low beams back on.
AUTOMATIC HIGH BEAM HEADLAMP
C
ONTROL — IF EQUIPPED
The Automatic High Beam Headlamp Control
system provides increased forward lighting at night
by automating high beam control through the use
of a camera mounted on the inside rearview mirror
or a windshield mounted camera. These cameras
detect vehicle specific light and automatically
switch from high beams to low beams until the
approaching vehicle is out of view.
NOTE:
The Automatic High Beam Headlamp Control
can be turned on or off by selecting “ON” under
“Auto Dim High Beams” within your Uconnect
Settings Ú page 199, as well as turning the
headlight switch to the AUTO position.
Broken, muddy, or obstructed headlights and
taillights of vehicles in the field of view will
cause headlights to remain on longer (closer to
the vehicle). Also, dirt, film, and other obstruc -
tions on the windshield or camera lens will
cause the system to function improperly.
If the windshield or Automatic High Beam Head -
lamp Control mirror is replaced, the mirror must
be re-aimed to ensure proper performance. See
a local authorized dealer.
To opt out of the Automatic High-Beam Sensi -
tivity Control (default) and enter Reduced
High-Beam Sensitivity Control (not recom -
mended), toggle the multifunction lever six full
on/off cycles within 10 seconds of ignition ON.
The system will return to the default setting
when the ignition is placed in the OFF position.
FLASH-TO-PASS
You can signal another vehicle with your headlights
by lightly pulling the multifunction lever toward you.
This will cause the high beam headlights to turn on,
and remain on, until the lever is released.
AUTOMATIC HEADLIGHTS — IF EQUIPPED
This system automatically turns your headlights on
or off based on ambient light levels. To turn the
system on, rotate the headlight switch to the AUTO
position.
When the system is on, the Headlight Delay feature
is also on. This means the headlights will stay on
for up to 90 seconds after you place the ignition
into the OFF position. To turn the automatic
headlights off, turn the headlight switch out of the
AUTO position.
NOTE:The engine must be running before the headlights
will come on in the Automatic mode.
23_DPF_OM_EN_USC_t.book Page 52
Page 74 of 444
72GETTING TO KNOW YOUR VEHICLE
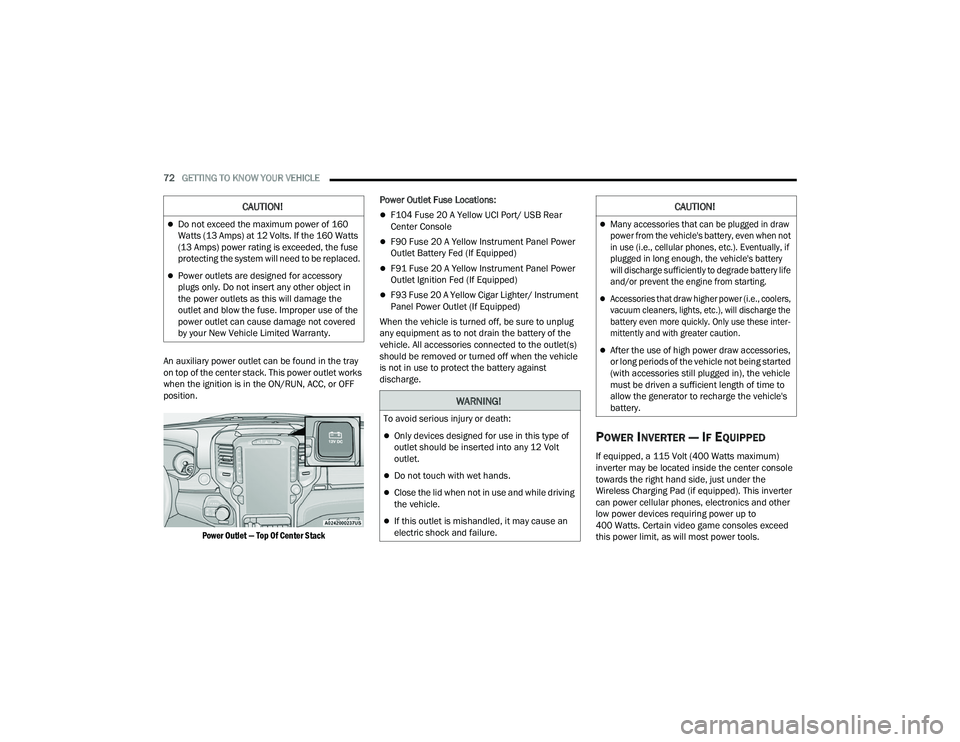
An auxiliary power outlet can be found in the tray
on top of the center stack. This power outlet works
when the ignition is in the ON/RUN, ACC, or OFF
position.
Power Outlet — Top Of Center Stack
Power Outlet Fuse Locations:
F104 Fuse 20 A Yellow UCI Port/ USB Rear
Center Console
F90 Fuse 20 A Yellow Instrument Panel Power
Outlet Battery Fed (If Equipped)
F91 Fuse 20 A Yellow Instrument Panel Power
Outlet Ignition Fed (If Equipped)
F93 Fuse 20 A Yellow Cigar Lighter/ Instrument
Panel Power Outlet (If Equipped)
When the vehicle is turned off, be sure to unplug
any equipment as to not drain the battery of the
vehicle. All accessories connected to the outlet(s)
should be removed or turned off when the vehicle
is not in use to protect the battery against
discharge.
POWER INVERTER — IF EQUIPPED
If equipped, a 115 Volt (400 Watts maximum)
inverter may be located inside the center console
towards the right hand side, just under the
Wireless Charging Pad (if equipped). This inverter
can power cellular phones, electronics and other
low power devices requiring power up to
400 Watts. Certain video game consoles exceed
this power limit, as will most power tools.
CAUTION!
Do not exceed the maximum power of 160
Watts (13 Amps) at 12 Volts. If the 160 Watts
(13 Amps) power rating is exceeded, the fuse
protecting the system will need to be replaced.
Power outlets are designed for accessory
plugs only. Do not insert any other object in
the power outlets as this will damage the
outlet and blow the fuse. Improper use of the
power outlet can cause damage not covered
by your New Vehicle Limited Warranty.
WARNING!
To avoid serious injury or death:
Only devices designed for use in this type of
outlet should be inserted into any 12 Volt
outlet.
Do not touch with wet hands.
Close the lid when not in use and while driving
the vehicle.
If this outlet is mishandled, it may cause an
electric shock and failure.
CAUTION!
Many accessories that can be plugged in draw
power from the vehicle's battery, even when not
in use (i.e., cellular phones, etc.). Eventually, if
plugged in long enough, the vehicle's battery
will discharge sufficiently to degrade battery life
and/or prevent the engine from starting.
Accessories that draw higher power (i.e., coolers,
vacuum cleaners, lights, etc.), will discharge the
battery even more quickly. Only use these inter -
mittently and with greater caution.
After the use of high power draw accessories,
or long periods of the vehicle not being started
(with accessories still plugged in), the vehicle
must be driven a sufficient length of time to
allow the generator to recharge the vehicle's
battery.
23_DPF_OM_EN_USC_t.book Page 72
Page 77 of 444

GETTING TO KNOW YOUR VEHICLE75
NOTE:The power window switches will remain active for
up to 10 minutes after the ignition is placed in the
OFF position. Opening either front door will cancel
this feature. The timing is programmable within
Uconnect Settings Úpage 199.
AUTOMATIC WINDOW FEATURES —
I
F EQUIPPED
Auto-Down Feature
The driver and front passenger door power window
switches have an Auto-Down feature. Push the
window switch down for a short briefly, then
release, and the window will go down
automatically. To stop the window from going all the way down
during the Auto-Down operation, pull up or push
down on the switch briefly.
Auto-Up Feature With Anti-Pinch Protection
Lift the window switch up for a short briefly and
release; the window will go up automatically.
To stop the window from going all the way up
during the Auto-Up operation, push down on the
switch briefly.
To close the window part way, lift the window
switch and release it when you want the window to
stop.
If the window runs into any obstacle during
auto-closure, it will reverse direction and then go
back down. Remove the obstacle and use the
window switch again to close the window.
NOTE:Any impact due to rough road conditions may
trigger the auto-reverse function unexpectedly
during auto-closure. If this happens, pull the switch
lightly and hold to close the window manually.
RESET AUTO-UP
Should the Auto-Up feature stop working, the
window probably needs to be reset. To reset
Auto-Up:
1. Pull the window switch up to close the window
completely and continue to hold the switch up
for an additional two seconds after the
window is closed.
2. Push the window switch down firmly to open the window completely and continue to hold
the switch down for an additional two seconds
after the window is fully open.
WARNING!
Never leave children unattended in a vehicle. Do
not leave the key fob in or near the vehicle or in
a location accessible to children, and do not
leave the Keyless Enter ‘n Go™ Ignition in the
ACC or ON/RUN position. Occupants, particularly
unattended children, can become entrapped by
the windows while operating the power window
switches. Such entrapment may result in serious
injury or death.
WARNING!
There is no anti-pinch protection when the
window is almost closed. To avoid personal
injury be sure to clear your arms, hands, fingers
and all objects from the window path before
closing.
2
23_DPF_OM_EN_USC_t.book Page 75
Page 87 of 444
GETTING TO KNOW YOUR INSTRUMENT PANEL85
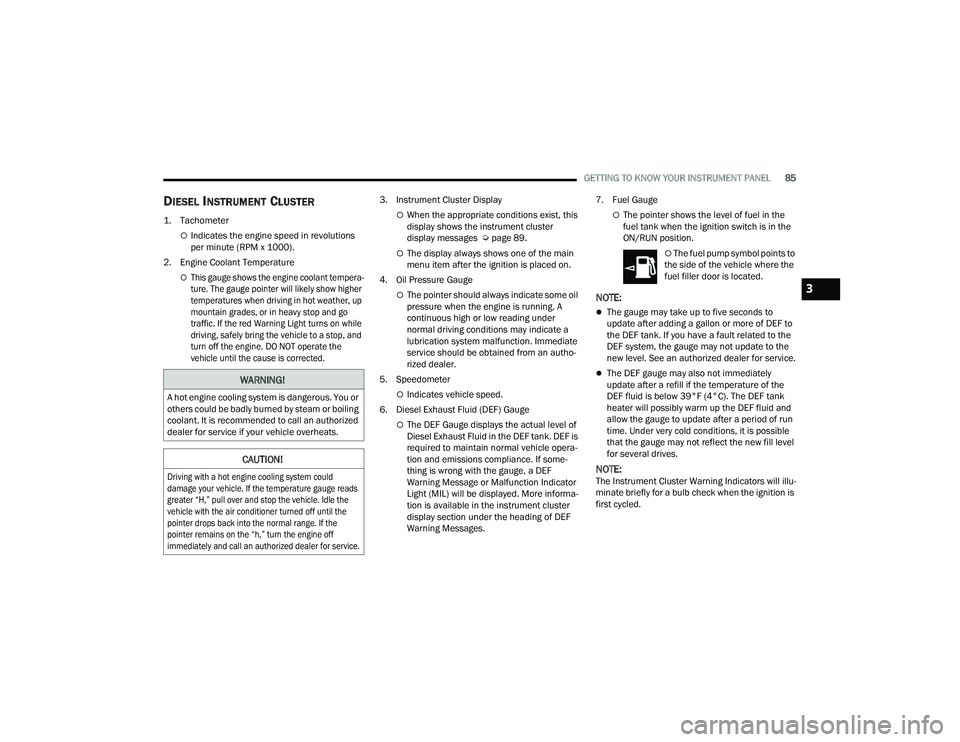
DIESEL INSTRUMENT CLUSTER
1. Tachometer
Indicates the engine speed in revolutions
per minute (RPM x 1000).
2. Engine Coolant Temperature
This gauge shows the engine coolant tempera -
ture. The gauge pointer will likely show higher
temperatures when driving in hot weather, up
mountain grades, or in heavy stop and go
traffic. If the red Warning Light turns on while
driving, safely bring the vehicle to a stop, and
turn off the engine. DO NOT operate the
vehicle until the cause is corrected.
3. Instrument Cluster Display
When the appropriate conditions exist, this
display shows the instrument cluster
display messages Ú
page 89.
The display always shows one of the main
menu item after the ignition is placed on.
4. Oil Pressure Gauge
The pointer should always indicate some oil
pressure when the engine is running. A
continuous high or low reading under
normal driving conditions may indicate a
lubrication system malfunction. Immediate
service should be obtained from an autho -
rized dealer.
5. Speedometer
Indicates vehicle speed.
6. Diesel Exhaust Fluid (DEF) Gauge
The DEF Gauge displays the actual level of
Diesel Exhaust Fluid in the DEF tank. DEF is
required to maintain normal vehicle opera -
tion and emissions compliance. If some -
thing is wrong with the gauge, a DEF
Warning Message or Malfunction Indicator
Light (MIL) will be displayed. More informa -
tion is available in the instrument cluster
display section under the heading of DEF
Warning Messages. 7. Fuel Gauge
The pointer shows the level of fuel in the
fuel tank when the ignition switch is in the
ON/RUN position.
The fuel pump symbol points to
the side of the vehicle where the
fuel filler door is located.
NOTE:
The gauge may take up to five seconds to
update after adding a gallon or more of DEF to
the DEF tank. If you have a fault related to the
DEF system, the gauge may not update to the
new level. See an authorized dealer for service.
The DEF gauge may also not immediately
update after a refill if the temperature of the
DEF fluid is below 39°F (4°C). The DEF tank
heater will possibly warm up the DEF fluid and
allow the gauge to update after a period of run
time. Under very cold conditions, it is possible
that the gauge may not reflect the new fill level
for several drives.
NOTE:The Instrument Cluster Warning Indicators will illu -
minate briefly for a bulb check when the ignition is
first cycled.
WARNING!
A hot engine cooling system is dangerous. You or
others could be badly burned by steam or boiling
coolant. It is recommended to call an authorized
dealer for service if your vehicle overheats.
CAUTION!
Driving with a hot engine cooling system could
damage your vehicle. If the temperature gauge reads
greater “H,” pull over and stop the vehicle. Idle the
vehicle with the air conditioner turned off until the
pointer drops back into the normal range. If the
pointer remains on the “h,” turn the engine off
immediately and call an authorized dealer for service.
3
23_DPF_OM_EN_USC_t.book Page 85
Page 89 of 444
GETTING TO KNOW YOUR INSTRUMENT PANEL87
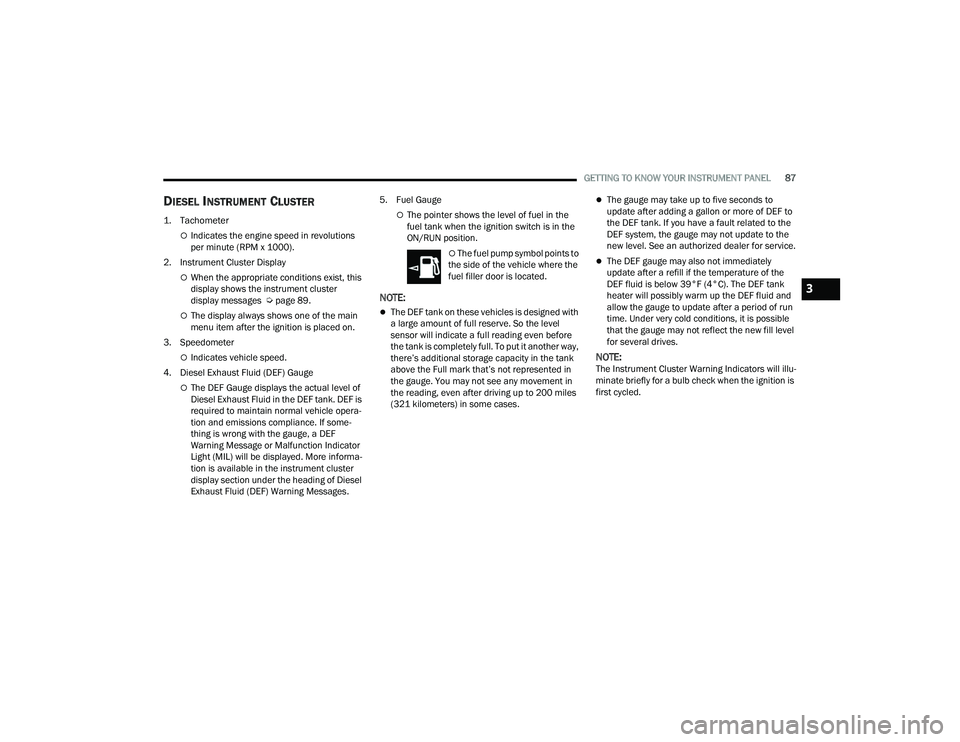
DIESEL INSTRUMENT CLUSTER
1. Tachometer
Indicates the engine speed in revolutions
per minute (RPM x 1000).
2. Instrument Cluster Display
When the appropriate conditions exist, this
display shows the instrument cluster
display messages Ú page 89.
The display always shows one of the main
menu item after the ignition is placed on.
3. Speedometer
Indicates vehicle speed.
4. Diesel Exhaust Fluid (DEF) Gauge
The DEF Gauge displays the actual level of
Diesel Exhaust Fluid in the DEF tank. DEF is
required to maintain normal vehicle opera -
tion and emissions compliance. If some -
thing is wrong with the gauge, a DEF
Warning Message or Malfunction Indicator
Light (MIL) will be displayed. More informa -
tion is available in the instrument cluster
display section under the heading of Diesel
Exhaust Fluid (DEF) Warning Messages. 5. Fuel Gauge
The pointer shows the level of fuel in the
fuel tank when the ignition switch is in the
ON/RUN position.
The fuel pump symbol points to
the side of the vehicle where the
fuel filler door is located.
NOTE:
The DEF tank on these vehicles is designed with
a large amount of full reserve. So the level
sensor will indicate a full reading even before
the tank is completely full. To put it another way,
there’s additional storage capacity in the tank
above the Full mark that’s not represented in
the gauge. You may not see any movement in
the reading, even after driving up to 200 miles
(321 kilometers) in some cases.
The gauge may take up to five seconds to
update after adding a gallon or more of DEF to
the DEF tank. If you have a fault related to the
DEF system, the gauge may not update to the
new level. See an authorized dealer for service.
The DEF gauge may also not immediately
update after a refill if the temperature of the
DEF fluid is below 39°F (4°C). The DEF tank
heater will possibly warm up the DEF fluid and
allow the gauge to update after a period of run
time. Under very cold conditions, it is possible
that the gauge may not reflect the new fill level
for several drives.
NOTE:The Instrument Cluster Warning Indicators will illu -
minate briefly for a bulb check when the ignition is
first cycled.
3
23_DPF_OM_EN_USC_t.book Page 87
Page 95 of 444
GETTING TO KNOW YOUR INSTRUMENT PANEL93
3. Without pushing the brake pedal, push the ENGINE START/STOP button once to return the
ignition to the OFF position.
NOTE:If the indicator message illuminates when you start
the vehicle, the oil change indicator system did not
reset. If necessary, repeat this procedure.
DISPLAY MENU ITEMS
Push and release the up or down arrow
button until the desired selectable menu icon is
highlighted in the instrument cluster display.
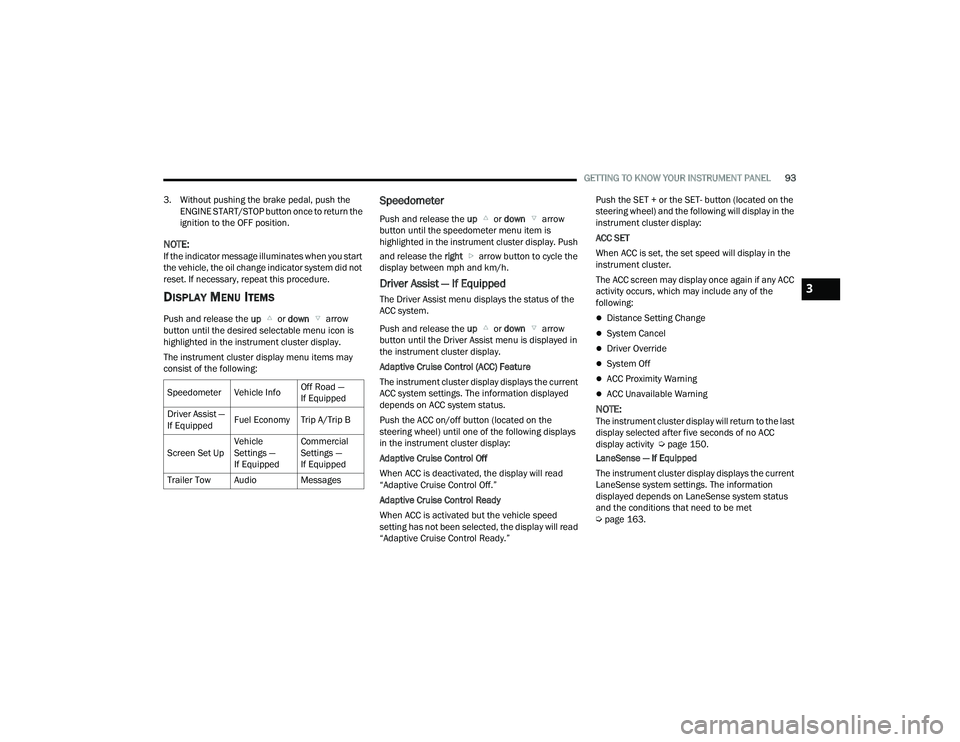
The instrument cluster display menu items may
consist of the following:
Speedometer
Push and release the up or down arrow
button until the speedometer menu item is
highlighted in the instrument cluster display. Push
and release the right arrow button to cycle the
display between mph and km/h.
Driver Assist — If Equipped
The Driver Assist menu displays the status of the
ACC system.
Push and release the up or down arrow
button until the Driver Assist menu is displayed in
the instrument cluster display.
Adaptive Cruise Control (ACC) Feature
The instrument cluster display displays the current
ACC system settings. The information displayed
depends on ACC system status.
Push the ACC on/off button (located on the
steering wheel) until one of the following displays
in the instrument cluster display:
Adaptive Cruise Control Off
When ACC is deactivated, the display will read
“Adaptive Cruise Control Off.”
Adaptive Cruise Control Ready
When ACC is activated but the vehicle speed
setting has not been selected, the display will read
“Adaptive Cruise Control Ready.” Push the SET + or the SET- button (located on the
steering wheel) and the following will display in the
instrument cluster display:
ACC SET
When ACC is set, the set speed will display in the
instrument cluster.
The ACC screen may display once again if any ACC
activity occurs, which may include any of the
following:
Distance Setting Change
System Cancel
Driver Override
System Off
ACC Proximity Warning
ACC Unavailable Warning
NOTE:The instrument cluster display will return to the last
display selected after five seconds of no ACC
display activity Ú
page 150.
LaneSense — If Equipped
The instrument cluster display displays the current
LaneSense system settings. The information
displayed depends on LaneSense system status
and the conditions that need to be met
Ú page 163.
Speedometer Vehicle Info
Off Road —
If Equipped
Driver Assist —
If Equipped Fuel Economy Trip A/Trip B
Screen Set Up Vehicle
Settings —
If EquippedCommercial
Settings —
If Equipped
Trailer Tow Audio Messages
3
23_DPF_OM_EN_USC_t.book Page 93