ignition RAM CHASSIS CAB 2023 Manual Online
[x] Cancel search | Manufacturer: RAM, Model Year: 2023, Model line: CHASSIS CAB, Model: RAM CHASSIS CAB 2023Pages: 444, PDF Size: 20.51 MB
Page 169 of 444
STARTING AND OPERATING167
following conditions occur: The vehicle speed
exceeds 8 mph (13 km/h), the vehicle is shifted
into PARK, the vehicle’s ignition is placed in the
OFF position, or the user presses the touchscreen
X button to exit out of the camera video display.
Whenever the Rear View Camera image is
activated through the Back Up Camera button in
the Controls menu, and the vehicle speed is
greater than, or equal to, 8 mph (13 km/h), a
display timer for the image is initiated. The image
will continue to be displayed until the display timer
exceeds 10 seconds.
NOTE:
If the vehicle speed remains below 8 mph
(13 km/h), the Rear View Camera image will be
displayed continuously until deactivated via the
touchscreen X button, the transmission is
shifted into PARK, or the ignition is placed in the
OFF position.
The touchscreen X button to disable display of
the camera image is made available ONLY when
the vehicle is not in REVERSE. Cargo Camera Icons — If Equipped
If equipped with a Cargo Camera, a touchscreen
button is made available to indicate the current
active Camera image being displayed whenever
the Rear View Camera image is displayed.
If equipped with a Cargo Camera, a touchscreen
button to switch the display to Cargo Camera
image is made available whenever the Rear View
Camera image is displayed.
A touchscreen X button to disable display of the
camera image is made available when the vehicle
is not in REVERSE gear.
When enabled, active guidelines are overlaid on
the Back Up Camera image to illustrate the width
of the vehicle and its projected back up path based
on the steering wheel position. The active
guidelines will show separate zones that will help
indicate the distance to the rear of the vehicle. These settings can be adjusted within Uconnect
Settings Ú
page 199.
A dashed center line overlay indicates the center of
the vehicle to assist with parking or aligning to a
hitch/receiver. The following table shows the
approximate distances for each zone:
Back Up Camera Touchscreen
Button
Cargo Camera Touchscreen Button
AUX Camera Touchscreen Button
Zones
Distance To The Rear
Of The Vehicle
Red 0 - 1 ft (0 - 30 cm)
Yellow 1 ft - 6.5 ft
(30 cm - 2m)
Green 6.5 ft or greater
(2 m or greater)
WARNING!
Drivers must be careful when backing up even
when using the ParkView Rear Back Up Camera.
Always check carefully behind your vehicle, and
be sure to check for pedestrians, animals, other
vehicles, obstructions, or blind spots before
backing up. You are responsible for the safety of
your surroundings and must continue to pay
attention while backing up. Failure to do so can
result in serious injury or death.
4
23_DPF_OM_EN_USC_t.book Page 167
Page 170 of 444
168STARTING AND OPERATING
NOTE:If snow, ice, mud, or any foreign substance builds
up on the camera lens, clean the lens, rinse with
water, and dry with a soft cloth. Do not cover the
lens.
Zoom View
When the Rear View Camera image is
being displayed, and the vehicle speed is
below 8 mph (13 km/h) while in any gear
selector position, Zoom View is available.
By pressing the “magnifying glass” icon in the
upper left of the display screen, the image will
zoom in to four times the standard view. Pressing
the icon a second time will return the view to the
standard Back Up Camera display.
When Zoom View is selected while the vehicle is in
REVERSE, then shifted to DRIVE, the camera delay
view will display the standard Back Up Camera view. If the vehicle is then returned to REVERSE
gear from DRIVE, the Zoom View selection will
automatically resume.
Shifting to NEUTRAL from any gear will maintain
the selected view (Zoom or Standard) as long as
the vehicle speed is below 8 mph (13 km/h).
If the vehicle is in PARK, Zoom View is available
until the gear selector is placed in DRIVE or
REVERSE.
NOTE:
If the vehicle is in DRIVE, NEUTRAL, or REVERSE,
and speed is greater than or equal to 8 mph
(13 km/h), Zoom View is unavailable and the
icon will appear gray.
While in Zoom View, the guidelines will not be
visible.
For information on Auxiliary Cameras (if equipped),
see Ú page 176.
SURROUND VIEW CAMERA SYSTEM —
IF EQUIPPED
Your vehicle may be equipped with the Surround
View Camera system that allows you to see an
on-screen image of the surroundings and Top View
of your vehicle whenever the gear selector is put
into REVERSE or manually activated via the
Uconnect system. The Top View of the vehicle will
show which doors are open. The image will be displayed on the touchscreen display along with a
caution note “Check Entire Surroundings” across
the top of the screen. After five seconds, this note
will disappear. The Surround View Camera system
is comprised of three sequential cameras located
in the front grille and side mirrors, in addition to a
fourth Rear Back Up Camera.
NOTE:
For the 3500, 4500, and 5500 Chassis Cab
vehicles, the Rear Back Up Camera is shipped
loose and not installed. Please refer to the Ram
Body Builder’s Guide for more information.
The Surround View Camera system has
programmable settings that may be selected
through the Uconnect system Ú
page 199.
Press this button on the touchscreen to
enter the Surround View Camera menu in
the Uconnect system.
When the vehicle is shifted into REVERSE, the Rear
View and Top View is the default view of the
system.
If the camera delay is turned on, the camera image
will display for up to 10 seconds after shifting out
of REVERSE. The camera image will not display for
10 seconds if the vehicle speed exceeds 8 mph
(13 km/h), the vehicle is shifted into PARK, or the
ignition is placed in the OFF position. The
touchscreen X button disables the display of the
camera image.
CAUTION!
To avoid vehicle damage, ParkView should
only be used as a parking aid. The ParkView
camera is unable to view every obstacle or
object in your drive path.
To avoid vehicle damage, the vehicle must be
driven slowly when using ParkView to be able
to stop in time when an obstacle is seen. It is
recommended that the driver look frequently
over his/her shoulder when using ParkView.
23_DPF_OM_EN_USC_t.book Page 168
Page 172 of 444
170STARTING AND OPERATING
Back Up Camera View Pressing the Back Up Camera button will
provide a full screen rear view with Zoom
View.
NOTE:If the Rear View Camera view was selected through
the Surround View Camera menu, exiting out of the
Rear View screen will return to the Surround View
menu. If the Back Up Camera was manually acti -
vated through the Controls menu of the Uconnect
system, exiting out of the display screen will return
to the Controls menu.
Cargo Camera
Pressing the Cargo Camera button will
provide a full screen view of the cargo
area.
NOTE:If the Cargo Camera view was selected through the
Surround View screen, exiting out of the Cargo
Camera screen will return to the Surround View
screen. If the Cargo Camera was manually acti -
vated through the Controls menu of the Uconnect
display, exiting out of the display screen will return
to the Controls menu. Trailer Reverse Guidance
NOTE:Trailer Reverse Guidance can only be selected
through the Surround View screen; exiting out of
the Trailer Reverse Guidance screen will return to
the Surround View screen.
Zoom View
When the Rear View image is being displayed, and
the vehicle speed is below 8 mph (13 km/h) while
in any gear, Zoom View is available. By pressing the
“magnifying glass” icon in the upper left of the
display screen, the image will zoom in to four times
the standard view. Pressing the icon a second time
will return the view to the standard Rear View.
When Zoom View is selected while the vehicle is in
REVERSE, then shifted to DRIVE, the camera delay view will display the standard Back Up Camera
view. If the vehicle is then returned to REVERSE
gear from DRIVE, the Zoom View selection will
automatically resume.
Shifting to NEUTRAL from any gear will maintain
the selected view (Zoom or Standard) as long as
the vehicle speed is below 8 mph (13 km/h).
If the vehicle is in PARK, Zoom View is available
until the gear selector is placed in DRIVE or
REVERSE and speeds are at or above 8 mph
(13 km/h).
NOTE:
If the vehicle is in DRIVE, NEUTRAL, or REVERSE,
and speed is greater than or equal to 8 mph
(13 km/h), Zoom View is unavailable and the
icon will appear gray.
While in Zoom View, the guidelines will not be
visible.
Deactivation
The system is deactivated in the following
conditions if it was activated automatically:
When the vehicle is shifted out of REVERSE with
camera delay turned on, the camera image will
continue to be displayed for up to 10 seconds
unless the vehicle speed exceeds 8 mph
(13 km/h), the vehicle is shifted into PARK or
the ignition is placed in the OFF position. There
Pressing the Trailer Reverse
Guidance button will provide a full
screen view of the cargo area and
trailer.
Pressing the Left & Right Tow Mirror
Split Screen View button within the
Trailer Reverse Guidance screen will
display a split screen to allow the
driver to see both sides of the trailer
at the same time. This view allows
the driver to pan left/right to better
frame the trailer in the image.
23_DPF_OM_EN_USC_t.book Page 170
Page 173 of 444
STARTING AND OPERATING171
is a touchscreen X button to disable the display
of the camera image.
When the vehicle is shifted out of REVERSE with
camera delay turned off, the Surround View
Camera mode is exited and the last known
screen appears again.
The system is deactivated in the following
conditions if it was activated manually from the
Uconnect controls menu via the Surround View
Camera button, Back Up Camera button, Cargo
Camera button or Forward Facing Camera button:
The touchscreen X button on the display is
pressed
Vehicle is shifted into PARK
Ignition is placed in the OFF position
Vehicle speed is over 8 mph (13 km/h) for 10
seconds
NOTE:If the Surround View Camera, Cargo Camera, Back
Up Camera, or Forward Facing Camera is activated
manually, and the vehicle is shifted into REVERSE,
deactivation methods for automatic activation are
assumed.
The camera delay system is turned off manually
through Uconnect Settings Ú page 199.
NOTE:
If snow, ice, mud, or any foreign substance
builds up on the camera lenses, clean the
lenses, rinse with water, and dry with a soft
cloth. Do not cover the lenses.
If a malfunction with the system has occurred,
see an authorized dealer.
Cargo Camera Zoom View When the Cargo Camera image is being
displayed, and the vehicle speed is below
8 mph (13 km/h) while in any gear
selector position, Zoom View is available.
By pressing the “magnifying glass” icon in the
upper left of the display screen, the image will
zoom in to four times the standard view. Pressing
the icon a second time will return the view to the
standard Cargo Camera display.
When Zoom View is selected while the vehicle is in
REVERSE, then shifted to DRIVE, the camera delay
view will display the standard Cargo Camera view.
If the vehicle is then returned to REVERSE gear
from DRIVE, the Zoom View selection will
automatically resume.
Shifting to NEUTRAL from any gear will maintain
the selected view (Zoom or Standard) as long as
the vehicle is below 8 mph (13 km/h).
Zoom View is available until the gear selector is
placed in DRIVE or REVERSE and speeds are at or
above 8 mph (13 km/h).
NOTE:
If the vehicle is in DRIVE, NEUTRAL, or REVERSE,
and speed is greater than or equal to 8 mph
(13 km/h), Zoom View is unavailable and the
icon will appear gray.
While in Zoom View, the dynamic centerline will
not be visible.
Forward Facing Camera With Tire Lines —
If Equipped
The Forward Facing Camera displays a front view
image of the road ahead, along with tire lines to
guide the driver when driving on narrow roads. Tire
lines can be activated/deactivated through the
Uconnect Settings.
Activation
The Forward Facing Camera can be activated in
the following ways:
Pressing the Forward Facing Camera button in
the Controls screen or Apps menu
Pressing the Forward Facing Camera button
located in the upper left corner of the Back Up
camera display
Once activated, the camera image will remain on
as long as the vehicle speed is below 8 mph
(13 km/h).
4
23_DPF_OM_EN_USC_t.book Page 171
Page 174 of 444
172STARTING AND OPERATING
Deactivation
The Forward Facing Camera is deactivated in the
following conditions:
The vehicle exceeds 8 mph (13 km/h), except
when vehicle is in 4WD Low
The touchscreen X button on the display is
pressed.
The vehicle is shifted into PARK.
The ignition is placed in the OFF position.
NOTE:If the vehicle is in 4WD Low, the Forward Facing
Camera image will be displayed until the X button
is pressed or the ignition is placed in the OFF
position.
Trailer Reverse Guidance — If Equipped
The Trailer Reverse Guidance feature assists the
driver in backing up a trailer by providing
adjustable camera views of the trailer and
surrounding area. The cameras are mounted on
the side mirrors and the images will be displayed
side-by-side on the touchscreen. Left and right
camera images are swapped and mirrored on the
touchscreen to show the equivalent area behind
the vehicle as though the driver is using the side
mirrors. Activation
The Trailer Reverse Guidance feature can be
activated by pressing the Trailer Reverse Guidance
button on the Back Up/Cargo Camera Display.
Deactivation
When the vehicle is shifted out of REVERSE with
camera delay turned on, the camera image will
continue to be displayed for up to 10 seconds unless
the vehicle speed exceeds 8 mph (13 km/h), the
vehicle is shifted into PARK or the ignition is placed
in the OFF position. There is a touchscreen X button
to disable the display of the camera image.
If Trailer Reverse Guidance is selected through
manually activated Surround View, Back Up
Camera, or Cargo Camera, the following
deactivation conditions apply:
The touchscreen X button on the display is
pressed
The ignition is placed in the OFF position
The vehicle speed is over 8 mph (13 km/h) for
10 seconds
Blind Spot Assist Cameras — If Equipped
There are cameras located in the exterior mirrors
to assist in blind spot detection by providing a wide
camera view of the side of the vehicle selected.
The blind spot cameras will work in the ON/RUN or
ignition ON position. Press the X or More Cams
button to exit the screen. The Blind Spot Cameras can also be activated with Turn Signal
engagement, see Ú
page 166 for more
information.
Activation
Press the Driver Blind Spot or Passenger Blind
Spot buttons by locating the Vehicle screen, then
Cameras screen.
Driver Blind Spot
Pressing the Driver’s Blind Spot button
will provide a full screen view of the
driver’s outside mirror camera.
Passenger Blind Spot Pressing the Passenger’s Blind Spot
button will provide a full screen view of
the passenger’s outside mirror camera.
WARNING!
Drivers must be careful when backing up even
when using the Surround View Camera. Always
check carefully behind your vehicle, and be sure
to check for pedestrians, animals, other
vehicles, obstructions, or blind spots before
backing up. You are responsible for the safety of
your surroundings and must continue to pay
attention while backing up. Failure to do so can
result in serious injury or death.
23_DPF_OM_EN_USC_t.book Page 172
Page 176 of 444
174STARTING AND OPERATING
Inputting Trailer Values
For the Trailer Surround View Camera system to
function, all fields must be entered. When a value
is needed the screen will display “Required”.
When the Trailer Type button is selected two
options are available: Conventional or Gooseneck/
5th Wheel.
Activation
The Trailer Surround Camera can be activated
through the Uconnect system when the vehicle is
in PARK, NEUTRAL, or DRIVE.
When the vehicle is shifted into REVERSE,
Surround View Camera showing the Top View and
Back Up Camera is the default view of the system.
Press the More Cams button and then press the
Trailer tab to access the Trailer Cameras. Press Trailer Surround Camera button to access Top
View and Rear View of the trailer.
If the camera delay is turned on, the camera image
will display for up to 10 seconds after shifting out
of REVERSE. The camera image will not display for
10 seconds if the vehicle speed exceeds 8 mph
(13 km/h), the vehicle is shifted into PARK, or the
ignition is placed in the OFF position. The
touchscreen X button disables the display of the
camera image.
If the camera delay is turned off, the camera image
will close and display the previous screen after
shifting out of REVERSE.
Modes Of Operation
The Trailer Surround View Camera system offers
two different camera displays:
Top View split screen with one selected
mounted camera
Full screen view of a selected mounted camera
Press the More Cams button on the Surround View
screen and select the Trailer tab to access the
Trailer Cameras. Press Trailer Surround Camera
button to access the default Top View and Rear
View of the trailer.
Top View
The Trailer Top View will show in the Uconnect
system with Top View and Rear View in a split
screen display.
Trailer Top and Rear Camera View
NOTE:Due to wide angle cameras, the image will appear
distorted.
Rear View
Pressing the Rear View button will show
the Top View and Rear View in a split
screen display.
Front View Pressing the Front View button will show
you what is immediately in front of the
trailer and is paired with the Top View of
the trailer.
Left View Pressing the Left View button will give the
driver a wider angle view of the left side
trailer camera and is paired with the Top
View of the trailer.
Setting
Description
Trailer Length Input the total length of
the trailer
Trailer Width Input the total width of
the trailer
Camera Height Input the height of the
mounted camera
Trailer Type Choose the trailer type
from menu
23_DPF_OM_EN_USC_t.book Page 174
Page 177 of 444
STARTING AND OPERATING175
Right View Pressing the Right View button will give
the driver a wider angle view of the right
side trailer camera and is paired with the
Top View of the trailer.
Full Screen Camera View
To display a full screen image of the Trailer
Surround View mounted cameras, select one of
the following options from the Trailer Cameras
screen: Trailer Left, Trailer Right, Trailer Front,
Trailer Rear. Exiting out of the full screen view will
return the system to the previous screen.
NOTE:If the Trailer Surround Camera was selected
through the More Cameras menu, an option to
return to the More Cameras menu will display. If
the Trailer Surround Camera was manually acti-
vated through the Controls menu of the Uconnect
system, exiting out of the display screen will return
to the Controls menu.
Trailer Reverse Guidance Pressing the Trailer Reverse Guidance
button will provide a split screen view of
the cargo area and trailer, and provides
the option to pan left or right. For more
information, see Ú page 168. Deactivation
The system is deactivated in the following
conditions if it was activated
automatically:
When the vehicle is shifted out of REVERSE with
camera delay turned on, the camera image will
continue to be displayed for up to 10 seconds,
unless the vehicle speed exceeds 8 mph
(13 km/h), the vehicle is shifted into PARK or
the ignition is placed in the OFF position. There
is a touchscreen X button to disable the display
of the camera image.
When the vehicle is shifted out of REVERSE with
camera delay turned off, the Trailer Surround
View Camera mode is exited and the last known
screen appears again.
The system is deactivated in the following
conditions if it was activated manually from the
Uconnect controls menu via the Trailer Surround
Camera button:
The touchscreen X button on the display is
pressed
Vehicle is shifted into PARK
Ignition is placed in the OFF position
Vehicle speed is over 8 mph (13 km/h) for 10
seconds
NOTE:If the Trailer Surround Camera is activated
manually, and the vehicle is shifted into REVERSE,
deactivation methods for automatic activation are
assumed.
The camera delay system is turned off manually
through the Uconnect system Ú page 199.
NOTE:
If snow, ice, mud, or any foreign substance
builds up on the camera lenses, clean the
lenses, rinse with water, and dry with a soft
cloth. Do not cover the lenses.
If a malfunction with the system has occurred,
see an authorized dealer.
WARNING!
Drivers must be careful when backing up even
when using the Trailer Surround View Camera.
Always check carefully behind your vehicle, and
be sure to check for pedestrians, animals, other
vehicles, obstructions, or blind spots before
backing up. You are responsible for the safety of
your surroundings and must continue to pay
attention while backing up. Failure to do so can
result in serious injury or death.
4
23_DPF_OM_EN_USC_t.book Page 175
Page 178 of 444
176STARTING AND OPERATING
(Continued)
AUX CAMERA — IF EQUIPPED
Your vehicle may be equipped with one or two AUX
Cameras, which display a rearview image from the
trailer on the touchscreen.
NOTE:Two Aux Cameras are only available on vehicles
with NAV equipped radios if the vehicle is not
equipped with a Center High Mounted Stop Lamp
(CHMSL) and Surround View Camera system.
Activation
The AUX Camera is activated by first pressing the
Backup Camera or Cargo Camera (if equipped)
button on the touchscreen, followed by the AUX
button located in the upper left corner of the rearview display. On vehicles with Surround View
Camera (if equipped), the AUX Camera can be
activated when the vehicle is in REVERSE by first
pressing the More Cams button in the Surround
view screen, followed by the AUX tab. The AUX
camera can also be activated when the vehicle is
in REVERSE by pressing the AUX button.
If equipped with two AUX Cameras, you can switch
between each camera by pressing the AUX 1 or
AUX 2 buttons on the Trailer Camera display.
Deactivation
The AUX Camera is deactivated by pressing the
touchscreen X button in the upper right corner of
the touchscreen. This will return the display back
to the previously displayed screen.
NOTE:
If the AUX button is pressed and no AUX Camera
is connected, the touchscreen will display a blue
screen along with the message “Camera
System Unavailable.” The screen can be exited
out by pressing the touchscreen X button in the upper right hand corner. This will return the
display back to the previously displayed screen.
Zoom View is not available with the AUX Camera
feature.
The display will always default to the Trailer
Camera display AUX 1.
ENGINE RUNAWAY
Diesel engine runaway is a rare condition affecting
diesel engines, where the engine consumes its
own lubrication oil and runs at higher and higher
RPM until it overspeeds to a point where it destroys
itself due to either mechanical failure or engine
seizure through lack of lubrication.
CAUTION!
To avoid vehicle damage, Trailer Surround
View should only be used as a parking aid. The
Trailer Surround View Camera is unable to
view every obstacle or object in your drive
path.
To avoid vehicle damage, the vehicle must be
driven slowly when using Trailer Surround
View to be able to stop in time when an
obstacle is seen. It is recommended that the
driver look frequently over his/her shoulder
when using Trailer Surround View.
AUX 1 Camera Button
AUX 2 Camera Button
WARNING!
In case of engine runaway due to flammable
fumes from fuel spills or turbocharger oil leaks
being sucked into the engine, do the following to
help avoid personal injury and/or vehicle
damage:
Turn the ignition switch to the OFF position.
Using a CO2 or dry chemical type fire extin
-
guisher, direct the spray from the fire extin -
guisher into the grille on the passenger side so
that the spray enters the engine air intake.
23_DPF_OM_EN_USC_t.book Page 176
Page 190 of 444
188STARTING AND OPERATING
Integrated Trailer Brake Module (ITBM) —
If Equipped
Your vehicle may have an ITBM for Electric and
Electric Over Hydraulic (EOH) trailer brakes.
NOTE:This module has been designed and verified with
electric trailer brakes and new electric over
hydraulic systems. Some previous EOH systems
may not be compatible with ITBM.
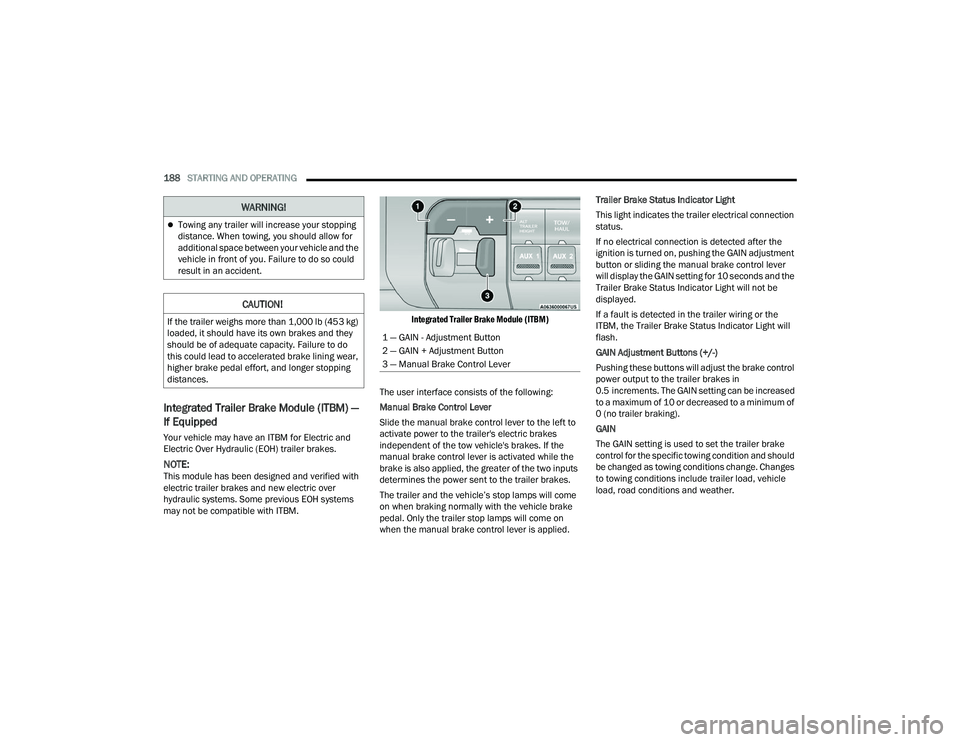
Integrated Trailer Brake Module (ITBM)
The user interface consists of the following:
Manual Brake Control Lever
Slide the manual brake control lever to the left to
activate power to the trailer's electric brakes
independent of the tow vehicle's brakes. If the
manual brake control lever is activated while the
brake is also applied, the greater of the two inputs
determines the power sent to the trailer brakes.
The trailer and the vehicle’s stop lamps will come
on when braking normally with the vehicle brake
pedal. Only the trailer stop lamps will come on
when the manual brake control lever is applied. Trailer Brake Status Indicator Light
This light indicates the trailer electrical connection
status.
If no electrical connection is detected after the
ignition is turned on, pushing the GAIN adjustment
button or sliding the manual brake control lever
will display the GAIN setting for 10 seconds and the
Trailer Brake Status Indicator Light will not be
displayed.
If a fault is detected in the trailer wiring or the
ITBM, the Trailer Brake Status Indicator Light will
flash.
GAIN Adjustment Buttons (+/-)
Pushing these buttons will adjust the brake control
power output to the trailer brakes in
0.5 increments. The GAIN setting can be increased
to a maximum of 10 or decreased to a minimum of
0 (no trailer braking).
GAIN
The GAIN setting is used to set the trailer brake
control for the specific towing condition and should
be changed as towing conditions change. Changes
to towing conditions include trailer load, vehicle
load, road conditions and weather.
Towing any trailer will increase your stopping
distance. When towing, you should allow for
additional space between your vehicle and the
vehicle in front of you. Failure to do so could
result in an accident.
CAUTION!
If the trailer weighs more than 1,000 lb (453 kg)
loaded, it should have its own brakes and they
should be of adequate capacity. Failure to do
this could lead to accelerated brake lining wear,
higher brake pedal effort, and longer stopping
distances.
WARNING!
1 — GAIN - Adjustment Button
2 — GAIN + Adjustment Button
3 — Manual Brake Control Lever
23_DPF_OM_EN_USC_t.book Page 188
Page 193 of 444
STARTING AND OPERATING191
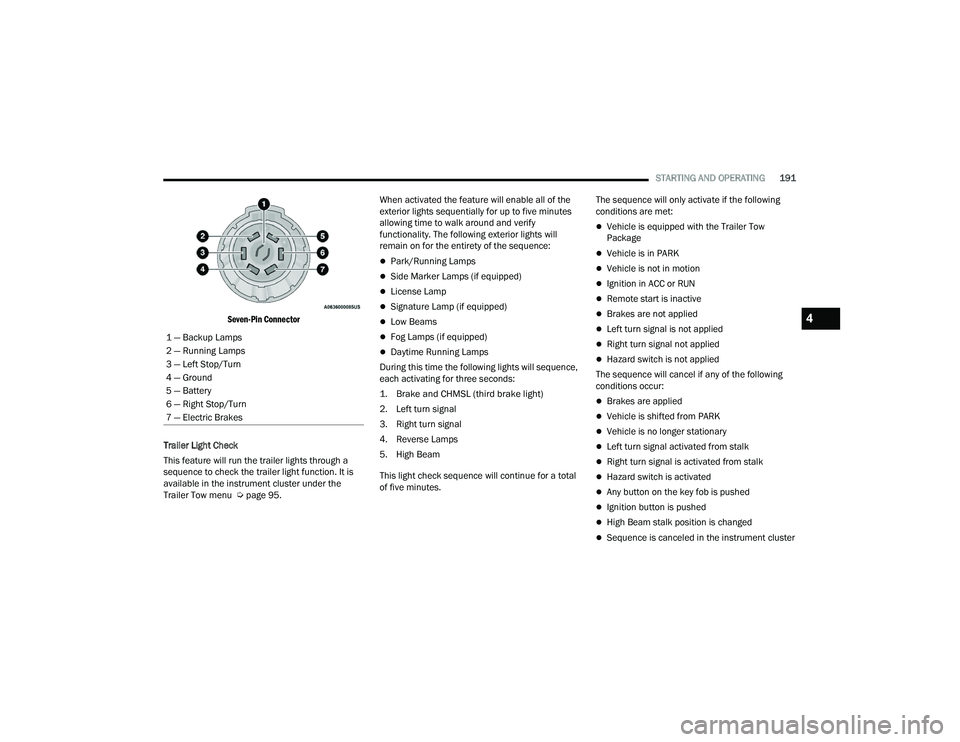
Seven-Pin Connector
Trailer Light Check
This feature will run the trailer lights through a
sequence to check the trailer light function. It is
available in the instrument cluster under the
Trailer Tow menu Ú page 95. When activated the feature will enable all of the
exterior lights sequentially for up to five minutes
allowing time to walk around and verify
functionality. The following exterior lights will
remain on for the entirety of the sequence:
Park/Running Lamps
Side Marker Lamps (if equipped)
License Lamp
Signature Lamp (if equipped)
Low Beams
Fog Lamps (if equipped)
Daytime Running Lamps
During this time the following lights will sequence,
each activating for three seconds:
1. Brake and CHMSL (third brake light)
2. Left turn signal
3. Right turn signal
4. Reverse Lamps
5. High Beam
This light check sequence will continue for a total
of five minutes. The sequence will only activate if the following
conditions are met:
Vehicle is equipped with the Trailer Tow
Package
Vehicle is in PARK
Vehicle is not in motion
Ignition in ACC or RUN
Remote start is inactive
Brakes are not applied
Left turn signal is not applied
Right turn signal not applied
Hazard switch is not applied
The sequence will cancel if any of the following
conditions occur:
Brakes are applied
Vehicle is shifted from PARK
Vehicle is no longer stationary
Left turn signal activated from stalk
Right turn signal is activated from stalk
Hazard switch is activated
Any button on the key fob is pushed
Ignition button is pushed
High Beam stalk position is changed
Sequence is canceled in the instrument cluster
1 — Backup Lamps
2 — Running Lamps
3 — Left Stop/Turn
4 — Ground
5 — Battery
6 — Right Stop/Turn
7 — Electric Brakes
4
23_DPF_OM_EN_USC_t.book Page 191