navigation system RAM CHASSIS CAB 2023 Owners Manual
[x] Cancel search | Manufacturer: RAM, Model Year: 2023, Model line: CHASSIS CAB, Model: RAM CHASSIS CAB 2023Pages: 444, PDF Size: 20.51 MB
Page 31 of 444
GETTING TO KNOW YOUR VEHICLE29
BASIC VOICE COMMANDS
The following basic Voice Commands can be given
at any point while using your Uconnect system.
Push the VR button or for the Uconnect 5/
5 NAV, say the vehicle’s Wake Up word, “Hey
Uconnect”. After the beep, say:
“Cancel ” to stop a current voice session
“Help ” to hear a list of suggested Voice
Commands
“ Repeat ” to listen to the system prompts again
Notice the visual cues that inform you of your voice
recognition system’s status. Cues appear on the
touchscreen.
NOTE:On Uconnect 5 systems, the factory default Wake
Up word is set to “Hey Uconnect” and can be repro -
grammed through the Uconnect Settings.
GET STARTED
All you need to control your Uconnect system with
your voice are the buttons on your steering wheel.
Helpful hints for using Voice Recognition:
Reduce background noise. Wind and passenger
conversations are examples of noise that may
impact recognition.
Speak clearly at a normal pace and volume
while facing straight ahead.
Each time you give a Voice Command, first push
the VR button, wait until after the beep, then say
your Voice Command. You can also say the
vehicle “Wake Up” word and state your
command. Some examples of “Wake up” words
include “Hey Uconnect” or “Hey Ram”.
A passenger can press the VR button shortcut
on the radio status bar to also issue a
command.
You can interrupt the help message or system
prompts by pushing the VR button and saying a
Voice Command from the current category.
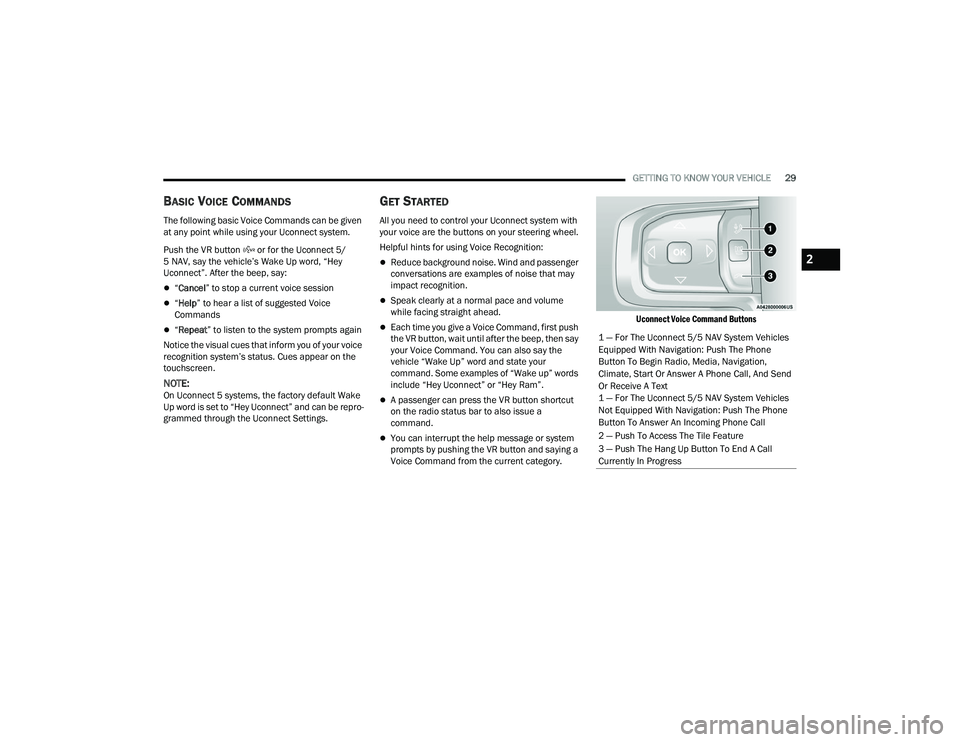
Uconnect Voice Command Buttons
1 — For The Uconnect 5/5 NAV System Vehicles
Equipped With Navigation: Push The Phone
Button To Begin Radio, Media, Navigation,
Climate, Start Or Answer A Phone Call, And Send
Or Receive A Text
1 — For The Uconnect 5/5 NAV System Vehicles
Not Equipped With Navigation: Push The Phone
Button To Answer An Incoming Phone Call
2 — Push To Access The Tile Feature
3 — Push The Hang Up Button To End A Call
Currently In Progress
2
23_DPF_OM_EN_USC_t.book Page 29
Page 94 of 444
92GETTING TO KNOW YOUR INSTRUMENT PANEL
You can customize your Instrument Cluster Display
with up to five tiles that may consist of the
following:
NOTE:These options may vary based on your vehicle trim
level.
Navigation
Route Set / Route Not Set
Trip A / Trip B
Vehicle Info
Coolant Temp
Trans Temp
Oil Temp
Oil Pressure
Battery Voltage
Oil Life
Tire Pressure
Fuel Economy
Air Suspension
Driver Info
Driver Assist
Audio
Audio Info
Off Road
Selec-Terrain / Air Suspension Status
Steering Angle
Pitch
Roll
Trailer Tow
Trailer Trip
Trailer Brake
Trailer Tire Pressure Monitor
OIL LIFE RESET
Use this QR code to access your
digital experience.
Your vehicle is equipped with an
engine oil change indicator
system. The “Oil Change
Required” message will display in
the instrument cluster display
after a single chime has sounded, to indicate the
next scheduled oil change interval. The engine oil
change indicator system is duty cycle based, which
means the engine oil change interval may
fluctuate, dependent upon your personal driving
style.
NOTE:Use the steering wheel instrument cluster display
controls for the following procedure. Oil Life Reset Procedure
1. Without pushing the brake pedal, push the
ENGINE START/STOP button and place the
ignition to the ON/RUN position (do not start
the engine).
2. Push and release the down arrow button to
scroll downward through the main menu to
“Vehicle Info.”
3. Push and release the right arrow button to
access the ”Vehicle Info” screen, then scroll up
or down to select “Oil Life.”
4. Push and hold the right arrow button to
select “Reset”.
5. Push and release the down arrow button to
select “Yes,” then push and release the
right arrow button to reset the Oil Life to
100%.
6. Push and release the up arrow button to
exit the instrument cluster display screen.
Secondary Method Of Resetting Engine Oil Life
1. Without pressing the brake pedal, push the ENGINE START/STOP button and place the
ignition to the ON/RUN position (do not start
the engine).
2. Fully press the accelerator pedal, slowly, three times within ten seconds.
23_DPF_OM_EN_USC_t.book Page 92
Page 97 of 444
GETTING TO KNOW YOUR INSTRUMENT PANEL95
Pitch And Roll
Displays the pitch and roll of the vehicle in
the graphic with the angle number on the
screen.
NOTE:When vehicle speed becomes too high to display
the pitch and roll, “- -” will display in place of the
numbers, and the graphic will be greyed out. A
message indicating the necessary speed for the
feature to become available will also display.
Fuel Economy — If Equipped
Push and release the up or down arrow
button until the Fuel Economy menu item is
highlighted in the instrument cluster display. Push
and Hold the right arrow button to reset
Average Fuel Economy.
Current Fuel Economy Gauge
Average Fuel Economy Value
Range To Empty
Fuel Tank Levels — If Equipped
Trip A/Trip B
Push and release the up or down arrow
button until the Trip menu item is highlighted in the
instrument cluster display. Push and release the
right arrow button to enter the submenus of Trip A and Trip B. The Trip A or Trip B information
will display the following:
Distance
Average Fuel Economy
Elapsed Time
Push and hold right arrow button to reset all
information.
Navigation — If Equipped
Push and release the up or down arrow
button until the Navigation display title is
highlighted in the instrument cluster display, “Hold
OK to Start Route” will display when no active route
is set. “Hold OK to Cancel Route” will display when
active route is set. Use the left or right arrow
button to zoom in or out on the display
Ú page 199.
Trailer Tow
Push and release the up or down arrow
button until the Trailer Tow menu item is
highlighted in the instrument cluster display. Push
and release the right or left arrow button to
cycle through the following trailer tow information:
Trip (trailer specific) Distance: Push and hold
the OK button to reset the distance.
Integrated Trailer Brake Module (ITBM):
Braking Output
Trailer Type
ITBM Gain
Trailer Tire Pressure Monitoring: The Instrument
Cluster Display will display the Trailer Tire Pres -
sure for a connected trailer with sensors that
match the active trailer profile. When a low tire
is present, the low tire value will be displayed in
red, and the affected low tire will have a red
glow. “Trailer Tire Low“ will be displayed on the
center bottom of the Instrument Cluster Display
screen.
Trailer Light Check – If Equipped: Push and hold
the OK button to begin the Trailer Light Test
sequence Ú page 190.
For vehicles equipped with Blind Spot Monitoring
(BSM):
When a Trailer Brake signal is detected, a
pop-up message will appear in the cluster
requiring user to select trailer type.
If a conventional trailer is selected, the BSM
operation will function as normal.
If Gooseneck/5th Wheel trailer is selected
BSM will be disabled due to unsupported
trailer type.
If no selection is made, the BSM system will
remain on until a selection is chosen.
3
23_DPF_OM_EN_USC_t.book Page 95
Page 100 of 444
98GETTING TO KNOW YOUR INSTRUMENT PANEL
Fuel Gauge
Hide Range
Show Range
Defaults (Restores All Settings To Default Settings)
Restore
Cancel
Commercial Settings — If Equipped
Commercial Settings allows the driver to set and
recall additional features when the transmission is
in PARK.
Push and release the up or down arrow
button until Commercial Settings displays in the
instrument cluster display.
Follow the prompts to enter the required PIN and
enter the Commercial Settings submenu.
NOTE:If your vehicle is equipped with a touchscreen
radio, “Commercial Settings” will replace “Vehicle
Settings” in the instrument cluster display. The
Commercial Settings menu will only include the
settings below Ú page 199. Commercial Settings allows you to access the
following features (if equipped):
Power Take Off (PTO)
Remote Ignition
Idle Control
Backup Alarm
ParkSense
Aux Switches
PIN Setup
NOTE:If the vehicle’s PIN is forgotten or not known, see
an authorized dealer to have the PIN reset.
DIESEL MESSAGES AND WARNINGS
Diesel Particulate Filter (DPF) Messages
The Cummins® diesel engine meets all diesel
emissions standards, resulting in one of the lowest
emitting diesel engines ever produced. To achieve
these emissions standards, your vehicle is
equipped with a state-of-the-art engine and
exhaust system. These systems are seamlessly
integrated into your vehicle and managed by the
Powertrain Control Module (PCM). The PCM
manages engine combustion to allow the exhaust
system’s catalyst to trap and burn Particulate
Matter (PM) pollutants, with no input or interaction
on your part.
Your vehicle has the ability to alert you to
additional maintenance required on your vehicle or
engine. The following messages may display in
your instrument cluster display:
Perform Service
— Your vehicle will require emis -
sions maintenance at a set interval. To help
remind you when this maintenance is due, the
instrument cluster display will display “Perform
Service”. When the “Perform Service” message
is displayed in the instrument cluster display it is
necessary to have the emissions maintenance
performed. Emissions maintenance may
include replacing the Closed Crankcase Ventila -
tion (CCV) filter element. The procedure for
clearing and resetting the "Perform Service"
indicator message is located in the appropriate
Service Information.
Favorite Menus
Trip Info Navigation Off Road
Trailer Tow –
If Equipped
(show/hide) Audio (show/
hide)
WARNING!
A hot exhaust system can start a fire if you park
over materials that can burn. Such materials
might be grass or leaves coming into contact
with your exhaust system. Do not park or
operate your vehicle in areas where your
exhaust system can contact anything that can
burn.
23_DPF_OM_EN_USC_t.book Page 98
Page 204 of 444
202MULTIMEDIA
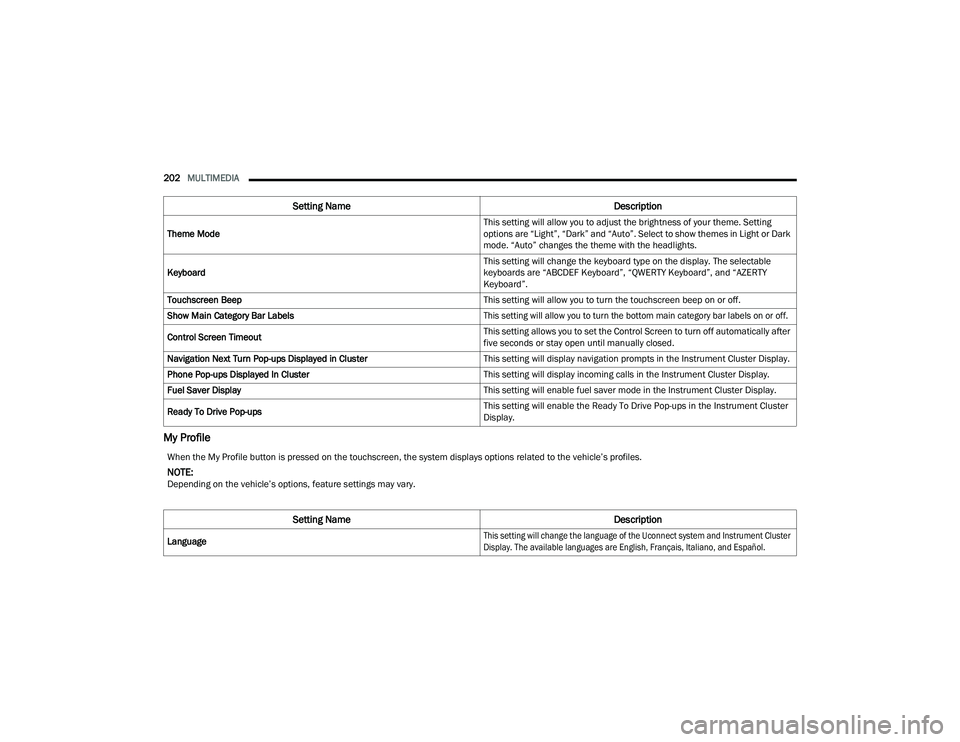
My Profile
Theme Mode This setting will allow you to adjust the brightness of your theme. Setting
options are “Light”, “Dark” and “Auto”. Select to show themes in Light or Dark
mode. “Auto” changes the theme with the headlights.
Keyboard This setting will change the keyboard type on the display. The selectable
keyboards are “ABCDEF Keyboard”, “QWERTY Keyboard”, and “AZERTY
Keyboard”.
Touchscreen Beep This setting will allow you to turn the touchscreen beep on or off.
Show Main Category Bar Labels
This setting will allow you to turn the bottom main category bar labels on or off.
Control Screen Timeout This setting allows you to set the Control Screen to turn off automatically after
five seconds or stay open until manually closed.
Navigation Next Turn Pop-ups Displayed in Cluster This setting will display navigation prompts in the Instrument Cluster Display.
Phone Pop-ups Displayed In Cluster This setting will display incoming calls in the Instrument Cluster Display.
Fuel Saver Display This setting will enable fuel saver mode in the Instrument Cluster Display.
Ready To Drive Pop-ups This setting will enable the Ready To Drive Pop-ups in the Instrument Cluster
Display.
Setting Name
Description
When the My Profile button is pressed on the touchscreen, the system displays options related to the vehicle’s profiles.
NOTE:Depending on the vehicle’s options, feature settings may vary.
Setting NameDescription
Language
This setting will change the language of the Uconnect system and Instrument Cluster
Display. The available languages are English, Français, Italiano, and Español.
23_DPF_OM_EN_USC_t.book Page 202
Page 206 of 444
204MULTIMEDIA
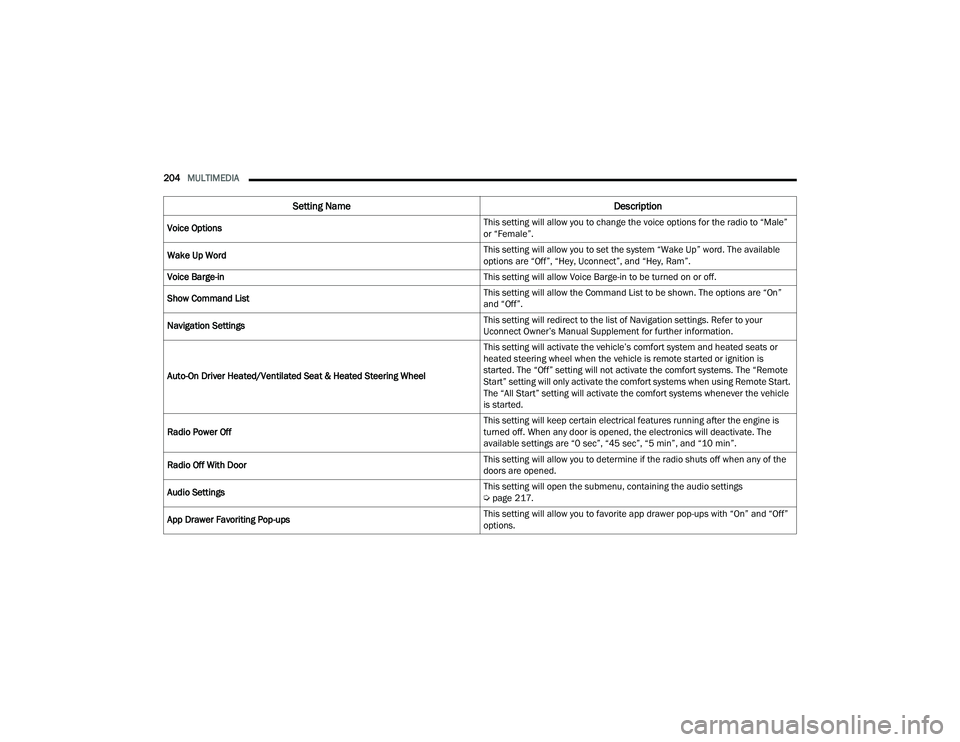
Voice Options This setting will allow you to change the voice options for the radio to “Male”
or “Female”.
Wake Up Word This setting will allow you to set the system “Wake Up” word. The available
options are “Off”, “Hey, Uconnect”, and “Hey, Ram”.
Voice Barge-in This setting will allow Voice Barge-in to be turned on or off.
Show Command List This setting will allow the Command List to be shown. The options are “On”
and “Off”.
Navigation Settings This setting will redirect to the list of Navigation settings. Refer to your
Uconnect Owner’s Manual Supplement for further information.
Auto-On Driver Heated/Ventilated Seat & Heated Steering Wheel This setting will activate the vehicle’s comfort system and heated seats or
heated steering wheel when the vehicle is remote started or ignition is
started. The “Off” setting will not activate the comfort systems. The “Remote
Start” setting will only activate the comfort systems when using Remote Start.
The “All Start” setting will activate the comfort systems whenever the vehicle
is started.
Radio Power Off This setting will keep certain electrical features running after the engine is
turned off. When any door is opened, the electronics will deactivate. The
available settings are “0 sec”, “45 sec”, “5 min”, and “10 min”.
Radio Off With Door This setting will allow you to determine if the radio shuts off when any of the
doors are opened.
Audio Settings This setting will open the submenu, containing the audio settings
Ú
page 217.
App Drawer Favoriting Pop-ups This setting will allow you to favorite app drawer pop-ups with “On” and “Off”
options.
Setting Name
Description
23_DPF_OM_EN_USC_t.book Page 204
Page 207 of 444
MULTIMEDIA205
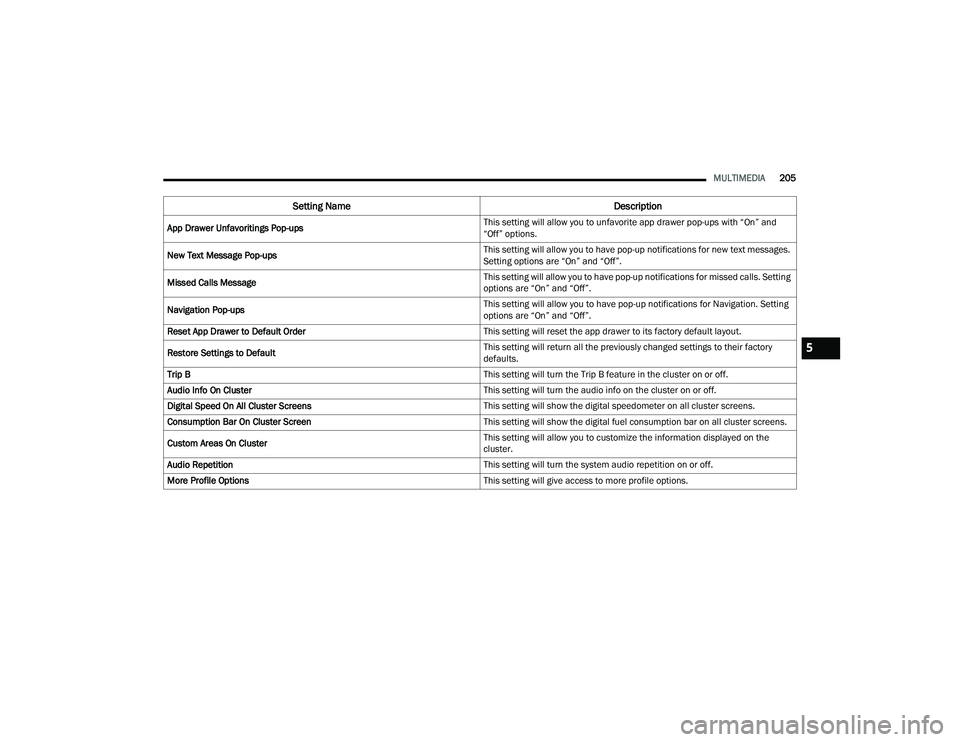
App Drawer Unfavoritings Pop-ups This setting will allow you to unfavorite app drawer pop-ups with “On” and
“Off” options.
New Text Message Pop-ups This setting will allow you to have pop-up notifications for new text messages.
Setting options are “On” and “Off”.
Missed Calls Message This setting will allow you to have pop-up notifications for missed calls. Setting
options are “On” and “Off”.
Navigation Pop-ups This setting will allow you to have pop-up notifications for Navigation. Setting
options are “On” and “Off”.
Reset App Drawer to Default Order This setting will reset the app drawer to its factory default layout.
Restore Settings to Default This setting will return all the previously changed settings to their factory
defaults.
Trip B This setting will turn the Trip B feature in the cluster on or off.
Audio Info On Cluster This setting will turn the audio info on the cluster on or off.
Digital Speed On All Cluster Screens This setting will show the digital speedometer on all cluster screens.
Consumption Bar On Cluster Screen This setting will show the digital fuel consumption bar on all cluster screens.
Custom Areas On Cluster This setting will allow you to customize the information displayed on the
cluster.
Audio Repetition This setting will turn the system audio repetition on or off.
More Profile Options This setting will give access to more profile options.
Setting NameDescription
5
23_DPF_OM_EN_USC_t.book Page 205
Page 212 of 444
210MULTIMEDIA
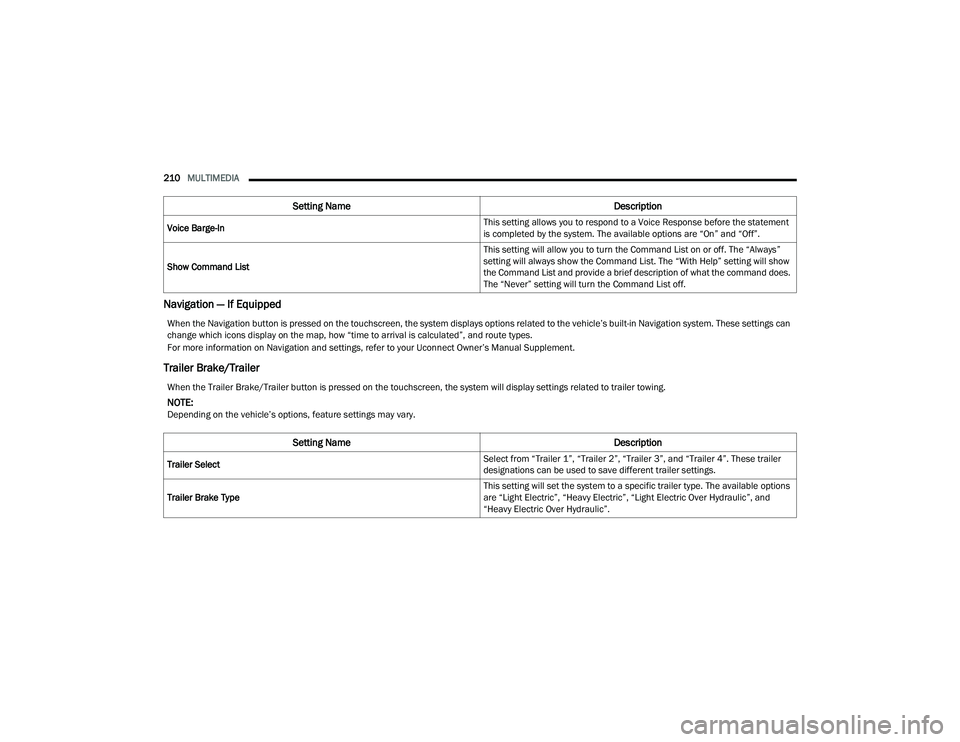
Navigation — If Equipped
Trailer Brake/Trailer
Voice Barge-In This setting allows you to respond to a Voice Response before the statement
is completed by the system. The available options are “On” and “Off”.
Show Command List This setting will allow you to turn the Command List on or off. The “Always”
setting will always show the Command List. The “With Help” setting will show
the Command List and provide a brief description of what the command does.
The “Never” setting will turn the Command List off.
Setting Name
Description
When the Navigation button is pressed on the touchscreen, the system displays options related to the vehicle’s built-in Navigation system. These settings can
change which icons display on the map, how “time to arrival is calculated”, and route types.
For more information on Navigation and settings, refer to your Uconnect Owner’s Manual Supplement.
When the Trailer Brake/Trailer button is pressed on the touchscreen, the system will display settings related to trailer towing.
NOTE:Depending on the vehicle’s options, feature settings may vary.
Setting NameDescription
Trailer Select Select from “Trailer 1”, “Trailer 2”, “Trailer 3”, and “Trailer 4”. These trailer
designations can be used to save different trailer settings.
Trailer Brake Type This setting will set the system to a specific trailer type. The available options
are “Light Electric”, “Heavy Electric”, “Light Electric Over Hydraulic”, and
“Heavy Electric Over Hydraulic”.
23_DPF_OM_EN_USC_t.book Page 210
Page 220 of 444
218MULTIMEDIA
Notifications
SiriusXM® Setup
When the Notifications button is pressed on the touchscreen, the system displays the options related to Notifications for the system.
NOTE:Depending on the vehicle’s options, feature settings may vary.
Setting Name Description
Notification Sounds This setting will turn off the Notification chime that plays when a new
notification is sent. The options are “On” and “Off”.
App Drawer Favoriting Pop-Ups This setting turns the App Favorited pop-up on or off.
App Drawer Unfavoriting Pop-Ups This setting turns the App Unfavorited pop-up on or off.
New Text Message Pop-Ups This setting turns receiving/storing a pop-up for new text messages of any
connected phone on or off.
Missed Calls Message This setting turns receiving/storing a pop-up for missed calls of any connected
phone on or off.
Navigation Pop-Ups This setting turns receiving/storing predictive Navigation Pop-Ups on or off.
When the SiriusXM® Setup button is pressed on the touchscreen, the system displays options related to SiriusXM® satellite radio. These settings can be used
to skip specific radio channels and restart favorite songs from the beginning.
NOTE:
A subscription to SiriusXM® satellite radio is required for these settings to be functional.
Depending on the vehicle’s options, feature settings may vary.
Setting NameDescription
Tune Start This setting will play the current song from the beginning when you tune to a
music channel using one of the 12 presets.
23_DPF_OM_EN_USC_t.book Page 218
Page 247 of 444
MULTIMEDIA245
networks. Depending on the type of device in your
vehicle, some SiriusXM Guardian™ connected
services require an operable LTE (voice/data) or
4G (data) network compatible with your device.
SiriusXM Guardian™ is available only on equipped
vehicles purchased within the continental United
States, Alaska, Hawaii, Puerto Rico and Canada.
NOTE:
Certain SiriusXM Guardian™ connected
services are dependent upon an operative
telematics device, a cellular connection, naviga -
tion map data, and GPS satellite signal recep -
tion, which can limit the ability to reach the
response center or reach emergency support.
Not all features of SiriusXM Guardian™ are
available everywhere at all times, particularly in
remote or enclosed areas.
Other factors outside the control of SiriusXM
Guardian™ that may limit or prevent service
delivery are hills, structures, buildings, tunnels,
weather, damage to the electrical system or
other important parts of your vehicle, network
congestion, civil disturbances, actions of third
parties or the government, Internet failure, and/
or the physical location of your vehicle, such as
in an underground parking structure or under a
bridge.
Not all SiriusXM Guardian™ features are available
for all models. SiriusXM Guardian™ provides:
The ability to remotely lock/unlock and remote
start your vehicle from virtually anywhere by
using the Vehicle Branded App or your
computer.
If equipped — Send & Go capability with the
Vehicle Branded App. Use the Vehicle Branded
App to easily search, map and send your loca
-
tions directly to your Uconnect Navigation.
The ability to locate your vehicle, when you
forget where you parked, using the Vehicle
Finder function of the Vehicle Branded App.
Before you drive, familiarize yourself with the
easy-to-use Uconnect system and SiriusXM
Guardian™ connected services.
The ASSIST and SOS Call Buttons On Your
Rearview Mirror Or Overhead Console
If equipped, the ASSIST Button is used for
contacting Roadside Assistance, Vehicle Care,
Uconnect Care, and SiriusXM Guardian™
Customer Care. The SOS Call button connects you
directly to SiriusXM Guardian™ Customer Care for
assistance in an emergency.
Activation — If Equipped
To unlock the full potential of SiriusXM Guardian™
in your vehicle, you must activate your SiriusXM
Guardian™ connected services.
1. Press the Apps icon on the bottom of your in-vehicle touchscreen.
2. Select the Activate Services icon from your list of apps.
3. For customers in the United States , select
“Customer Care” to speak with a SiriusXM
Guardian™ Customer Care agent who will
activate services in your vehicle, or select
“Enter Email” to activate on the web.
For customers in Canada , enter your email ad-
dress to activate services in your vehicle.
Included Trial Period For New Vehicles
Your new vehicle may come with an included trial*
period for use of SiriusXM Guardian™ connected
services starting on the date of vehicle purchase.
To get started with your trial, enrollment in
SiriusXM Guardian™ is required.
* Included trial applies to new vehicles only.
Features And Packages
After the trial period, you must purchase a
subscription to continue your services by calling a
SiriusXM Guardian™ Customer Care agent.
5
23_DPF_OM_EN_USC_t.book Page 245