key fob Ram ProMaster 2018 User Guide
[x] Cancel search | Manufacturer: RAM, Model Year: 2018, Model line: ProMaster, Model: Ram ProMaster 2018Pages: 204, PDF Size: 4 MB
Page 13 of 204

GETTING TO KNOW YOUR VEHICLE
KEYS......................12
KeyFob.....................12
SEATS .....................13
Heated Seats — If Equipped ........13
Adjustable Armrests — If Equipped ....14
HEAD RESTRAINTS..............14
Front Head Restraint Adjustment .....15
Front Head Restraint Removal .......15
STEERING WHEEL..............16
Telescoping Steering Column .......16
EXTERIOR LIGHTS..............16
Multifunction Lever ..............16
Headlights ...................17
High Beam/Low Beam Select Switch . . .17
Parking Lights .................17
Turn Signals ..................17
Lane Change Assist .............17
INTERIOR LIGHTS...............17
WIPERS AND WASHERS ..........17
Front Wiper Operation............17
CLIMATE CONTROLS.............19
Manual Climate Control Overview .....19
Climate Control Functions ..........22
Operating Tips .................23
HOOD......................24
Opening .....................24
Closing .....................24
INTERNAL EQUIPMENT ...........25
Power Outlets.................25
GETTING TO KNOW YOUR VEHICLE
11
Page 14 of 204
KEYS
Key Fob
Your vehicle uses a key start ignition system.
The ignition system consists of a key fob with
a Remote Keyless Entry (RKE) and an igni-
tion switch.
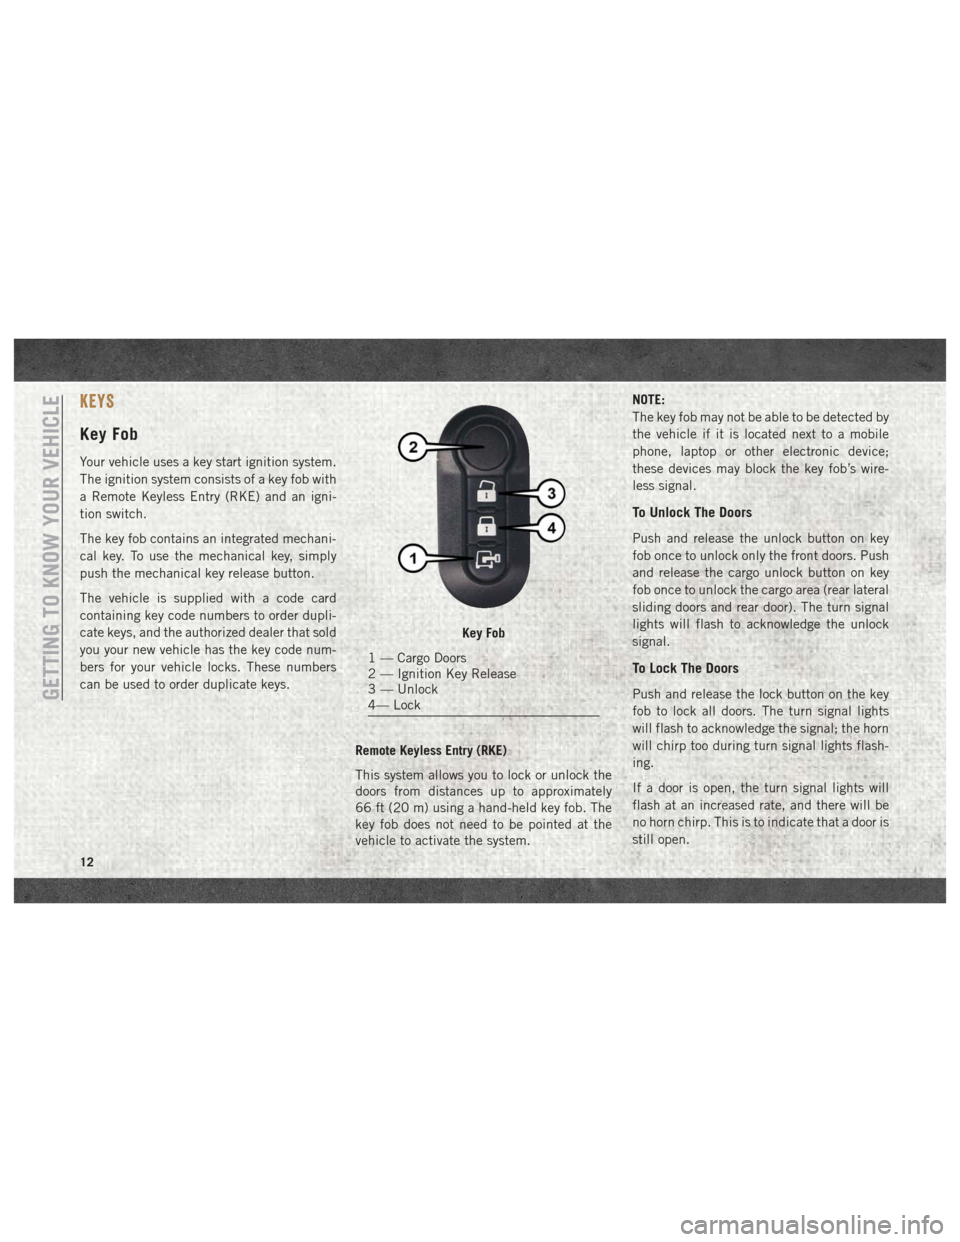
The key fob contains an integrated mechani-
cal key. To use the mechanical key, simply
push the mechanical key release button.
The vehicle is supplied with a code card
containing key code numbers to order dupli-
cate keys, and the authorized dealer that sold
you your new vehicle has the key code num-
bers for your vehicle locks. These numbers
can be used to order duplicate keys.Remote Keyless Entry (RKE)
This system allows you to lock or unlock the
doors from distances up to approximately
66 ft (20 m) using a hand-held key fob. The
key fob does not need to be pointed at the
vehicle to activate the system. NOTE:
The key fob may not be able to be detected by
the vehicle if it is located next to a mobile
phone, laptop or other electronic device;
these devices may block the key fob’s wire-
less signal.
To Unlock The Doors
Push and release the unlock button on key
fob once to unlock only the front doors. Push
and release the cargo unlock button on key
fob once to unlock the cargo area (rear lateral
sliding doors and rear door). The turn signal
lights will flash to acknowledge the unlock
signal.
To Lock The Doors
Push and release the lock button on the key
fob to lock all doors. The turn signal lights
will flash to acknowledge the signal; the horn
will chirp too during turn signal lights flash-
ing.
If a door is open, the turn signal lights will
flash at an increased rate, and there will be
no horn chirp. This is to indicate that a door is
still open.
Key Fob
1 — Cargo Doors
2 — Ignition Key Release
3 — Unlock
4— Lock
GETTING TO KNOW YOUR VEHICLE
12
Page 19 of 204
Headlights
To turn on the headlights, turn the end of the
multifunction lever to the headlight position.
When the headlight switch is on, the parking
lights, taillights, license plate light, the clear-
ance lights and instrument panel lights are
also turned on. To turn off the headlights,
turn the end of the multifunction lever back
to the O (Off) position.
High Beam/Low Beam Select
Switch
Pull the multifunction lever toward you to
switch the headlights to high beam. Pull the
lever a second time to switch the headlights
back to low beam.
Parking Lights
These lights can only be turned on with igni-
tion key in the STOP position or removed, by
moving the end of the multifunction lever to
O (off) position and then to the headlight
position.The warning light telltale in the instrument
panel comes on. The lights stay on until the
next ignition cycle is performed.
Turn Signals
Move the multifunction lever up or down and
the arrows on each side of the instrument
cluster flash to show proper operation of the
front and rear turn signal lights.
NOTE:
If either light remains on and does not flash,
or there is a very fast flash rate, check for a
defective outside light bulb. If an indicator
fails to light when the lever is moved, it would
suggest that the indicator bulb is defective.
Lane Change Assist
Tap the lever up or down once, without mov-
ing beyond the detent, and the turn signal
(right or left) will flash five times then auto-
matically turn off.
INTERIOR LIGHTS
The courtesy lights, dome lights, and map
lights are mounted between the sun visors on
the overhead shelf. Each light is turned on by
pushing the corresponding switch.
The courtesy lights will turn on when you use
the key fob or manually from the driver door
cylinder to unlock the doors or open any door.
The lights will fade to off after approximately
30 seconds, or they will immediately fade to
off once the ignition switch is turned to ON/
RUN from the OFF position.
WIPERS AND WASHERS
Front Wiper Operation
The windshield wiper/washer lever is located
on the right side of the steering column.
There are five different modes of operation
for the front windshield wipers. The wind-
shield wiper lever can be raised or lowered to
access the modes.
17
Page 76 of 204
STARTING THE ENGINE — GAS
ENGINE
Before starting your vehicle, adjust your seat,
adjust both inside and outside mirrors, and
fasten your seat belts.
WARNING!
• Never leave children alone in a vehicle,or with access to an unlocked vehicle.
• Allowing children to be in a vehicle un-
attended is dangerous for a number of
reasons. A child or others could be seri-
ously or fatally injured. Children should
be warned not to touch the parking
brake, brake pedal or the transmission
gear selector.
• Do not leave the key fob in or near the
vehicle (or in a location accessible to
children). A child could operate power
windows, other controls, or move the
vehicle.
Normal Starting
NOTE:
Normal starting of either a cold or a warm
engine is obtained without pumping or press-
ing the accelerator pedal.
Turn the ignition switch to the AVV (START)
position and release it when the engine
starts. If the engine fails to start within
10 seconds, turn the ignition switch to the
STOP (OFF/LOCK) position, wait 10 to
15 seconds, then repeat the “Normal Start-
ing” procedure.
STARTING THE ENGINE — DIESEL
ENGINE
Before starting your vehicle, adjust your seat,
both inside and outside mirrors, and fasten
your seat belts.
The starter is allowed to crank for up to
10-second intervals. Waiting a few minutes
between such intervals will protect the starter
from overheating.
WARNING!
• Never leave children alone in a vehicle,or with access to an unlocked vehicle.
• Allowing children to be in a vehicle un-
attended is dangerous for a number of
reasons. A child or others could be seri-
ously or fatally injured. Children should
be warned not to touch the parking
brake, brake pedal or the transmission
gear selector.
• Do not leave the key fob in or near the
vehicle (or in a location accessible to
children). A child could operate power
windows, other controls, or move the
vehicle.
NOTE:
Engine start up in very low ambient tempera-
ture could result in evident white smoke. This
condition will disappear as the engine warms
up.
STARTING AND OPERATING
74
Page 82 of 204
prevent the Electronic Park Brake system
from working properly and result in unin-
tended vehicle movement.
WARNING!
• When leaving the vehicle, always removethe key fob from the ignition and lock
your vehicle.
• Never leave children alone in a vehicle,
or with access to an unlocked vehicle.
Allowing children to be in a vehicle un-
attended is dangerous for a number of
reasons. A child or others could be seri-
ously or fatally injured. Children should
be warned not to touch the parking
brake, brake pedal or the gear selector.
• Do not leave the key fob in or near the
vehicle, or in a location accessible to
children, and do not leave a vehicle
equipped with Keyless Enter-N-Go in
the ACC or ON/RUN mode. A child could
operate power windows, other controls,
or move the vehicle.
• Be sure the parking brake is fully disen-
gaged before driving; failure to do so can
lead to brake failure and a collision.
WARNING!
• Always fully apply the parking brakewhen leaving your vehicle, or it may roll
and cause damage or injury.
CAUTION!
If the Brake System Warning Light remains
on with the parking brake released, a brake
system malfunction is indicated. Have the
brake system serviced by an authorized
dealer immediately.
If exceptional circumstances should make it
necessary to engage the park brake while the
vehicle is in motion, a buzzer repeats until
the park brake switch is released or vehicle
speed is below 1.25 mph (2 km/h).
To disengage the park brake while the vehicle
is in motion, release the switch. If the vehicle
is brought to a complete stop using the park
brake, when the vehicle reaches approxi-
mately 1.25 mph (2 km/h) the parking brake
will remain engaged.
WARNING!
Driving the vehicle with the parking brake
engaged, or repeated use of the parking
brake to slow the vehicle may cause seri-
ous damage to the brake system. Be sure
the parking brake is fully disengaged be-
fore driving; failure to do so can lead to
brake failure and a collision.
In the unlikely event of a malfunction of the
Electric Park Brake system, a yellow triangle
EPB fault lamp will illuminate. In this status
some EPB functionality may be deactivated,
in this event, urgent service of the electric
park brake system is required. Do not rely on
the parking brake to hold the vehicle station-
ary, wheel chocks or other mechanical secur-
ing of the vehicle is required to prevent roll-
ing.
Loss Of Electric Power
If electric power is not available and the EPB
must be released for towing the vehicle, the
EPB can be mechanically released by use of
STARTING AND OPERATING
80
Page 123 of 204
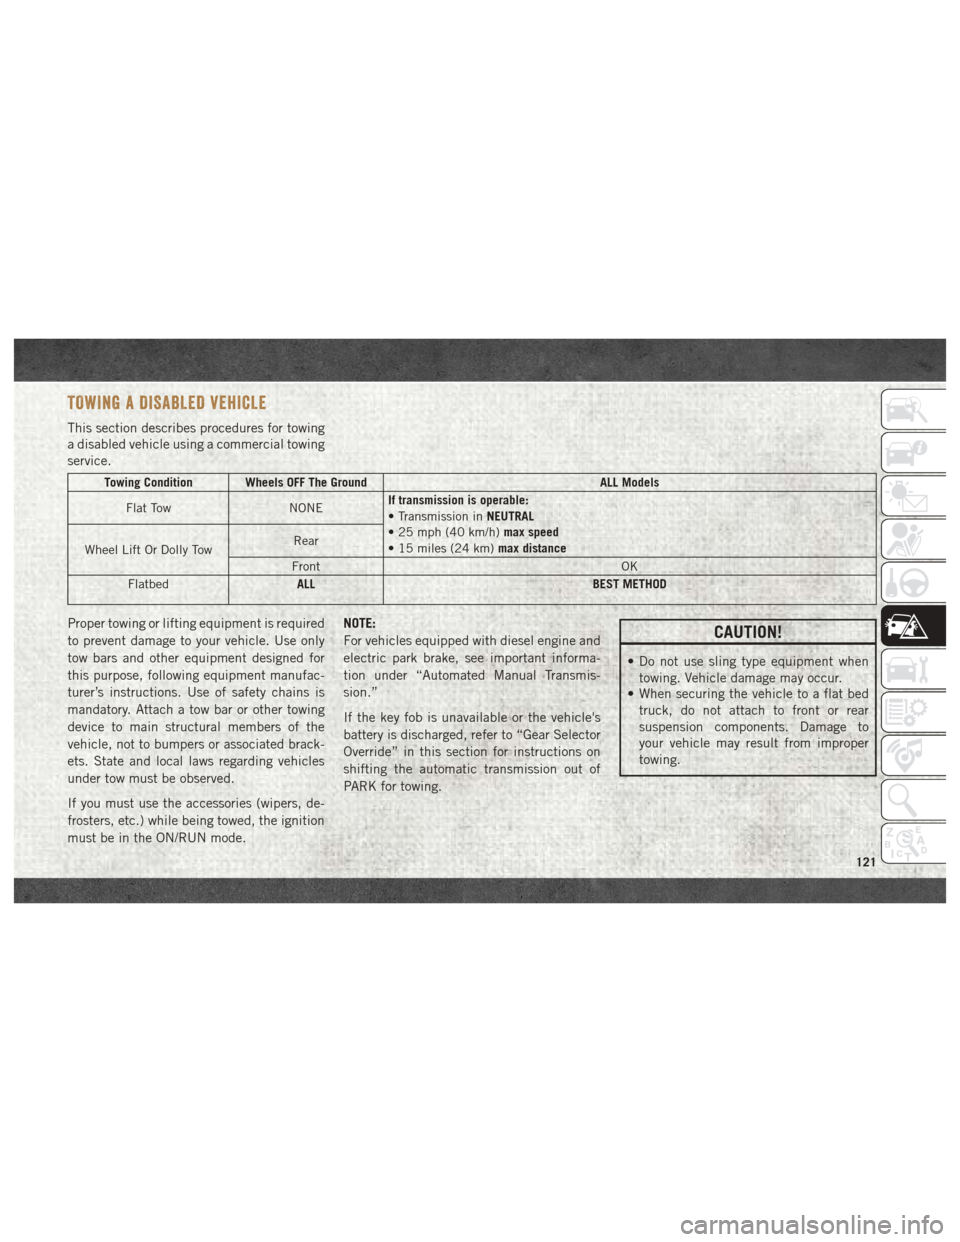
TOWING A DISABLED VEHICLE
This section describes procedures for towing
a disabled vehicle using a commercial towing
service.
Towing Condition Wheels OFF The GroundALL Models
Flat Tow NONEIf transmission is operable:
• Transmission in
NEUTRAL
• 25 mph (40 km/h) max speed
• 15 miles (24 km) max distance
Wheel Lift Or Dolly Tow Rear
Front OK
Flatbed ALL
BEST METHOD
Proper towing or lifting equipment is required
to prevent damage to your vehicle. Use only
tow bars and other equipment designed for
this purpose, following equipment manufac-
turer’s instructions. Use of safety chains is
mandatory. Attach a tow bar or other towing
device to main structural members of the
vehicle, not to bumpers or associated brack-
ets. State and local laws regarding vehicles
under tow must be observed.
If you must use the accessories (wipers, de-
frosters, etc.) while being towed, the ignition
must be in the ON/RUN mode.NOTE:
For vehicles equipped with diesel engine and
electric park brake, see important informa-
tion under “Automated Manual Transmis-
sion.”
If the key fob is unavailable or the vehicle's
battery is discharged, refer to “Gear Selector
Override” in this section for instructions on
shifting the automatic transmission out of
PARK for towing.CAUTION!
• Do not use sling type equipment when
towing. Vehicle damage may occur.
• When securing the vehicle to a flat bed
truck, do not attach to front or rear
suspension components. Damage to
your vehicle may result from improper
towing.
121