buttons RAM PROMASTER 2021 User Guide
[x] Cancel search | Manufacturer: RAM, Model Year: 2021, Model line: PROMASTER, Model: RAM PROMASTER 2021Pages: 288, PDF Size: 15.22 MB
Page 106 of 288

104MULTIMEDIA
When in Satellite mode:
The SXM button on the touchscreen is high -
lighted.
The SiriusXM® Presets are displayed at the
top of the screen.
The SiriusXM® Channel Number is displayed
in the center.
The Program Information is displayed at the
bottom of the Channel Number.
The SiriusXM® function buttons are
displayed below the Program Information.
Tuning is done by operating the Tune Knob or by
Direct Tune, similar to other Radio Bands.
In addition to the tuning operation functions
common to all radio modes, the replay, Traffic/
Weather button, and Favorite button functions
are available in SiriusXM® Mode.
Uconnect 3/3 NAV With 5-inch Display SiriusXM®
Satellite Radio
Replay
The replay function provides a means to store
and replay up to 22 minutes of music audio and
48 minutes of talk radio. Once the channel is
switched, content in replay memory is lost.
Press the Replay button on the touchscreen.
The play/pause, rewind/forward and live
buttons will display at the top of the screen,
along with the replay time.
You can exit by pressing the Replay button on
the touchscreen any time during the Replay
mode.1 — Browse
2 — Radio Bands
3 — Direct Tune
4 — Info Button
5 — Next Button
21_VF_OM_EN_USC_t.book Page 104
Page 110 of 288
108MULTIMEDIA
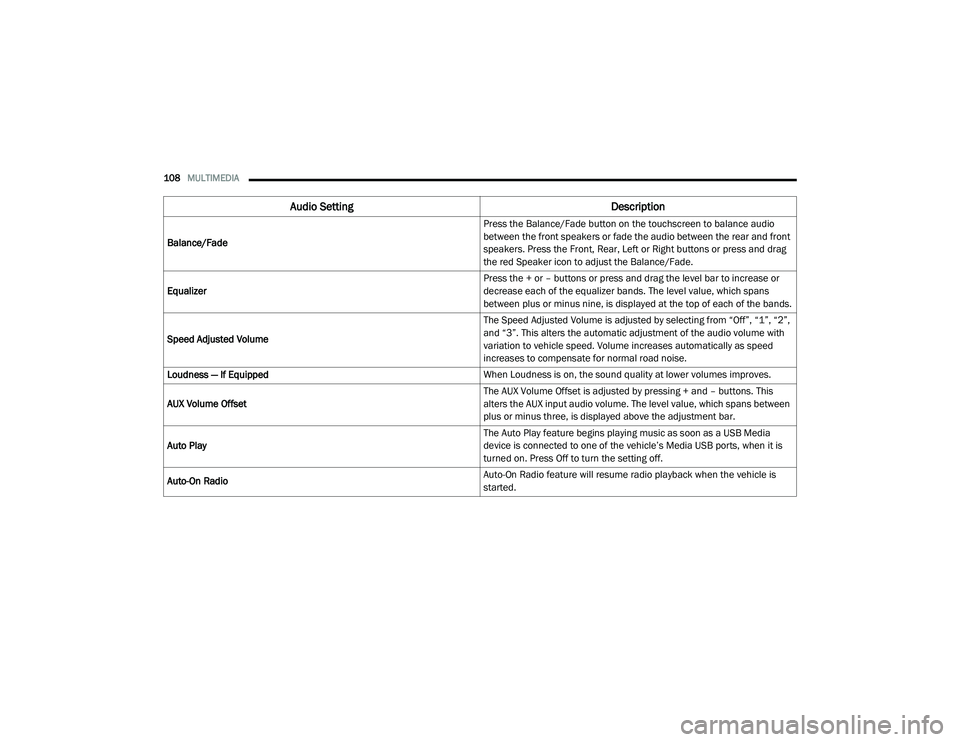
Audio Setting Description
Balance/Fade Press the Balance/Fade button on the touchscreen to balance audio
between the front speakers or fade the audio between the rear and front
speakers. Press the Front, Rear, Left or Right buttons or press and drag
the red Speaker icon to adjust the Balance/Fade.
Equalizer Press the + or – buttons or press and drag the level bar to increase or
decrease each of the equalizer bands. The level value, which spans
between plus or minus nine, is displayed at the top of each of the bands.
Speed Adjusted Volume The Speed Adjusted Volume is adjusted by selecting from “Off”, “1”, “2”,
and “3”. This alters the automatic adjustment of the audio volume with
variation to vehicle speed. Volume increases automatically as speed
increases to compensate for normal road noise.
Loudness — If Equipped When Loudness is on, the sound quality at lower volumes improves.
AUX Volume Offset The AUX Volume Offset is adjusted by pressing + and – buttons. This
alters the AUX input audio volume. The level value, which spans between
plus or minus three, is displayed above the adjustment bar.
Auto Play The Auto Play feature begins playing music as soon as a USB Media
device is connected to one of the vehicle’s Media USB ports, when it is
turned on. Press Off to turn the setting off.
Auto-On Radio Auto-On Radio feature will resume radio playback when the vehicle is
started.
21_VF_OM_EN_USC_t.book Page 108
Page 118 of 288
116MULTIMEDIA
You can also use the following VR command to
bring up the Paired Phone screen from any
screen on the radio:
“Show Paired Phones”
NOTE:
Software updates on your phone or the
Uconnect system may interfere with the Blue -
tooth® connection. If this happens, simply
repeat the pairing process. However, first, make
sure to delete the device from the list of phones
on your Uconnect system. Next, be sure to
remove Uconnect from the list of devices in your
phone’s Bluetooth® settings.
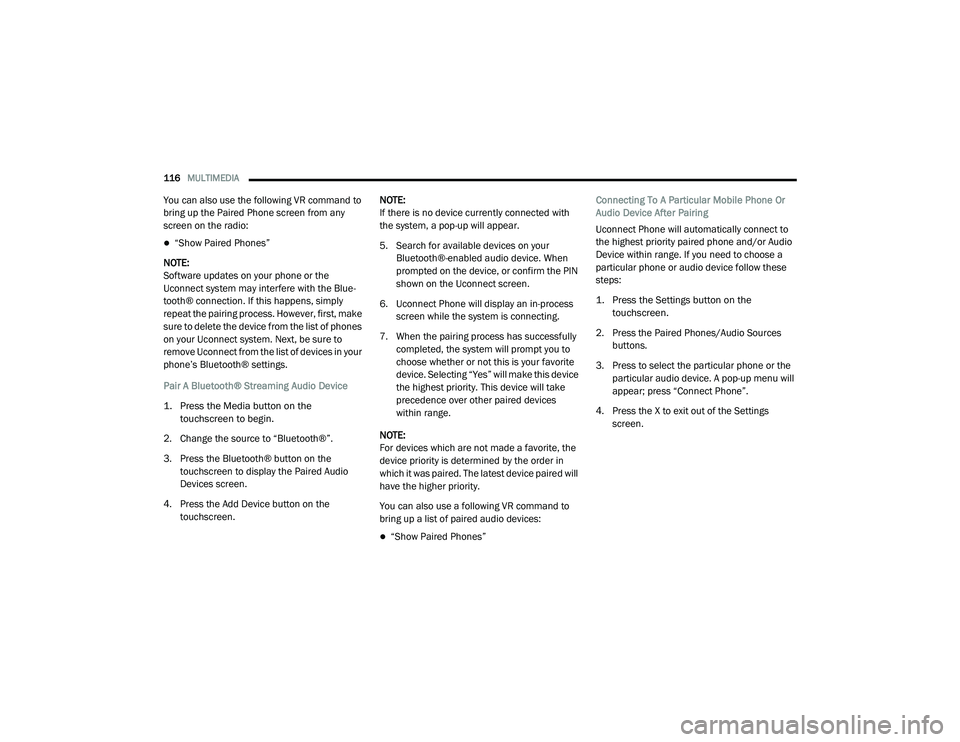
Pair A Bluetooth® Streaming Audio Device
1. Press the Media button on the touchscreen to begin.
2. Change the source to “Bluetooth®”.
3. Press the Bluetooth® button on the touchscreen to display the Paired Audio
Devices screen.
4. Press the Add Device button on the touchscreen. NOTE:
If there is no device currently connected with
the system, a pop-up will appear.
5. Search for available devices on your
Bluetooth®-enabled audio device. When
prompted on the device, or confirm the PIN
shown on the Uconnect screen.
6. Uconnect Phone will display an in-process screen while the system is connecting.
7. When the pairing process has successfully completed, the system will prompt you to
choose whether or not this is your favorite
device. Selecting “Yes” will make this device
the highest priority. This device will take
precedence over other paired devices
within range.
NOTE:
For devices which are not made a favorite, the
device priority is determined by the order in
which it was paired. The latest device paired will
have the higher priority.
You can also use a following VR command to
bring up a list of paired audio devices:
“Show Paired Phones” Connecting To A Particular Mobile Phone Or
Audio Device After Pairing
Uconnect Phone will automatically connect to
the highest priority paired phone and/or Audio
Device within range. If you need to choose a
particular phone or audio device follow these
steps:
1. Press the
Settings
button on the
touchscreen.
2. Press the Paired Phones/Audio Sources buttons.
3. Press to select the particular phone or the particular audio device. A pop-up menu will
appear; press “Connect Phone”.
4. Press the X to exit out of the Settings screen.
21_VF_OM_EN_USC_t.book Page 116
Page 120 of 288
118MULTIMEDIA
Depending on the maximum number of
entries downloaded, there may be a short
delay before the latest downloaded names
can be used. Until then, if available, the
previously downloaded phonebook is
available for use.
Only the phonebook of the currently
connected mobile phone is accessible.
This downloaded phonebook cannot be
edited or deleted on the Uconnect Phone.
These can only be edited on the mobile
phone. The changes are transferred and
updated to Uconnect Phone on the next
phone connection.
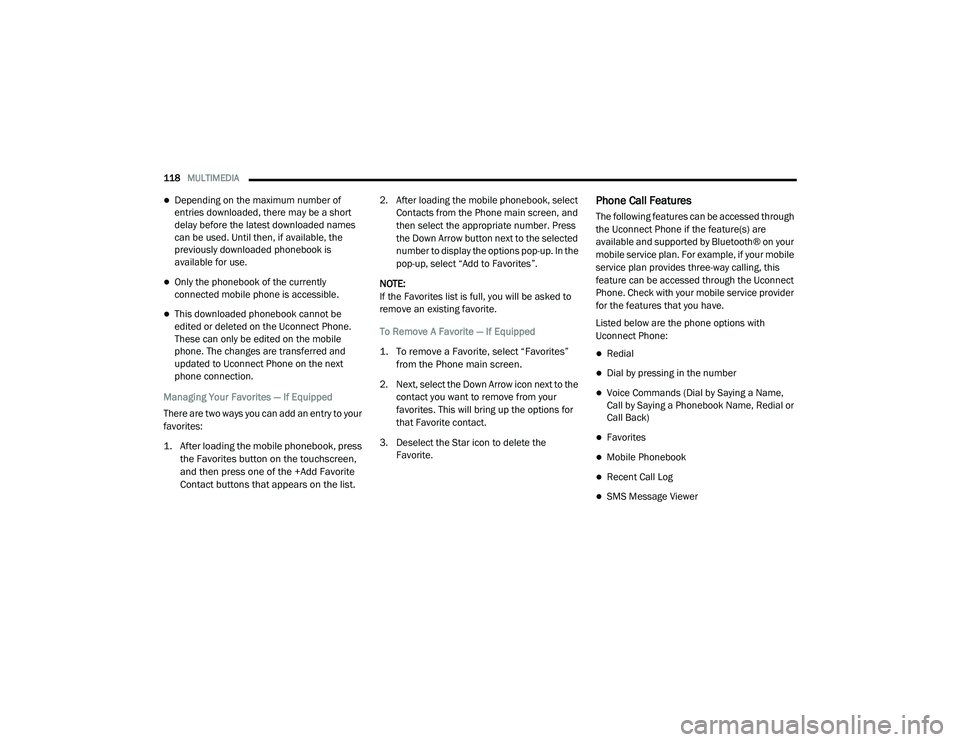
Managing Your Favorites — If Equipped
There are two ways you can add an entry to your
favorites:
1. After loading the mobile phonebook, press the Favorites button on the touchscreen,
and then press one of the +Add Favorite
Contact buttons that appears on the list.
2. After loading the mobile phonebook, select
Contacts from the Phone main screen, and
then select the appropriate number. Press
the Down Arrow button next to the selected
number to display the options pop-up. In the
pop-up, select “Add to Favorites”.
NOTE:
If the Favorites list is full, you will be asked to
remove an existing favorite.
To Remove A Favorite — If Equipped
1. To remove a Favorite, select “Favorites” from the Phone main screen.
2. Next, select the Down Arrow icon next to the contact you want to remove from your
favorites. This will bring up the options for
that Favorite contact.
3. Deselect the Star icon to delete the Favorite.
Phone Call Features
The following features can be accessed through
the Uconnect Phone if the feature(s) are
available and supported by Bluetooth® on your
mobile service plan. For example, if your mobile
service plan provides three-way calling, this
feature can be accessed through the Uconnect
Phone. Check with your mobile service provider
for the features that you have.
Listed below are the phone options with
Uconnect Phone:
Redial
Dial by pressing in the number
Voice Commands (Dial by Saying a Name,
Call by Saying a Phonebook Name, Redial or
Call Back)
Favorites
Mobile Phonebook
Recent Call Log
SMS Message Viewer
21_VF_OM_EN_USC_t.book Page 118
Page 121 of 288
MULTIMEDIA119
Call Controls
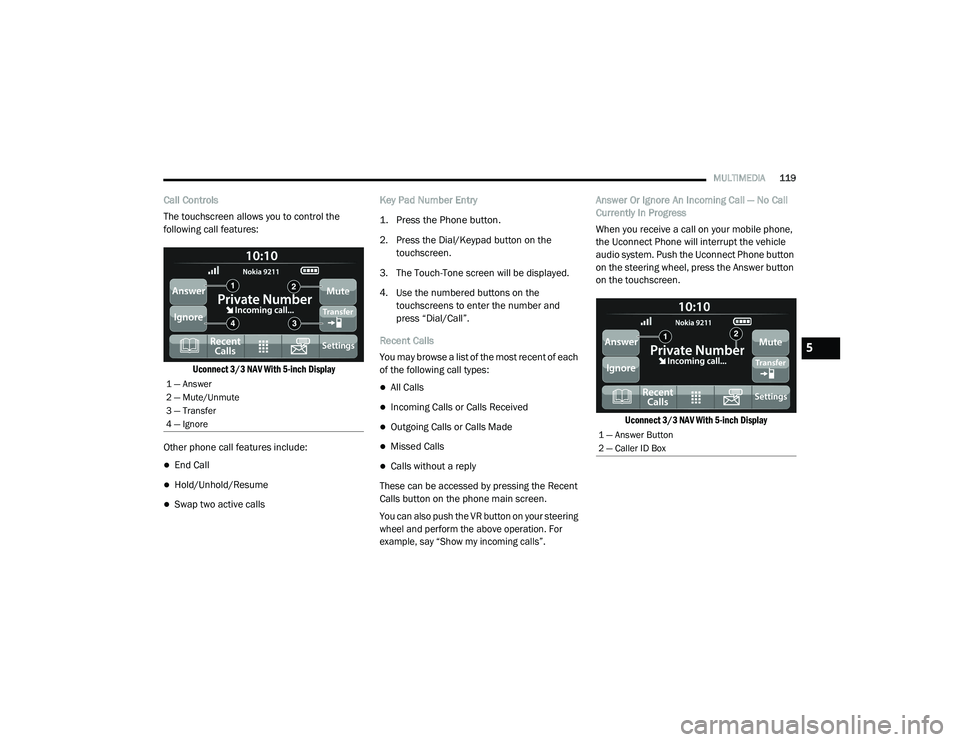
The touchscreen allows you to control the
following call features:
Uconnect 3/3 NAV With 5-inch Display
Other phone call features include:
End Call
Hold/Unhold/Resume
Swap two active calls Key Pad Number Entry
1. Press the Phone button.
2. Press the Dial/Keypad button on the
touchscreen.
3. The Touch-Tone screen will be displayed.
4. Use the numbered buttons on the touchscreens to enter the number and
press “Dial/Call”.
Recent Calls
You may browse a list of the most recent of each
of the following call types:
All Calls
Incoming Calls or Calls Received
Outgoing Calls or Calls Made
Missed Calls
Calls without a reply
These can be accessed by pressing the Recent
Calls button on the phone main screen.
You can also push the VR button on your steering
wheel and perform the above operation. For
example, say “Show my incoming calls”.
Answer Or Ignore An Incoming Call — No Call
Currently In Progress
When you receive a call on your mobile phone,
the Uconnect Phone will interrupt the vehicle
audio system. Push the Uconnect Phone button
on the steering wheel, press the Answer button
on the touchscreen.
Uconnect 3/3 NAV With 5-inch Display
1 — Answer
2 — Mute/Unmute
3 — Transfer
4 — Ignore
1 — Answer Button
2 — Caller ID Box
5
21_VF_OM_EN_USC_t.book Page 119
Page 126 of 288
124MULTIMEDIA
To enable Siri, push and hold, then release the
Uconnect Voice Recognition (VR) button on the
steering wheel. After you hear a double beep,
you can ask Siri to play podcasts and music, get
directions, read text messages, and many other
useful requests.
Bluetooth® Communication Link
Mobile phones may lose connection to the
Uconnect Phone. When this happens, the
connection can generally be re-established by
restarting the mobile phone. Your mobile phone
is recommended to remain in Bluetooth® ON
mode.
Power-Up
After switching the ignition key from OFF to
either the ON/RUN or ACC position, or after a
language change, you must wait at least
15 seconds prior to using the system
Úpage 274.NAVIGATION MODE — IF EQUIPPED
OPERATING NAVIGATION MODE — IF
E
QUIPPED
Planning A Route
Using the search bar provides a wide range of
ways to find places and then navigate to them.
You can search for your destination in different
ways:
A specific address
A partial address
A type of place
A zip code
A city to navigate to a city center
A Point of Interest (POI) near your current
location
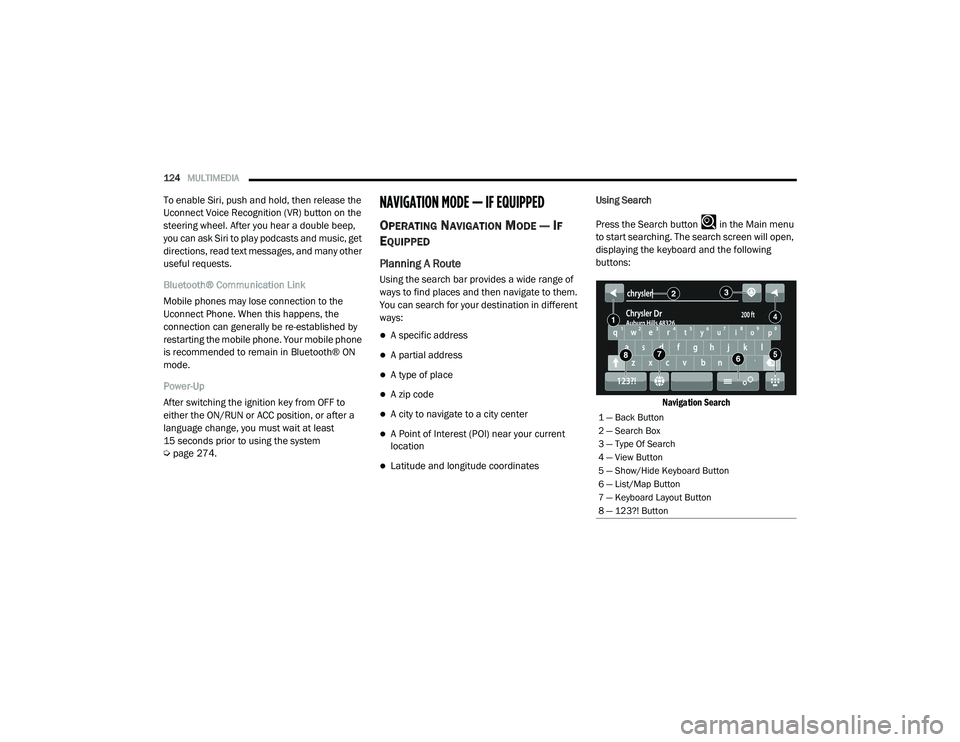
Latitude and longitude coordinates Using Search
Press the Search button in the Main menu
to start searching. The search screen will open,
displaying the keyboard and the following
buttons:
Navigation Search
1 — Back Button
2 — Search Box
3 — Type Of Search
4 — View Button
5 — Show/Hide Keyboard Button
6 — List/Map Button
7 — Keyboard Layout Button
8 — 123?! Button
21_VF_OM_EN_USC_t.book Page 124
Page 138 of 288
136MULTIMEDIA
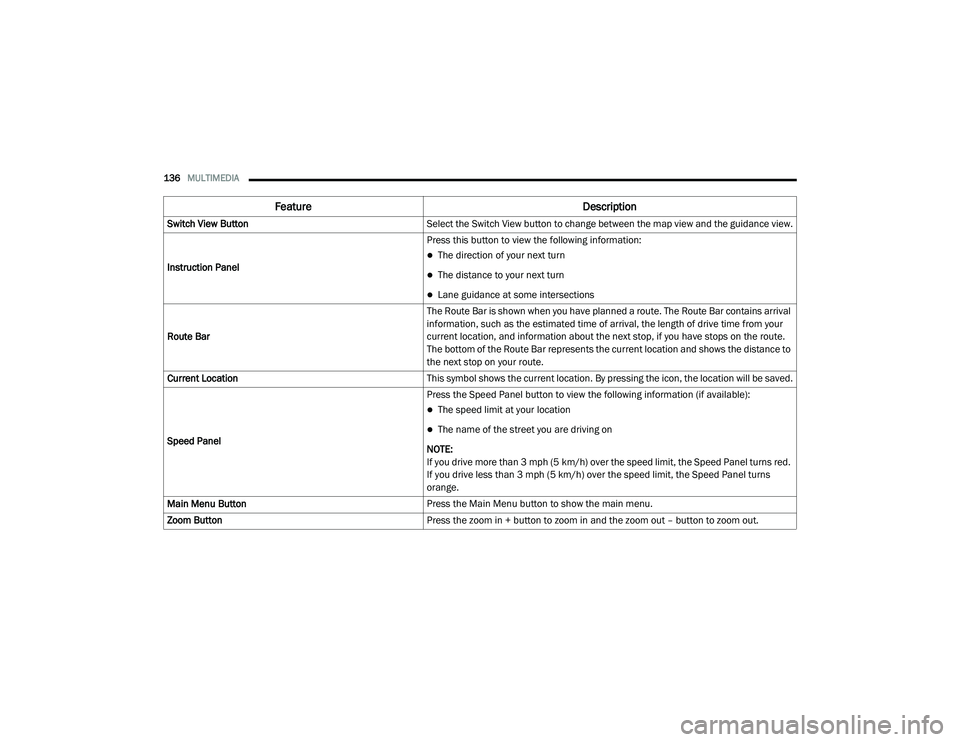
Feature Description
Switch View ButtonSelect the Switch View button to change between the map view and the guidance view.
Instruction Panel Press this button to view the following information:
The direction of your next turn
The distance to your next turn
Lane guidance at some intersections
Route Bar The Route Bar is shown when you have planned a route. The Route Bar contains arrival
information, such as the estimated time of arrival, the length of drive time from your
current location, and information about the next stop, if you have stops on the route.
The bottom of the Route Bar represents the current location and shows the distance to
the next stop on your route.
Current Location This symbol shows the current location. By pressing the icon, the location will be saved.
Speed Panel Press the Speed Panel button to view the following information (if available):
The speed limit at your location
The name of the street you are driving on
NOTE:
If you drive more than 3 mph (5 km/h) over the speed limit, the Speed Panel turns red.
If you drive less than 3 mph (5 km/h) over the speed limit, the Speed Panel turns
orange.
Main Menu Button Press the Main Menu button to show the main menu.
Zoom Button Press the zoom in + button to zoom in and the zoom out – button to zoom out.
21_VF_OM_EN_USC_t.book Page 136
Page 139 of 288
MULTIMEDIA137
Advanced Lane Guidance
NOTE:
Lane guidance is not available for all intersec -
tions or in all countries.
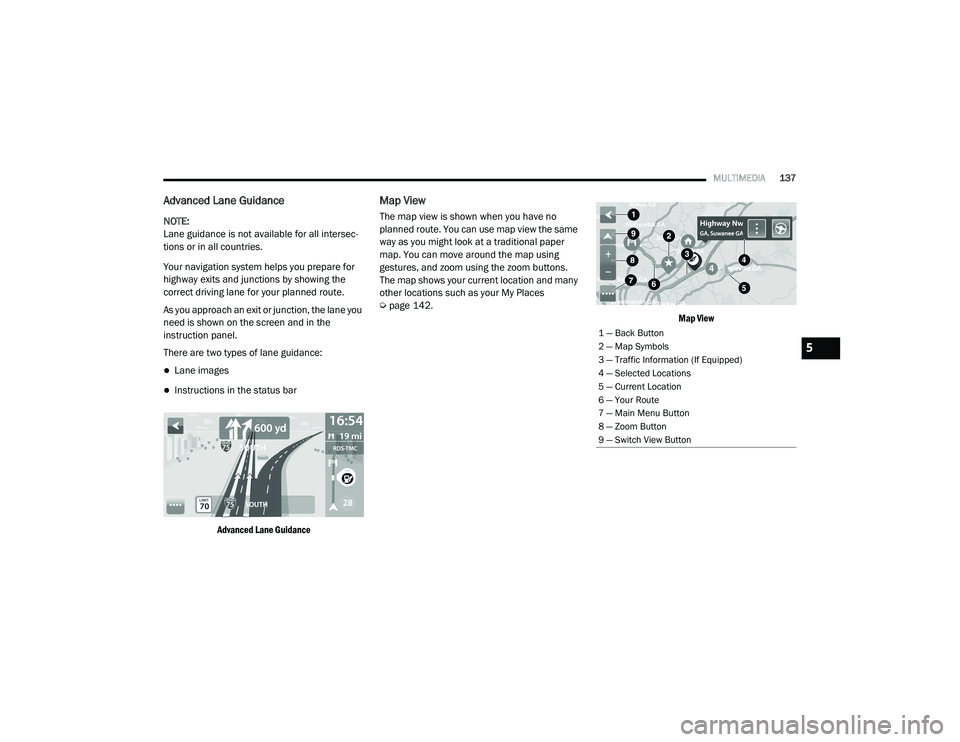
Your navigation system helps you prepare for
highway exits and junctions by showing the
correct driving lane for your planned route.
As you approach an exit or junction, the lane you
need is shown on the screen and in the
instruction panel.
There are two types of lane guidance:
Lane images
Instructions in the status bar
Advanced Lane Guidance
Map View
The map view is shown when you have no
planned route. You can use map view the same
way as you might look at a traditional paper
map. You can move around the map using
gestures, and zoom using the zoom buttons.
The map shows your current location and many
other locations such as your My Places
Úpage 142.
Map View
1 — Back Button
2 — Map Symbols
3 — Traffic Information (If Equipped)
4 — Selected Locations
5 — Current Location
6 — Your Route
7 — Main Menu Button
8 — Zoom Button
9 — Switch View Button
5
21_VF_OM_EN_USC_t.book Page 137
Page 148 of 288

146MULTIMEDIA
STEERING WHEEL AUDIO CONTROLS
The remote sound system controls are located
on the surface of the steering wheel.
Remote Sound System Controls
Pushing the top of the left-hand switch will
increase the volume, and pushing the bottom of
the switch will decrease the volume.
Pushing the Voice Recognition (VR) button
below the volume controls will begin your voice
command functions Ú page 22.
The function of the right-hand control is
different depending on which mode you are in.
The following describes the right-hand control
operation in each mode.
RADIO OPERATION
Pushing the top of the right-hand switch will
“Scan” up for the next listenable station, and
pushing the bottom of the right-hand switch will
“Scan” down for the next listenable station.
Pushing the Phone pick up button on top of the
of the Scan buttons will open a phone call.
Pushing the Phone hang up button below the
Scan buttons will close a phone call.
PLAYER OPERATION
Pushing the switch up once will go to the next
track on the Player. Pushing the switch down
once will go to the beginning of the current track
or to the beginning of the previous track if it is
within one second after the current track begins
to play.
If you push the switch up or down twice, it plays
the second track; three times, it will play the
third, etc.
RAM TELEMATICS - IF EQUIPPED
Ram Telematics is designed to help improve
safety, efficiency, and productivity. It gives you
complete visibility of your fleet options, whether
from behind a desk or on a mobile device while
you are on the go. You can log-in to view near
real-time and historical activity, including
location, vehicle heath, and driver performance.
Activating Ram Telematics In Your Vehicles
Before you get started you will need:
The Vehicle Identification Number (VIN) of
each vehicle you want to activate.
Your main user’s log-in and password; new
customers will be asked to register.
If you are a new customer, you will need
company credit card information or invoice
number as further proof of customer identifi -
cation. Don’t worry, you will not be charged.
21_VF_OM_EN_USC_t.book Page 146