buttons RAM PROMASTER 2022 Owners Manual
[x] Cancel search | Manufacturer: RAM, Model Year: 2022, Model line: PROMASTER, Model: RAM PROMASTER 2022Pages: 268, PDF Size: 13.26 MB
Page 23 of 268
GETTING TO KNOW YOUR VEHICLE21
To unlock the front doors, pull the inside door
handle to the detent.
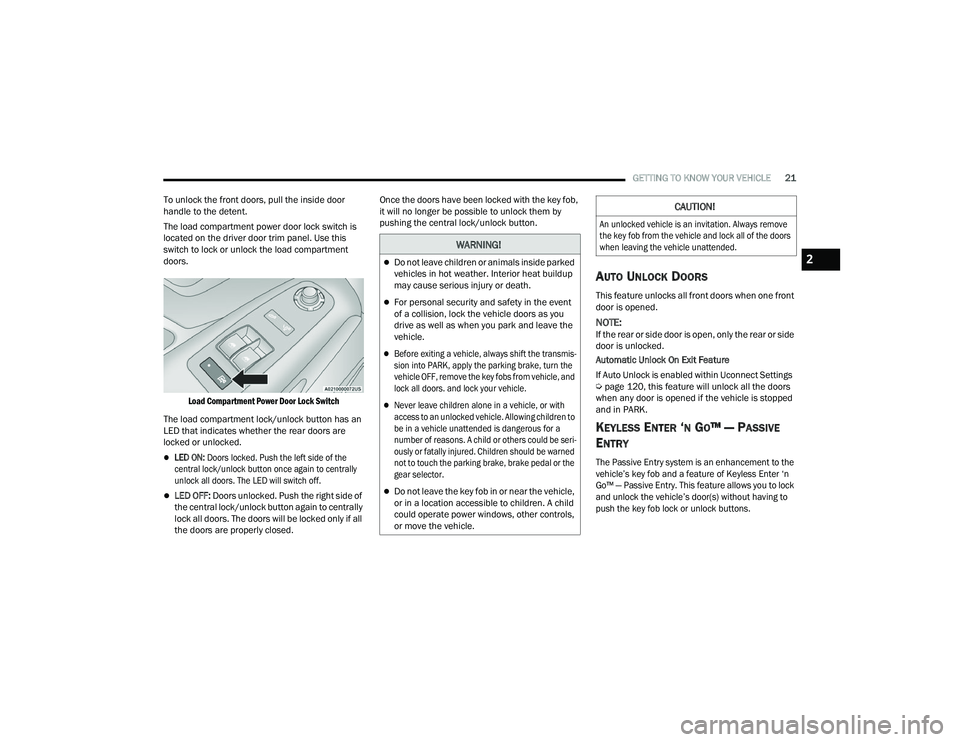
The load compartment power door lock switch is
located on the driver door trim panel. Use this
switch to lock or unlock the load compartment
doors.
Load Compartment Power Door Lock Switch
The load compartment lock/unlock button has an
LED that indicates whether the rear doors are
locked or unlocked.
LED ON: Doors locked. Push the left side of the
central lock/unlock button once again to centrally
unlock all doors. The LED will switch off.
LED OFF: Doors unlocked. Push the right side of
the central lock/unlock button again to centrally
lock all doors. The doors will be locked only if all
the doors are properly closed. Once the doors have been locked with the key fob,
it will no longer be possible to unlock them by
pushing the central lock/unlock button.
AUTO UNLOCK DOORS
This feature unlocks all front doors when one front
door is opened.
NOTE:If the rear or side door is open, only the rear or side
door is unlocked.
Automatic Unlock On Exit Feature
If Auto Unlock is enabled within Uconnect Settings
Ú
page 120, this feature will unlock all the doors
when any door is opened if the vehicle is stopped
and in PARK.
KEYLESS ENTER ‘N GO™ — PASSIVE
E
NTRY
The Passive Entry system is an enhancement to the
vehicle’s key fob and a feature of Keyless Enter ‘n
Go™ — Passive Entry. This feature allows you to lock
and unlock the vehicle’s door(s) without having to
push the key fob lock or unlock buttons.
WARNING!
Do not leave children or animals inside parked
vehicles in hot weather. Interior heat buildup
may cause serious injury or death.
For personal security and safety in the event
of a collision, lock the vehicle doors as you
drive as well as when you park and leave the
vehicle.
Before exiting a vehicle, always shift the transmis -
sion into PARK, apply the parking brake, turn the
vehicle OFF, remove the key fobs from vehicle, and
lock all doors. and lock your vehicle.
Never leave children alone in a vehicle, or with
access to an unlocked vehicle. Allowing children to
be in a vehicle unattended is dangerous for a
number of reasons. A child or others could be seri -
ously or fatally injured. Children should be warned
not to touch the parking brake, brake pedal or the
gear selector.
Do not leave the key fob in or near the vehicle,
or in a location accessible to children. A child
could operate power windows, other controls,
or move the vehicle.
CAUTION!
An unlocked vehicle is an invitation. Always remove
the key fob from the vehicle and lock all of the doors
when leaving the vehicle unattended.
2
22_VF_OM_EN_USC_t.book Page 21
Page 30 of 268
28GETTING TO KNOW YOUR VEHICLE
Front Head Restraint Adjustment
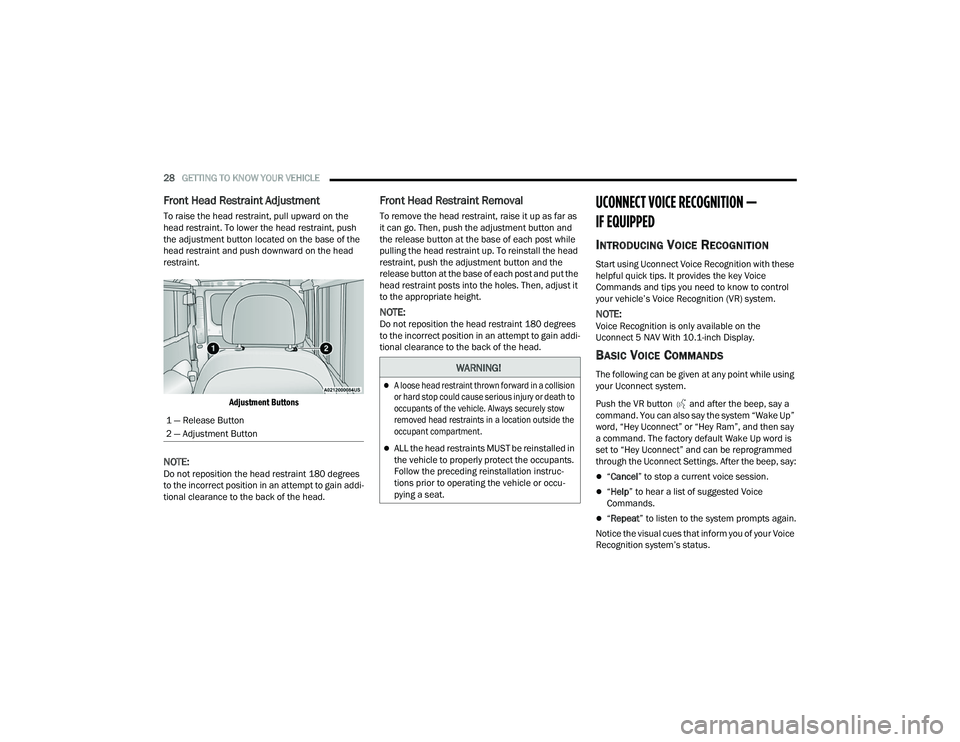
To raise the head restraint, pull upward on the
head restraint. To lower the head restraint, push
the adjustment button located on the base of the
head restraint and push downward on the head
restraint.
Adjustment Buttons
NOTE:Do not reposition the head restraint 180 degrees
to the incorrect position in an attempt to gain addi -
tional clearance to the back of the head.
Front Head Restraint Removal
To remove the head restraint, raise it up as far as
it can go. Then, push the adjustment button and
the release button at the base of each post while
pulling the head restraint up. To reinstall the head
restraint, push the adjustment button and the
release button at the base of each post and put the
head restraint posts into the holes. Then, adjust it
to the appropriate height.
NOTE:Do not reposition the head restraint 180 degrees
to the incorrect position in an attempt to gain addi -
tional clearance to the back of the head.
UCONNECT VOICE RECOGNITION —
IF EQUIPPED
INTRODUCING VOICE RECOGNITION
Start using Uconnect Voice Recognition with these
helpful quick tips. It provides the key Voice
Commands and tips you need to know to control
your vehicle’s Voice Recognition (VR) system.
NOTE:Voice Recognition is only available on the
Uconnect 5 NAV With 10.1-inch Display.
BASIC VOICE COMMANDS
The following can be given at any point while using
your Uconnect system.
Push the VR button and after the beep, say a
command. You can also say the system “Wake Up”
word, “Hey Uconnect” or “Hey Ram”, and then say
a command. The factory default Wake Up word is
set to “Hey Uconnect” and can be reprogrammed
through the Uconnect Settings. After the beep, say:
“ Cancel ” to stop a current voice session.
“Help ” to hear a list of suggested Voice
Commands.
“ Repeat ” to listen to the system prompts again.
Notice the visual cues that inform you of your Voice
Recognition system’s status.
1 — Release Button
2 — Adjustment Button
WARNING!
A loose head restraint thrown forward in a collision
or hard stop could cause serious injury or death to
occupants of the vehicle. Always securely stow
removed head restraints in a location outside the
occupant compartment.
ALL the head restraints MUST be reinstalled in
the vehicle to properly protect the occupants.
Follow the preceding reinstallation instruc
-
tions prior to operating the vehicle or occu -
pying a seat.
22_VF_OM_EN_USC_t.book Page 28
Page 31 of 268
GETTING TO KNOW YOUR VEHICLE29
GET STARTED
The VR button is used to activate/deactivate
your Voice Recognition system. You can also use
the system’s “Wake Up” word to activate voice
recognition. The “Wake Up” word can be set
through the Uconnect Settings Úpage 120.
Helpful hints for using Voice Recognition:
Reduce background noise. Wind noise and
passenger conversations are examples of noise
that may impact recognition.
Speak clearly at a normal pace and volume
while facing straight ahead.
Each time you give a Voice Command, first push the
VR button, wait until after the beep, then say your
Voice Command. Also, you can say the vehicle
“Wake Up” word to issue a Voice Command.
The available “Wake Up” words are “Hey Uconnect”
and “Hey Ram”.
You can interrupt the help message or system
prompts by pushing the VR button and saying a
Voice Command from the current category.
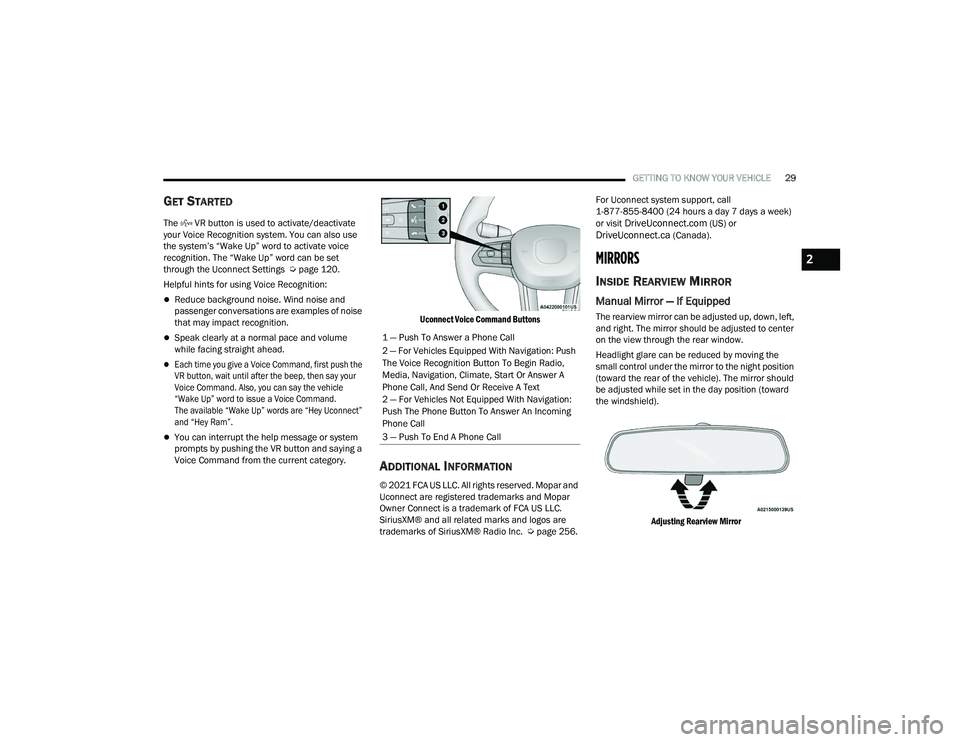
Uconnect Voice Command Buttons
ADDITIONAL INFORMATION
© 2021 FCA US LLC. All rights reserved. Mopar and
Uconnect are registered trademarks and Mopar
Owner Connect is a trademark of FCA US LLC.
SiriusXM® and all related marks and logos are
trademarks of SiriusXM® Radio Inc. Ú
page 256.For Uconnect system support, call
1-877-855-8400 (24 hours a day 7 days a week)
or visit
DriveUconnect.com (US) or DriveUconnect.ca (Canada).
MIRRORS
INSIDE REARVIEW MIRROR
Manual Mirror — If Equipped
The rearview mirror can be adjusted up, down, left,
and right. The mirror should be adjusted to center
on the view through the rear window.
Headlight glare can be reduced by moving the
small control under the mirror to the night position
(toward the rear of the vehicle). The mirror should
be adjusted while set in the day position (toward
the windshield).
Adjusting Rearview Mirror
1 — Push To Answer a Phone Call
2 — For Vehicles Equipped With Navigation: Push
The Voice Recognition Button To Begin Radio,
Media, Navigation, Climate, Start Or Answer A
Phone Call, And Send Or Receive A Text
2 — For Vehicles Not Equipped With Navigation:
Push The Phone Button To Answer An Incoming
Phone Call
3 — Push To End A Phone Call
2
22_VF_OM_EN_USC_t.book Page 29
Page 32 of 268
30GETTING TO KNOW YOUR VEHICLE
Digital Rearview Mirror — If Equipped
The Digital Rearview Mirror provides a high
definition, wide and unobstructed view of the road
behind while driving.
Position the mirror in the regular Automatic
Dimming Mirror mode, then activate the Digital
Rearview Mirror mode.
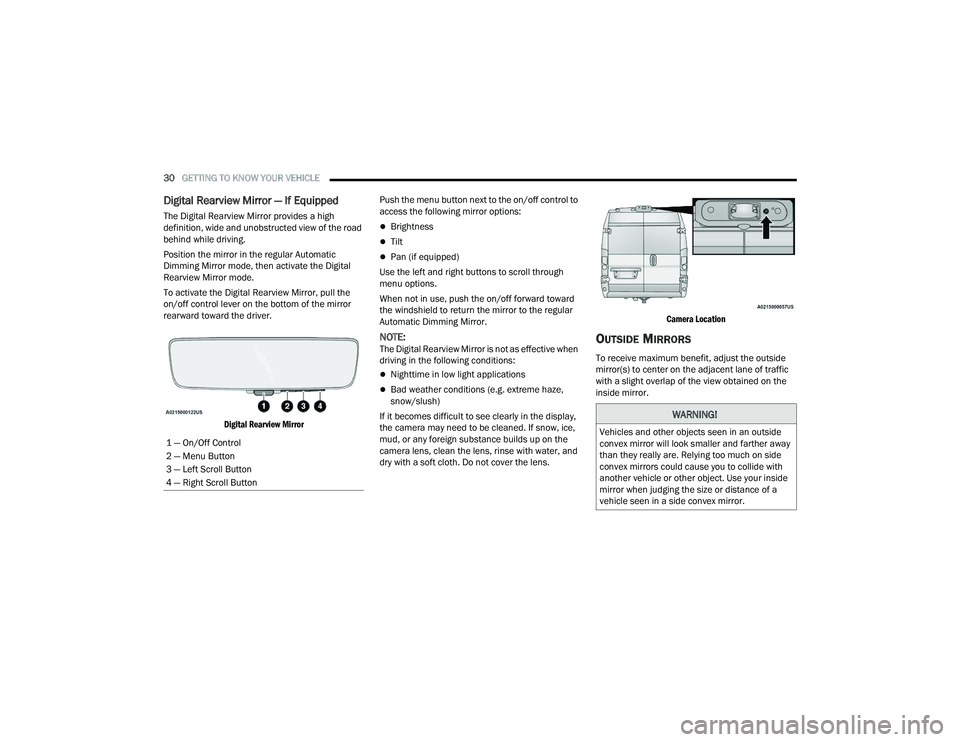
To activate the Digital Rearview Mirror, pull the
on/off control lever on the bottom of the mirror
rearward toward the driver.
Digital Rearview Mirror
Push the menu button next to the on/off control to
access the following mirror options:Brightness
Tilt
Pan (if equipped)
Use the left and right buttons to scroll through
menu options.
When not in use, push the on/off forward toward
the windshield to return the mirror to the regular
Automatic Dimming Mirror.
NOTE:The Digital Rearview Mirror is not as effective when
driving in the following conditions:
Nighttime in low light applications
Bad weather conditions (e.g. extreme haze,
snow/slush)
If it becomes difficult to see clearly in the display,
the camera may need to be cleaned. If snow, ice,
mud, or any foreign substance builds up on the
camera lens, clean the lens, rinse with water, and
dry with a soft cloth. Do not cover the lens.
Camera Location
OUTSIDE MIRRORS
To receive maximum benefit, adjust the outside
mirror(s) to center on the adjacent lane of traffic
with a slight overlap of the view obtained on the
inside mirror.
1 — On/Off Control
2 — Menu Button
3 — Left Scroll Button
4 — Right Scroll Button
WARNING!
Vehicles and other objects seen in an outside
convex mirror will look smaller and farther away
than they really are. Relying too much on side
convex mirrors could cause you to collide with
another vehicle or other object. Use your inside
mirror when judging the size or distance of a
vehicle seen in a side convex mirror.
22_VF_OM_EN_USC_t.book Page 30
Page 33 of 268
GETTING TO KNOW YOUR VEHICLE31
Outside Mirrors Folding Feature
All outside mirrors are hinged and may be folded
forward or rearward to avoid damage. The hinges
have three detent positions:
Full forward position
Full rearward position
Normal position
POWER MIRRORS — IF EQUIPPED
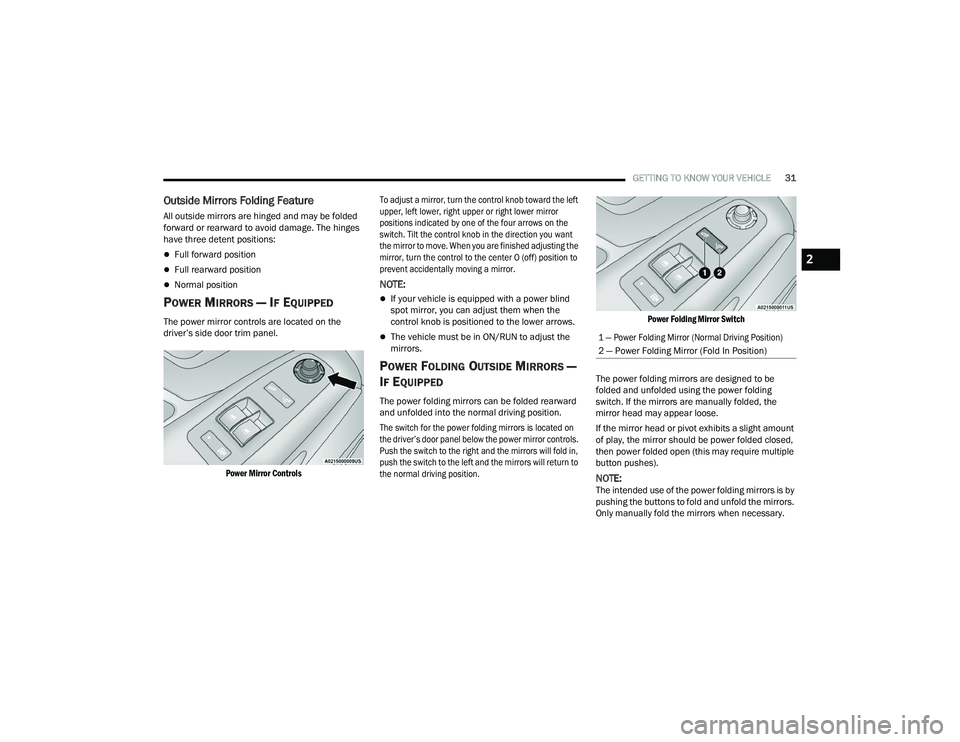
The power mirror controls are located on the
driver’s side door trim panel.
Power Mirror Controls
To adjust a mirror, turn the control knob toward the left
upper, left lower, right upper or right lower mirror
positions indicated by one of the four arrows on the
switch. Tilt the control knob in the direction you want
the mirror to move. When you are finished adjusting the
mirror, turn the control to the center O (off) position to
prevent accidentally moving a mirror.
NOTE:
If your vehicle is equipped with a power blind
spot mirror, you can adjust them when the
control knob is positioned to the lower arrows.
The vehicle must be in ON/RUN to adjust the
mirrors.
POWER FOLDING OUTSIDE MIRRORS —
I
F EQUIPPED
The power folding mirrors can be folded rearward
and unfolded into the normal driving position.
The switch for the power folding mirrors is located on
the driver’s door panel below the power mirror controls.
Push the switch to the right and the mirrors will fold in,
push the switch to the left and the mirrors will return to
the normal driving position.
Power Folding Mirror Switch
The power folding mirrors are designed to be
folded and unfolded using the power folding
switch. If the mirrors are manually folded, the
mirror head may appear loose.
If the mirror head or pivot exhibits a slight amount
of play, the mirror should be power folded closed,
then power folded open (this may require multiple
button pushes).
NOTE:The intended use of the power folding mirrors is by
pushing the buttons to fold and unfold the mirrors.
Only manually fold the mirrors when necessary.
1 — Power Folding Mirror (Normal Driving Position)
2 — Power Folding Mirror (Fold In Position)
2
22_VF_OM_EN_USC_t.book Page 31
Page 43 of 268
GETTING TO KNOW YOUR VEHICLE41
Temperature Control
Temperature Control regulates the temperature of
the air forced through the climate system.
The temperature increases as you press
the red arrow button on the faceplate.
The temperature decreases as you press
the blue arrow button on the faceplate. You can also adjust the temperature using the
sliding temperature bar on the touchscreen.
Slide the bar upward into the red to increase the
temperature, and slide it downward into the blue to
decrease the temperature.
Blower Control
Blower Control regulates the amount of
air forced through the climate system.
There are seven blower speeds available.
The blower speed increases as you press
the up arrow above the blower control symbol.
The blower speed decreases as you press the
down arrow below the blower control symbol.
You can also adjust the blower speed on the
touchscreen by selecting a speed on the blower bar.
Mode Control
Select Mode by pressing one of the Mode
buttons on the touchscreen, or the faceplate,
to change the airflow distribution mode.
Pushing this button will cycle through the five
mode combinations in order: Face, Face/Feet, Feet,
Windshield/Feet, Windshield. The cycle will repeat if
the button is continually pushed.
NOTE:The distribution modes on the climate control
screen will also illuminate when a selection is
made using the button on the instrument panel.
Panel Mode
Air comes from the outlets in the instrument
panel. Each of these outlets can be
individually adjusted to direct the flow of air.
The air vents out of the center outlets and
outboard outlets can be moved up and down or side to
side to regulate airflow direction. Move the vent to the
furthermost sides to close the vent.
Bi-Level Mode
Air comes from the instrument panel
outlets and floor outlets. A slight amount
of air is directed through the defrost and
side window demister outlets.
NOTE:Bi-Level mode is designed under comfort condi -
tions to provide cooler air out of the panel outlets
and warmer air from the floor outlets.
Floor Mode
Air comes from the floor outlets. A slight
amount of air is directed through the defrost
and side window demister outlets.
CAUTION!
Failure to follow these cautions can cause
damage to the heating elements:
Use care when washing the inside of the rear
window. Do not use abrasive window cleaners
on the interior surface of the window. Use a
soft cloth and a mild washing solution, wiping
parallel to the heating elements. Labels can
be peeled off after soaking with warm water.
Do not use scrapers, sharp instruments, or
abrasive window cleaners on the interior
surface of the window.
Keep all objects a safe distance from the window.
2
22_VF_OM_EN_USC_t.book Page 41
Page 47 of 268
GETTING TO KNOW YOUR VEHICLE45
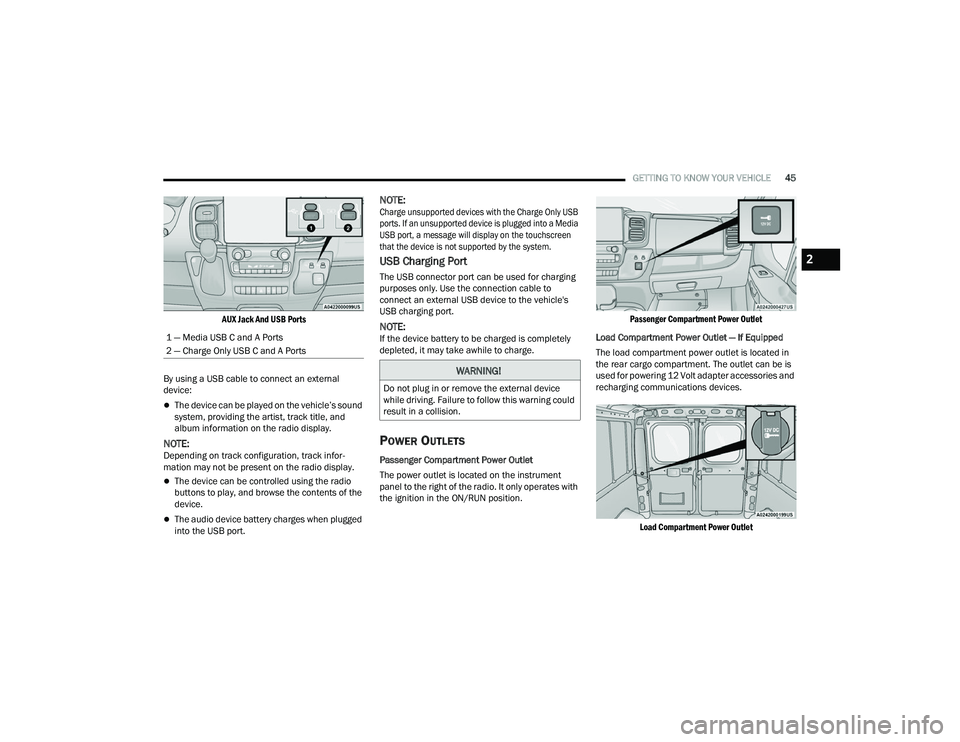
AUX Jack And USB Ports
By using a USB cable to connect an external
device:
The device can be played on the vehicle’s sound
system, providing the artist, track title, and
album information on the radio display.
NOTE:Depending on track configuration, track infor -
mation may not be present on the radio display.
The device can be controlled using the radio
buttons to play, and browse the contents of the
device.
The audio device battery charges when plugged
into the USB port.
NOTE:
Charge unsupported devices with the Charge Only USB
ports. If an unsupported device is plugged into a Media
USB port, a message will display on the touchscreen
that the device is not supported by the system.
USB Charging Port
The USB connector port can be used for charging
purposes only. Use the connection cable to
connect an external USB device to the vehicle's
USB charging port.
NOTE:If the device battery to be charged is completely
depleted, it may take awhile to charge.
POWER OUTLETS
Passenger Compartment Power Outlet
The power outlet is located on the instrument
panel to the right of the radio. It only operates with
the ignition in the ON/RUN position.
Passenger Compartment Power Outlet
Load Compartment Power Outlet — If Equipped
The load compartment power outlet is located in
the rear cargo compartment. The outlet can be is
used for powering 12 Volt adapter accessories and
recharging communications devices.
Load Compartment Power Outlet
1 — Media USB C and A Ports
2 — Charge Only USB C and A Ports
WARNING!
Do not plug in or remove the external device
while driving. Failure to follow this warning could
result in a collision.
2
22_VF_OM_EN_USC_t.book Page 45
Page 57 of 268
GETTING TO KNOW YOUR INSTRUMENT PANEL55
INSTRUMENT CLUSTER DISPLAY
Your vehicle will be equipped with an instrument cluster
display, which offers useful information to the driver.
With the ignition in the OFF mode, opening/closing of a
door will activate the display for viewing, and display
the total miles, or kilometers, in the odometer. Your
instrument cluster display is designed to display
important information about your vehicle’s systems
and features. Using a driver interactive display located
on the instrument panel, your instrument cluster
display can show you how systems are working and give
you warnings when they are not. The steering wheel
mounted controls allow you to scroll through the main
menus and submenus. You can access the specific
information you want and make selections and
adjustments.
LOCATION AND CONTROLS
The instrument cluster display features a driver
interactive display that is located in the instrument
cluster.
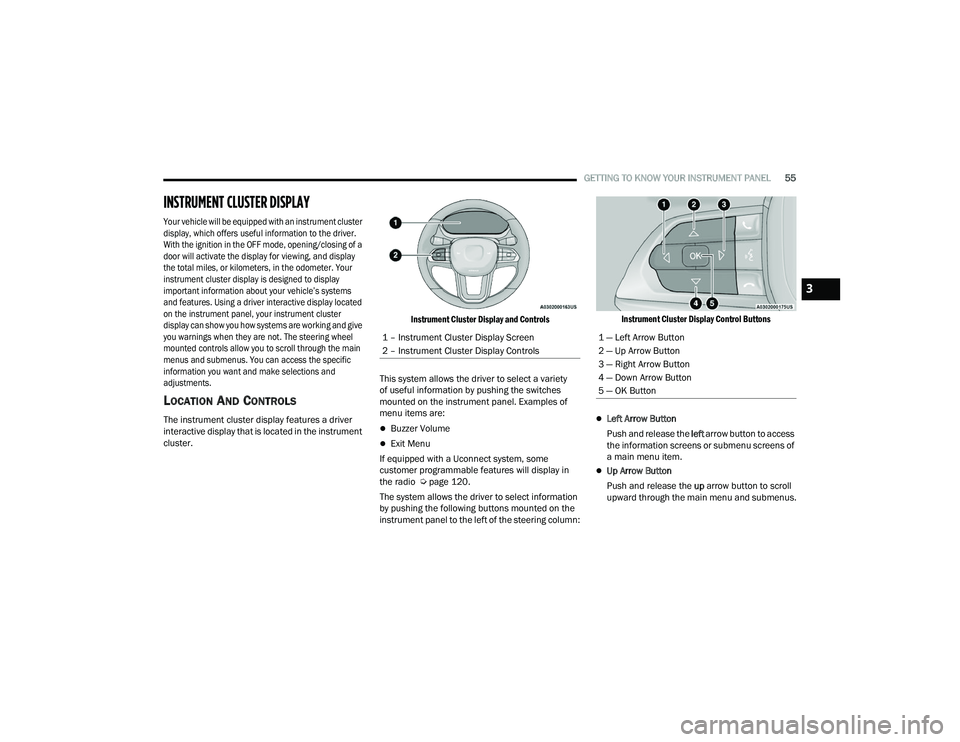
Instrument Cluster Display and Controls
This system allows the driver to select a variety
of useful information by pushing the switches
mounted on the instrument panel. Examples of
menu items are:Buzzer Volume
Exit Menu
If equipped with a Uconnect system, some
customer programmable features will display in
the radio Ú page 120.
The system allows the driver to select information
by pushing the following buttons mounted on the
instrument panel to the left of the steering column:
Instrument Cluster Display Control Buttons
Left Arrow Button
Push and release the left arrow button to access
the information screens or submenu screens of
a main menu item.
Up Arrow Button
Push and release the up arrow button to scroll
upward through the main menu and submenus.
1 – Instrument Cluster Display Screen
2 – Instrument Cluster Display Controls
1 — Left Arrow Button
2 — Up Arrow Button
3 — Right Arrow Button
4 — Down Arrow Button
5 — OK Button
3
22_VF_OM_EN_USC_t.book Page 55
Page 58 of 268
56GETTING TO KNOW YOUR INSTRUMENT PANEL
Right Arrow Button
Push and release the right arrow button to
access the information screens or submenu
screens of a main menu item.
Down Arrow Button
Push and release the down arrow button to
scroll downward through the main menu and
submenus.
OK Button
Push the OK button to access/select the infor -
mation screens or submenu screens of a main
menu item. Push and hold the OK button for
one second to reset displayed/selected
features that can be reset.
NOTE:For vehicles with a 3.5 inch instrument cluster
display, press the OK button to toggle between
mph or km/h.
For Screen Setup:
OK button allows user to enter menu and
submenus.
Within each submenu layer, the up and
down arrow buttons will allow the user to
select the item of interest.
Pushing the OK button makes the selection and
a confirmation screen will appear (returning the
user to the first page of the submenu).
Pushing the left arrow button will exit each
submenu layer and return to the main menu.
CHANGE ENGINE OIL — IF EQUIPPED
Your vehicle is equipped with an engine oil change
indicator system. The “Change Engine Oil” message
will display in the instrument cluster display. The
engine oil change indicator system is duty cycle
based, which means the engine oil change interval
may fluctuate, dependent upon your personal
driving style.
Unless reset, this message will continue to display
each time you turn the ignition switch to the
ON/RUN position. To turn off the message
temporarily, push and release the OK button.
To reset the oil change indicator system (after
performing the scheduled maintenance), refer
to the following procedure.
1. Turn the ignition switch to the ON position (do not start the engine).
2. Fully push the accelerator pedal slowly, three times, within 10 seconds.
3. Turn the ignition switch to the OFF position.
NOTE:If the indicator message illuminates when you start
the vehicle, the oil change indicator system did not
reset. If necessary, repeat this procedure.
MAIN MENU
NOTE:All of the following items are accessed by pressing
the OK button.
Home
Speedometer Graph
This uses the round bar graph filling to visually
represent current speed. When a speed control
system is active, the graph also provides visual
cues for the different states of that particular
speed control system.
Trip
Vehicles with 7 Inch Instrument Cluster Display
Access to trip information is available through the
following submenus.
Instant Consumption – Shows the instant
consumption in real time (MPG or L/100 km or
km/L).
Average Consumption – Shows the average
consumption (MPG or L/100 km or km/L) of
Trip A or Trip B since the last reset.
22_VF_OM_EN_USC_t.book Page 56
Page 82 of 268
80STARTING AND OPERATING
ACTIVATION
To activate the feature, make sure the Traffic Sign
Assist (TSA) system is enabled within Uconnect
Settings Úpage 120, then push the Active Speed
Limiter button located on the right side of the
steering wheel. The message “Ready” will appear
along with a white indicator light in the instrument
cluster display to signal that the system has been
activated.
While the system is in the “Ready” state, the driver
must press the SET (+), SET (–), or RES button to
engage the system. When the system is fully
engaged and detects the current speed limit using
the TSA system, the message in the instrument
cluster display will indicate the new detected
speed limit by suggesting the driver to press "RES"
to accept it.
If the detected speed sign is greater then the
current set speed, an up arrow will be displayed
too. If the detected speed sign is lower then the
current set speed, a down arrow will be displayed
instead. If the driver accepts the new suggested
speed sign, the indicator light will change to green.
Pushing the SET (+) or SET (–) button on the right
of the steering wheel will raise and lower the set
speed to a desired value above or below the set ISA
speed. Pushing and holding down the SET (+) or
SET (–) button will increase/decrease the speed
value by increments of 5 mph (5 km/h).
NOTE:The Cruise Control (if equipped) and Adaptive
Cruise Control (if equipped) systems will be
unavailable while the ISA system is in use.
EXCEEDING THE SET SPEED
By fully pressing the accelerator pedal, the
maximum set speed can be exceeded while the
system is active.
When the maximum set speed is exceeded, the
green indicator light will blink and the instrument
cluster display will show an override message for
five seconds, or until the accelerator pedal is
released.
DEACTIVATION
To turn off the Intelligent Speed Assist system,
push the Active Speed Limiter button on the right
side of the steering wheel. A message will appear
in the instrument cluster display to confirm that the
feature has been turned off. The Intelligent Speed
Assist system can also be deactivated by pressing
the CANC button. In this case, the ISA system is
not completely turned off, and the driver can
reactivate the system by pressing the RES button.
CRUISE CONTROL SYSTEMS — IF EQUIPPED
Your vehicle may be equipped with the Cruise
Control system, or the Adaptive Cruise Control
(ACC) system:
Cruise Control will keep your vehicle at a
constant preset speed.
Adaptive Cruise Control (ACC) will adjust the
vehicle speed up to the preset speed to main -
tain a distance with the vehicle ahead.
NOTE:
In vehicles equipped with ACC, if ACC is not
enabled, Fixed Speed Cruise Control will not
detect vehicles directly ahead of you. Always be
aware of the feature selected.
Only one Cruise Control feature can operate at a
time. For example, if Fixed Speed Cruise Control
is enabled, Adaptive Cruise Control will be
unavailable, and vice versa.
CRUISE CONTROL
When engaged, the Cruise Control takes over
accelerator operations at speeds greater than
25 mph (40 km/h) up to the maximum speed of
100 mph (160 km/h).
The Cruise Control buttons are located on the right
side of the steering wheel.
22_VF_OM_EN_USC_t.book Page 80