light RAM PROMASTER 2022 Workshop Manual
[x] Cancel search | Manufacturer: RAM, Model Year: 2022, Model line: PROMASTER, Model: RAM PROMASTER 2022Pages: 268, PDF Size: 13.26 MB
Page 107 of 268

STARTING AND OPERATING105
CHANGING LANESENSE STATUS
The LaneSense system has settings to adjust the
intensity of the torque warning and the warning zone
sensitivity (Early/Medium/Late) that you can configure
through the Uconnect system
Ú
page 120.
NOTE:
When enabled the system operates above
37 mph (60 km/h) and below 112 mph
(180 km/h).
The warnings are disabled with use of the turn
signal.
The system will not apply torque to the steering
wheel whenever a safety system engages
(Anti-Lock Brakes, Traction Control System,
Electronic Stability Control, Forward Collision
Warning, etc.).
PARKVIEW REAR BACK UP CAMERA
Your vehicle is equipped with the ParkView Rear Back
Up Camera that allows you to see an on-screen image
of the rear surroundings of your vehicle whenever the
gear selector is put into REVERSE and/or when the rear
doors are opened. The image will be displayed on the
touchscreen display along with a caution note to
“Check Entire Surroundings” across the top of the
screen. After five seconds this note will disappear. The ParkView Rear Back Up Camera is located on the
top rear of the vehicle below the center light.
Rear Back Up Camera Location
When the vehicle is shifted out of REVERSE and/or
when the rear doors are closed, the rear camera
mode is exited and the previous screen appears.
When engaged in the REVERSE gear, with the “Camera
Delay” turned on, the camera image will continue to be
displayed for up to 10 seconds after switching out of
the REVERSE position, unless the speed of the vehicle
does not exceed 8 mph (13 km/h), or that the gear is
placed in the NEUTRAL or PARK position. When the
gear is no longer in the REVERSE position, on the radio
display, together to the images behind it, a deactivation
button of the image displays on the camera screen, if
“Camera Delay” is active.
NOTE:The image displayed on the display may appear
slightly deformed.
When displayed, static grid lines will illustrate the
width of the vehicle and will show separate zones
that will help indicate the distance to the rear of
the vehicle. The following table shows the
approximate distances for each zone:
Zone Distance To The Rear Of The Vehicle Red 0 - 1 ft (0 - 30 cm)
Yellow 1 ft - 3 ft (30 cm - 1 m) Green 3 ft or greater (1 m or greater)
WARNING!
Drivers must be careful when backing up even
when using the Rear Back Up Camera. Always
check carefully behind your vehicle, and be
sure to check for pedestrians, animals, other
vehicles, obstructions, or blind spots before
backing up. You are responsible for the safety of
your surroundings and must continue to pay
attention while backing up. Failure to do so can
result in serious injury or death.
4
22_VF_OM_EN_USC_t.book Page 105
Page 108 of 268
106STARTING AND OPERATING
NOTE:
If snow, ice, mud, or any foreign substance builds up
on the camera lens, clean the lens, rinse with water,
and dry with a soft cloth. Do not cover the lens.
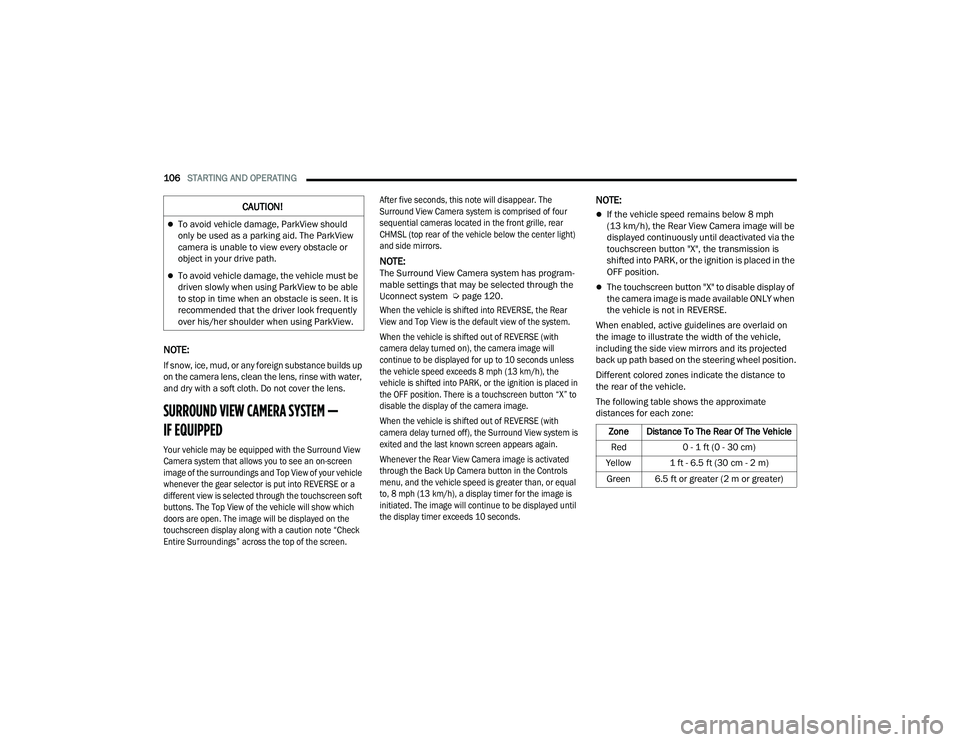
SURROUND VIEW CAMERA SYSTEM —
IF EQUIPPED
Your vehicle may be equipped with the Surround View
Camera system that allows you to see an on-screen
image of the surroundings and Top View of your vehicle
whenever the gear selector is put into REVERSE or a
different view is selected through the touchscreen soft
buttons. The Top View of the vehicle will show which
doors are open. The image will be displayed on the
touchscreen display along with a caution note “Check
Entire Surroundings” across the top of the screen. After five seconds, this note will disappear. The
Surround View Camera system is comprised of four
sequential cameras located in the front grille, rear
CHMSL (top rear of the vehicle below the center light)
and side mirrors.
NOTE:The Surround View Camera system has program
-
mable settings that may be selected through the
Uconnect system Ú page 120.
When the vehicle is shifted into REVERSE, the Rear
View and Top View is the default view of the system.
When the vehicle is shifted out of REVERSE (with
camera delay turned on), the camera image will
continue to be displayed for up to 10 seconds unless
the vehicle speed exceeds 8 mph (13 km/h), the
vehicle is shifted into PARK, or the ignition is placed in
the OFF position. There is a touchscreen button “X” to
disable the display of the camera image.
When the vehicle is shifted out of REVERSE (with
camera delay turned off), the Surround View system is
exited and the last known screen appears again.
Whenever the Rear View Camera image is activated
through the Back Up Camera button in the Controls
menu, and the vehicle speed is greater than, or equal
to, 8 mph (13 km/h), a display timer for the image is
initiated. The image will continue to be displayed until
the display timer exceeds 10 seconds.
NOTE:
If the vehicle speed remains below 8 mph
(13 km/h), the Rear View Camera image will be
displayed continuously until deactivated via the
touchscreen button "X", the transmission is
shifted into PARK, or the ignition is placed in the
OFF position.
The touchscreen button "X" to disable display of
the camera image is made available ONLY when
the vehicle is not in REVERSE.
When enabled, active guidelines are overlaid on
the image to illustrate the width of the vehicle,
including the side view mirrors and its projected
back up path based on the steering wheel position.
Different colored zones indicate the distance to
the rear of the vehicle.
The following table shows the approximate
distances for each zone:
CAUTION!
To avoid vehicle damage, ParkView should
only be used as a parking aid. The ParkView
camera is unable to view every obstacle or
object in your drive path.
To avoid vehicle damage, the vehicle must be
driven slowly when using ParkView to be able
to stop in time when an obstacle is seen. It is
recommended that the driver look frequently
over his/her shoulder when using ParkView.
Zone Distance To The Rear Of The Vehicle
Red 0 - 1 ft (0 - 30 cm)
Yellow 1 ft - 6.5 ft (30 cm - 2 m) Green 6.5 ft or greater (2 m or greater)
22_VF_OM_EN_USC_t.book Page 106
Page 110 of 268

108STARTING AND OPERATING
(Continued)
REFUELING THE VEHICLE
The gas cap is located behind the fuel filler door on
the left side of the vehicle. If the gas cap is lost or
damaged, be sure to use the correct replacement
cap for this vehicle.
1. Open the fuel filler door.
2. Remove the fuel cap by rotating it counter-
clockwise.
Fuel Filler
3. Fully insert the fuel nozzle into the filler pipe.
4. Fill the vehicle with fuel.
NOTE:
When the fuel nozzle “clicks” or shuts off,
the fuel tank is full.
Wait five seconds before removing the fuel
nozzle to allow excess fuel to drain from the
nozzle. 5. Remove the fuel nozzle, reinstall fuel cap and
close fuel filler door.
NOTE:During fuel fill, nozzle position could affect the flow
of fuel. For best results, allow the nozzle to rest
naturally in the filler tube - do not raise the handle
to increase the fill angle.
WARNING!
Drivers must be careful when backing up even
when using the Surround View Camera. Always
check carefully behind your vehicle, and be sure
to check for pedestrians, animals, other
vehicles, obstructions, or blind spots before
backing up. You are responsible for the safety of
your surroundings and must continue to pay
attention while backing up. Failure to do so can
result in serious injury or death.
CAUTION!
To avoid vehicle damage, Surround View
should only be used as a parking aid.
The Surround View camera is unable to view
every obstacle or object in your drive path.
To avoid vehicle damage, the vehicle must be
driven slowly when using Surround View to be
able to stop in time when an obstacle is seen.
It is recommended that the driver look
frequently over his/her shoulder when using
Surround View.
WARNING!
Never have any smoking materials lit in or
near the vehicle when the fuel door is open or
the tank is being filled.
Never add fuel when the engine is running.
This is in violation of most state and federal
fire regulations and may cause the Malfunc -
tion Indicator Light to turn on.
A fire may result if fuel is pumped into a
portable container that is inside of a vehicle.
You could be burned. Always place fuel
containers on the ground while filling.
CAUTION!
Damage to the fuel system or emissions
control system could result from using an
improper fuel tank filler tube cap.
A poorly fitting fuel filler cap could let impuri -
ties into the fuel system.
22_VF_OM_EN_USC_t.book Page 108
Page 111 of 268

STARTING AND OPERATING109
NOTE:
Tighten the fuel filler cap until you hear a
“clicking” sound. This is an indication that the
fuel filler cap is properly tightened.
If the gas cap is not tightened properly, the MIL
may come on. Be sure the gas cap is tightened
every time the vehicle is refueled.
LOOSE FUEL FILLER CAP MESSAGE
If the vehicle diagnostic system determines that the
fuel filler cap is loose, improperly installed, or
damaged, a “Check Fuel Cap” message will be
displayed in the instrument cluster display
Ú
page 55.
Tighten the fuel filler cap until a “clicking” sound is
heard. This is an indication that the fuel filler cap is
properly tightened.
If the problem continues, the message will appear
the next time the vehicle is started. See an
authorized dealer as soon as possible.
VEHICLE LOADING
As required by National Highway Traffic Safety
Administration regulations, your vehicle has a
certification label affixed to the driver's side door or
B-pillar.
If seats are removed for carrying cargo, do not
exceed the specified GVWR and GAWR.
VEHICLE CERTIFICATION LABEL
Your vehicle has a Vehicle Certification Label
affixed to the driver’s side B-pillar or the rear of the
driver’s door.
The label contains the following information:
Name of manufacturer
Month and year of manufacture
Gross Vehicle Weight Rating (GVWR)
Gross Axle Weight Rating (GAWR) front and rear
Vehicle Identification Number (VIN)
Type of vehicle
Month, Day, and Hour (MDH) of manufacture
The bar code allows a computer scanner to read
the VIN.
GROSS VEHICLE WEIGHT RATING
(GVWR)
The GVWR is the total allowable weight of your
vehicle. This includes driver, passengers, and
cargo. The total load must be limited so that you do
not exceed the GVWR.
GROSS AXLE WEIGHT RATING (GAWR)
The GAWR is the maximum capacity of the front
and rear axles. Distribute the load over the front
and rear axles evenly. Make sure that you do not
exceed either front or rear GAWR.
TIRE SIZE
The tire size on the Vehicle Certification Label
represents the actual tire size on your vehicle.
Replacement tires must be equal to the load
capacity of this tire size.
A poorly fitting fuel filler cap may cause the
Malfunction Indicator Light (MIL) to turn on.
To avoid fuel spillage and overfilling, do not
“top off” the fuel tank after filling. When the
fuel nozzle “clicks” or shuts off, the fuel tank
is full.
CAUTION!
WARNING!
Because the front wheels steer the vehicle, it is
important that you do not exceed the maximum front
or rear GAWR. A dangerous driving condition can
result if either rating is exceeded. You could lose
control of the vehicle and have a collision.
4
22_VF_OM_EN_USC_t.book Page 109
Page 114 of 268
112STARTING AND OPERATING
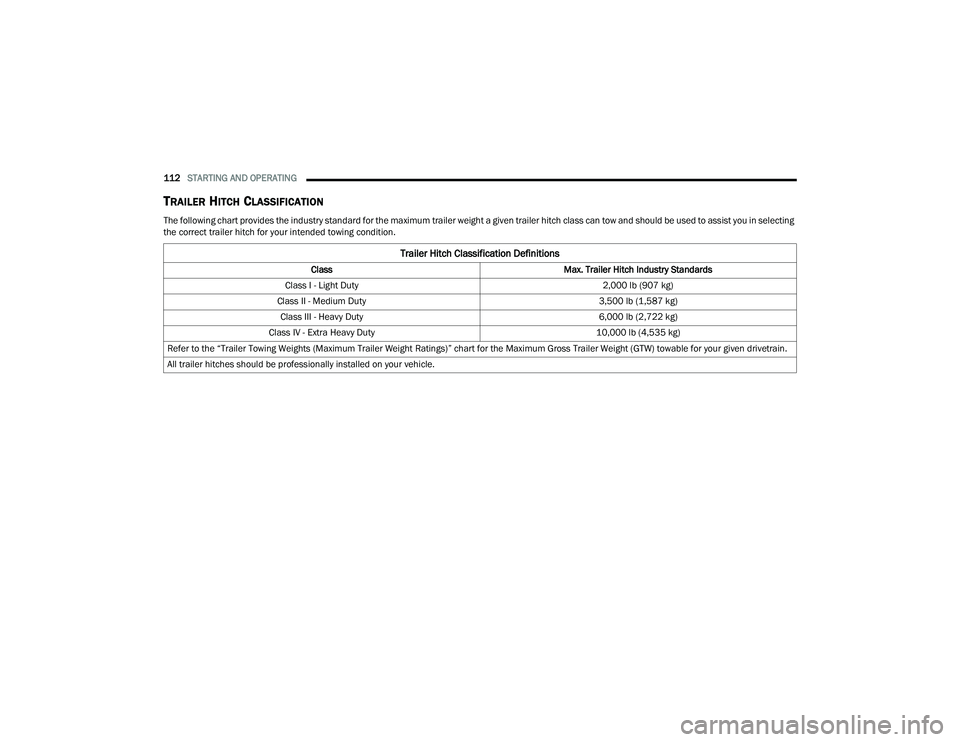
TRAILER HITCH CLASSIFICATION
The following chart provides the industry standard for the maximum trailer weight a given trailer hitch class can tow and should be used to assist you in selecting
the correct trailer hitch for your intended towing condition.
Trailer Hitch Classification Definitions
Class Max. Trailer Hitch Industry Standards
Class I - Light Duty 2,000 lb (907 kg)
Class II - Medium Duty 3,500 lb (1,587 kg)
Class III - Heavy Duty 6,000 lb (2,722 kg)
Class IV - Extra Heavy Duty 10,000 lb (4,535 kg)
Refer to the “Trailer Towing Weights (Maximum Trailer Weight Ratings)” chart for the Maximum Gross Trailer Weight (GTW) towable for your given drivetrain.
All trailer hitches should be professionally installed on your vehicle.
22_VF_OM_EN_USC_t.book Page 112
Page 117 of 268

STARTING AND OPERATING115
Towing Requirements — Trailer Lights And
Wiring
Whenever you pull a trailer, regardless of the trailer
size, stoplights and turn signals on the trailer are
required for motoring safety.
The Trailer Tow Package may include a four- and
seven-pin wiring harness. Use a factory approved
trailer harness and connector.
NOTE:Do not cut or splice wiring into the vehicle’s wiring
harness. The electrical connections are all complete to the
vehicle but you must mate the harness to a trailer
connector. Refer to the following illustrations.
NOTE:
Disconnect trailer wiring connector from the
vehicle before launching a boat (or any other
device plugged into vehicle’s electrical connect)
into water.
Be sure to reconnect after clear from water area.
Four-Pin Connector Seven-Pin Connector
TOWING TIPS
Before towing, practice turning, stopping, and
backing up the trailer in an area located away from
heavy traffic.
Towing any trailer will increase your stopping
distance. When towing, you should allow for
additional space between your vehicle and the
vehicle in front of you. Failure to do so could
result in an accident.
CAUTION!
If the trailer weighs more than 1,000 lb (453 kg)
loaded, it should have its own brakes and they
should be of adequate capacity. Failure to do
this could lead to accelerated brake lining wear,
higher brake pedal effort, and longer stopping
distances.
WARNING!
1 — Ground
2 — Tail Lamp
3 — Left Stop/Turn
4 — Right Stop/Turn
1 — Backup Lamps
2 — Tail Lamp
3 — Left Stop/Turn
4 — Ground
5 — Battery
6 — Right Stop/Turn
7 — Electric Brakes
4
22_VF_OM_EN_USC_t.book Page 115
Page 118 of 268
116STARTING AND OPERATING
Automatic Transmission
The DRIVE range can be selected when towing.
The transmission controls include a drive strategy to
avoid frequent shifting when towing. However, if
frequent shifting does occur while in DRIVE, select
TOW/HAUL mode or select a lower gear range (using
the Electronic Range Select (ERS) shift control).
NOTE:Using TOW/HAUL mode or selecting a lower gear
range (using the ERS shift control) while operating
the vehicle under heavy loading conditions will
improve performance and extend transmission life
by reducing excessive shifting and heat buildup.
This action will also provide better engine braking. When towing a loaded trailer up steep grades at
low speeds, holding your vehicle in FIRST gear
(using the ERS shift control) can help to avoid
transmission overheating.
Tow/Haul Mode
To reduce potential for automatic transmission
overheating, activate TOW/HAUL mode when
driving in hilly areas, or select a lower gear range
(using the Electronic Range Select (ERS) shift
control) on more severe grades.
Cruise Control — If Equipped
Do not use on hilly terrain or with heavy loads.
When using the Cruise Control, if you experience
speed drops greater than 10 mph (16 km/h),
disengage until you can get back to cruising
speed.
Use Cruise Control in flat terrain and with light
loads to maximize fuel efficiency.
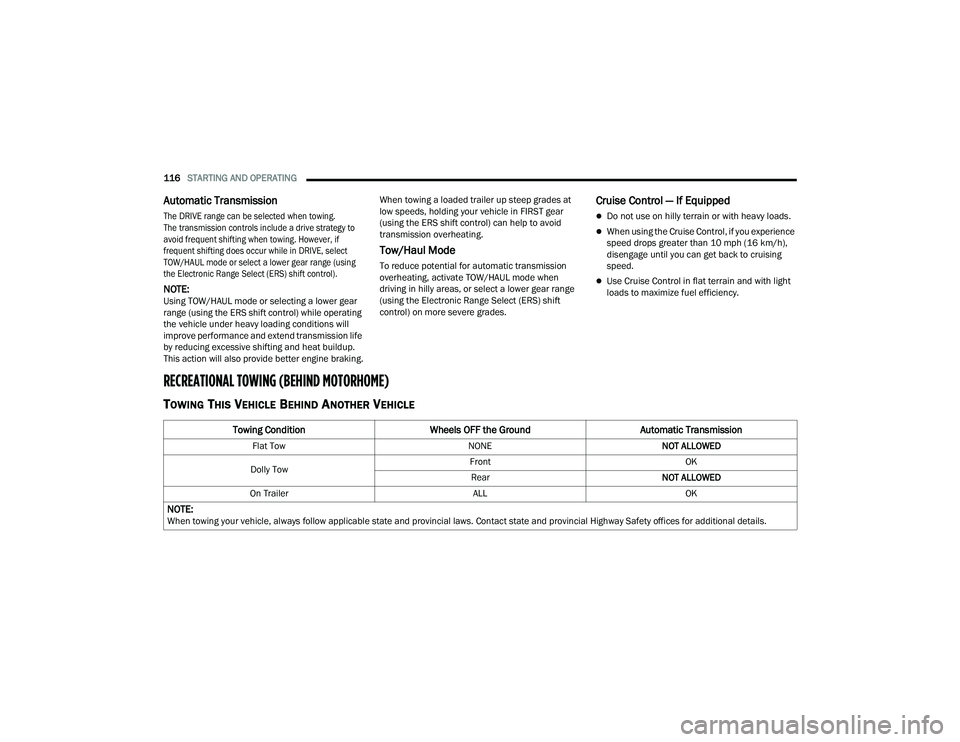
RECREATIONAL TOWING (BEHIND MOTORHOME)
TOWING THIS VEHICLE BEHIND ANOTHER VEHICLE
Towing Condition
Wheels OFF the Ground Automatic Transmission
Flat Tow NONENOT ALLOWED
Dolly Tow Front
OK
Rear NOT ALLOWED
On Trailer ALLOK
NOTE:When towing your vehicle, always follow applicable state and provincial laws. Contact state and provincial Highway Safety offices for additional details.
22_VF_OM_EN_USC_t.book Page 116
Page 120 of 268

118STARTING AND OPERATING
(Continued)
DRIVING THROUGH WATER
Driving through water more than a few inches/
centimeters deep will require extra caution to
ensure safety and prevent damage to your vehicle.
Flowing/Rising Water
Shallow Standing Water
Although your vehicle is capable of driving through
shallow standing water, consider the following
Cautions and Warnings before doing so.
WARNING!
Do not drive on or across a road or path where
water is flowing and/or rising (as in storm
run-off). Flowing water can wear away the road
or path's surface and cause your vehicle to sink
into deeper water. Furthermore, flowing and/or
rising water can carry your vehicle away swiftly.
Failure to follow this warning may result in
injuries that are serious or fatal to you, your
passengers, and others around you.
WARNING!
Driving through standing water limits your
vehicle’s traction capabilities. Do not exceed
5 mph (8 km/h) when driving through
standing water.
Driving through standing water limits your
vehicle’s braking capabilities, which increases
stopping distances. Therefore, after driving
through standing water, drive slowly and
lightly press on the brake pedal several times
to dry the brakes.
Failure to follow these warnings may result in
injuries that are serious or fatal to you, your
passengers, and others around you.
CAUTION!
Always check the depth of the standing water
before driving through it. Never drive through
standing water that is deeper than the bottom
of the tire rims mounted on the vehicle.
Determine the condition of the road or the
path that is under water and if there are any
obstacles in the way before driving through
the standing water.
Do not exceed 5 mph (8 km/h) when driving through standing water. This will minimize
wave effects.
Driving through standing water may cause
damage to your vehicle’s drivetrain compo -
nents. Always inspect your vehicle’s fluids
(i.e., engine oil, transmission, axle, etc.) for
signs of contamination (i.e., fluid that is milky
or foamy in appearance) after driving through
standing water. Do not continue to operate
the vehicle if any fluid appears contaminated,
as this may result in further damage. Such
damage is not covered by the New Vehicle
Limited Warranty.
Getting water inside your vehicle’s engine can
cause it to lock up and stall out, and cause
serious internal damage to the engine. Such
damage is not covered by the New Vehicle
Limited Warranty.
CAUTION!
22_VF_OM_EN_USC_t.book Page 118
Page 123 of 268
MULTIMEDIA121
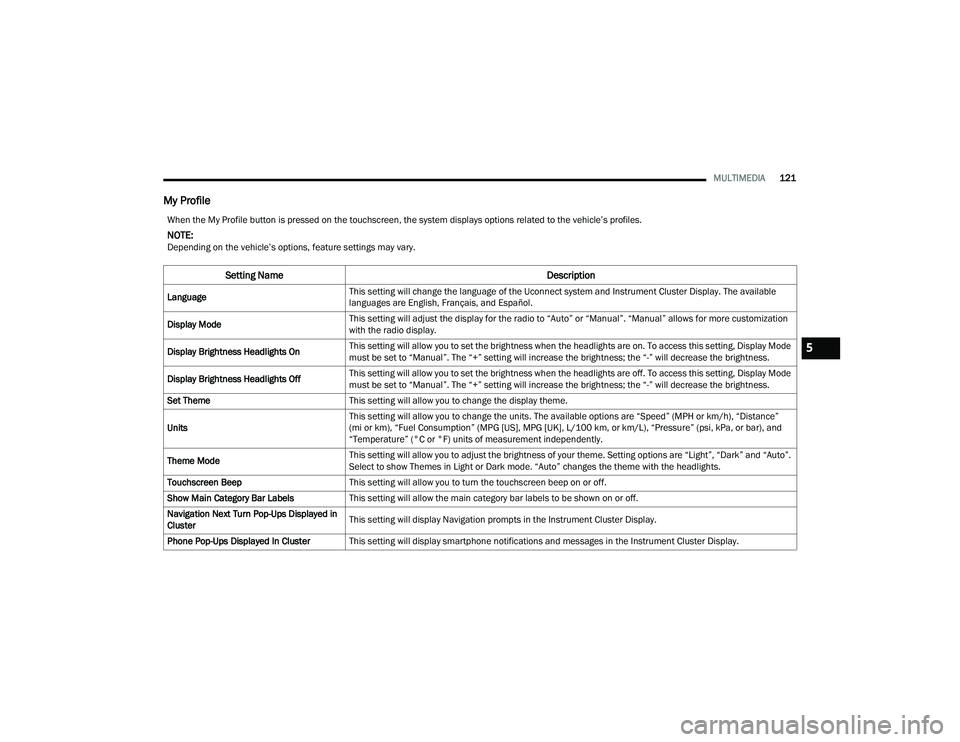
My Profile
When the My Profile button is pressed on the touchscreen, the system displays options related to the vehicle’s profiles.
NOTE:Depending on the vehicle’s options, feature settings may vary.
Setting Name Description
LanguageThis setting will change the language of the Uconnect system and Instrument Cluster Display. The available
languages are English, Français, and Español.
Display Mode This setting will adjust the display for the radio to “Auto” or “Manual”. “Manual” allows for more customization
with the radio display.
Display Brightness Headlights On This setting will allow you to set the brightness when the headlights are on. To access this setting, Display Mode
must be set to “Manual”. The “+” setting will increase the brightness; the “-” will decrease the brightness.
Display Brightness Headlights Off This setting will allow you to set the brightness when the headlights are off. To access this setting, Display Mode
must be set to “Manual”. The “+” setting will increase the brightness; the “-” will decrease the brightness.
Set Theme This setting will allow you to change the display theme.
Units This setting will allow you to change the units. The available options are “Speed” (MPH or km/h), “Distance”
(mi or km), “Fuel Consumption” (MPG [US], MPG [UK], L/100 km, or km/L), “Pressure” (psi, kPa, or bar), and
“Temperature” (°C or °F) units of measurement independently.
Theme Mode This setting will allow you to adjust the brightness of your theme. Setting options are “Light”, “Dark” and “Auto”.
Select to show Themes in Light or Dark mode. “Auto” changes the theme with the headlights.
Touchscreen Beep This setting will allow you to turn the touchscreen beep on or off.
Show Main Category Bar Labels This setting will allow the main category bar labels to be shown on or off.
Navigation Next Turn Pop-Ups Displayed in
Cluster This setting will display Navigation prompts in the Instrument Cluster Display.
Phone Pop-Ups Displayed In Cluster This setting will display smartphone notifications and messages in the Instrument Cluster Display.
5
22_VF_OM_EN_USC_t.book Page 121
Page 125 of 268
MULTIMEDIA123
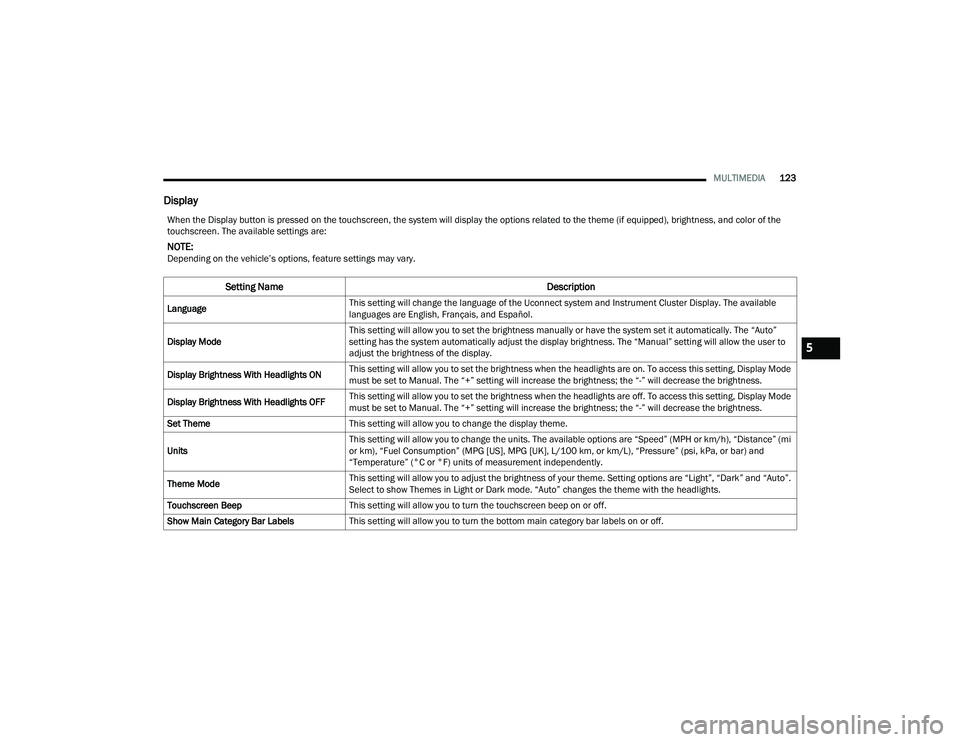
Display
When the Display button is pressed on the touchscreen, the system will display the options related to the theme (if equipped), brightness, and color of the
touchscreen. The available settings are:
NOTE:Depending on the vehicle’s options, feature settings may vary.
Setting Name Description
LanguageThis setting will change the language of the Uconnect system and Instrument Cluster Display. The available
languages are English, Français, and Español.
Display Mode This setting will allow you to set the brightness manually or have the system set it automatically. The “Auto”
setting has the system automatically adjust the display brightness. The “Manual” setting will allow the user to
adjust the brightness of the display.
Display Brightness With Headlights ON This setting will allow you to set the brightness when the headlights are on. To access this setting, Display Mode
must be set to Manual. The “+” setting will increase the brightness; the “-” will decrease the brightness.
Display Brightness With Headlights OFF This setting will allow you to set the brightness when the headlights are off. To access this setting, Display Mode
must be set to Manual. The “+” setting will increase the brightness; the “-” will decrease the brightness.
Set Theme This setting will allow you to change the display theme.
Units This setting will allow you to change the units. The available options are “Speed” (MPH or km/h), “Distance” (mi
or km), “Fuel Consumption” (MPG [US], MPG [UK], L/100 km, or km/L), “Pressure” (psi, kPa, or bar) and
“Temperature” (°C or °F) units of measurement independently.
Theme Mode This setting will allow you to adjust the brightness of your theme. Setting options are “Light”, “Dark” and “Auto”.
Select to show Themes in Light or Dark mode. “Auto” changes the theme with the headlights.
Touchscreen Beep This setting will allow you to turn the touchscreen beep on or off.
Show Main Category Bar Labels This setting will allow you to turn the bottom main category bar labels on or off.
5
22_VF_OM_EN_USC_t.book Page 123