warning light RAM PROMASTER 2022 Owners Manual
[x] Cancel search | Manufacturer: RAM, Model Year: 2022, Model line: PROMASTER, Model: RAM PROMASTER 2022Pages: 268, PDF Size: 13.26 MB
Page 5 of 268
3
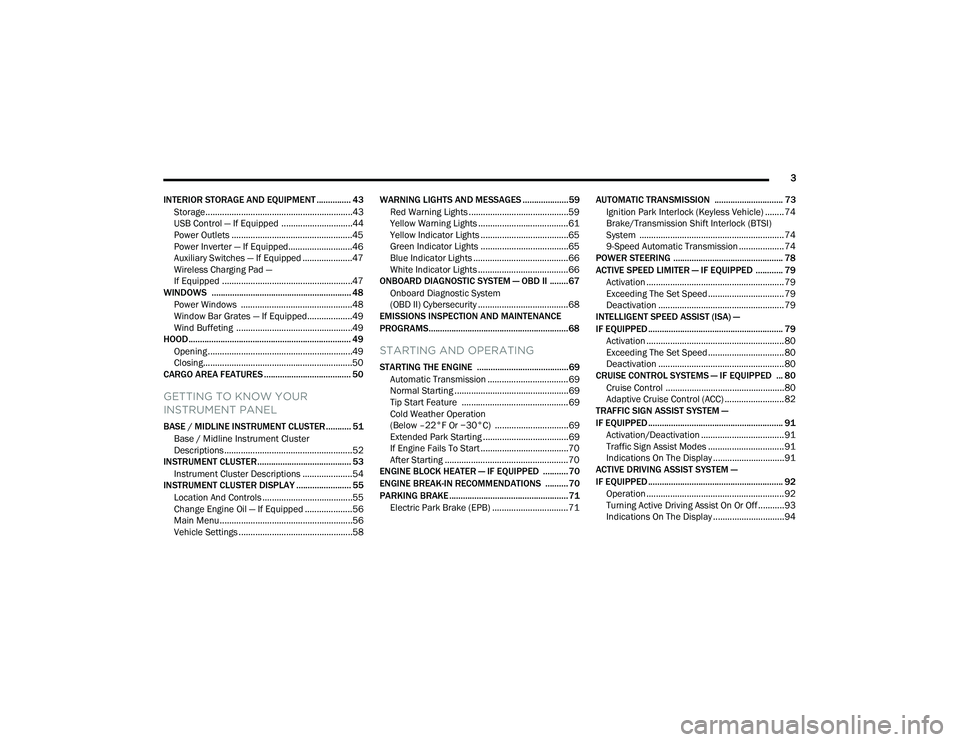
INTERIOR STORAGE AND EQUIPMENT ............... 43 Storage..............................................................43
USB Control — If Equipped ..............................44
Power Outlets ...................................................45
Power Inverter — If Equipped...........................46
Auxiliary Switches — If Equipped .....................47
Wireless Charging Pad —
If Equipped .......................................................47
WINDOWS ............................................................. 48
Power Windows ...............................................48
Window Bar Grates — If Equipped...................49
Wind Buffeting .................................................49
HOOD....................................................................... 49
Opening .............................................................49
Closing...............................................................50
CARGO AREA FEATURES ...................................... 50
GETTING TO KNOW YOUR
INSTRUMENT PANEL
BASE / MIDLINE INSTRUMENT CLUSTER........... 51
Base / Midline Instrument Cluster
Descriptions ......................................................52
INSTRUMENT CLUSTER......................................... 53
Instrument Cluster Descriptions .....................54
INSTRUMENT CLUSTER DISPLAY ........................ 55
Location And Controls ......................................55
Change Engine Oil — If Equipped ....................56
Main Menu........................................................56
Vehicle Settings ................................................58 WARNING LIGHTS AND MESSAGES ....................59
Red Warning Lights ..........................................59
Yellow Warning Lights ......................................61
Yellow Indicator Lights .....................................65
Green Indicator Lights .....................................65
Blue Indicator Lights ........................................66
White Indicator Lights ......................................66
ONBOARD DIAGNOSTIC SYSTEM — OBD II ........ 67
Onboard Diagnostic System
(OBD II) Cybersecurity ......................................68
EMISSIONS INSPECTION AND MAINTENANCE
PROGRAMS.............................................................68
STARTING AND OPERATING
STARTING THE ENGINE ........................................69
Automatic Transmission ..................................69
Normal Starting ................................................69
Tip Start Feature .............................................69
Cold Weather Operation
(Below –22°F Or −30°C) ...............................69
Extended Park Starting ....................................69
If Engine Fails To Start .....................................70
After Starting ....................................................70
ENGINE BLOCK HEATER — IF EQUIPPED ...........70
ENGINE BREAK-IN RECOMMENDATIONS ..........70
PARKING BRAKE ....................................................71
Electric Park Brake (EPB) ................................71 AUTOMATIC TRANSMISSION .............................. 73
Ignition Park Interlock (Keyless Vehicle) ........ 74
Brake/Transmission Shift Interlock (BTSI)
System ............................................................. 74
9-Speed Automatic Transmission ................... 74
POWER STEERING ................................................ 78
ACTIVE SPEED LIMITER — IF EQUIPPED ............ 79
Activation .......................................................... 79
Exceeding The Set Speed ................................ 79
Deactivation ..................................................... 79
INTELLIGENT SPEED ASSIST (ISA) —
IF EQUIPPED ........................................................... 79
Activation .......................................................... 80
Exceeding The Set Speed ................................ 80
Deactivation ..................................................... 80
CRUISE CONTROL SYSTEMS — IF EQUIPPED ... 80
Cruise Control .................................................. 80
Adaptive Cruise Control (ACC) ......................... 82
TRAFFIC SIGN ASSIST SYSTEM —
IF EQUIPPED ........................................................... 91
Activation/Deactivation ................................... 91
Traffic Sign Assist Modes ................................ 91
Indications On The Display .............................. 91
ACTIVE DRIVING ASSIST SYSTEM —
IF EQUIPPED ........................................................... 92
Operation .......................................................... 92
Turning Active Driving Assist On Or Off ........... 93
Indications On The Display .............................. 94
22_VF_OM_EN_USC_t.book Page 3
Page 11 of 268
9
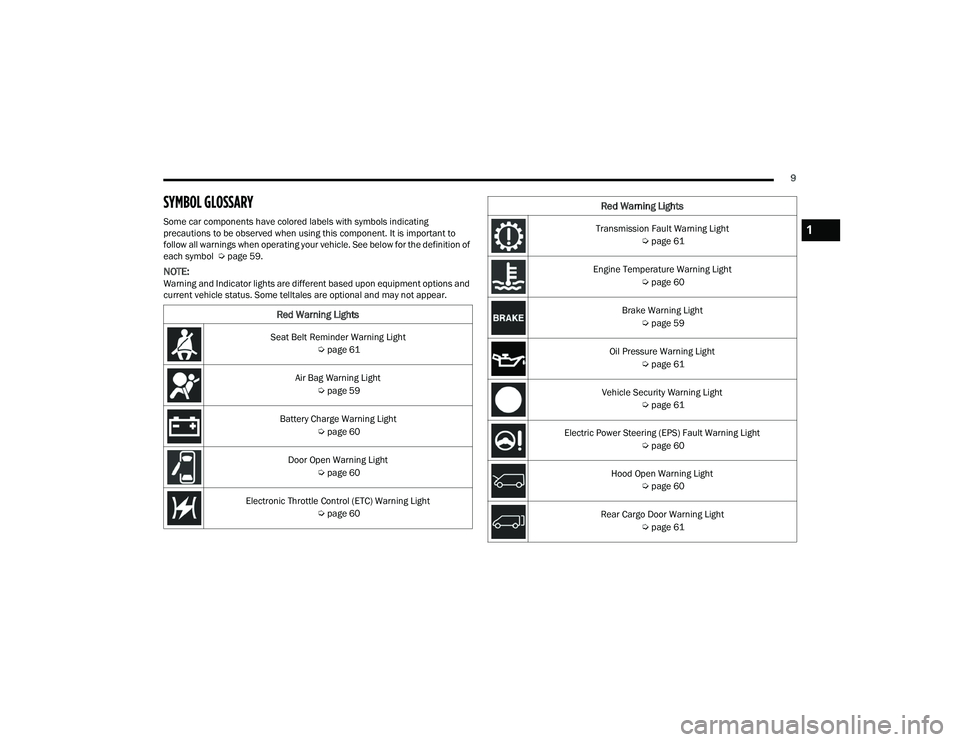
SYMBOL GLOSSARY
Some car components have colored labels with symbols indicating
precautions to be observed when using this component. It is important to
follow all warnings when operating your vehicle. See below for the definition of
each symbol Úpage 59.
NOTE:Warning and Indicator lights are different based upon equipment options and
current vehicle status. Some telltales are optional and may not appear.
Red Warning Lights
Seat Belt Reminder Warning Light
Úpage 61
Air Bag Warning Light Úpage 59
Battery Charge Warning Light Úpage 60
Door Open Warning Light Úpage 60
Electronic Throttle Control (ETC) Warning Light Úpage 60
Transmission Fault Warning Light
Úpage 61
Engine Temperature Warning Light Úpage 60
Brake Warning Light Úpage 59
Oil Pressure Warning Light Úpage 61
Vehicle Security Warning Light Úpage 61
Electric Power Steering (EPS) Fault Warning Light Úpage 60
Hood Open Warning Light Úpage 60
Rear Cargo Door Warning Light Úpage 61
Red Warning Lights
1
22_VF_OM_EN_USC_t.book Page 9
Page 12 of 268
10
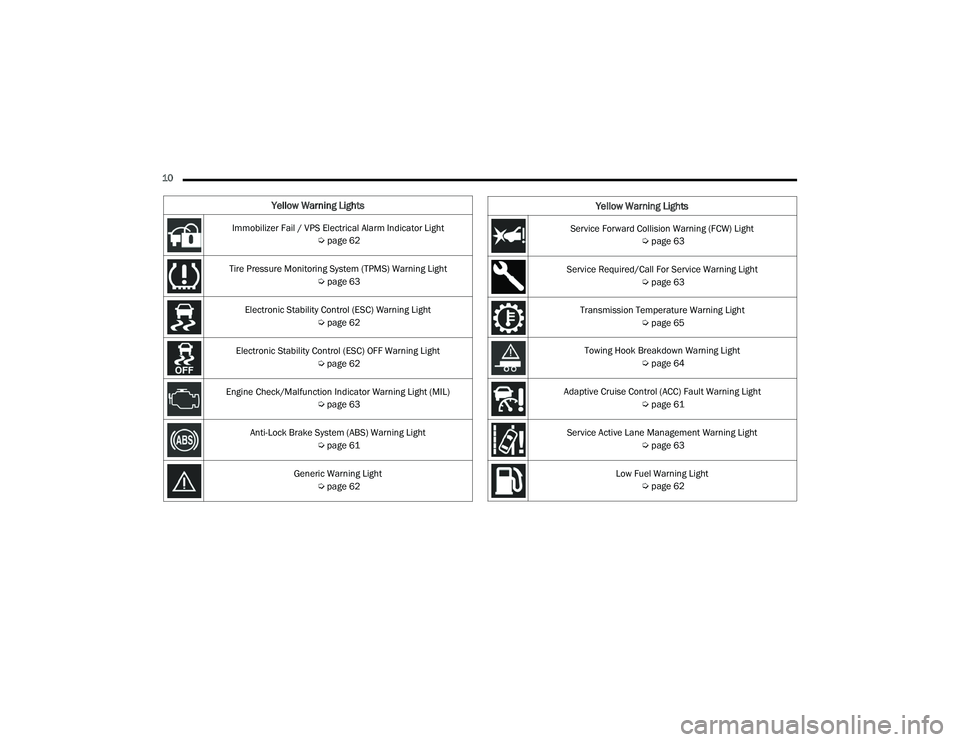
Yellow Warning Lights
Immobilizer Fail / VPS Electrical Alarm Indicator Light Úpage 62
Tire Pressure Monitoring System (TPMS) Warning Light Úpage 63
Electronic Stability Control (ESC) Warning Light Úpage 62
Electronic Stability Control (ESC) OFF Warning Light Úpage 62
Engine Check/Malfunction Indicator Warning Light (MIL) Úpage 63
Anti-Lock Brake System (ABS) Warning Light Úpage 61
Generic Warning Light Úpage 62Service Forward Collision Warning (FCW) Light
Úpage 63
Service Required/Call For Service Warning Light Úpage 63
Transmission Temperature Warning Light Úpage 65
Towing Hook Breakdown Warning Light Úpage 64
Adaptive Cruise Control (ACC) Fault Warning Light Úpage 61
Service Active Lane Management Warning Light Úpage 63
Low Fuel Warning Light Úpage 62
Yellow Warning Lights
22_VF_OM_EN_USC_t.book Page 10
Page 13 of 268
11
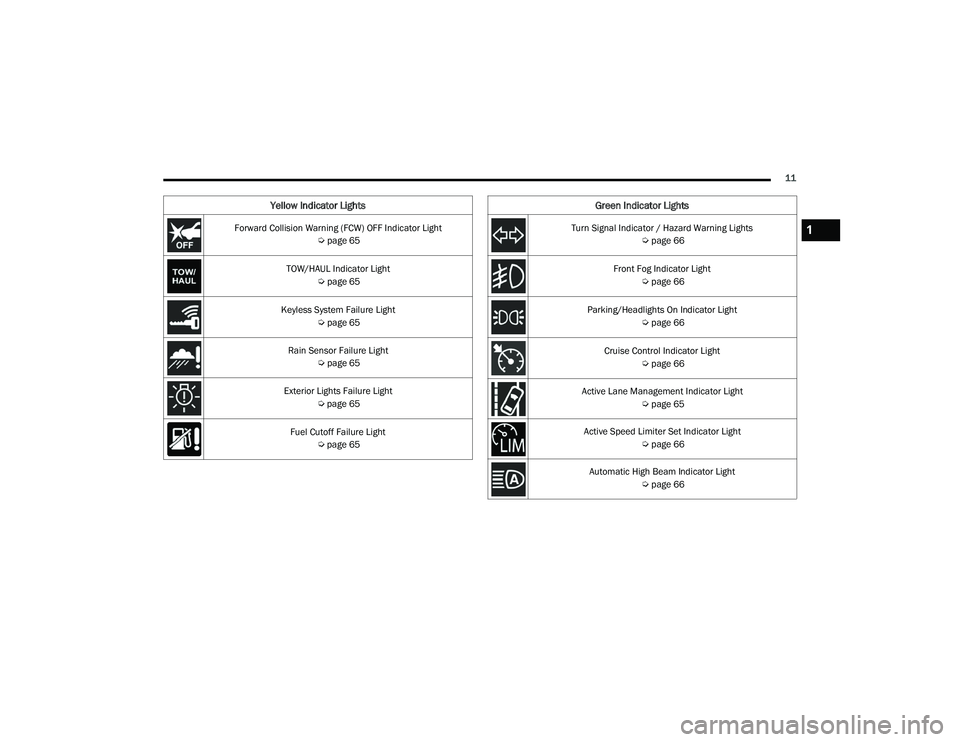
Yellow Indicator Lights
Forward Collision Warning (FCW) OFF Indicator Light Úpage 65
TOW/HAUL Indicator Light Úpage 65
Keyless System Failure Light Úpage 65
Rain Sensor Failure Light Úpage 65
Exterior Lights Failure Light Úpage 65
Fuel Cutoff Failure Light Úpage 65
Green Indicator Lights
Turn Signal Indicator / Hazard Warning Lights
Úpage 66
Front Fog Indicator Light Úpage 66
Parking/Headlights On Indicator Light Úpage 66
Cruise Control Indicator Light Úpage 66
Active Lane Management Indicator Light Úpage 65
Active Speed Limiter Set Indicator Light Úpage 66
Automatic High Beam Indicator Light Úpage 661
22_VF_OM_EN_USC_t.book Page 11
Page 14 of 268

12
Blue Indicator Lights
High Beam Indicator Light Úpage 66
White Indicator Lights
Speed Warning Indicator Light
Úpage 67
Adaptive Cruise Control (ACC) Set With Target Indicator Light Úpage 66
Active Lane Management Indicator Light
Úpage 67
Active Speed Limiter Ready Indicator Light Úpage 67
White Indicator Lights
22_VF_OM_EN_USC_t.book Page 12
Page 20 of 268
18GETTING TO KNOW YOUR VEHICLE
HOW TO USE REMOTE START
Push and release the Remote Start button on the
key fob twice within five seconds. The vehicle
doors will lock, the parking lights will flash, and the
horn will chirp twice (if programmed). Then, the
engine will start, and the vehicle will remain in the
Remote Start mode for a 15 minute cycle.
Pushing the Remote Start button a third time shuts
the engine off.
NOTE:
With Remote Start, the engine will only run for
15 minutes.
Remote Start can only be used twice.
If an engine fault is present or fuel level is low,
the vehicle will start and then shut down in
10 seconds.
The park lights will turn on and remain on during
Remote Start mode.
For security, power window is disabled when the
vehicle is in the Remote Start mode.
The ignition must be placed in the ON/RUN posi -
tion before the Remote Start sequence can be
repeated for a third cycle.
All of the following conditions must be met before
the engine will Remote Start:
Gear selector in PARK
Doors closed
Hood closed
Rear cargo doors closed
Hazard switch off
Brake switch inactive (brake pedal not pressed)
Battery at an acceptable charge level
PANIC button not pushed
Fuel meets minimum requirement
System not disabled from previous Remote
Start event
Vehicle Security system not active
Malfunction Indicator Light (MIL) is not illuminated
Ignition in OFF position
TO EXIT REMOTE START MODE
To drive the vehicle after starting the Remote Start
system, push and release the START/STOP ignition
button while pressing the brake pedal prior to the
end of the 15 minute cycle.
The Remote Start system will turn the engine off if the
Remote Start button on the key fob is pushed again, or
if the engine is allowed to run for the entire 15 minute
cycle. Once the ignition is placed in the ON/RUN
position, the climate controls will resume the previously
set operations (temperature, blower control, etc.).
NOTE:To avoid unintentional shutdowns, the system will
disable for two seconds after receiving a valid
Remote Start request.
WARNING!
Do not start or run an engine in a closed garage
or confined area. Exhaust gas contains Carbon
Monoxide (CO) which is odorless and colorless.
Carbon Monoxide is poisonous and can cause
serious injury or death when inhaled.
Keep key fobs away from children. Operation
of the Remote Start system, windows, door
locks or other controls could cause serious
injury or death.
WARNING!
Do not start or run an engine in a closed garage or
confined area. Exhaust gas contains Carbon
Monoxide (CO) which is odorless and colorless.
Carbon Monoxide is poisonous and can cause
serious injury or death when inhaled.
Keep key fobs away from children. Operation
of the Remote Start system, windows, door
locks or other controls could cause serious
injury or death.
22_VF_OM_EN_USC_t.book Page 18
Page 26 of 268

24GETTING TO KNOW YOUR VEHICLE
(Continued)
Seat Adjustment (With Swivel Seat)
Forward And Rearward Adjustment
The adjustment bar is at the front of the seat, near
the floor. Pull the bar upward to move the seat
forward or rearward. Release the bar once the
seat is in the desired position. Then, using body
pressure, move forward and rearward on the seat
to be sure that the seat adjusters have latched.
Height Adjustment
Without Swivel Seat
The height adjustment levers are located on the
center outboard side of the seat. Lift up on the
front lever to adjust the front of the seat, or lift up
on the rear lever to adjust the rear of the seat.
To raise the front or rear of the seat, lift the
appropriate lever while none or minimal weight
is applied to the seat.
To lower the front or rear of the seat, lift the
appropriate lever while seated or applying
weight to the seat.
With Swivel Seat
The height adjustment knobs are located on the
center outboard side of the seat. Rotate the front
knob to adjust the front of the seat up or down.
Rotate the rear knob to adjust the rear of the seat
up or down.
Recliner Adjustment
Without Swivel Seat
The recliner knob is on the rear outboard side of the
seat. To recline the seatback, lean back, rotate the
knob rearward to position the seatback as desired.
To return the seatback to its normal upright position,
lean forward, rotate the knob forward until the
seatback is in the upright position.
With Swivel Seat
The recliner lever is located at the lower front
outboard side of the seat. To recline the seatback,
lean forward slightly, pull the lever outward, lean
back to the desired position and release the lever.
To return the seatback to its normal upright
position, lean forward and pull the lever outward.
Release the lever once the seatback is in the
upright position.
1 — Lumbar Knob
2 — Recline Lever
3 — Forward/Rearward Adjustment Bar
4 — Front Height Adjustment Knob
5 — Rear Height Adjustment Knob
WARNING!
Adjusting a seat while driving may be
dangerous. Moving a seat while driving could
result in loss of control which could cause a
collision and serious injury or death.
Seats should be adjusted before fastening the
seat belts and while the vehicle is parked.
Serious injury or death could result from a
poorly adjusted seat belt.
WARNING!
Adjusting a seat while the vehicle is moving is
dangerous. The sudden movement of the seat
could cause you to lose control. The seat belt
might not be adjusted properly and you could
be injured. Adjust the seat only while the
vehicle is parked.
22_VF_OM_EN_USC_t.book Page 24
Page 28 of 268
26GETTING TO KNOW YOUR VEHICLE
(Continued)
If the driver or the passenger seats are not locked
in the facing forward position during movement
of the vehicle, a message will appear in the
instrument cluster display and an intermittent
chime will sound until key-off or until the swivel
seats are locked in the facing forward position.
Stop and move the swivel seats in the correct
position before proceeding.
If a fault is present in the system and it is not
possible to check the correct position of the swivel
seats, a message and the generic warning light
appears in the instrument cluster display to inform
about the failure. In these conditions, check the
status of the swivel seats and do not drive the
vehicle until the swivel seats are locked in the
facing forward position.
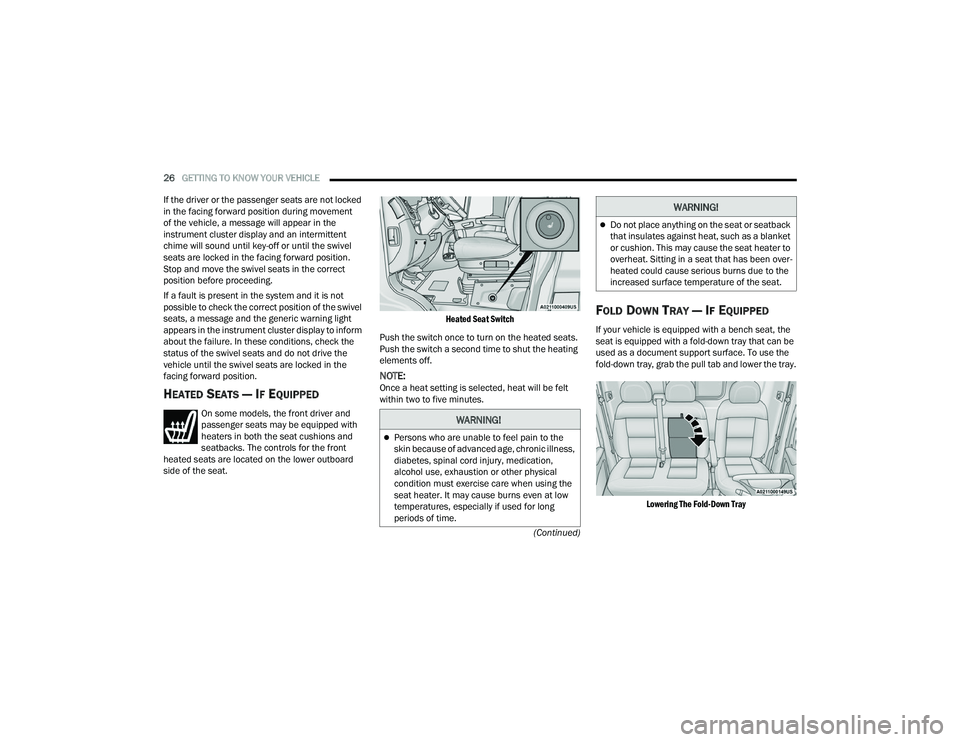
HEATED SEATS — IF EQUIPPED
On some models, the front driver and
passenger seats may be equipped with
heaters in both the seat cushions and
seatbacks. The controls for the front
heated seats are located on the lower outboard
side of the seat.
Heated Seat Switch
Push the switch once to turn on the heated seats.
Push the switch a second time to shut the heating
elements off.
NOTE:Once a heat setting is selected, heat will be felt
within two to five minutes.
FOLD DOWN TRAY — IF EQUIPPED
If your vehicle is equipped with a bench seat, the
seat is equipped with a fold-down tray that can be
used as a document support surface. To use the
fold-down tray, grab the pull tab and lower the tray.
Lowering The Fold-Down Tray
WARNING!
Persons who are unable to feel pain to the
skin because of advanced age, chronic illness,
diabetes, spinal cord injury, medication,
alcohol use, exhaustion or other physical
condition must exercise care when using the
seat heater. It may cause burns even at low
temperatures, especially if used for long
periods of time.
Do not place anything on the seat or seatback
that insulates against heat, such as a blanket
or cushion. This may cause the seat heater to
overheat. Sitting in a seat that has been over -
heated could cause serious burns due to the
increased surface temperature of the seat.
WARNING!
22_VF_OM_EN_USC_t.book Page 26
Page 32 of 268
30GETTING TO KNOW YOUR VEHICLE
Digital Rearview Mirror — If Equipped
The Digital Rearview Mirror provides a high
definition, wide and unobstructed view of the road
behind while driving.
Position the mirror in the regular Automatic
Dimming Mirror mode, then activate the Digital
Rearview Mirror mode.
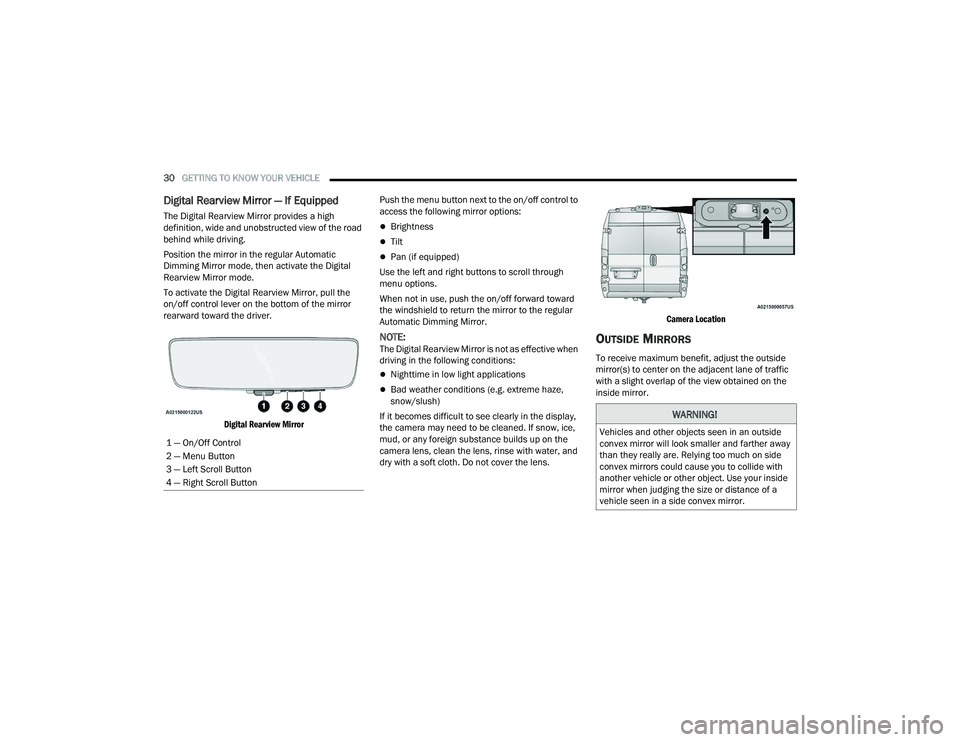
To activate the Digital Rearview Mirror, pull the
on/off control lever on the bottom of the mirror
rearward toward the driver.
Digital Rearview Mirror
Push the menu button next to the on/off control to
access the following mirror options:Brightness
Tilt
Pan (if equipped)
Use the left and right buttons to scroll through
menu options.
When not in use, push the on/off forward toward
the windshield to return the mirror to the regular
Automatic Dimming Mirror.
NOTE:The Digital Rearview Mirror is not as effective when
driving in the following conditions:
Nighttime in low light applications
Bad weather conditions (e.g. extreme haze,
snow/slush)
If it becomes difficult to see clearly in the display,
the camera may need to be cleaned. If snow, ice,
mud, or any foreign substance builds up on the
camera lens, clean the lens, rinse with water, and
dry with a soft cloth. Do not cover the lens.
Camera Location
OUTSIDE MIRRORS
To receive maximum benefit, adjust the outside
mirror(s) to center on the adjacent lane of traffic
with a slight overlap of the view obtained on the
inside mirror.
1 — On/Off Control
2 — Menu Button
3 — Left Scroll Button
4 — Right Scroll Button
WARNING!
Vehicles and other objects seen in an outside
convex mirror will look smaller and farther away
than they really are. Relying too much on side
convex mirrors could cause you to collide with
another vehicle or other object. Use your inside
mirror when judging the size or distance of a
vehicle seen in a side convex mirror.
22_VF_OM_EN_USC_t.book Page 30
Page 34 of 268
32GETTING TO KNOW YOUR VEHICLE
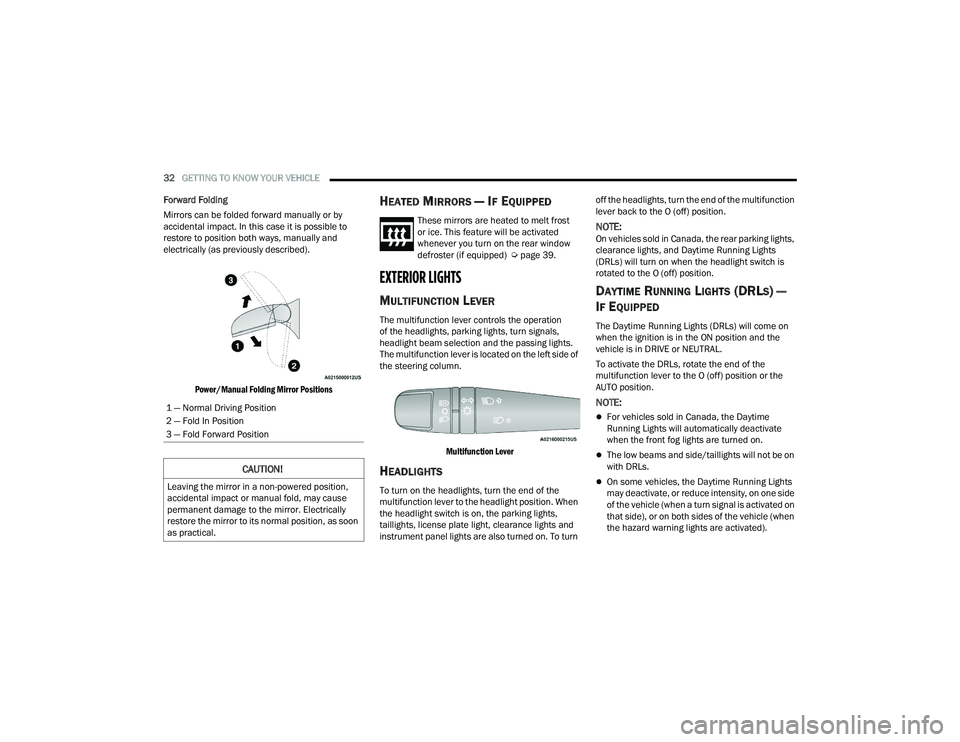
Forward Folding
Mirrors can be folded forward manually or by
accidental impact. In this case it is possible to
restore to position both ways, manually and
electrically (as previously described).
Power/Manual Folding Mirror Positions
HEATED MIRRORS — IF EQUIPPED
These mirrors are heated to melt frost
or ice. This feature will be activated
whenever you turn on the rear window
defroster (if equipped) Ú page 39.
EXTERIOR LIGHTS
MULTIFUNCTION LEVER
The multifunction lever controls the operation
of the headlights, parking lights, turn signals,
headlight beam selection and the passing lights.
The multifunction lever is located on the left side of
the steering column.
Multifunction Lever
HEADLIGHTS
To turn on the headlights, turn the end of the
multifunction lever to the headlight position. When
the headlight switch is on, the parking lights,
taillights, license plate light, clearance lights and
instrument panel lights are also turned on. To turn off the headlights, turn the end of the multifunction
lever back to the O (off) position.
NOTE:On vehicles sold in Canada, the rear parking lights,
clearance lights, and Daytime Running Lights
(DRLs) will turn on when the headlight switch is
rotated to the O (off) position.
DAYTIME RUNNING LIGHTS (DRLS) —
I
F EQUIPPED
The Daytime Running Lights (DRLs) will come on
when the ignition is in the ON position and the
vehicle is in DRIVE or NEUTRAL.
To activate the DRLs, rotate the end of the
multifunction lever to the O (off) position or the
AUTO position.
NOTE:
For vehicles sold in Canada, the Daytime
Running Lights will automatically deactivate
when the front fog lights are turned on.
The low beams and side/taillights will not be on
with DRLs.
On some vehicles, the Daytime Running Lights
may deactivate, or reduce intensity, on one side
of the vehicle (when a turn signal is activated on
that side), or on both sides of the vehicle (when
the hazard warning lights are activated).
1 — Normal Driving Position
2 — Fold In Position
3 — Fold Forward Position
CAUTION!
Leaving the mirror in a non-powered position,
accidental impact or manual fold, may cause
permanent damage to the mirror. Electrically
restore the mirror to its normal position, as soon
as practical.
22_VF_OM_EN_USC_t.book Page 32