Swivel RAM PROMASTER 2023 Owners Manual
[x] Cancel search | Manufacturer: RAM, Model Year: 2023, Model line: PROMASTER, Model: RAM PROMASTER 2023Pages: 296, PDF Size: 12.31 MB
Page 12 of 296
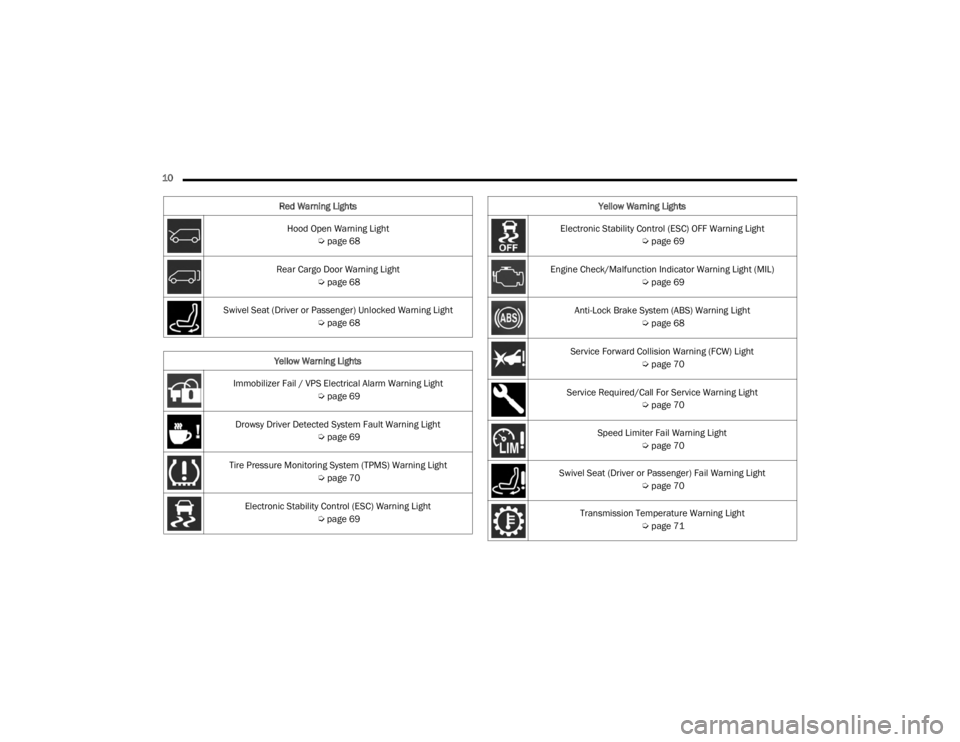
10 Hood Open Warning Light Úpage 68
Rear Cargo Door Warning Light Úpage 68
Swivel Seat (Driver or Passenger) Unlocked Warning Light Úpage 68
Yellow Warning Lights
Immobilizer Fail / VPS Electrical Alarm Warning Light Úpage 69
Drowsy Driver Detected System Fault Warning Light Úpage 69
Tire Pressure Monitoring System (TPMS) Warning Light Úpage 70
Electronic Stability Control (ESC) Warning Light Úpage 69
Red Warning Lights
Electronic Stability Control (ESC) OFF Warning Light
Úpage 69
Engine Check/Malfunction Indicator Warning Light (MIL) Úpage 69
Anti-Lock Brake System (ABS) Warning Light Úpage 68
Service Forward Collision Warning (FCW) Light Úpage 70
Service Required/Call For Service Warning Light Úpage 70
Speed Limiter Fail Warning Light Úpage 70
Swivel Seat (Driver or Passenger) Fail Warning Light Úpage 70
Transmission Temperature Warning Light Úpage 71
Yellow Warning Lights
23_VF_OM_EN_USC_t.book Page 10
Page 26 of 296
24GETTING TO KNOW YOUR VEHICLE
MANUAL ADJUSTMENTS
The driver and passenger seats can be adjusted
forward/rearward and reclined. Front and
rear height and lumbar can also be adjusted
(if equipped).
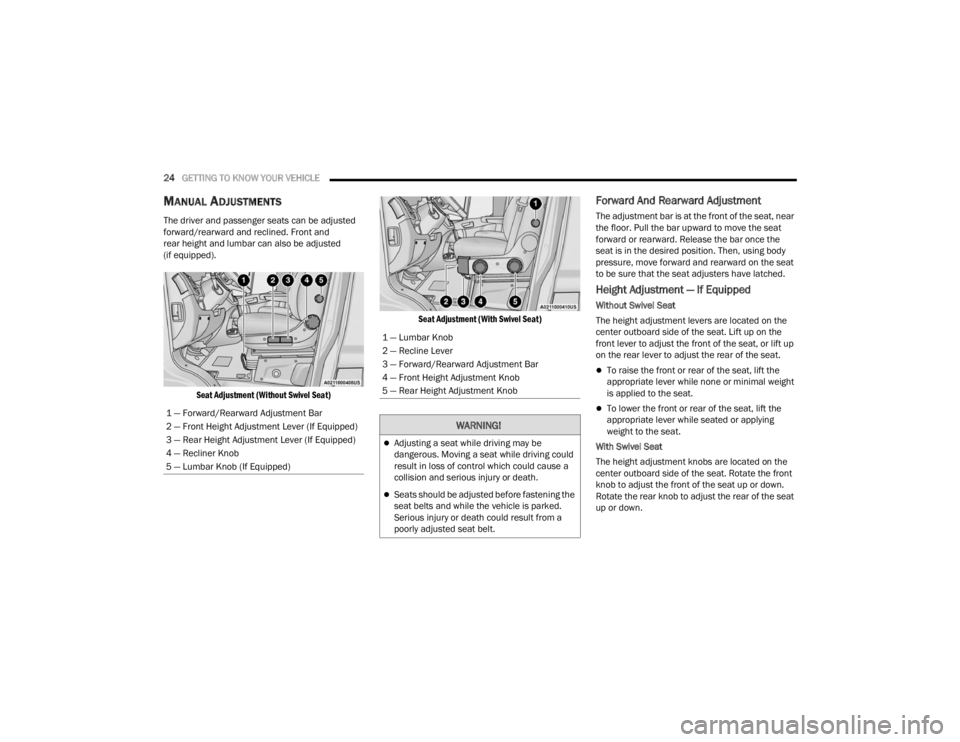
Seat Adjustment (Without Swivel Seat) Seat Adjustment (With Swivel Seat)
Forward And Rearward Adjustment
The adjustment bar is at the front of the seat, near
the floor. Pull the bar upward to move the seat
forward or rearward. Release the bar once the
seat is in the desired position. Then, using body
pressure, move forward and rearward on the seat
to be sure that the seat adjusters have latched.
Height Adjustment — If Equipped
Without Swivel Seat
The height adjustment levers are located on the
center outboard side of the seat. Lift up on the
front lever to adjust the front of the seat, or lift up
on the rear lever to adjust the rear of the seat.
To raise the front or rear of the seat, lift the
appropriate lever while none or minimal weight
is applied to the seat.
To lower the front or rear of the seat, lift the
appropriate lever while seated or applying
weight to the seat.
With Swivel Seat
The height adjustment knobs are located on the
center outboard side of the seat. Rotate the front
knob to adjust the front of the seat up or down.
Rotate the rear knob to adjust the rear of the seat
up or down.
1 — Forward/Rearward Adjustment Bar
2 — Front Height Adjustment Lever (If Equipped)
3 — Rear Height Adjustment Lever (If Equipped)
4 — Recliner Knob
5 — Lumbar Knob (If Equipped)
1 — Lumbar Knob
2 — Recline Lever
3 — Forward/Rearward Adjustment Bar
4 — Front Height Adjustment Knob
5 — Rear Height Adjustment Knob
WARNING!
Adjusting a seat while driving may be
dangerous. Moving a seat while driving could
result in loss of control which could cause a
collision and serious injury or death.
Seats should be adjusted before fastening the
seat belts and while the vehicle is parked.
Serious injury or death could result from a
poorly adjusted seat belt.
23_VF_OM_EN_USC_t.book Page 24
Page 27 of 296
GETTING TO KNOW YOUR VEHICLE25
(Continued)
Recliner Adjustment
Without Swivel Seat
The recliner knob is on the rear outboard side of the
seat. To recline the seatback, lean back and rotate
the knob rearward to position the seatback as desired.
To return the seatback to its normal upright position,
lean forward and rotate the knob forward until the
seatback is in the upright position.
With Swivel Seat
The recliner lever is located at the lower front outboard
side of the seat. To recline the seatback, lean forward
slightly, pull the lever outward, lean back to the desired
position and release the lever. To return the seatback
to its normal upright position, lean forward and pull the
lever outward. Release the lever once the seatback is
in the upright position.
Lumbar Support — If Equipped
This feature allows you to increase or decrease the
amount of lumbar support. The lumbar control
knob is located on the rear upper outboard side of
the driver's seatback. Rotate the control forward to
increase and rearward to decrease the desired
amount of lumbar support.
Suspension Seat — If Equipped
The seat is equipped with a mechanical spring
system and hydraulic shock absorber to ensure
maximum comfort and safety. The system of
springs also effectively absorbs impact from
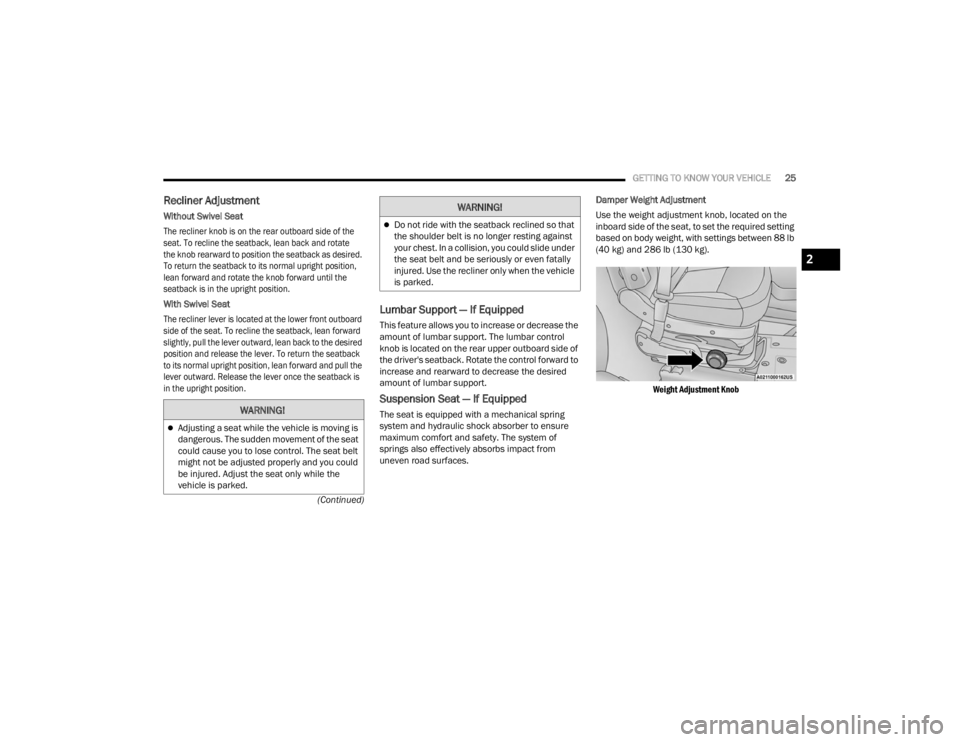
uneven road surfaces. Damper Weight Adjustment
Use the weight adjustment knob, located on the
inboard side of the seat, to set the required setting
based on body weight, with settings between 88 lb
(40 kg) and 286 lb (130 kg).
Weight Adjustment Knob
WARNING!
Adjusting a seat while the vehicle is moving is
dangerous. The sudden movement of the seat
could cause you to lose control. The seat belt
might not be adjusted properly and you could
be injured. Adjust the seat only while the
vehicle is parked.
Do not ride with the seatback reclined so that
the shoulder belt is no longer resting against
your chest. In a collision, you could slide under
the seat belt and be seriously or even fatally
injured. Use the recliner only when the vehicle
is parked.
WARNING!
2
23_VF_OM_EN_USC_t.book Page 25
Page 28 of 296
26GETTING TO KNOW YOUR VEHICLE
Swivel Seat — If Equipped
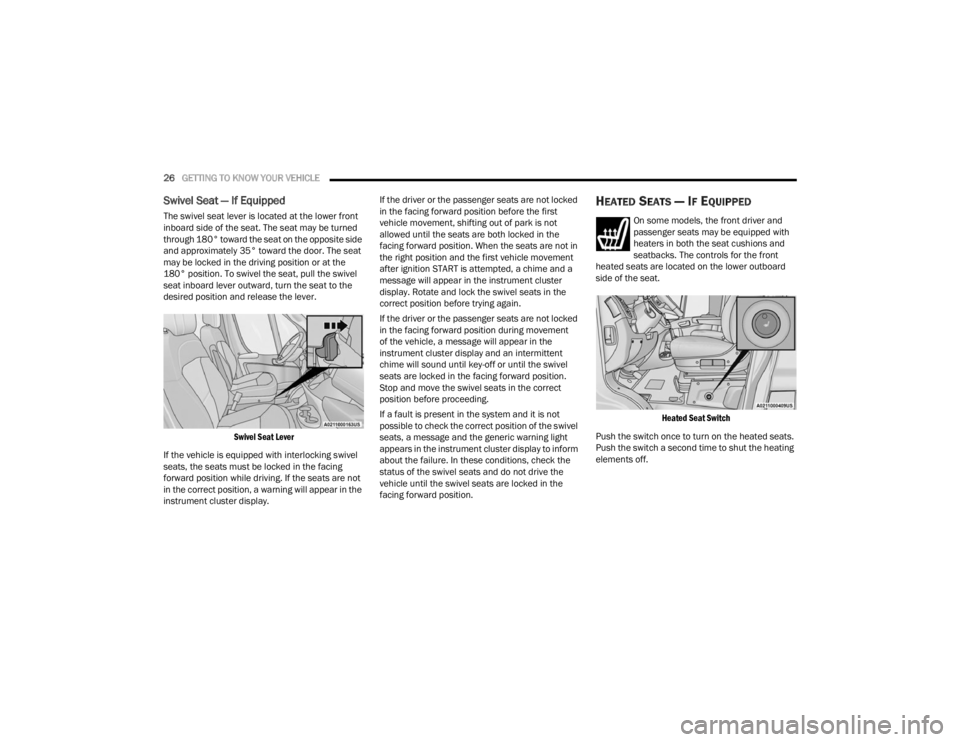
The swivel seat lever is located at the lower front
inboard side of the seat. The seat may be turned
through 180° toward the seat on the opposite side
and approximately 35° toward the door. The seat
may be locked in the driving position or at the
180° position. To swivel the seat, pull the swivel
seat inboard lever outward, turn the seat to the
desired position and release the lever.
Swivel Seat Lever
If the vehicle is equipped with interlocking swivel
seats, the seats must be locked in the facing
forward position while driving. If the seats are not
in the correct position, a warning will appear in the
instrument cluster display. If the driver or the passenger seats are not locked
in the facing forward position before the first
vehicle movement, shifting out of park is not
allowed until the seats are both locked in the
facing forward position. When the seats are not in
the right position and the first vehicle movement
after ignition START is attempted, a chime and a
message will appear in the instrument cluster
display. Rotate and lock the swivel seats in the
correct position before trying again.
If the driver or the passenger seats are not locked
in the facing forward position during movement
of the vehicle, a message will appear in the
instrument cluster display and an intermittent
chime will sound until key-off or until the swivel
seats are locked in the facing forward position.
Stop and move the swivel seats in the correct
position before proceeding.
If a fault is present in the system and it is not
possible to check the correct position of the swivel
seats, a message and the generic warning light
appears in the instrument cluster display to inform
about the failure. In these conditions, check the
status of the swivel seats and do not drive the
vehicle until the swivel seats are locked in the
facing forward position.
HEATED SEATS — IF EQUIPPED
On some models, the front driver and
passenger seats may be equipped with
heaters in both the seat cushions and
seatbacks. The controls for the front
heated seats are located on the lower outboard
side of the seat.
Heated Seat Switch
Push the switch once to turn on the heated seats.
Push the switch a second time to shut the heating
elements off.
23_VF_OM_EN_USC_t.book Page 26
Page 69 of 296

GETTING TO KNOW YOUR INSTRUMENT PANEL67
Drowsy Driver Detected Warning Light —
If Equipped
Drowsy driver detection helps to avoid
crashes caused by fatigue by advising
drivers to take a break in time. Once a
Drowsy Driver is detected, A pop-up will
display continuously until the driver presses the
OK button to clear.
Once the pop-up message is cleared, it is stored
until the condition is no longer true.
Electric Power Steering (EPS) Fault
Warning Light
This warning light will turn on when
there's a fault with the EPS system
Ú page 85.
Electronic Throttle Control (ETC) Warning
Light
This warning light will illuminate to inform of
a problem with the ETC system. If a problem
is detected while the vehicle is running, the
light will either stay on or flash depending on
the nature of the problem. Cycle the ignition when
the vehicle is safely and completely stopped and the
transmission is placed in the PARK (P) position.
The light should turn off. If the light remains on with the
vehicle running, your vehicle will usually be drivable;
however, see an authorized dealer for service as soon
as possible.
If the light continues to flash when the vehicle is
running, immediate service is required and you may
experience reduced performance, an elevated/
rough idle, or engine stall and your vehicle may
require towing. The light will come on when the
ignition is placed in the ON/RUN or MAR/ON/RUN
position and remain on briefly as a bulb check. If the
light does not come on during starting, have the
system checked by an authorized dealer.
Engine Temperature Warning Light
This light warns of an overheated
engine condition. If the engine coolant
temperature is too high, this indicator will
illuminate and a single chime will sound.
If the light turns on while driving, safely pull over and
stop the vehicle. If the Air Conditioning (A/C) system is
on, turn it off. Also, shift the transmission into NEUTRAL
and idle the vehicle. If the temperature reading does
not return to normal, turn the engine off immediately
and call for service
Ú
page 216.
Generic Warning Light
The Generic Warning Light will illuminate
to signal the failure of one or more safety
warning lights with a corresponding
message. The safety systems that may
cause the Generic Warning Light to illuminate
include but are not limited too: Seat belt Reminder,
Electric Park Brake, Brakes, Air Bag, and Swivel
Seat failure.
The telltale will remain on in case of swivel seat
failure and will blink in case of Air Bag Warning
Light Failure. Contact an authorized dealer
immediately for service.
WARNING!
Continued operation with reduced assist could
pose a safety risk to yourself and others. Service
should be obtained as soon as possible.
3
23_VF_OM_EN_USC_t.book Page 67
Page 70 of 296

68GETTING TO KNOW YOUR INSTRUMENT PANEL
Hood Open Warning Light
The telltale turns on when the hood is not
properly closed. Along with the icon, an
image of the vehicle with an open hood
cap appears on the display.
Close the hood properly.
Rear Door Open Warning Light —
If Equipped
This warning light will illuminate when the
rear door is open.
NOTE:This light will flash at a fast rate for approximately
15 seconds when the vehicle security system is
arming, and then will flash slowly until the vehicle
is disarmed.
Oil Pressure Warning Light
This warning light will illuminate to
indicate low engine oil pressure. If the
light turns on while driving, stop the
vehicle, shut off the engine as soon
as possible, and contact an authorized dealer.
A chime will sound when this light turns on.
Do not operate the vehicle until the cause is
corrected. This light does not indicate how much
oil is in the engine. The engine oil level must be
checked under the hood.
Seat Belt Reminder Warning Light
When the ignition is first placed in the
ON/RUN or MAR/ON/RUN position, if the
driver’s seat belt is unbuckled, a chime
will sound and the light will turn on. When
driving, if the driver or front passenger seat belt
remains unbuckled, the Seat Belt Reminder Light
will flash or remain on continuously and a chime
will sound Ú page 170.
Transmission Fault Warning Light
This light will illuminate (together with
a message in the instrument cluster display
and a buzzer) to indicate a transmission
fault. Contact an authorized dealer if the
message remains after restarting the engine.
Vehicle Security Warning Light —
If Equipped
This light will flash at a fast rate for
approximately 15 seconds when the
vehicle security system is arming, and
then will flash slowly until the vehicle is
disarmed.
Swivel Seat (Driver or Passenger)
Unlocked Warning Light — If Equipped
This light will illuminate when the driver
or passenger seat is unlocked.
YELLOW WARNING LIGHTS
Adaptive Cruise Control (ACC) Fault
Warning Light — If Equipped
This warning light will illuminate to
indicate a fault in the ACC system.
Contact a local authorized dealer for
service Ú page 89.
Anti-Lock Brake System (ABS) Warning
Light
This light monitors the ABS. The light will
turn on when the ignition is placed in the
ON/RUN or MAR/ON/RUN position and
may stay on for as long as four seconds.
If the ABS light remains on or turns on while
driving, then the Anti-Lock portion of the brake
system is not functioning and service is required.
However, the conventional brake system will
continue to operate normally if the brake warning
light is not on.
If the ABS light is on, the brake system should
be serviced as soon as possible to restore the
benefits of Anti-Lock Brakes. If the ABS light
does not turn on when the ignition is placed in
the ON/RUN or MAR/ON/RUN position, have the
light inspected by an authorized dealer.
23_VF_OM_EN_USC_t.book Page 68
Page 72 of 296
70GETTING TO KNOW YOUR INSTRUMENT PANEL
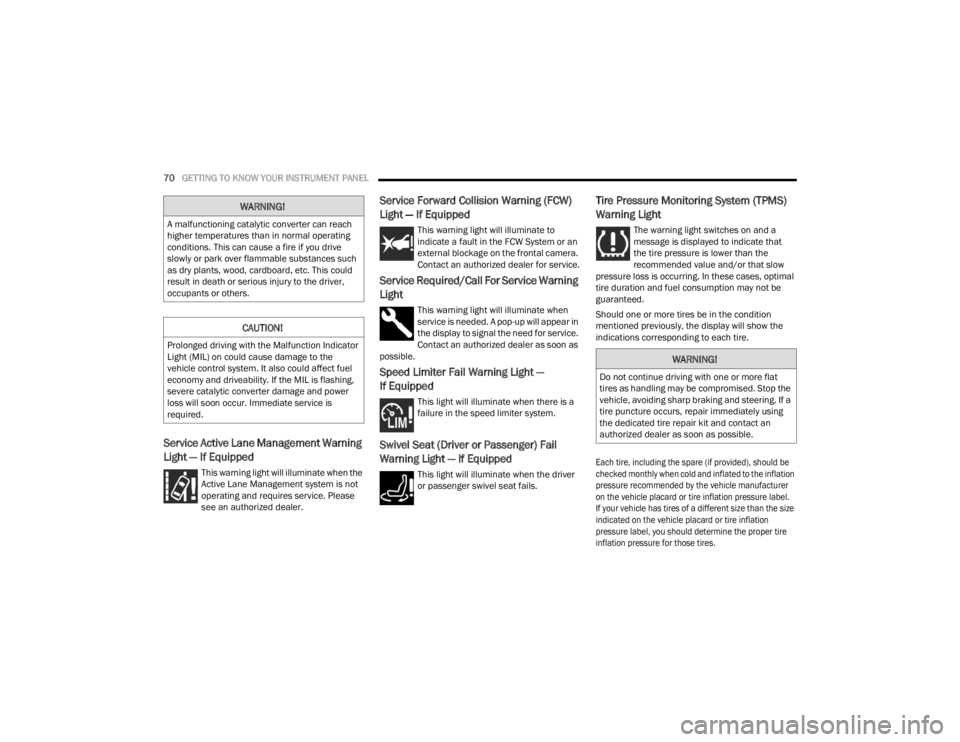
Service Active Lane Management Warning
Light — If Equipped
This warning light will illuminate when the
Active Lane Management system is not
operating and requires service. Please
see an authorized dealer.
Service Forward Collision Warning (FCW)
Light — If Equipped
This warning light will illuminate to
indicate a fault in the FCW System or an
external blockage on the frontal camera.
Contact an authorized dealer for service.
Service Required/Call For Service Warning
Light
This warning light will illuminate when
service is needed. A pop-up will appear in
the display to signal the need for service.
Contact an authorized dealer as soon as
possible.
Speed Limiter Fail Warning Light —
If Equipped
This light will illuminate when there is a
failure in the speed limiter system.
Swivel Seat (Driver or Passenger) Fail
Warning Light — If Equipped
This light will illuminate when the driver
or passenger swivel seat fails.
Tire Pressure Monitoring System (TPMS)
Warning Light
The warning light switches on and a
message is displayed to indicate that
the tire pressure is lower than the
recommended value and/or that slow
pressure loss is occurring. In these cases, optimal
tire duration and fuel consumption may not be
guaranteed.
Should one or more tires be in the condition
mentioned previously, the display will show the
indications corresponding to each tire.
Each tire, including the spare (if provided), should be
checked monthly when cold and inflated to the inflation
pressure recommended by the vehicle manufacturer
on the vehicle placard or tire inflation pressure label.
If your vehicle has tires of a different size than the size
indicated on the vehicle placard or tire inflation
pressure label, you should determine the proper tire
inflation pressure for those tires.
WARNING!
A malfunctioning catalytic converter can reach
higher temperatures than in normal operating
conditions. This can cause a fire if you drive
slowly or park over flammable substances such
as dry plants, wood, cardboard, etc. This could
result in death or serious injury to the driver,
occupants or others.
CAUTION!
Prolonged driving with the Malfunction Indicator
Light (MIL) on could cause damage to the
vehicle control system. It also could affect fuel
economy and driveability. If the MIL is flashing,
severe catalytic converter damage and power
loss will soon occur. Immediate service is
required.
WARNING!
Do not continue driving with one or more flat
tires as handling may be compromised. Stop the
vehicle, avoiding sharp braking and steering. If a
tire puncture occurs, repair immediately using
the dedicated tire repair kit and contact an
authorized dealer as soon as possible.
23_VF_OM_EN_USC_t.book Page 70
Page 84 of 296

82STARTING AND OPERATING
NOTE:Swivel seats that are unlocked can also prevent
the transmission gear selector from being moved
out of the PARK position. To shift the transmission
out of the PARK position the first time after
cranking is allowed, ensure swivel seats are locked
in the forward facing position.
9-SPEED AUTOMATIC TRANSMISSION
The transmission gear position display (located in
the instrument cluster) indicates the transmission
gear range. You must press the brake pedal to
move the gear selector out of PARK. To drive, move
the gear selector from PARK or NEUTRAL to the
DRIVE position.
The electronically controlled transmission provides
a precise shift schedule. The transmission
electronics are self-calibrating; therefore, the first
few shifts on a new vehicle may be somewhat
abrupt. This is a normal condition, and precision
shifts will develop within a few hundred miles
(kilometers).
Gear Selector
Only shift from DRIVE to PARK or REVERSE when
the accelerator pedal is released and the vehicle is
stopped. Be sure to keep your foot on the brake
pedal when shifting between these gears.
The transmission gear selector provides PARK,
REVERSE, NEUTRAL, DRIVE, and Electronic Range
Select (ERS) shift positions. Manual downshifts
can be made using the ERS shift control. Moving
the gear selector into the ERS “-”/”+” position
(beside the DRIVE position) activates ERS mode,
displays the current gear in the instrument cluster,
and prevents automatic upshifts beyond this gear.
In ERS mode, toggling the gear selector forward “-”
or rearward “+” will change the highest available
gear Ú page 85.
NOTE:If the gear selector cannot be moved to the PARK,
REVERSE, or NEUTRAL position (when pushed forward) it is probably in the ERS “+”/”-” position
(beside the DRIVE position). In ERS mode, the
transmission gear limit (1, 2, 3, etc.) is displayed in
the instrument cluster. Move the gear selector to
the right (into the DRIVE [D] position) for access to
PARK, REVERSE, and NEUTRAL.
Gear Ranges
Do not press the accelerator pedal when shifting
out of PARK or NEUTRAL.
NOTE:After selecting any gear range, wait a moment to
allow the selected gear to engage before acceler
-
ating. This is especially important when the engine
is cold.
PARK (P)
This range supplements the parking brake by
locking the transmission. The engine can be
started in this range. Never attempt to use PARK
while the vehicle is in motion. Apply the parking
brake when exiting the vehicle in this range.
When parking on a hill, apply the parking brake
before shifting the transmission to PARK,
otherwise the load on the transmission locking
mechanism may make it difficult to move the gear
selector out of PARK. As an added precaution, turn
the front wheels toward the curb on a downhill
grade, and away from the curb on an uphill grade.
23_VF_OM_EN_USC_t.book Page 82