low beam Ram ProMaster City 2015 Owner's Manual
[x] Cancel search | Manufacturer: RAM, Model Year: 2015, Model line: ProMaster City, Model: Ram ProMaster City 2015Pages: 414, PDF Size: 2.86 MB
Page 113 of 414
NOTE:When the headlights are turned on, the Daytime
Running Lights will be deactivated.
Daytime Running Lights — If Equipped
To activate the Daytime Running Lights (DRL), rotate the
end of the multifunction lever to the Osymbol.
NOTE:
• The low beams and side/tail lights will not be on with
DRL. The DRL function may be programmed to be ON
or OFF through the Uconnect® system screen. Refer to
“ Uconnect® Settings ” in “Understanding Your In-
strument Panel” for further information.
• If your vehicle is not equipped with a touchscreen
radio, this feature can be programmed through the
Electronic Vehicle Information Center (EVIC). Refer to
“Electronic Vehicle Information Center (EVIC)” in
“Understanding Your Instrument Panel” for further
information.
High Beams
With the low beams activated, pull the multifunc-
tion lever towards the steering wheel to turn on
the high beams. A high beam symbol will illuminate in
the cluster to indicate the high beams are on. Pull the
multifunction lever a second time to switch the head-
lights back to low beam.
Flash-To-Pass
You can signal another vehicle with your headlights by
lightly pulling the multifunction lever toward you. This
will turn on the high beams headlights until the lever is
released.
3
UNDERSTANDING THE FEATURES OF YOUR VEHICLE 111
Page 151 of 414
8. Generic Warning LightThe Generic Warning Light will illuminate if
any of the following conditions occur:
• Air Bag Warning Light Fault, (If the Generic Warning
Light starts flashing have your vehicle serviced by an
authorized dealer immediately)
• Engine Oil Pressure Sensor Failure
• Parking Sensor Failure
• External Lamp Failure (position, plate, rear fog, turn,
stop, drl, stop start failure)
9. Engine Temperature Warning Light
This light warns of an overheated engine con-
dition. As engine coolant temperatures rise and
the gauge approaches H, this indicator will
illuminate and a single chime will sound after
reaching a set threshold. Further overheating will cause the temperature gauge to pass
H, a continuous chime will
occur until the engine is allowed to cool or the four
minutes duration is expired, whichever comes first.
If the light turns on while driving, safely pull over and
stop the vehicle. If the A/C system is on, turn it off. Also,
shift the transmission into NEUTRAL and idle the ve-
hicle. If the temperature reading does not return to
normal, turn the engine off immediately and call for
service. Refer to “If Your Engine Overheats” in “What To
Do In Emergencies” for further information.
10. Tachometer
The tachometer indicates engine speed in Revolutions
Per Minute (RPM x 1000).
11. High Beam Indicator
This light shows that the high beam headlights
are on. Pull the multifunction lever toward you
4
UNDERSTANDING YOUR INSTRUMENT PANEL 149
Page 152 of 414
to switch the headlights to high beam. Pull the lever a
second time to switch the headlights back to low beam.
NOTE:If the driver’s door is open, and the headlights or
park lights are left on, the high beam indicator light will
remain illuminated and a chime will sound until lights
have been turned to the off position.
12. Glow Plug Light — If Equipped
If this icon blinks, it indicates that the engine
cranking is inhibited in order to prevent possible
engine damage while starting at low temperatures.
13. Engine Oil Level Warning Light
This warning light appears on the panel when the
engine oil level falls below the minimum recom-
mended value. Restore the correct engine oil level
or contact your authorized dealer for service.
14. Electronic Throttle Control (ETC) Light
This light informs you of a problem with the
Electronic Throttle Control (ETC) system. The
light will come on when the ignition is first
turned ON and remain on briefly as a bulb
check. If the light does not come on during starting, have
the system checked by an authorized dealer.
If a problem is detected, the light will come on while the
engine is running. Cycle the ignition key when the
vehicle has completely stopped and the gear selector is
placed in the 1st position. The light should turn off.
If the light remains lit with the engine running, your
vehicle will usually be drivable. However, see an autho-
rized dealer for service as soon as possible. If the light is
flashing when the engine is running, immediate service is
required. You may experience reduced performance, an
elevated/rough idle or engine stall and your vehicle may
require towing.
150 UNDERSTANDING YOUR INSTRUMENT PANEL
Page 364 of 414
CavityMaxi Fuse Mini Fuse Description
F01 60 Amp Blue Body Controller
F02 40 Amp Orange Front Heated Seats, Second 12 Volt IP
Outlet
F02 60 Amp Blue Rear Power Window Including Front
Heated Seats, Second 12 Volt IP Outlet
F03 20 Amp Yellow Ignition Switch
F04 40 Amp Orange BSM System Module
F05 50 Amp Red Available
F06 20 Amp Yellow Radiator Fan - Low Speed
F07 50 Amp Red Radiator Fan - High Speed
F08 40 Amp Orange Blower Motor
F09 10 Amp Red Available
F10 15 Amp Blue Horn
F11 10 Amp Red Secondary Loads ECM
F14 15 Amp Blue High Beam
362 MAINTAINING YOUR VEHICLE
Page 372 of 414
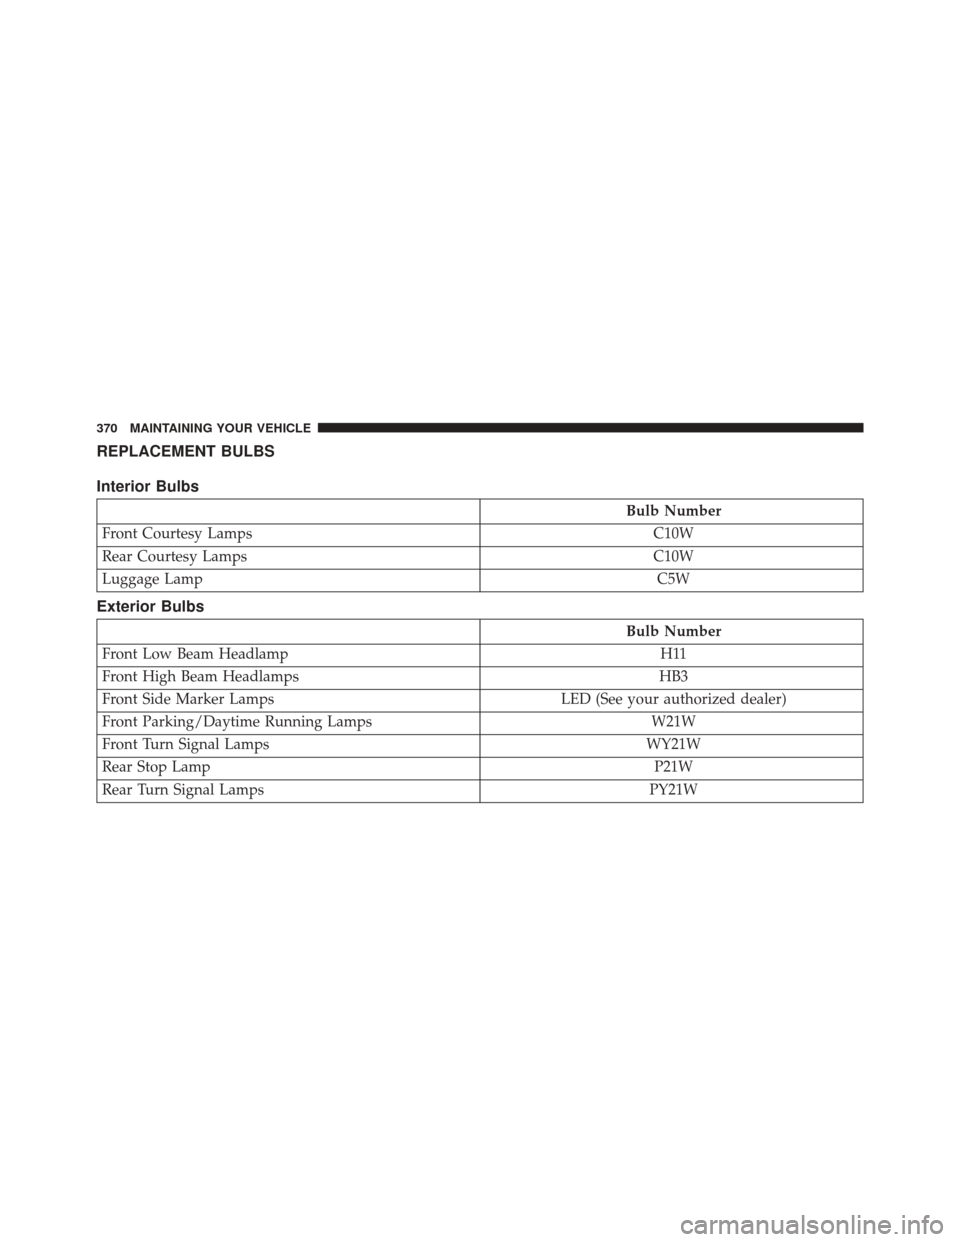
REPLACEMENT BULBS
Interior Bulbs
Bulb Number
Front Courtesy Lamps C10W
Rear Courtesy Lamps C10W
Luggage Lamp C5W
Exterior Bulbs
Bulb Number
Front Low Beam Headlamp H11
Front High Beam Headlamps HB3
Front Side Marker Lamps LED (See your authorized dealer)
Front Parking/Daytime Running Lamps W21W
Front Turn Signal Lamps WY21W
Rear Stop Lamp P21W
Rear Turn Signal Lamps PY21W
370 MAINTAINING YOUR VEHICLE