ECO mode Ram ProMaster City 2017 Owner's Manual
[x] Cancel search | Manufacturer: RAM, Model Year: 2017, Model line: ProMaster City, Model: Ram ProMaster City 2017Pages: 345, PDF Size: 3.25 MB
Page 16 of 345
General Information
The following regulatory statement applies to all radio
frequency (RF) devices equipped in this vehicle:
This device complies with Part 15 of the FCC Rules and
with Industry Canada license-exempt RSS standard(s).
Operation is subject to the following two conditions:
1. This device may not cause harmful interference, and
2. This device must accept any interference received, in-cluding interference that may cause undesired opera-
tion.
NOTE: Changes or modifications not expressly approved
by the party responsible for compliance could void the
user ’s authority to operate the equipment.
VEHICLE SECURITY ALARM — IF EQUIPPED
The Vehicle Security Alarm monitors the vehicle doors and
ignition for unauthorized operation. When the Vehicle
Security Alarm is activated, interior switches for door locks
are disabled. The system provides both audible and visible
signals. Every intrusion attempt causes three continuous
alarm cycles. Every alarm cycle lasts for 30 seconds. For 26
seconds, the horn will sound, and the turn signal lights will flash. For four seconds, it will pause. After a maximum of
10 alarm cycles, only the turn signal lights will flash until
the next alarm activation.
Rearming Of The System
If the system has not been disabled, the Vehicle Security
Alarm will rearm itself after processing all the alarm cycles
related to the intrusion attempt. If the condition which
initiated the alarm is still present, the system will ignore
that condition and monitor the remaining doors and igni-
tion.
To Arm The System
The Vehicle Security Alarm will set when you use the key
fob to lock the doors. If a door or the hood is not properly
shut, the alarm system will exclude the related door from
protection.
To Disarm The System
Use the key fob to unlock the door and disarm the system.
To exit the alarming mode, push the key fob UNLOCK
button and open the door.
14 THINGS TO KNOW BEFORE STARTING YOUR VEHICLE
Page 63 of 345
Installing A Child Restraint With A Switchable
Automatic Locking Retractor (ALR)
1. Place the child seat in the center of the seating position.For some second row seats, you may need to recline the
seat and/or raise the head restraint to get a better fit. If
the rear seat can be moved forward and rearward in the
vehicle, you may wish to move it to its rear-most
position to make room for the child seat. You may also
move the front seat forward to allow more room for the
child seat.
2. Pull enough of the seat belt webbing from the retractor to pass it through the belt path of the child restraint. Do
not twist the belt webbing in the belt path.
3. Slide the latch plate into the buckle until you hear a “click.”
4. Pull on the webbing to make the lap portion tight against the child seat.
5. To lock the seat belt, pull down on the shoulder part of the belt until you have pulled all the seat belt webbing
out of the retractor. Then, allow the webbing to retract
back into the retractor. As the webbing retracts, you will
hear a clicking sound. This means the seat belt is now in
the Automatic Locking mode. 6. Try to pull the webbing out of the retractor. If it is
locked, you should not be able to pull out any webbing.
If the retractor is not locked, repeat step 5.
7. Finally, pull up on any excess webbing to tighten the lap portion around the child restraint while you push the
child restraint rearward and downward into the vehicle
seat.
8. If the child restraint has a top tether strap and the seating position has a top tether anchorage, connect the
tether strap to the anchorage and tighten the tether
strap. See the section “Installing Child Restraints Using
the Top Tether Anchorage” for directions to attach a
tether anchor.
9. Test that the child restraint is installed tightly by pulling back and forth on the child seat at the belt path. It
should not move more than 1 inch (25.4 mm) in any
direction.
Any seat belt system will loosen with time, so check the
belt occasionally, and pull it tight if necessary.2
THINGS TO KNOW BEFORE STARTING YOUR VEHICLE 61
Page 68 of 345
posts. If not possible, lower the head restraint and pass
the tether strap around the outboard side of the head
restraint.
4. Attach the tether strap hook of the child restraint to the top tether anchorage as shown in the diagram.
5. Remove slack in the tether strap according to the child restraint manufacturer ’s instructions. NOTE:
•
An incorrectly anchored tether strap could lead to
increased head motion and possible injury to the child.
Use only the anchorage position directly behind the
child seat to secure a child restraint top tether strap.
• If your vehicle is equipped with a split rear seat, make
sure the tether strap does not slip into the opening
between the seatbacks as you remove slack in the strap.
Transporting Pets
Air Bags deploying in the front seat could harm your pet.
An unrestrained pet will be thrown about and possibly
injured, or injure a passenger during panic braking or in a
collision.
Pets should be restrained in the rear seat in pet harnesses or
pet carriers that are secured by seat belts.
ENGINE BREAK-IN RECOMMENDATIONS
A long break-in period is not required for the engine and
drivetrain (transmission and axle) in your vehicle.
Drive moderately during the first 300 miles (500 km). After
the initial 60 miles (100 km), speeds up to 50 or 55 mph (80
or 90 km/h) are desirable.
Tether Strap Installation
66 THINGS TO KNOW BEFORE STARTING YOUR VEHICLE
Page 70 of 345
Exhaust Gas
WARNING!
Exhaust gases can injure or kill. They contain carbon
monoxide (CO), which is colorless and odorless.
Breathing it can make you unconscious and can even-
tually poison you. To avoid breathing (CO), follow
these safety tips:
•Do not run the engine in a closed garage or in
confined areas any longer than needed to move your
vehicle in or out of the area.
• If you are required to drive with the trunk/liftgate/
rear doors open, make sure that all windows are
closed and the climate control BLOWER switch is set
at high speed. DO NOT use the recirculation mode.
• If it is necessary to sit in a parked vehicle with the
engine running, adjust your heating or cooling con-
trols to force outside air into the vehicle. Set the
blower at high speed.
The best protection against carbon monoxide entry into the
vehicle body is a properly maintained engine exhaust
system.
Whenever a change is noticed in the sound of the exhaust
system, when exhaust fumes can be detected inside the vehicle, or when the underside or rear of the vehicle is
damaged, have a competent mechanic inspect the complete
exhaust system and adjacent body areas for broken, dam-
aged, deteriorated, or mispositioned parts. Open seams or
loose connections could permit exhaust fumes to seep into
the passenger compartment. In addition, inspect the ex-
haust system each time the vehicle is raised for lubrication
or oil change. Replace as required.
Safety Checks You Should Make Inside The Vehicle
Seat Belts
Inspect the seat belt system periodically, checking for cuts,
frays, and loose parts. Damaged parts must be replaced
immediately. Do not disassemble or modify the system.
Front seat belt assemblies must be replaced after a collision.
Rear seat belt assemblies must be replaced after a collision
if they have been damaged (i.e., bent retractor, torn web-
bing, etc.). If there is any question regarding seat belt or
retractor condition, replace the seat belt.
Air Bag Warning Light
The Air Bag warning lightwill turn on for four to
eight seconds as a bulb check when the ignition is first
placed in the ON/RUN position. If the light is either not
on during starting, stays on, or turns on while driving,
68 THINGS TO KNOW BEFORE STARTING YOUR VEHICLE
Page 94 of 345
Passenger Vehicle Interior Lamps
The interior lamps are located in the center of the roof,
above the second row seating and in the roof in the center
of the rear load area.
Second Row Seating And Rear Roof Lights Operation
In auto-mode the light comes on automatically when you
open the sliding doors and the rear wing doors and goes
out when you close them.•
Push the left-hand side of the lens to switch the light
OFF when the doors are open.
• Push the right hand side of the lens to switch the light
ON when the doors are open.
Passenger Vehicle Interior Lamp Locations
1 — Rear Roof Light
2 — Second Row Seating Light
Interior Light
1—Off
2 — Auto
3—On
92 UNDERSTANDING THE FEATURES OF YOUR VEHICLE
Page 95 of 345
WINDSHIELD WIPERS AND WASHERS
The windshield wiper/washer lever is located on the right
side of the steering column.
NOTE:The windshield wipers/washers will only operate
with the ignition in the ON/RUN position.
Front Windshield Wiper Operation
There are five different modes of operation for the front
windshield wipers. The windshield wiper lever can be
moved in several positions to access these modes.
Windshield Wiper Off
This is the normal position of the wiper lever.
Intermittent Speed
Rotate the end of the lever upward to the first
detent. The wipers will operate at intermittent
speed. When the vehicle’s speed increases, the time be-
tween the wipes will decrease.
Low Speed
Rotate the end of the lever upward to the second
detent. The wipers will operate at low speed.
High Speed
Rotate the end of the lever upward to the third
detent. The wipers will operate at high speed.
Manual High Speed/Mist
Push the lever upward from the off position. The wipers
will operate at high speed to clear off road mist or spray
from a passing vehicle. This operation will continue until
the lever is released. When the lever is released, the wipers
will return to the off position and automatically shut off.
Windshield Wiper Lever
3
UNDERSTANDING THE FEATURES OF YOUR VEHICLE 93
Page 96 of 345
Front Windshield Washer Operation
Pull the windshield wiper/washer lever toward the steer-
ing wheel to activate the washers. The wipers will activate
automatically for three cycles after the lever is released.
CAUTION!
•Turn the windshield wipers off when driving
through an automatic car wash. Damage to the wind-
shield wipers may result if the wiper control is left in
any position other than off.
• In cold weather, always turn off the wiper switch and
allow the wipers to return to the “Park” position
before turning off the engine. If the wiper switch is
left on and the wipers freeze to the windshield,
damage to the wiper motor may occur when the
vehicle is restarted.
• Always remove any buildup of snow that prevents
the windshield wiper blades from returning to the
off position. If the windshield wiper control is
turned off and the blades cannot return to the off
position, damage to the wiper motor may occur.
Rear Window Wiper/Washer
Rear Windshield Wiper Operation
Rotate the windshield wiper lever center ring upwards to
operate the rear window wiper as follows:
• In intermittent mode when the front window wiper is
not operating.
• In synchronous mode (at half the speed of the front
window wiper) when the front window wiper is oper-
ating.
• In continuous mode with reverse engaged.
With the windshield wipers on and reverse gear engaged,
rear window wiping will be continuous in the same way.
Rear Windshield Washer Operation
Pushing the windshield wiper lever forward activates the
rear window washer. Keep the windshield wiper lever
pushed for more than quarter a second to activate the rear
window wiper as well. Releasing the windshield wiper
lever will activate the smart washing function, as described
for the windshield wipers.
The function stops when the windshield wiper lever is
released.
94 UNDERSTANDING THE FEATURES OF YOUR VEHICLE
Page 100 of 345
Metric Speed (km/h)
•Pushing the SET (-) button once will result in a 1 km/h
decrease in set speed. Each subsequent tap of the button
results in a decrease of 1 km/h.
• If the button is continually pushed, the set speed will
continue to decrease until the button is released, then the
new set speed will be established.
To Accelerate For Passing
Press the accelerator as you would normally. When the
pedal is released, the vehicle will return to the set speed.
Using Electronic Speed Control On Hills
The transmission may downshift on hills to maintain the
vehicle set speed.
NOTE: The Electronic Speed Control system maintains
speed up and down hills. A slight speed change on
moderate hills is normal.
On steep hills, a greater speed loss or gain may occur so it
may be preferable to drive without Electronic Speed Con-
trol.
WARNING!
Electronic Speed Control can be dangerous where the
system cannot maintain a constant speed. Your vehicle
could go too fast for the conditions, and you could lose
control and have an accident. Do not use Electronic
Speed Control in heavy traffic or on roads that are
winding, icy, snow-covered or slippery.
PARKSENSE REAR PARK ASSIST — IF EQUIPPED
The Park Assist system provides an audible indication of
the distance between the rear fascia/bumper and a de-
tected obstacle when backing up, e.g. during a parking
maneuver. Refer to ParkSense System Usage Precautions
for limitations of this system and recommendations.
The Park Assist is automatically activated when the trans-
mission is placed into REVERSE. As the distance from an
obstacle behind the vehicle decreases, the audible alert
becomes more frequent.
98 UNDERSTANDING THE FEATURES OF YOUR VEHICLE
Page 105 of 345
If it’s necessary to keep the ball mount and hitch ball
assembly mounted for a long period, it is possible to filter
out the ball mount and hitch ball assembly presence in
sensor field of view. The filtering operation must be
performed only by an authorized dealer.
PARKVIEW REAR BACK UP CAMERA — IF
EQUIPPED
Your vehicle may be equipped with the ParkView Rear
Back Up Camera that allows you to see an on-screen image
of the rear surroundings of your vehicle whenever the gear
selector is put into REVERSE. The image will be displayed
on the touchscreen display along with a caution note to
“check entire surroundings” across the top of the screen.
After five seconds this note will disappear. The ParkView
camera is located on the rear of the vehicle above the rear
License plate.
The Camera Delay setting can be set to ON/OFF on the
rear camera settings menu. When the vehicle is shifted outof REVERSE and the Camera Delay is turned OFF, the rear
camera mode is exited and the navigation or audio screen
appears on display again.
When the transmission is shifted out of REVERSE, with the
delay camera activated ON in the menu screen, the camera
image will continue to be displayed up to 10 seconds,
unless the speed of the vehicle is greater than 8 mph
(13 km/h), the transmission is in PARK position or the
ignition key is in the OFF position.
The display of the camera image can be enabled or
disabled through the rear camera setting menu item (Cam-
era ON/OFF).
When displayed, static grid lines will illustrate the width of
the vehicle and will show separate zones that will help
indicate the distance to the rear of the vehicle. The follow-
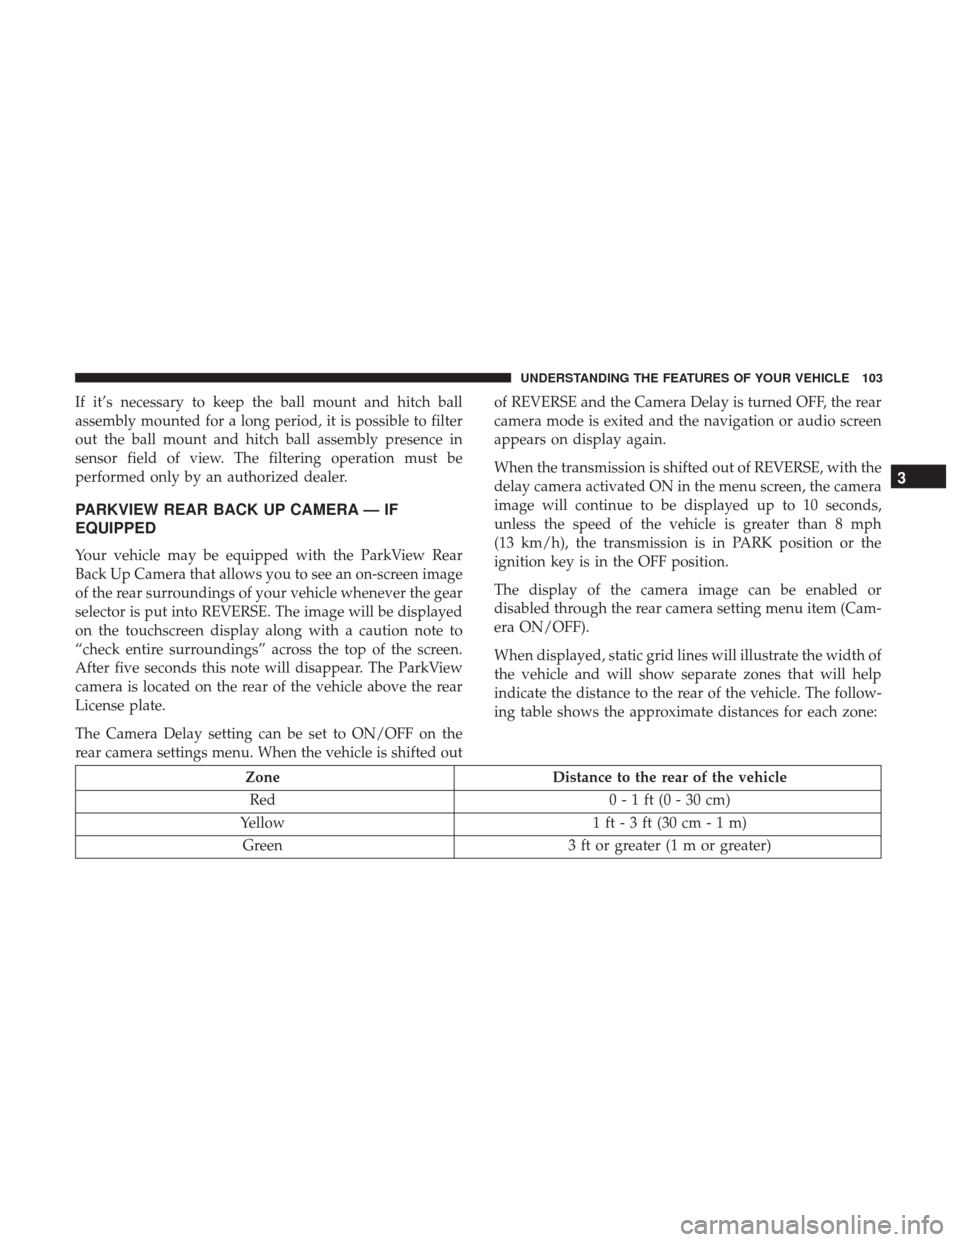
ing table shows the approximate distances for each zone:
Zone
Distance to the rear of the vehicle
Red 0 - 1 ft (0 - 30 cm)
Yellow 1 ft - 3 ft (30 cm - 1 m)
Green 3 ft or greater (1 m or greater)
3
UNDERSTANDING THE FEATURES OF YOUR VEHICLE 103
Page 112 of 345
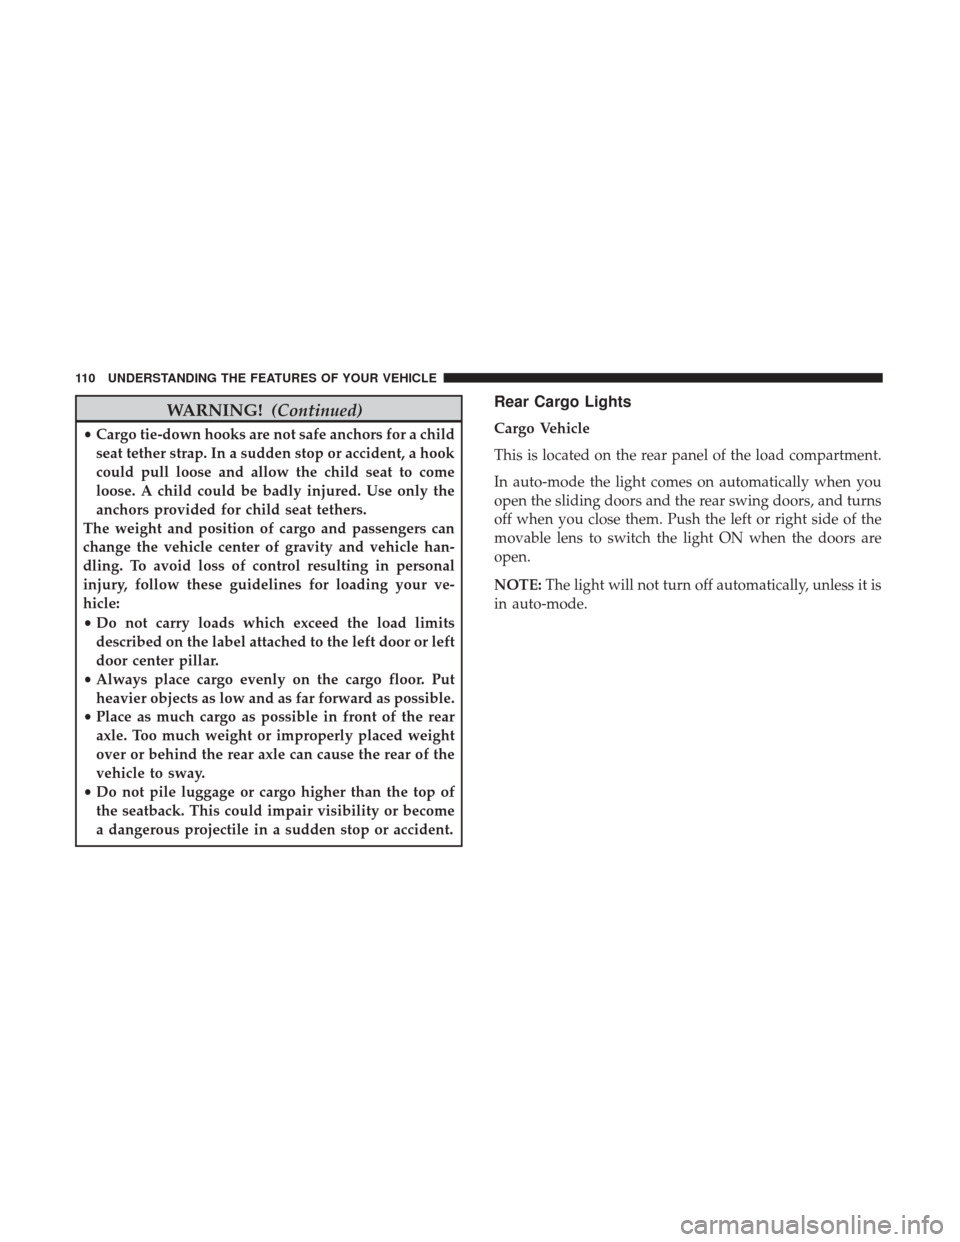
WARNING!(Continued)
•Cargo tie-down hooks are not safe anchors for a child
seat tether strap. In a sudden stop or accident, a hook
could pull loose and allow the child seat to come
loose. A child could be badly injured. Use only the
anchors provided for child seat tethers.
The weight and position of cargo and passengers can
change the vehicle center of gravity and vehicle han-
dling. To avoid loss of control resulting in personal
injury, follow these guidelines for loading your ve-
hicle:
• Do not carry loads which exceed the load limits
described on the label attached to the left door or left
door center pillar.
• Always place cargo evenly on the cargo floor. Put
heavier objects as low and as far forward as possible.
• Place as much cargo as possible in front of the rear
axle. Too much weight or improperly placed weight
over or behind the rear axle can cause the rear of the
vehicle to sway.
• Do not pile luggage or cargo higher than the top of
the seatback. This could impair visibility or become
a dangerous projectile in a sudden stop or accident.
Rear Cargo Lights
Cargo Vehicle
This is located on the rear panel of the load compartment.
In auto-mode the light comes on automatically when you
open the sliding doors and the rear swing doors, and turns
off when you close them. Push the left or right side of the
movable lens to switch the light ON when the doors are
open.
NOTE: The light will not turn off automatically, unless it is
in auto-mode.
110 UNDERSTANDING THE FEATURES OF YOUR VEHICLE