weight Ram ProMaster City 2017 Owner's Manual
[x] Cancel search | Manufacturer: RAM, Model Year: 2017, Model line: ProMaster City, Model: Ram ProMaster City 2017Pages: 345, PDF Size: 3.25 MB
Page 51 of 345
There are different sizes and types of restraints for children
from newborn size to the child almost large enough for an
adult safety belt. Always check the child seat Owner ’s
Manual to make sure you have the correct seat for your
child. Carefully read and follow all the instructions and
warnings in the child restraint Owner ’s Manual and on all
the labels attached to the child restraint.
Before buying any restraint system, make sure that it has a
label certifying that it meets all applicable Safety Stan-
dards. You should also make sure that you can install it in
the vehicle where you will use it.NOTE:
•
For additional information, refer to www.seatcheck.org
or call 1-866-732-8243.
•
Canadian residents should refer to Transport Canada’s
website for additional information: www.tc.gc.ca/eng/
motorvehiclesafety/safedrivers-childsafety-index-53.htm
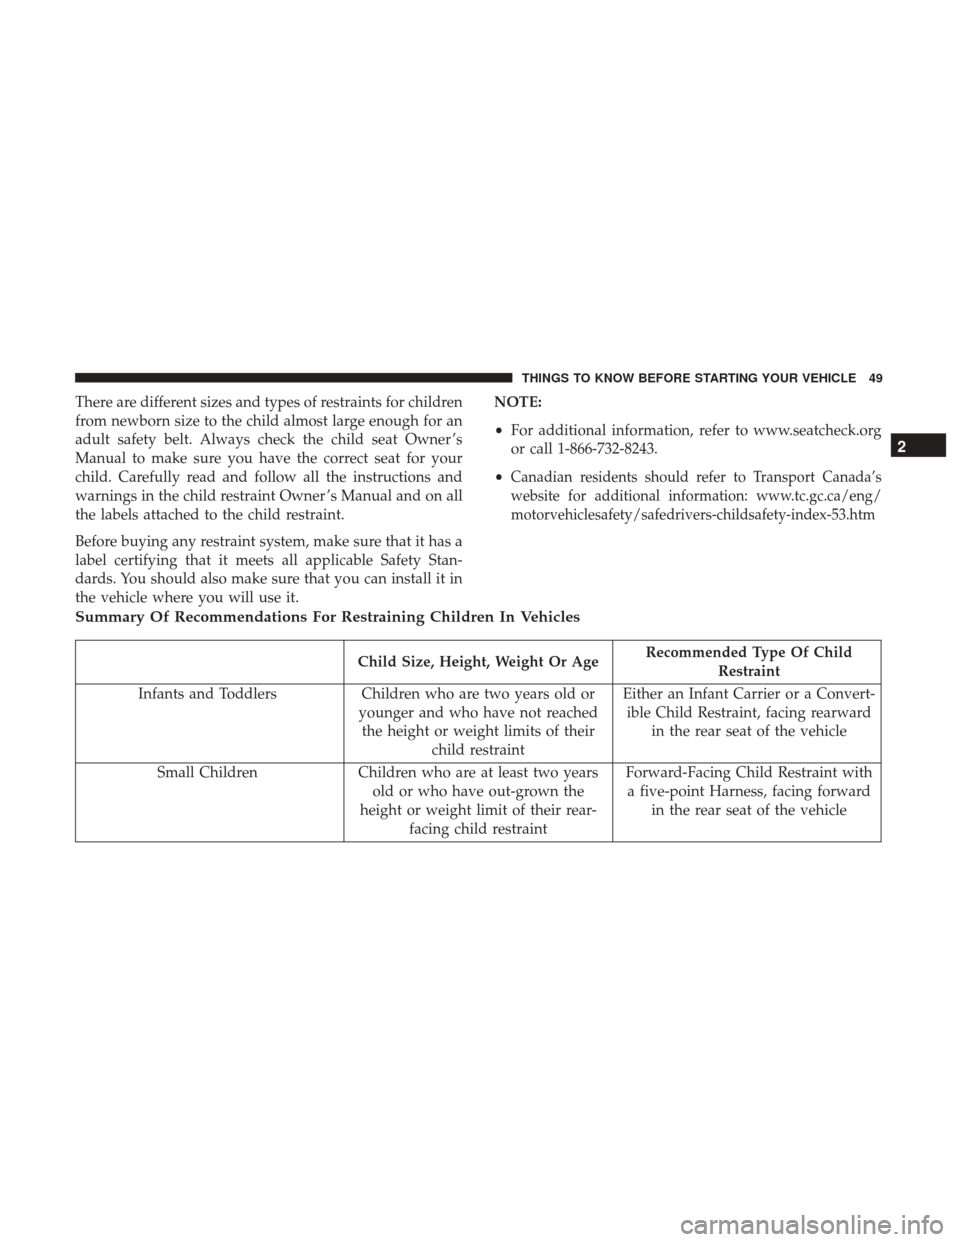
Summary Of Recommendations For Restraining Children In Vehicles
Child Size, Height, Weight Or Age Recommended Type Of Child
Restraint
Infants and Toddlers Children who are two years old or
younger and who have not reached the height or weight limits of their child restraint Either an Infant Carrier or a Convert-
ible Child Restraint, facing rearward in the rear seat of the vehicle
Small Children Children who are at least two years
old or who have out-grown the
height or weight limit of their rear- facing child restraint Forward-Facing Child Restraint with
a five-point Harness, facing forward in the rear seat of the vehicle
2
THINGS TO KNOW BEFORE STARTING YOUR VEHICLE 49
Page 52 of 345
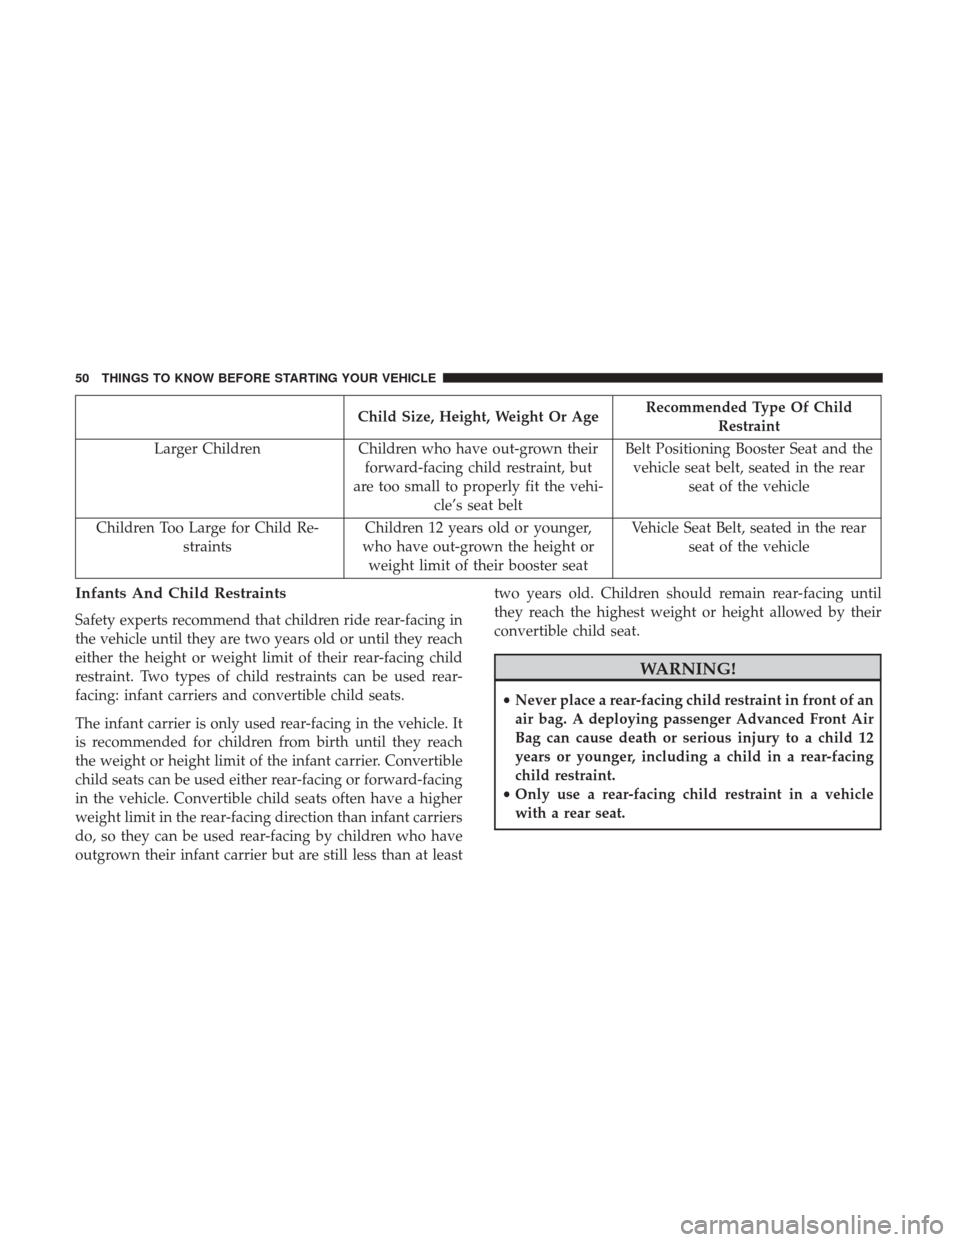
Child Size, Height, Weight Or AgeRecommended Type Of Child
Restraint
Larger Children Children who have out-grown their
forward-facing child restraint, but
are too small to properly fit the vehi- cle’s seat belt Belt Positioning Booster Seat and the
vehicle seat belt, seated in the rear seat of the vehicle
Children Too Large for Child Re- straints Children 12 years old or younger,
who have out-grown the height or weight limit of their booster seat Vehicle Seat Belt, seated in the rear
seat of the vehicle
Infants And Child Restraints
Safety experts recommend that children ride rear-facing in
the vehicle until they are two years old or until they reach
either the height or weight limit of their rear-facing child
restraint. Two types of child restraints can be used rear-
facing: infant carriers and convertible child seats.
The infant carrier is only used rear-facing in the vehicle. It
is recommended for children from birth until they reach
the weight or height limit of the infant carrier. Convertible
child seats can be used either rear-facing or forward-facing
in the vehicle. Convertible child seats often have a higher
weight limit in the rear-facing direction than infant carriers
do, so they can be used rear-facing by children who have
outgrown their infant carrier but are still less than at least two years old. Children should remain rear-facing until
they reach the highest weight or height allowed by their
convertible child seat.
WARNING!
•
Never place a rear-facing child restraint in front of an
air bag. A deploying passenger Advanced Front Air
Bag can cause death or serious injury to a child 12
years or younger, including a child in a rear-facing
child restraint.
• Only use a rear-facing child restraint in a vehicle
with a rear seat.
50 THINGS TO KNOW BEFORE STARTING YOUR VEHICLE
Page 53 of 345
Older Children And Child Restraints
Children who are two years old or who have outgrown
their rear-facing convertible child seat can ride forward-
facing in the vehicle. Forward-facing child seats and con-
vertible child seats used in the forward-facing direction are
for children who are over two years old or who have
outgrown the rear-facing weight or height limit of their
rear-facing convertible child seat. Children should remain
in a forward-facing child seat with a harness for as long as
possible, up to the highest weight or height allowed by the
child seat.
All children whose weight or height is above the forward-
facing limit for the child seat should use a belt-positioning
booster seat until the vehicle’s seat belts fit properly. If the
child cannot sit with knees bent over the vehicle’s seat
cushion while the child’s back is against the seatback, they
should use a belt-positioning booster seat. The child and
belt-positioning booster seat are held in the vehicle by the
seat belt.
WARNING!
•Improper installation can lead to failure of an infant
or child restraint. It could come loose in a collision.
The child could be badly injured or killed. Follow
the child restraint manufacturer ’s directions exactly
when installing an infant or child restraint.
• After a child restraint is installed in the vehicle, do
not move the vehicle seat forward or rearward be-
cause it can loosen the child restraint attachments.
Remove the child restraint before adjusting the ve-
hicle seat position. When the vehicle seat has been
adjusted, reinstall the child restraint.
• When your child restraint is not in use, secure it in
the vehicle with the seat belt or LATCH anchorages,
or remove it from the vehicle. Do not leave it loose in
the vehicle. In a sudden stop or accident, it could
strike the occupants or seatbacks and cause serious
personal injury.2
THINGS TO KNOW BEFORE STARTING YOUR VEHICLE 51
Page 55 of 345
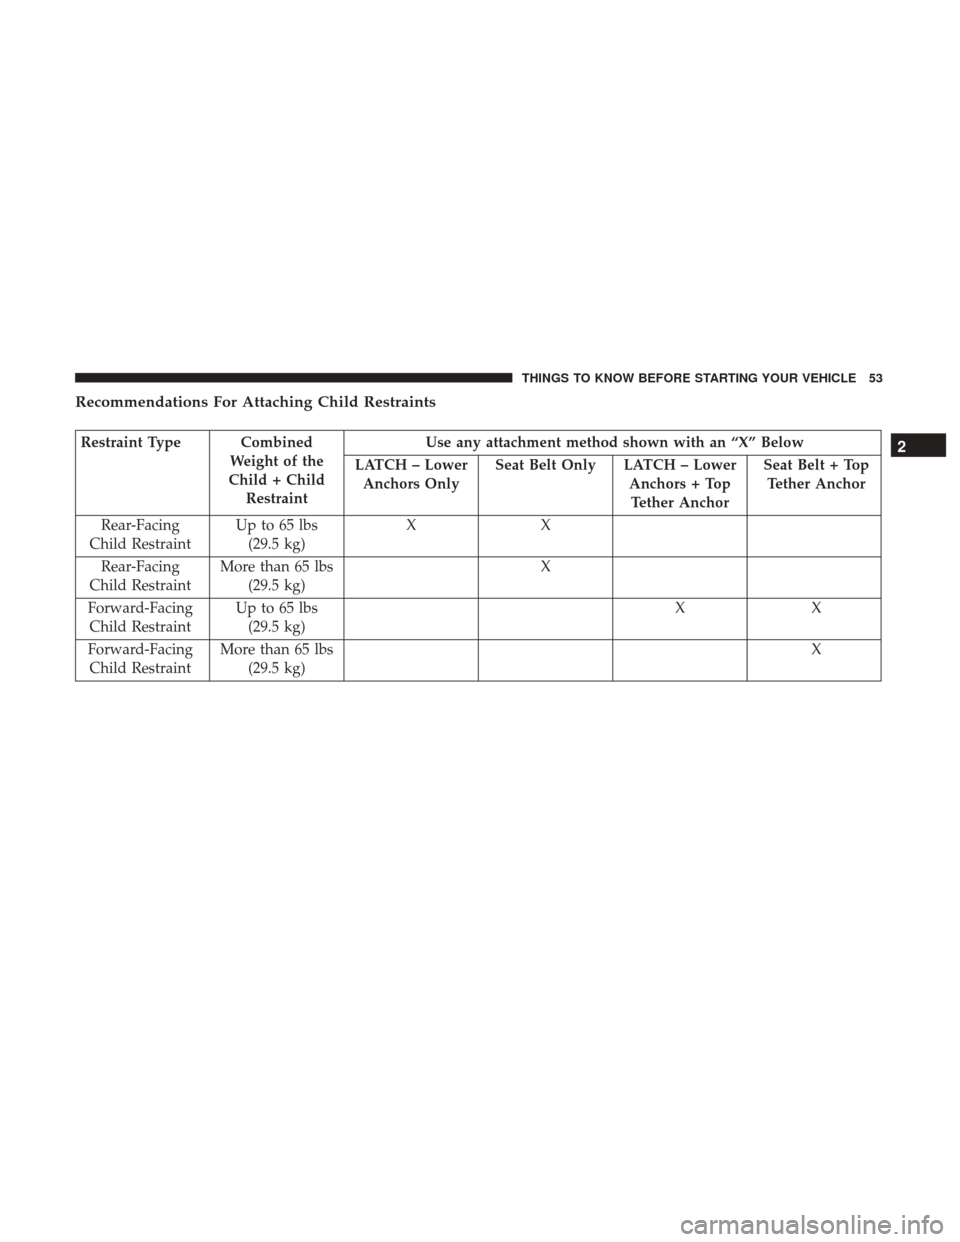
Recommendations For Attaching Child Restraints
Restraint Type CombinedWeight of the
Child + Child Restraint Use any attachment method shown with an “X” Below
LATCH – Lower Anchors Only Seat Belt Only LATCH – Lower
Anchors + TopTether Anchor Seat Belt + Top
Tether Anchor
Rear-Facing
Child Restraint Up to 65 lbs
(29.5 kg) XX
Rear-Facing
Child Restraint More than 65 lbs
(29.5 kg) X
Forward-Facing Child Restraint Up to 65 lbs
(29.5 kg) XX
Forward-Facing Child Restraint More than 65 lbs
(29.5 kg) X2
THINGS TO KNOW BEFORE STARTING YOUR VEHICLE 53
Page 57 of 345
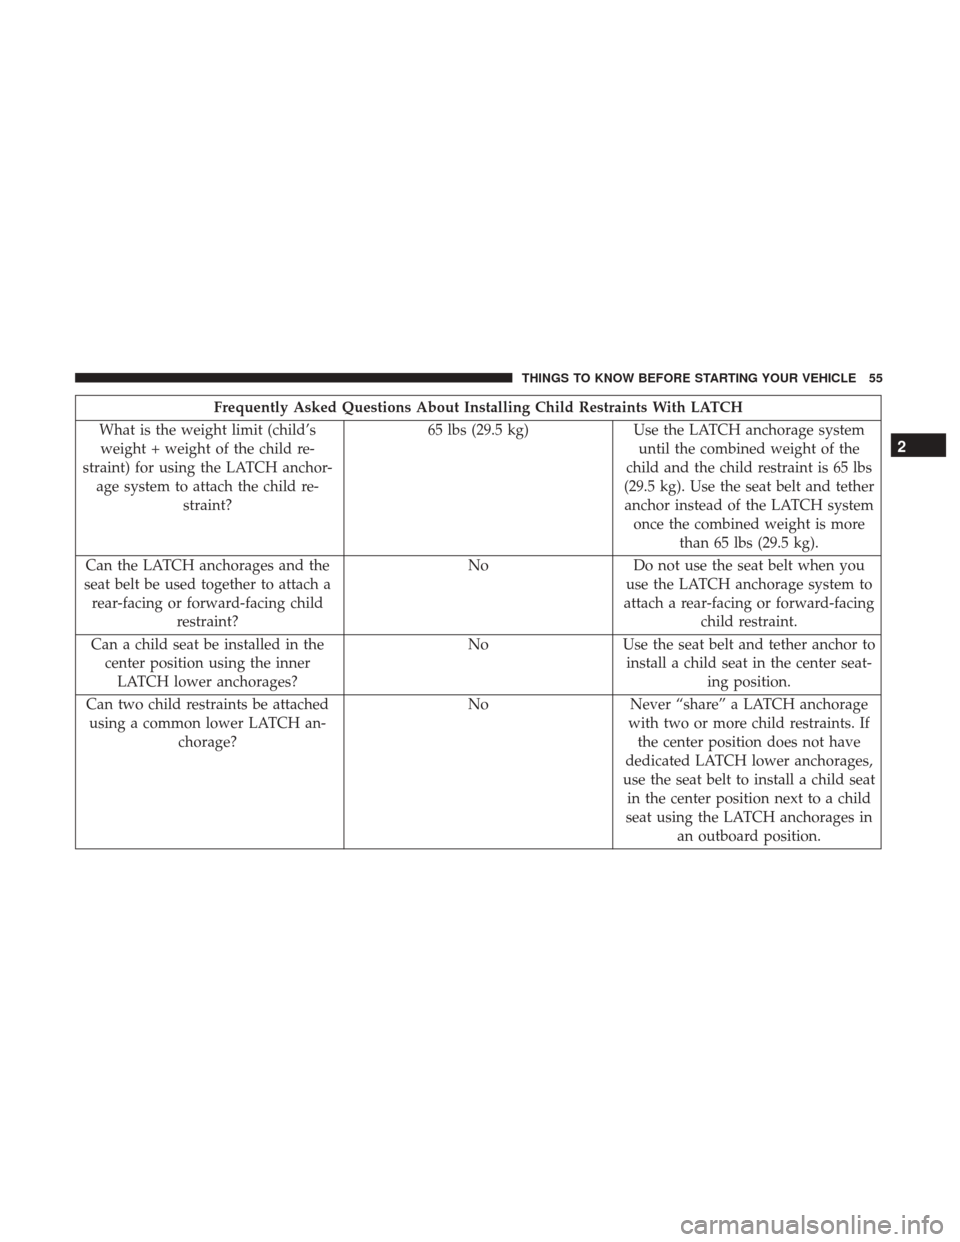
Frequently Asked Questions About Installing Child Restraints With LATCH
What is the weight limit (child’s weight + weight of the child re-
straint) for using the LATCH anchor- age system to attach the child re- straint? 65 lbs (29.5 kg)
Use the LATCH anchorage system
until the combined weight of the
child and the child restraint is 65 lbs
(29.5 kg). Use the seat belt and tether anchor instead of the LATCH system once the combined weight is more than 65 lbs (29.5 kg).
Can the LATCH anchorages and the
seat belt be used together to attach a rear-facing or forward-facing child restraint? No
Do not use the seat belt when you
use the LATCH anchorage system to
attach a rear-facing or forward-facing child restraint.
Can a child seat be installed in the center position using the innerLATCH lower anchorages? No
Use the seat belt and tether anchor to
install a child seat in the center seat- ing position.
Can two child restraints be attached using a common lower LATCH an- chorage? No
Never “share” a LATCH anchorage
with two or more child restraints. If the center position does not have
dedicated LATCH lower anchorages,
use the seat belt to install a child seat in the center position next to a child
seat using the LATCH anchorages in an outboard position.
2
THINGS TO KNOW BEFORE STARTING YOUR VEHICLE 55
Page 62 of 345
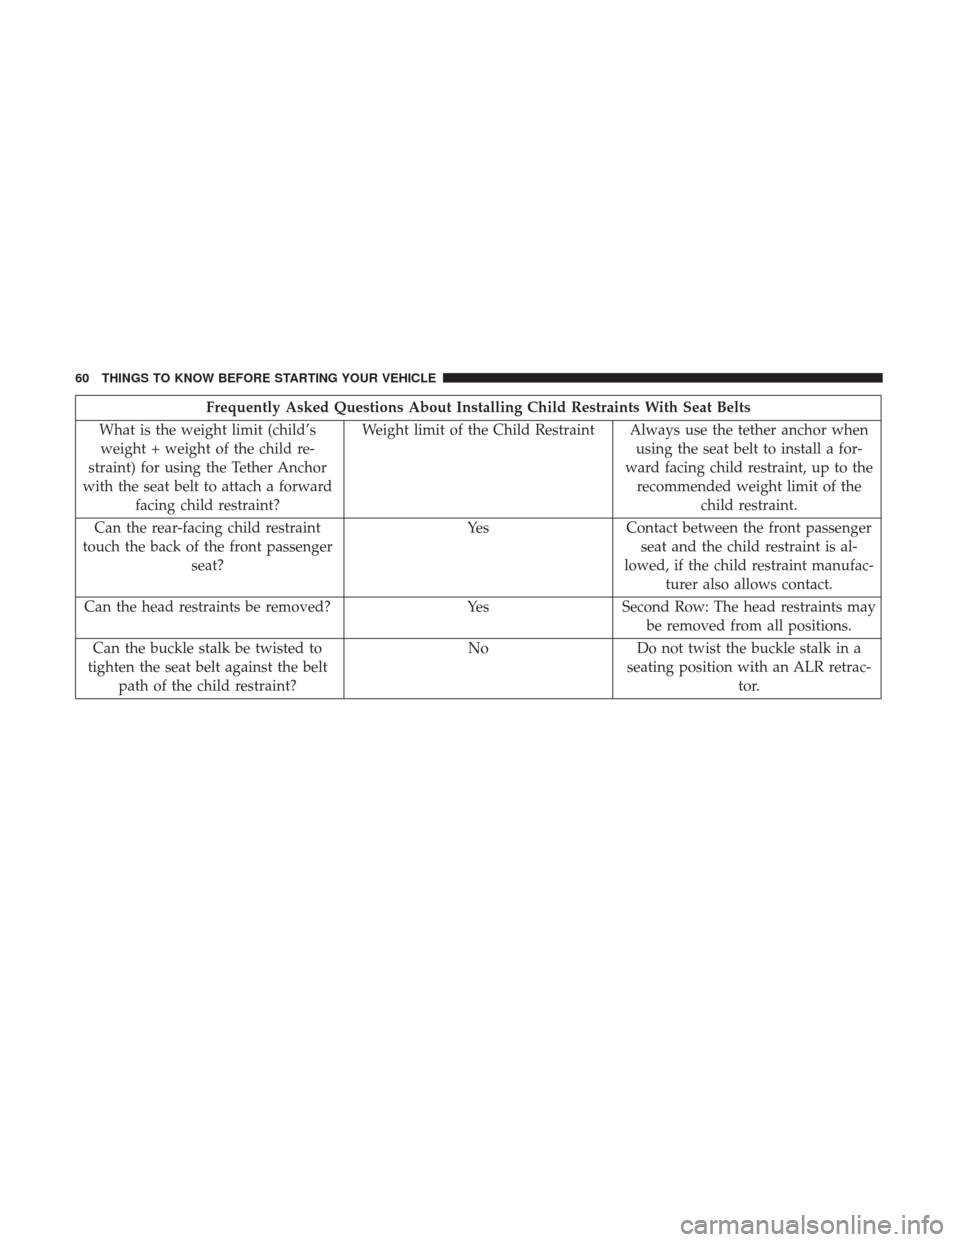
Frequently Asked Questions About Installing Child Restraints With Seat Belts
What is the weight limit (child’s weight + weight of the child re-
straint) for using the Tether Anchor
with the seat belt to attach a forward facing child restraint? Weight limit of the Child Restraint Always use the tether anchor when
using the seat belt to install a for-
ward facing child restraint, up to the recommended weight limit of the child restraint.
Can the rear-facing child restraint
touch the back of the front passenger seat? Yes Contact between the front passenger
seat and the child restraint is al-
lowed, if the child restraint manufac- turer also allows contact.
Can the head restraints be removed? YesSecond Row: The head restraints may
be removed from all positions.
Can the buckle stalk be twisted to
tighten the seat belt against the belt path of the child restraint? No
Do not twist the buckle stalk in a
seating position with an ALR retrac- tor.
60 THINGS TO KNOW BEFORE STARTING YOUR VEHICLE
Page 65 of 345
WARNING!
•An incorrectly anchored tether strap could lead to
increased head motion and possible injury to the
child. Use only the anchorage position directly be-
hind the child seat to secure a child restraint top
tether strap.
• If your vehicle is equipped with a split rear seat,
make sure the tether strap does not slip into the
opening between the seatbacks as you remove slack
in the strap.
Installing Child Restraints in Commercial Vehicles
This commercial vehicle is not designed for use as a family
vehicle and is not intended for carrying children in the
front passenger seat(s). Never install rearward-facing child
restraints in this vehicle. Although the seat belt can be
locked to secure a child restraint, there are no tether
anchorages to complete the proper installation of a
forward-facing child restraint. If you must carry a child in
a forward-facing child restraint, the passenger seat should
be moved to the full rearward position and the child must
be in a proper restraint system based on its age, size and
weight. Follow the instructions below to secure the child
restraint using the seat belt.
WARNING!
Rear-facing infant restraints must never be secured in
the passenger seat of a vehicle with a passenger Air
Bag. In a collision, a passenger Air Bag may deploy
causing severe injury or death to infants riding in
rear-facing infant restraints.
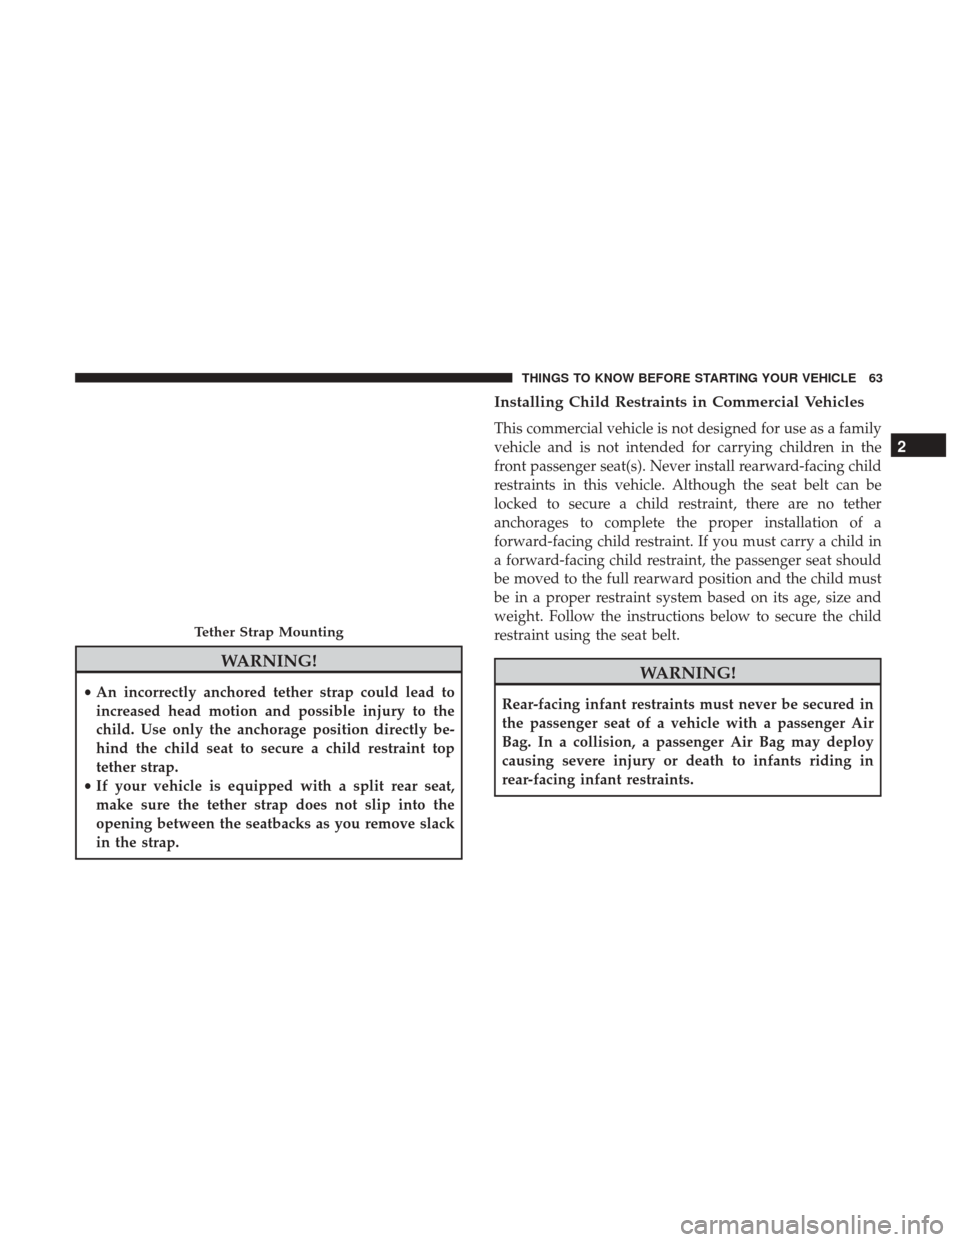
Tether Strap Mounting
2
THINGS TO KNOW BEFORE STARTING YOUR VEHICLE 63
Page 112 of 345
WARNING!(Continued)
•Cargo tie-down hooks are not safe anchors for a child
seat tether strap. In a sudden stop or accident, a hook
could pull loose and allow the child seat to come
loose. A child could be badly injured. Use only the
anchors provided for child seat tethers.
The weight and position of cargo and passengers can
change the vehicle center of gravity and vehicle han-
dling. To avoid loss of control resulting in personal
injury, follow these guidelines for loading your ve-
hicle:
• Do not carry loads which exceed the load limits
described on the label attached to the left door or left
door center pillar.
• Always place cargo evenly on the cargo floor. Put
heavier objects as low and as far forward as possible.
• Place as much cargo as possible in front of the rear
axle. Too much weight or improperly placed weight
over or behind the rear axle can cause the rear of the
vehicle to sway.
• Do not pile luggage or cargo higher than the top of
the seatback. This could impair visibility or become
a dangerous projectile in a sudden stop or accident.
Rear Cargo Lights
Cargo Vehicle
This is located on the rear panel of the load compartment.
In auto-mode the light comes on automatically when you
open the sliding doors and the rear swing doors, and turns
off when you close them. Push the left or right side of the
movable lens to switch the light ON when the doors are
open.
NOTE: The light will not turn off automatically, unless it is
in auto-mode.
110 UNDERSTANDING THE FEATURES OF YOUR VEHICLE
Page 115 of 345
ROOF LUGGAGE RACK — IF EQUIPPED
The crossbars and siderails are designed to carry the
weight on vehicles equipped with a luggage rack. The load
must not exceed 150 lbs (68 kg), and should be uniformly
distributed over the luggage rack crossbars.
NOTE:If not equipped with crossbars, your authorized
dealer can order and install MOPAR crossbars built spe-
cifically for this roof rack system.
Distribute cargo weight evenly on the roof rack crossbars.
The roof rack does not increase the total load carrying
capacity of the vehicle. Be sure the total load of cargo inside
the vehicle plus that on the external rack does not exceed
the maximum vehicle load capacity.
To move the crossbars, loosen the attachments, located at
the upper edge of each crossbar, approximately eight turns
using the anti-theft wrench provided with the MOPAR
crossbars. Then, move the crossbar to the desired position,
keeping the crossbars parallel to the rack frame. Once the
crossbar is in the desired position, retighten the with the
wrench to lock the crossbar into position. NOTE:
•
To help control wind noise when the crossbars are not in
use, place the front and rear crossbars approximately
24 in (61 cm) apart. Optimal noise reduction can then be
achieved by adjusting the front crossbar forward or aft
using increments of 1 in (2.5 cm).
• If (or any metallic object) is placed over the satellite
radio antenna (if equipped), you may experience inter-
ruption of satellite radio reception. For improved satel-
lite radio reception, avoid placing the rear crossbar over
the satellite radio antenna.
WARNING!
Cargo must be securely tied before driving your ve-
hicle. Improperly secured loads can fly off the vehicle,
particularly at high speeds, resulting in personal injury
or property damage. Follow the roof rack cautions
when carrying cargo on your roof rack.
3
UNDERSTANDING THE FEATURES OF YOUR VEHICLE 113
Page 209 of 345
Tire And Loading Information Placard
This placard tells you important information about the:
1. Number of people that can be carried in the vehicle.
2. Total weight your vehicle can carry.
3. Tire size designed for your vehicle.
4. Cold tire inflation pressures for the front, rear, and sparetires.
Loading
The vehicle maximum load on the tire must not exceed the
load carrying capacity of the tire on your vehicle. You will
not exceed the tire’s load carrying capacity if you adhere to
the loading conditions, tire size, and cold tire inflation
pressures specified on the Tire and Loading Information
placard in “Vehicle Loading” in the “Starting And Operat-
ing” section of this manual.
NOTE: Under a maximum loaded vehicle condition, gross
axle weight ratings (GAWRs) for the front and rear axles
must not be exceeded. For further information on GAWRs,
vehicle loading, and trailer towing, refer to “Vehicle Load-
ing” in the “Starting And Operating” section of this
manual.
To determine the maximum loading conditions of your
vehicle, locate the statement “The combined weight of
occupants and cargo should never exceed XXX kg or
XXX lbs” on the Tire and Loading Information placard. The
combined weight of occupants, cargo/luggage and trailer
tongue weight (if applicable) should never exceed the
weight referenced here.
Tire And Loading Information Placard
5
STARTING AND OPERATING 207