window Ram ProMaster City 2018 User Guide
[x] Cancel search | Manufacturer: RAM, Model Year: 2018, Model line: ProMaster City, Model: Ram ProMaster City 2018Pages: 180, PDF Size: 7.52 MB
Page 9 of 180
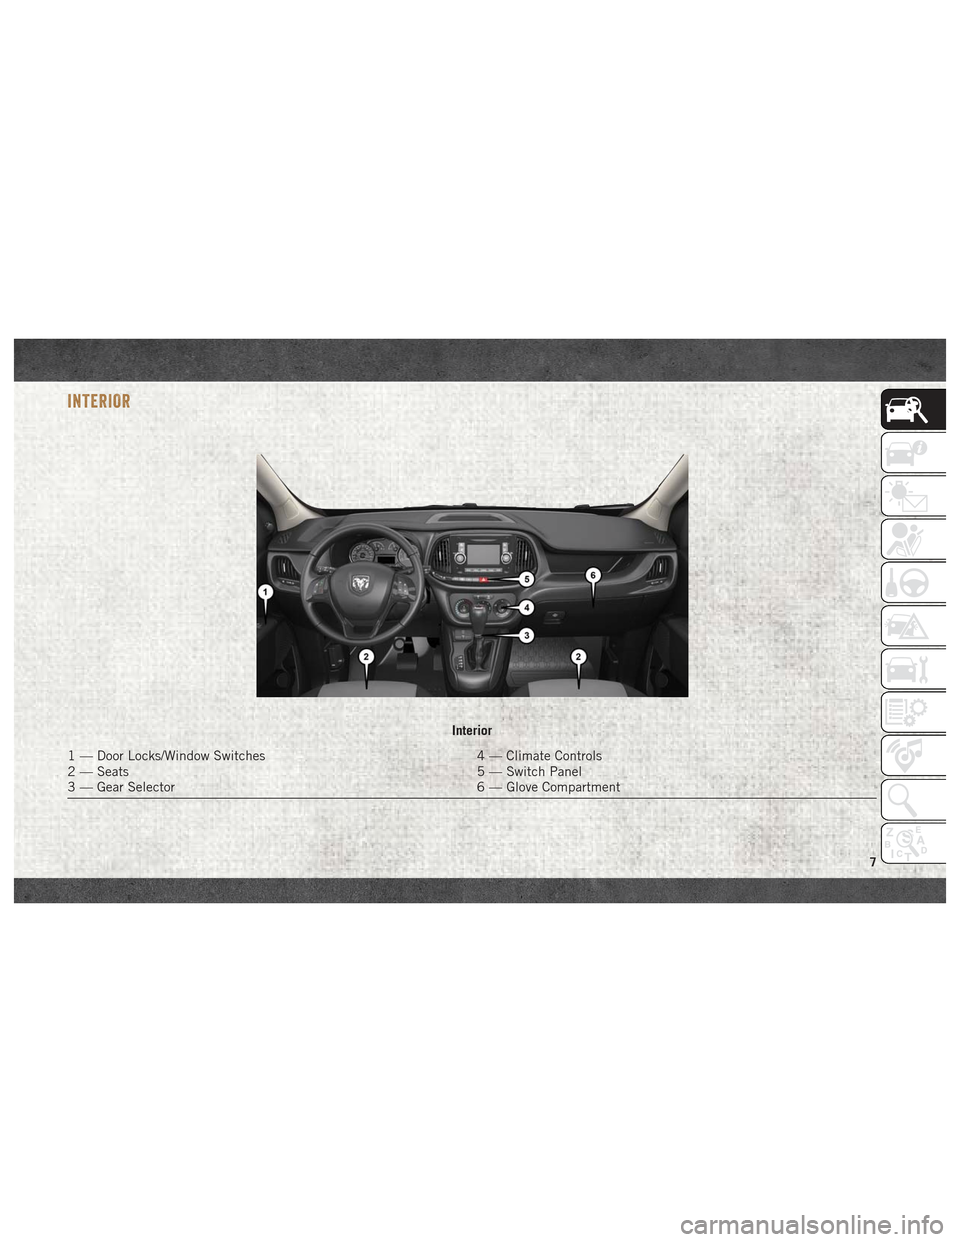
INTERIOR
Interior
1 — Door Locks/Window Switches4 — Climate Controls
2 — Seats 5 — Switch Panel
3 — Gear Selector 6 — Glove Compartment
7
Page 21 of 180
CAUTION!
• Turn the windshield wipers off whendriving through an automatic car wash.
Damage to the windshield wipers may
result if the wiper control is left in any
position other than off.
• In cold weather, always turn off the wiper
switch and allow the wipers to return to
the park position before turning off the
engine. If the wiper switch is left on and
the wipers freeze to the windshield,
damage to the wiper motor may occur
when the vehicle is restarted.
• Always remove any buildup of snow that
prevents the windshield wiper blades
from returning to the off position. If the
windshield wiper control is turned off
and the blades cannot return to the off
position, damage to the wiper motor may
occur.
Manual High Speed/Mist
Push the lever upward from the off position.
The wipers will operate at high speed to clear
off road mist or spray from a passing vehicle.
This operation will continue until the lever is
released. When the lever is released, the
wipers will return to the off position and
automatically shut off.
Rear Wiper Operation
Rear Windshield Wiper Operation
Rotate the windshield wiper lever center ring
upwards to operate the rear window wiper as
follows:
• In intermittent mode when the front win-
dow wiper is not operating.
• In synchronous mode (at half the speed of the front window wiper) when the front
window wiper is operating. • In continuous mode while vehicle is in
REVERSE.
With the windshield wipers on, and REVERSE
gear engaged, rear window wiping will be
continuous in the same way.
Rear Windshield Washer Operation
Pushing the windshield wiper lever forward
activates the rear window washer. Keep the
windshield wiper lever pushed for more than
quarter a second to activate the rear window
wiper as well. Releasing the windshield wiper
lever will activate the smart washing func-
tion, as described for the windshield wipers.
The function stops when the windshield
wiper lever is released.
19
Page 22 of 180
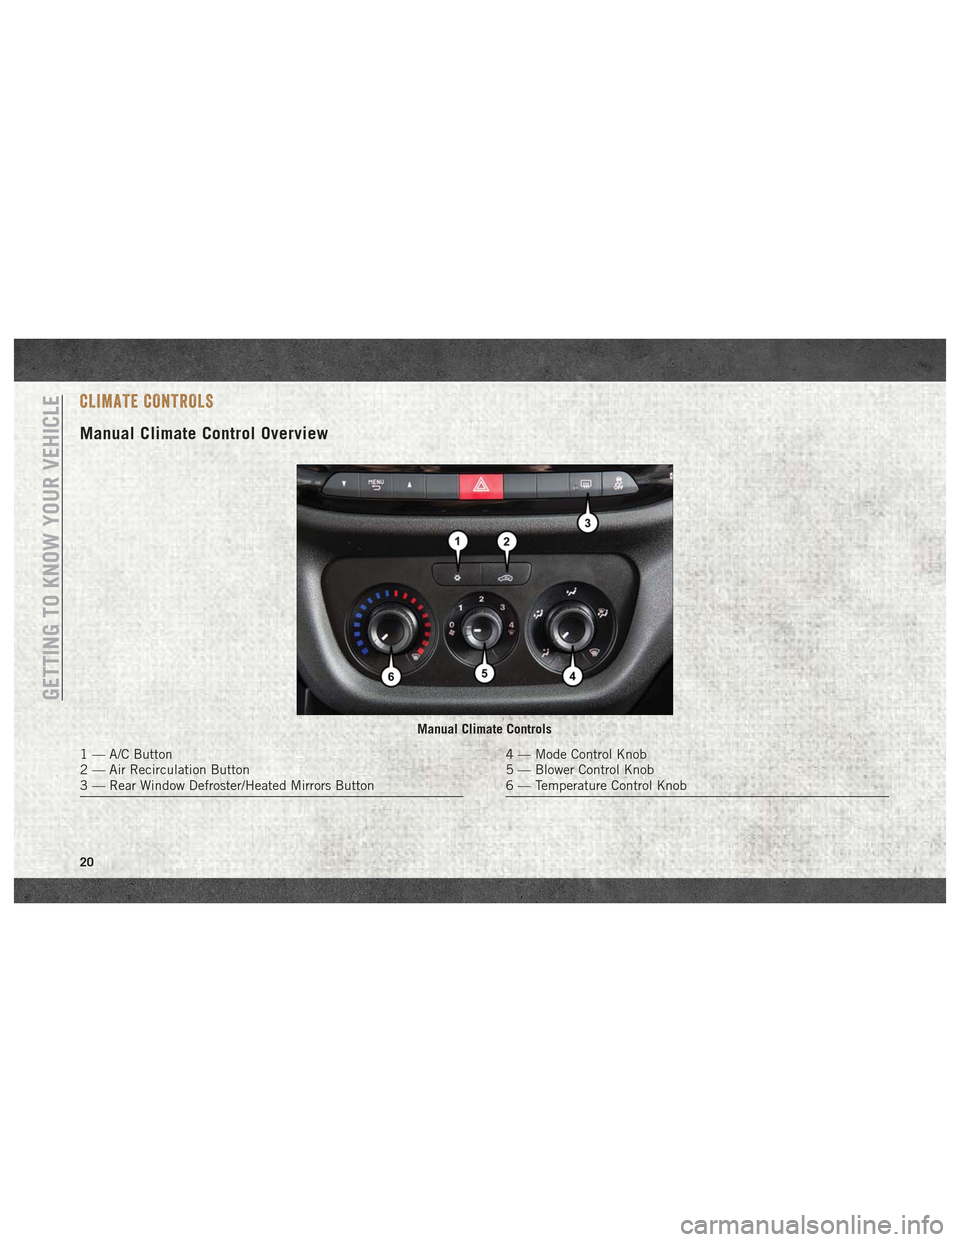
CLIMATE CONTROLS
Manual Climate Control Overview
Manual Climate Controls
1 — A/C Button
2 — Air Recirculation Button
3 — Rear Window Defroster/Heated Mirrors Button4 — Mode Control Knob
5 — Blower Control Knob
6 — Temperature Control Knob
GETTING TO KNOW YOUR VEHICLE
20
Page 23 of 180
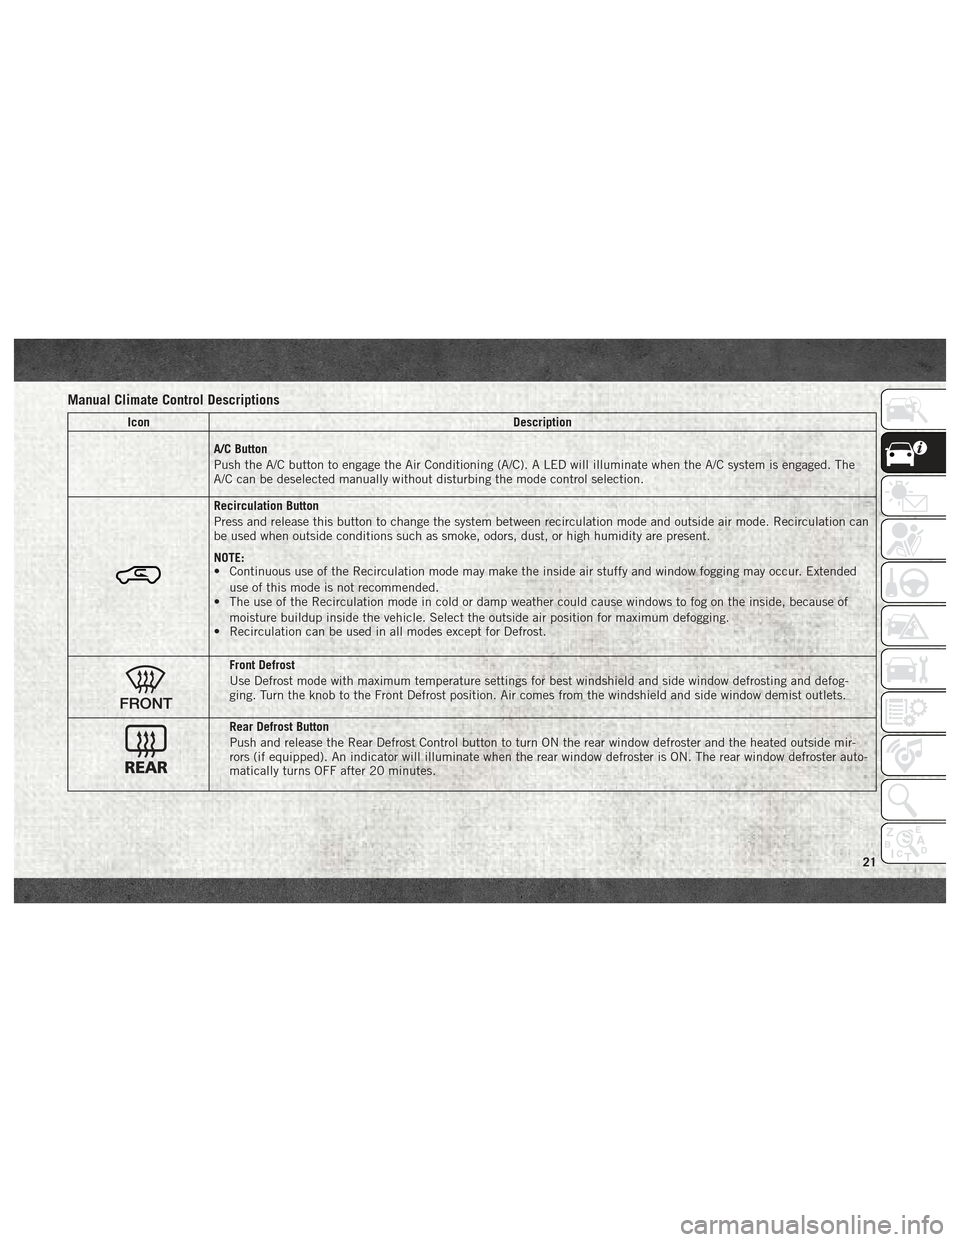
Manual Climate Control Descriptions
IconDescription
A/C Button
Push the A/C button to engage the Air Conditioning (A/C). A LED will illuminate when the A/C system is engaged. The
A/C can be deselected manually without disturbing the mode control selection.
Recirculation Button
Press and release this button to change the system between recirculation mode and outside air mode. Recirculation can
be used when outside conditions such as smoke, odors, dust, or high humidity are present.
NOTE:
• Continuous use of the Recirculation mode may make the inside air stuffy and window fogging may occur. Extended
use of this mode is not recommended.
• The use of the Recirculation mode in cold or damp weather could cause windows to fog on the inside, because of
moisture buildup inside the vehicle. Select the outside air position for maximum defogging.
• Recirculation can be used in all modes except for Defrost.
Front Defrost
Use Defrost mode with maximum temperature settings for best windshield and side window defrosting and defog-
ging. Turn the knob to the Front Defrost position. Air comes from the windshield and side window demist outlets.
Rear Defrost Button
Push and release the Rear Defrost Control button to turn ON the rear window defroster and the heated outside mir-
rors (if equipped). An indicator will illuminate when the rear window defroster is ON. The rear window defroster auto-
matically turns OFF after 20 minutes.
21
Page 24 of 180
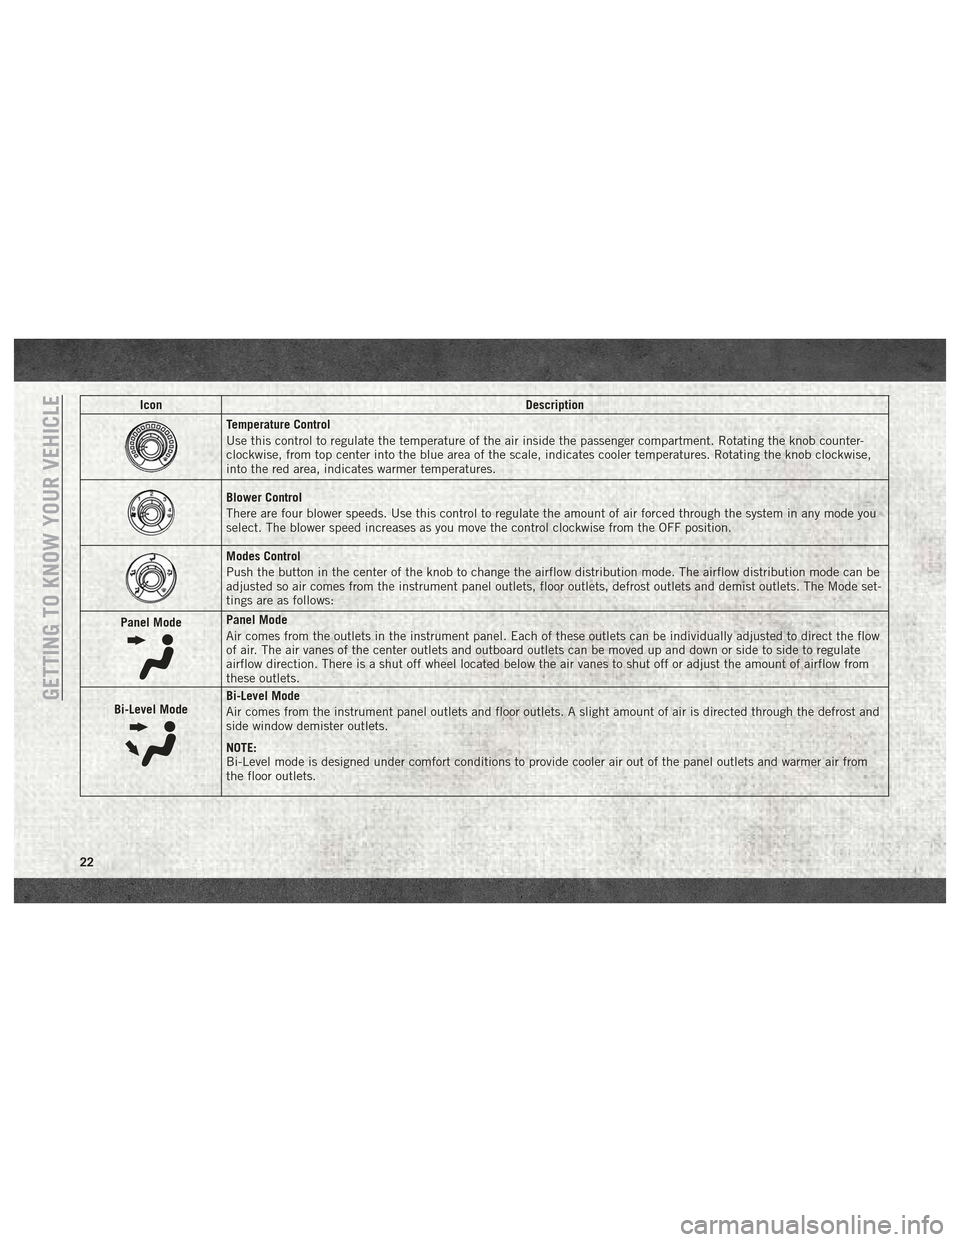
IconDescription
Temperature Control
Use this control to regulate the temperature of the air inside the passenger compartment. Rotating the knob counter-
clockwise, from top center into the blue area of the scale, indicates cooler temperatures. Rotating the knob clockwise,
into the red area, indicates warmer temperatures.
Blower Control
There are four blower speeds. Use this control to regulate the amount of air forced through the system in any mode you
select. The blower speed increases as you move the control clockwise from the OFF position.
Modes Control
Push the button in the center of the knob to change the airflow distribution mode. The airflow distribution mode can be
adjusted so air comes from the instrument panel outlets, floor outlets, defrost outlets and demist outlets. The Mode set-
tings are as follows:
Panel Mode
Panel Mode
Air comes from the outlets in the instrument panel. Each of these outlets can be individually adjusted to direct the flow
of air. The air vanes of the center outlets and outboard outlets can be moved up and down or side to side to regulate
airflow direction. There is a shut off wheel located below the air vanes to shut off or adjust the amount of airflow from
these outlets.
Bi-Level Mode
Bi-Level Mode
Air comes from the instrument panel outlets and floor outlets. A slight amount of air is directed through the defrost and
side window demister outlets.
NOTE:
Bi-Level mode is designed under comfort conditions to provide cooler air out of the panel outlets and warmer air from
the floor outlets.GETTING TO KNOW YOUR VEHICLE
22
Page 25 of 180
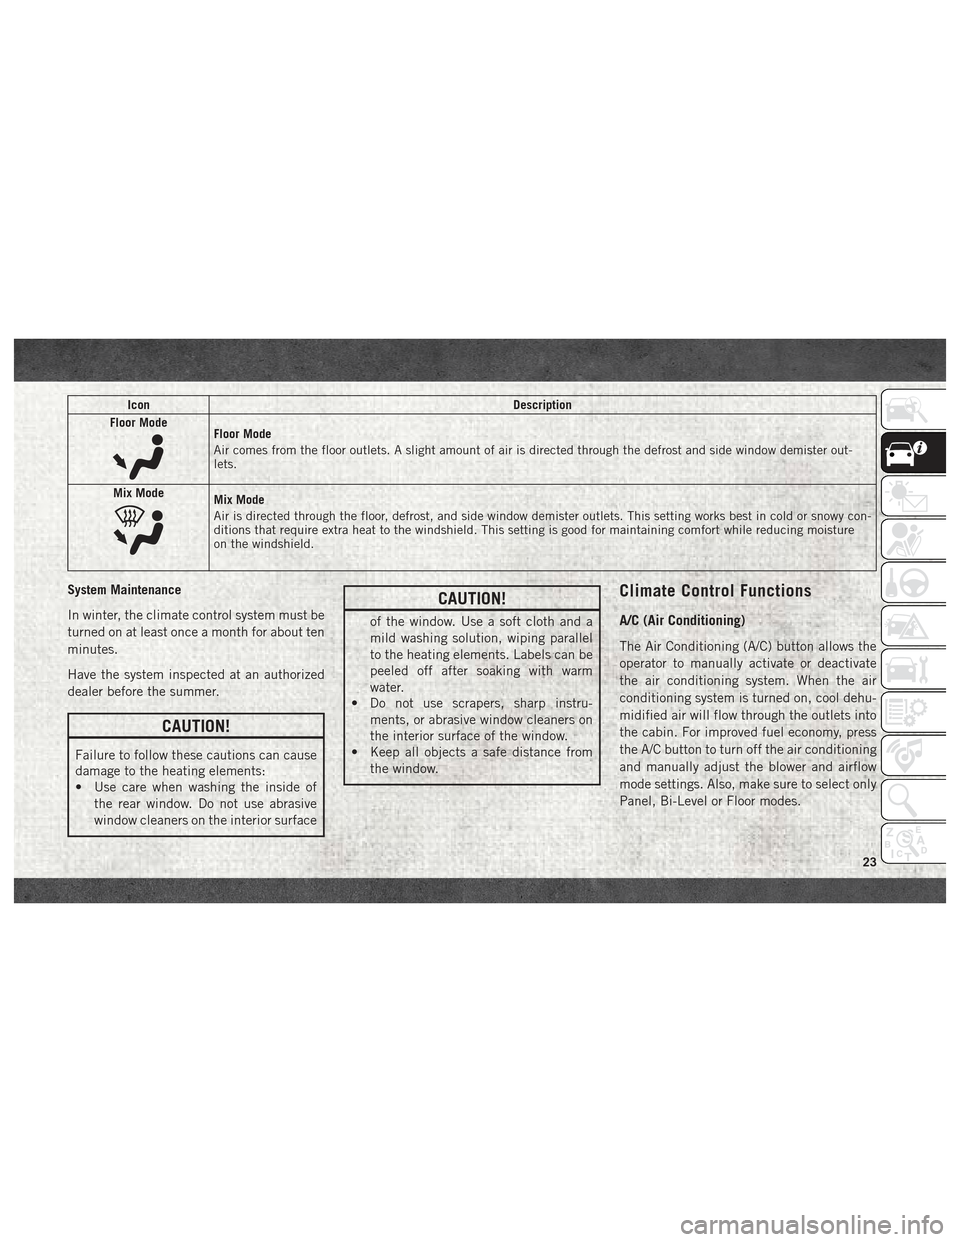
IconDescription
Floor Mode
Floor Mode
Air comes from the floor outlets. A slight amount of air is directed through the defrost and side window demister out-
lets.
Mix Mode
Mix Mode
Air is directed through the floor, defrost, and side window demister outlets. This setting works best in cold or snowy con-
ditions that require extra heat to the windshield. This setting is good for maintaining comfort while reducing moisture
on the windshield.
System Maintenance
In winter, the climate control system must be
turned on at least once a month for about ten
minutes.
Have the system inspected at an authorized
dealer before the summer.
CAUTION!
Failure to follow these cautions can cause
damage to the heating elements:
• Use care when washing the inside of the rear window. Do not use abrasive
window cleaners on the interior surface
CAUTION!
of the window. Use a soft cloth and a
mild washing solution, wiping parallel
to the heating elements. Labels can be
peeled off after soaking with warm
water.
• Do not use scrapers, sharp instru-
ments, or abrasive window cleaners on
the interior surface of the window.
• Keep all objects a safe distance from
the window.
Climate Control Functions
A/C (Air Conditioning)
The Air Conditioning (A/C) button allows the
operator to manually activate or deactivate
the air conditioning system. When the air
conditioning system is turned on, cool dehu-
midified air will flow through the outlets into
the cabin. For improved fuel economy, press
the A/C button to turn off the air conditioning
and manually adjust the blower and airflow
mode settings. Also, make sure to select only
Panel, Bi-Level or Floor modes.
23
Page 26 of 180
NOTE:
• If fog or mist appears on the windshield orside glass, select Defrost mode and in-
crease blower speed if needed.
• If your air conditioning performance seems lower than expected, check the front of the
A/C condenser (located in front of the ra-
diator), for an accumulation of dirt or in-
sects. Clean with a gentle water spray from
the front of the radiator and through the
condenser.
Recirculation
When outside air contains smoke, odors, or
high humidity, or if rapid cooling is desired,
you may wish to recirculate interior air by
pressing the Recirculation control button.
The recirculation indicator will illuminate
when this button is selected. Press the but-
ton a second time to turn off the Recircula-
tion mode and allow outside air into the
vehicle. NOTE:
In cold weather, use of recirculation mode
may lead to excessive window fogging. On
systems with Manual Climate Controls, the
Recirculation mode is not allowed in Defrost
mode to improve window clearing operation.
Recirculation will be disabled automatically
if this mode is selected. Attempting to use
Recirculation while in this mode will cause
the LED in the control button to blink and
then turn off.
Operating Tips
Summer Operation
The engine cooling system must be protected
with a high-quality antifreeze coolant to pro-
vide proper corrosion protection and to pro-
tect against engine overheating. OAT coolant
(conforming to MS.90032) is recommended.
Refer to “Dealer Service” in “Servicing And
Maintenance” in your Owner’s Manual at
www.mopar.com/en-us/care/owners-manual.html
(U.S. Residents) or www.owners.mopar.ca
(Canadian Residents) for proper coolant se-
lection.
Winter Operation
To ensure the best possible heater and de-
froster performance, make sure the engine
cooling system is functioning properly and
the proper amount, type, and concentration
of coolant is used. Refer to “Dealer Service”
in “Servicing And Maintenance” in your Own-
er’s Manual at
www.mopar.com/en-us/
care/owners-manual.html
(U.S. Residents) or
www.owners.mopar.ca (Canadian Residents)
for proper coolant selection. Use of the air
Recirculation mode during Winter months is
not recommended because it may cause win-
dow fogging.
Vacation/Storage
Any time you store your vehicle or keep it out
of service (i.e., vacation) for two weeks or
more, run the air conditioning system at idle
for about five minutes in fresh air with the
blower setting on high. This will ensure ad-
equate system lubrication to minimize the
possibility of compressor damage when the
system is started again.
GETTING TO KNOW YOUR VEHICLE
24
Page 27 of 180
Window Fogging
Vehicle windows tend to fog on the inside of
the glass in mild, rainy and/or humid weather.
Windows may frost on the inside of the glass
in very cold weather. To clear the windows,
select Defrost or Mix mode and increase the
front blower speed. Do not use the Recircu-
lation mode without A/C for long periods, as
fogging may occur.
Outside Air Intake
Make sure the air intake, located directly in
front of the windshield, is free of obstructions
such as leaves. Leaves collected in the air
intake may reduce airflow, can cause odor,
and if they enter the plenum they could plug
the water drains. In Winter months make sure
the air intake is clear of ice, slush and snow.
A/C Air Filter
The climate control system filters outside air
containing dust, pollen and some odors.
Strong odors cannot be totally filtered out.
Refer to “Dealer Service” in “Servicing and
Maintenance” in your Owner’s Manual on
www.mopar.com/en-us/care/owners-manual.html
(U.S. Residents) or www.owners.mopar.ca
(Canadian Residents) for filter replacement
instructions.
HOOD
Opening
To open the hood, two latches must be re-
leased.
1. Pull the release lever located below theinstrument panel and in front of the driv-
er's door.
2. Move to the outside of the vehicle, reach into the opening beneath the center of the
hood and push up the safety latch lever to
release it, before raising the hood.
3. Raise the hood and place the hood prop rod in hood slot to secure the hood in the
open position.
CAUTION!
Be sure to disengage the rod and secure it
in close position before closing the hood.
Damage may occur.
Closing
WARNING!
Be sure the hood is fully latched before
driving your vehicle. If the hood is not fully
latched, it could open when the vehicle is
in motion and block your vision. Failure to
follow this warning could result in serious
injury or death.
CAUTION!
To prevent possible damage, do not slam
the hood to close it. Lower hood to approxi-
mately 12 inches (30 cm) and drop the
hood to close. Make sure hood is fully
closed for both latches. Never drive ve-
hicle unless hood is fully closed, with both
latches engaged.
25
Page 48 of 180
6. All occupants should always wear their lapand shoulder belts properly.
7. The driver and front passenger seats should be moved back as far as practical
to allow the front air bags room to inflate.
8. Do not lean against the door or window. If your vehicle has side air bags, and deploy-
ment occurs, the side air bags will inflate
forcefully into the space between occu-
pants and the door and occupants could
be injured.
9. If the air bag system in this vehicle needs to be modified to accommodate a dis-
abled person, refer to “Customer Assis-
tance” for customer service contact
information.
WARNING!
• Never place a rear-facing child restraintin front of an air bag. A deploying pas-
senger front air bag can cause death or
serious injury to a child 12 years or
younger, including a child in a rear-
facing child restraint.
WARNING!
• Only use a rear-facing child restraint in avehicle with a rear seat.
Seat Belt Systems
Buckle up even though you are an excellent
driver, even on short trips. Someone on the
road may be a poor driver and could cause a
collision that includes you. This can happen
far away from home or on your own street.
Research has shown that seat belts save
lives, and they can reduce the seriousness of
injuries in a collision. Some of the worst
injuries happen when people are thrown from
the vehicle. Seat belts reduce the possibility
of ejection and the risk of injury caused by
striking the inside of the vehicle. Everyone in
a motor vehicle should be belted at all times.
Enhanced Seat Belt Use Reminder System
(BeltAlert)
Driver And Passenger BeltAlert — If Equipped
BeltAlert is a feature intended to remind
the driver and outboard front seat passenger
(if equipped with outboard front passenger seat BeltAlert) to buckle their seat belts. The
Belt Alert feature is active whenever the igni-
tion switch is in the START or ON/RUN posi-
tion.
Initial Indication
If the driver is unbuckled when the ignition
switch is first in the START or ON/RUN posi-
tion, a chime will signal for a few seconds. If
the driver or outboard front seat passenger (if
equipped with outboard front passenger seat
BeltAlert) is unbuckled when the ignition
switch is first in the START or ON/RUN posi-
tion the Seat Belt Reminder Light will turn on
and remain on until both outboard front seat
belts are buckled. The outboard front passen-
ger seat BeltAlert is not active when an out-
board front passenger seat is unoccupied.
BeltAlert Warning Sequence
The BeltAlert warning sequence is activated
when the vehicle is moving above a specified
vehicle speed range and the driver or out-
board front seat passenger is unbuckled (if
equipped with outboard front passenger seat
BeltAlert) (the outboard front passenger seat
BeltAlert is not active when the outboard
front passenger seat is unoccupied). The
SAFETY
46
Page 59 of 180
Supplemental Side Air Bag Inflatable Curtains
(SABICs)
This vehicle is equipped with Supplemental
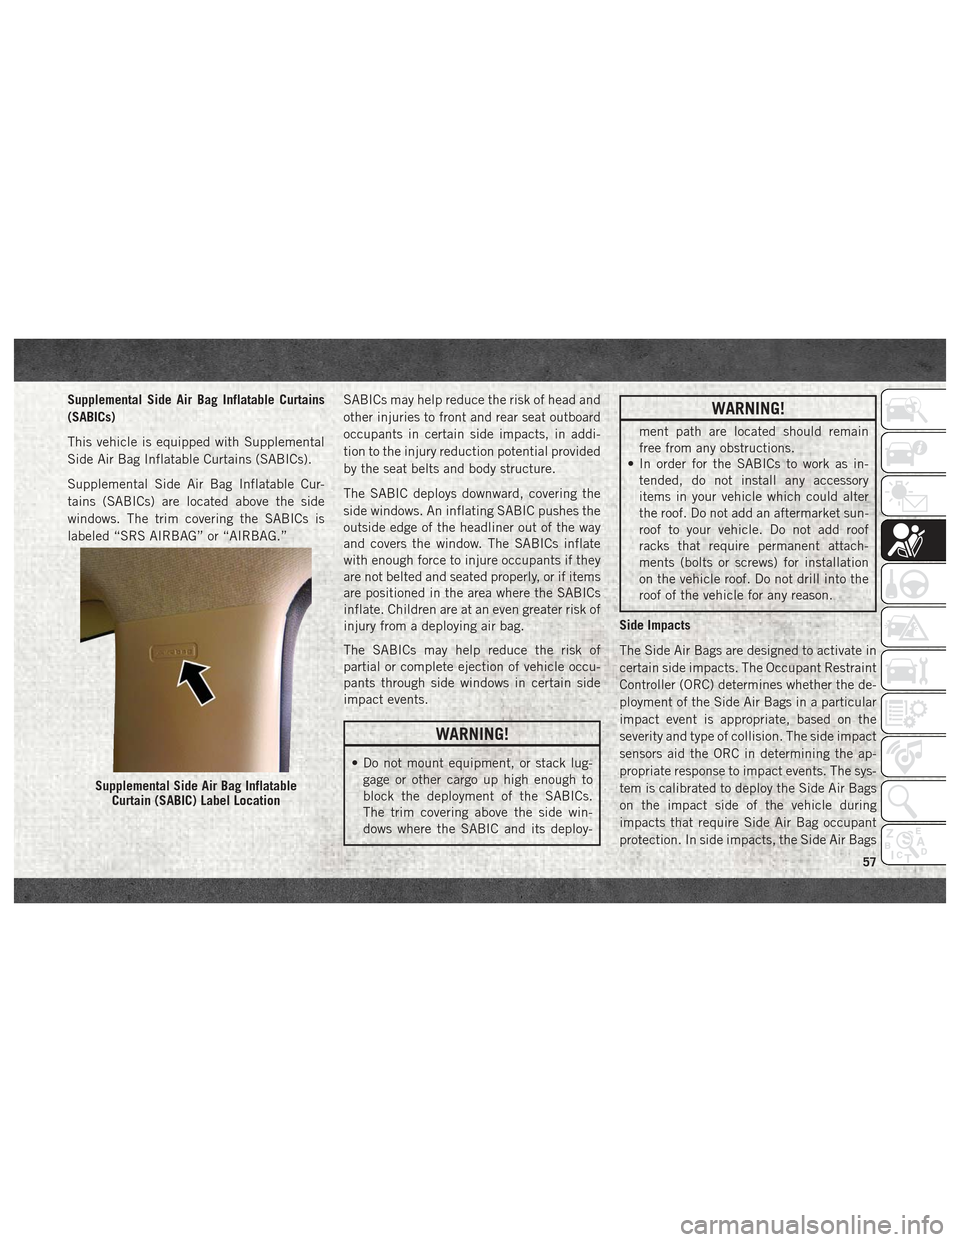
Side Air Bag Inflatable Curtains (SABICs).
Supplemental Side Air Bag Inflatable Cur-
tains (SABICs) are located above the side
windows. The trim covering the SABICs is
labeled “SRS AIRBAG” or “AIRBAG.”SABICs may help reduce the risk of head and
other injuries to front and rear seat outboard
occupants in certain side impacts, in addi-
tion to the injury reduction potential provided
by the seat belts and body structure.
The SABIC deploys downward, covering the
side windows. An inflating SABIC pushes the
outside edge of the headliner out of the way
and covers the window. The SABICs inflate
with enough force to injure occupants if they
are not belted and seated properly, or if items
are positioned in the area where the SABICs
inflate. Children are at an even greater risk of
injury from a deploying air bag.
The SABICs may help reduce the risk of
partial or complete ejection of vehicle occu-
pants through side windows in certain side
impact events.
WARNING!
• Do not mount equipment, or stack lug-
gage or other cargo up high enough to
block the deployment of the SABICs.
The trim covering above the side win-
dows where the SABIC and its deploy-
WARNING!
ment path are located should remain
free from any obstructions.
• In order for the SABICs to work as in-
tended, do not install any accessory
items in your vehicle which could alter
the roof. Do not add an aftermarket sun-
roof to your vehicle. Do not add roof
racks that require permanent attach-
ments (bolts or screws) for installation
on the vehicle roof. Do not drill into the
roof of the vehicle for any reason.
Side Impacts
The Side Air Bags are designed to activate in
certain side impacts. The Occupant Restraint
Controller (ORC) determines whether the de-
ployment of the Side Air Bags in a particular
impact event is appropriate, based on the
severity and type of collision. The side impact
sensors aid the ORC in determining the ap-
propriate response to impact events. The sys-
tem is calibrated to deploy the Side Air Bags
on the impact side of the vehicle during
impacts that require Side Air Bag occupant
protection. In side impacts, the Side Air Bags
Supplemental Side Air Bag Inflatable Curtain (SABIC) Label Location
57